First, let's review what ajax is?
Ajax = asynchronous JavaScript and XML.
Ajax is a technology for creating fast dynamic web pages.
Ajax can make web pages update asynchronously by exchanging a small amount of data with the server in the background. This means that a part of a web page can be updated without reloading the whole web page.
Traditional web pages (without Ajax) must reload the entire web page if they need to update content
We talked about what ajax is, that is, asynchronous submission. Do you know the difference between synchronous and asynchronous submission?
- Synchronous submission: when the user sends a request, the current page cannot be used. The server responds to the page to the client. After the response is completed, the user can use the page.
- Asynchronous submission: when the user sends a request, the current page can still be used. When the asynchronous request data is responded to the page, the page displays the data.
How Ajax works
The client sends the request to xhr, xhr submits the request to the service, the server processes the business, the server responds to the data to the xhr object, the xhr object receives the data, and javascript writes the data to the page, as shown in the following figure: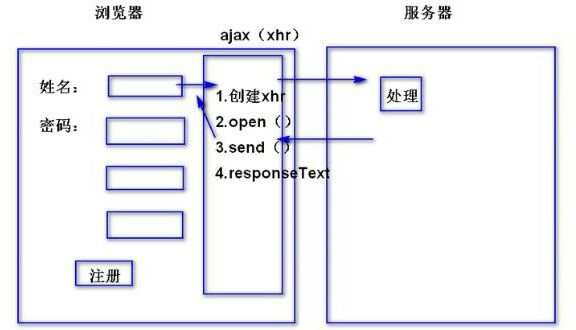
Five steps for Ajax requests:
//The first step is to create the XMLHttpRequest object
var xmlHttp = new XMLHttpRequest();
function CommentAll() {
//Step 2: register the callback function
xmlHttp.onreadystatechange =callback1;
//{
    //    if (xmlHttp.readyState == 4)
    //        if (xmlHttp.status == 200) {
    //            var responseText = xmlHttp.responseText;
    //        }
    //}
//Step 3: configure the request information, open(),get
     //The parameters under the get request are added after the url ashx? methodName = GetAllComment&str1=str1&str2=str2
      xmlHttp.open("post", "/ashx/myzhuye/Detail.ashx?methodName=GetAllComment", true);
    //The request header information needs to be configured under the post request
    //xmlHttp.setRequestHeader("Content-Type", "application/x-www-form-urlencoded");
    //Step 4: send the request. Under the post request, put the parameters to be passed here
    xmlHttp.send("methodName = GetAllComment&str1=str1&str2=str2");//"
}
//Step 5: create a callback function
function callback1() {
    if (xmlHttp.readyState == 4)
        if (xmlHttp.status == 200) {
            //Get the returned data
            var data = xmlHttp.responseText;
            //Convert json string to json format
            data = eval(data);
            $.each(data,
                function(i, v) {
                    alert(v);
                });
        }
}
//Background method
 public  void GetAllComment(HttpContext context)
        {
            //Params can get the values passed by get and post.
            string methodName = context.Request.Params["methodName"];
            //QueryString can only get the value passed by get.
            string str1 = context.Request.Form["str1"];
            //Get the value from httpRequest, including get and post methods
            string str2 = context.Request["str2"];
            List comments = new List();
            comments.Add(methodName);
            comments.Add(str1);
            comments.Add(str2);
            //ajax accepts json type and needs to transfer the returned data to json format
            string commentsJson = new JavaScriptSerializer().Serialize(comments);
            context.Response.Write(commentsJson);
}- Create xmlHttpRequest object
- Set callback function
- Use the open method to establish a link with the server
- Send data to server
- Handle different response states in the callback function
AJAX is very useful. Next, let's introduce several function points that Ajax needs to master:
1. Creating native Ajax objects
XMLHttpRequest is the foundation of ajax. All modern browsers (IE7 +, Firefox, Chrome, Safari and Opera) have built-in XMLHttpRequest objects. So let's create an ajax object
const instance = new XMLHttpRequest();
This creates an object for ajax interaction.
Of course, we mentioned here that the javascript objects of the old versions of ie5 and ie6 are implemented using ActiveX, so there is no XMLHttpRequest object. They create an object this way
const instance = new ActiveXObject("Microsoft.XMLHTTP");In fact, we just need to know about it. You don't need to add it to your code. Now all websites should give up their support for low version ie. this has withdrawn from the stage of history. Just learn about the situation.
2. Ajax send request
First, let's take a look at how XMLHttpRequest sends a request to the server
const instance = new XMLHttpRequest();

instance.open(method,url,async);

instance.send();
Two methods are used here. The first open method is actually to configure the necessary information of ajax, and the second send is to really initiate the request to the server.
3. Ajax receives server responses through changes in readyState state
When the request is sent to the server, we need to perform some response based tasks. Whenever the readyState changes, the onreadystatechange event will be triggered. The readyState attribute contains the state information of XMLHttpRequest.
4. Cross domain request for upgrade distress
Cross domain is a thorny problem that all front ends must face. When you request resources from other servers, browser security restrictions will prevent the request. Your request will not end up on the server and is blocked by the browser, which also follows the same origin policy.
So how to solve this cross domain problem? There are several common methods, but the core is that the server needs to cooperate to deal with cross domains, and the front end itself cannot deal with cross domains.
- The first one adopts the JsonP method. In fact, this method also needs the background to cooperate with the processing. The background makes the request, then assembles the data in a json object and returns it to the foreground, and then the foreground operates through the callback function. This is also cumbersome.
- The second is to put a cross domain file crossdomain on the server XML is placed on the server side, and then ip addresses that can cross domains are written.
- The third is to configure a reverse proxy server. Through the proxy server, we are actually a proxy server to request the periphery, and then forward it to our server. This also prevents cross domain.
The above is the summary of Ajax knowledge. Finally, it is recommended that you watch Ajax videos to learn. It is easier for novices to understand and absorb. The Ajax learning tutorial of power node makes a comprehensive explanation of Ajax through the traditional use of Ajax, the way of json operation, and the way of cross domain and other advanced technologies.
Ajax material download: http://www.bjpowernode.com/?s...