Configuration of nginx & HTTPS
01. Understanding of Https
HTTP (HyperText Transfer Protocol) is an application layer protocol for distributed, collaborative and hypermedia information systems. In short, it is a method of publishing and receiving HTML pages, which is used to transfer information between Web browsers and Web servers.
HTTP works on TCP protocol port 80 by default. Standard HTTP services start with http: / / when users visit the website.
The HTTP protocol sends the content in clear text, = = does not provide any way of data encryption, = = if the attacker intercepts the transmission message between the Web browser and the website server, he can directly read the information. Therefore, the HTTP protocol is not suitable for transmitting some sensitive information, such as credit card number, password and other payment information.
HTTPS (Hypertext Transfer Protocol Secure) is a transmission protocol for secure communication through computer network. HTTPS communicates through HTTP, but uses SSL/TLS to encrypt data packets. The main purpose of HTTPS development is to provide identity authentication to website server and protect the privacy and integrity of exchange data.
02. Application scenarios of Https
1. Of course, consider the security of website data transmission
2. Based on the front-end and back-end separation development methods, such as wechat applet, APP development, such as ios development. For these mobile application development, such as ios Apple software development, if your software is to be put on the apple application market, your server interface must be https. Or wechat applet: if it is released in a real project, you can't pass it if it's not an https interface.
03. Port monitored by Https
443
04. Implementation steps of Https
1. You must have a domain name,
2. And there should be a server (providing ip)
3. And the server ip and your domain name should be resolved
4. Get an ssl security certificate for free.
5. Bind the domain name and ssl security certificate for authorization
6. After successful authorization, install the certificate into nginx.
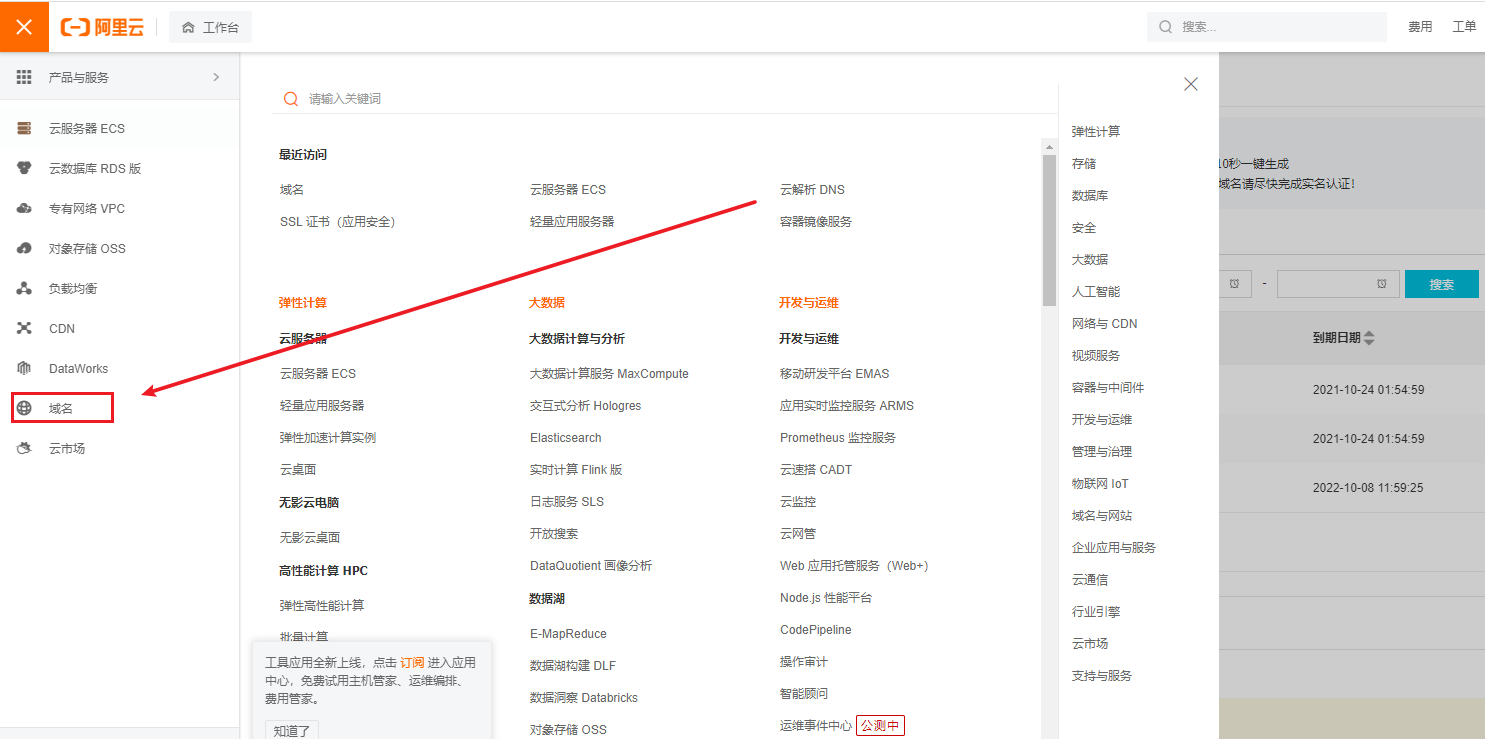
05. Purchase domain name
Wanwang: https://wanwang.aliyun.com/
After the purchase is successful. Enter Alibaba cloud's [control panel] and find the [domain name] configuration
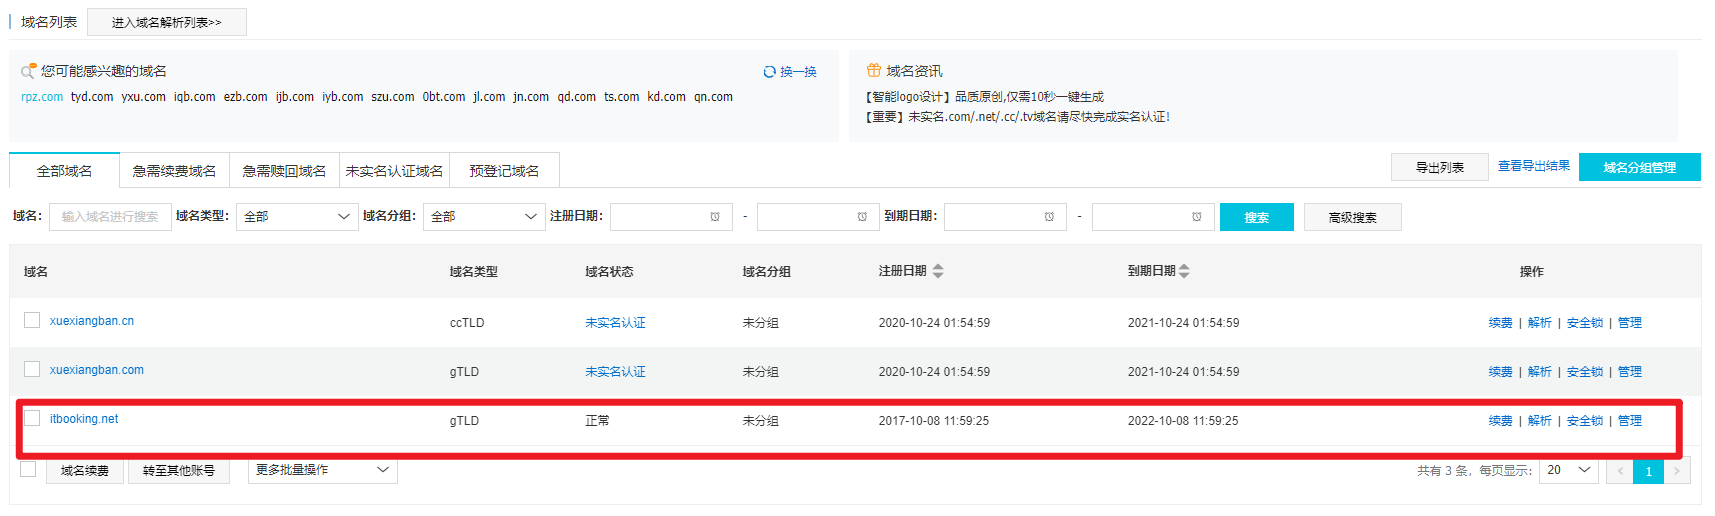
06. Domain name filing
The domain name purchased must be filed for the following use, otherwise you cannot resolve and map the IP server, and the registered address is:
https://beian.aliyun.com/?spm=a2c1d.8251892.top-nav.dicp.a56c5b762IUqTs
If you don't understand: ask customer service and submit work orders
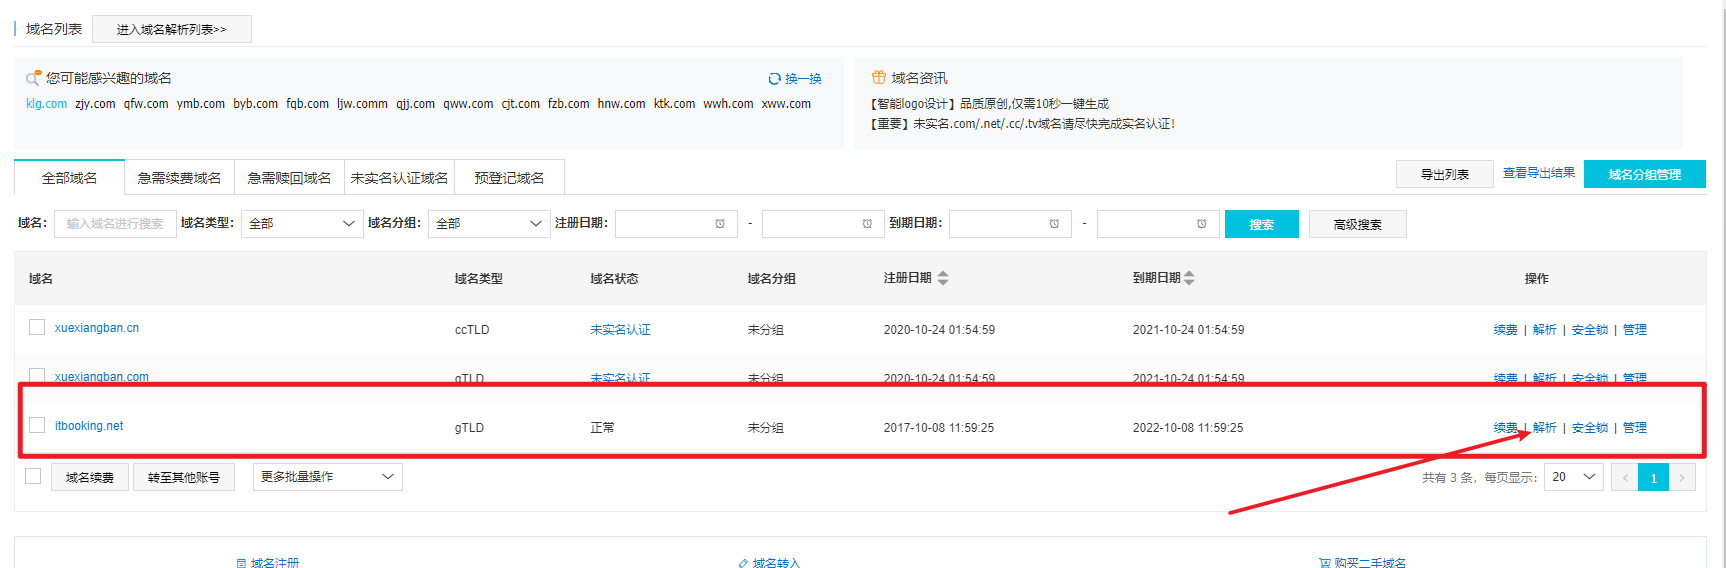
07. Purchase Alibaba cloud servers
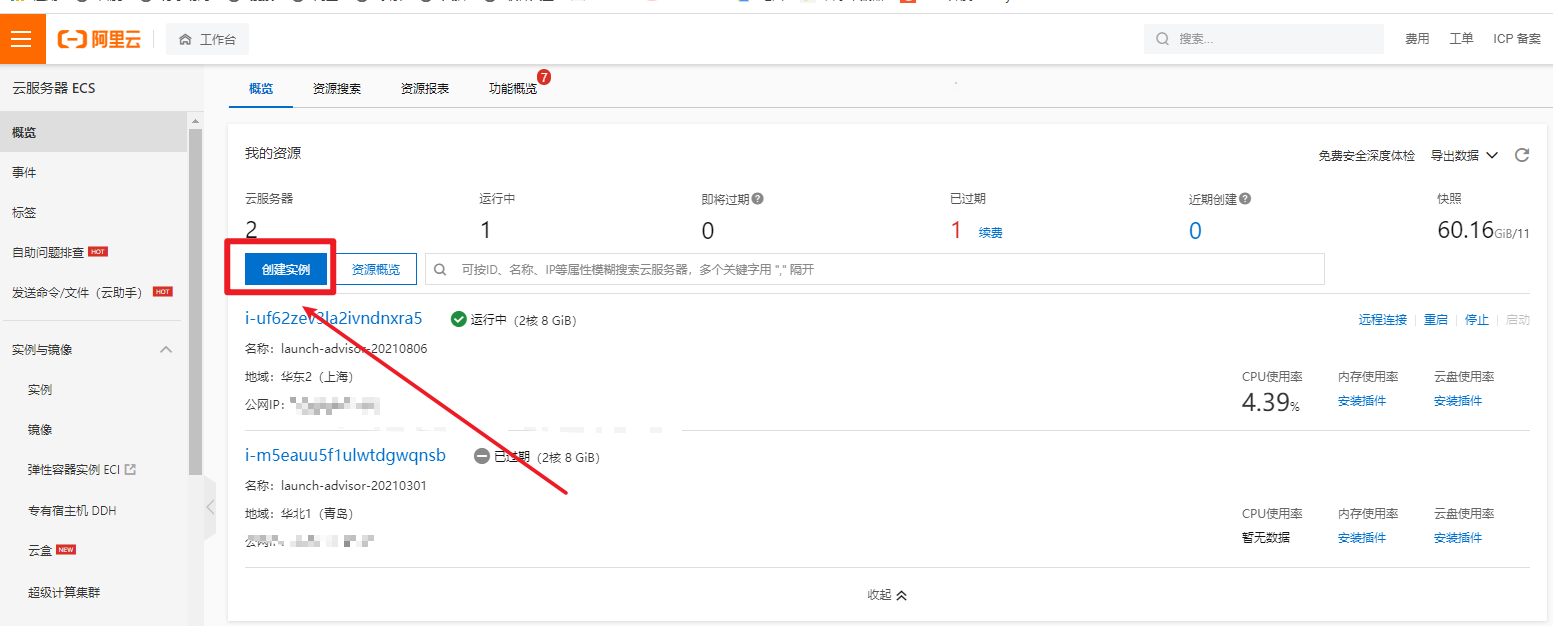
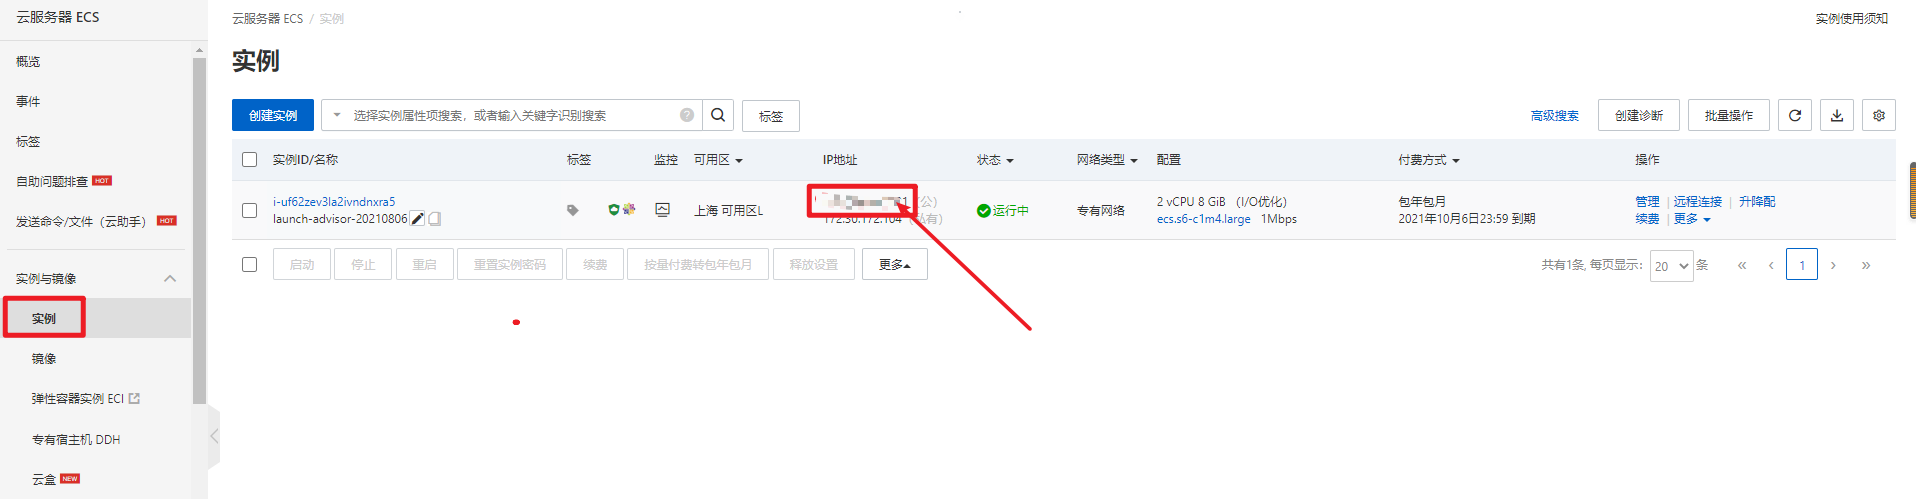
Get service Ip.
08. Binding of domain name and IP
General suggestion: main domain name: www.xxx com , xxxx. com
General recommendation: domain name of API: API xxx. com
01. Resolve the domain name
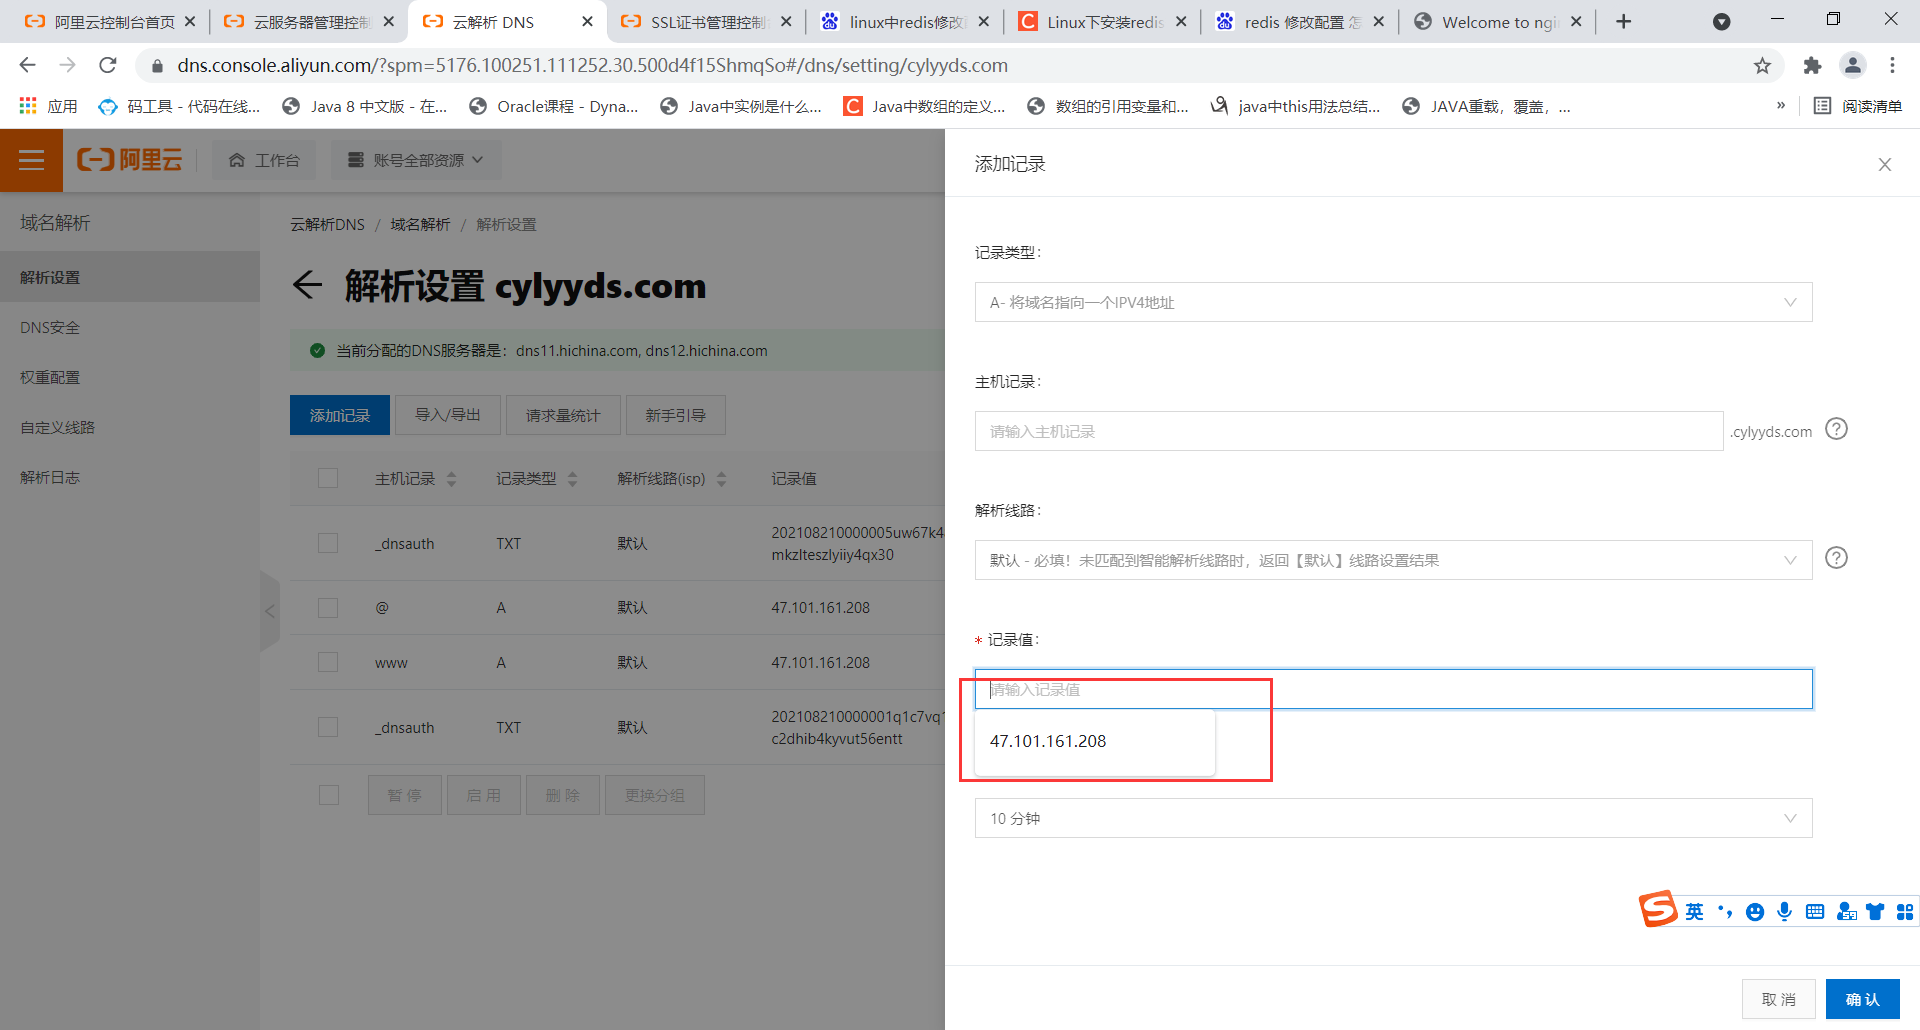
Enter the IP address of your server

Host records can be configured with WWW or*
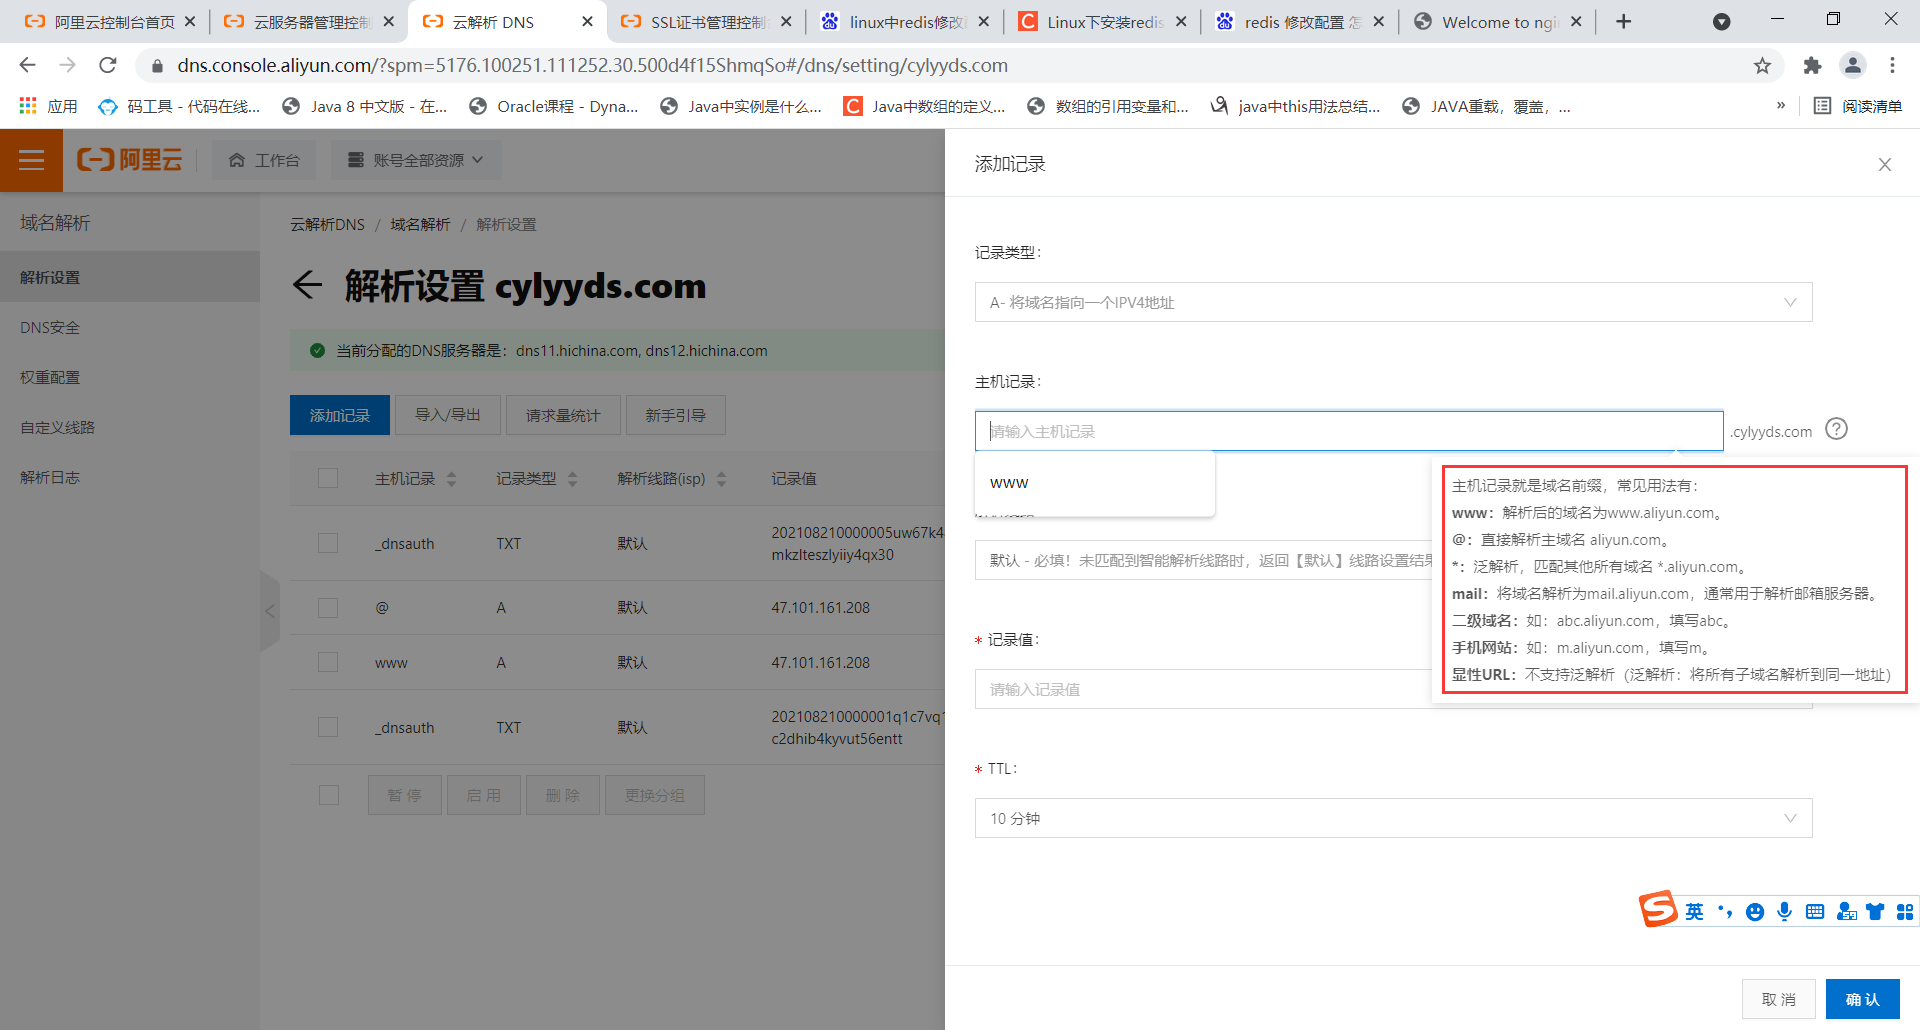
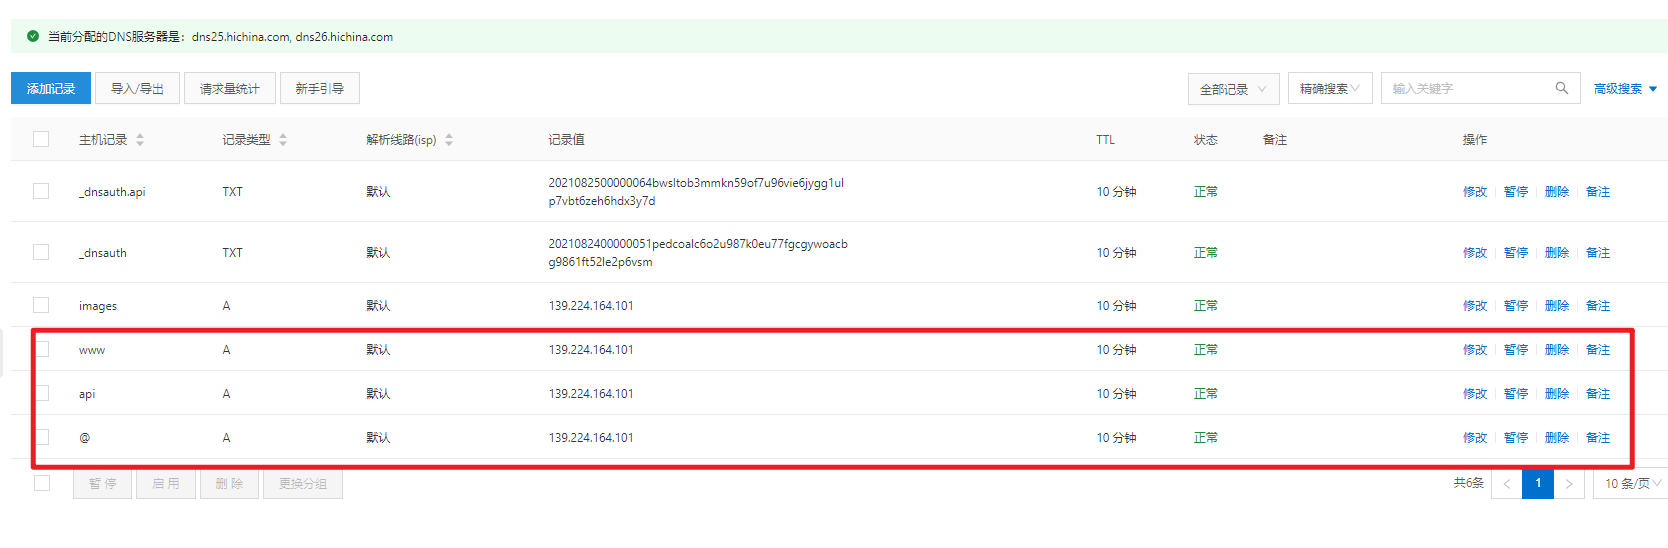
02. The final configuration is as follows:
09. Open service port
If you deploy multiple applications on a single machine, you can open the following ports:
- 80
- 443

If you deploy multiple applications on multiple machines, you must open the port of the service installed on the corresponding server. For example, your server is installed
redis,mysql,kafka ,zk
-
6379
-
3306
-
2181
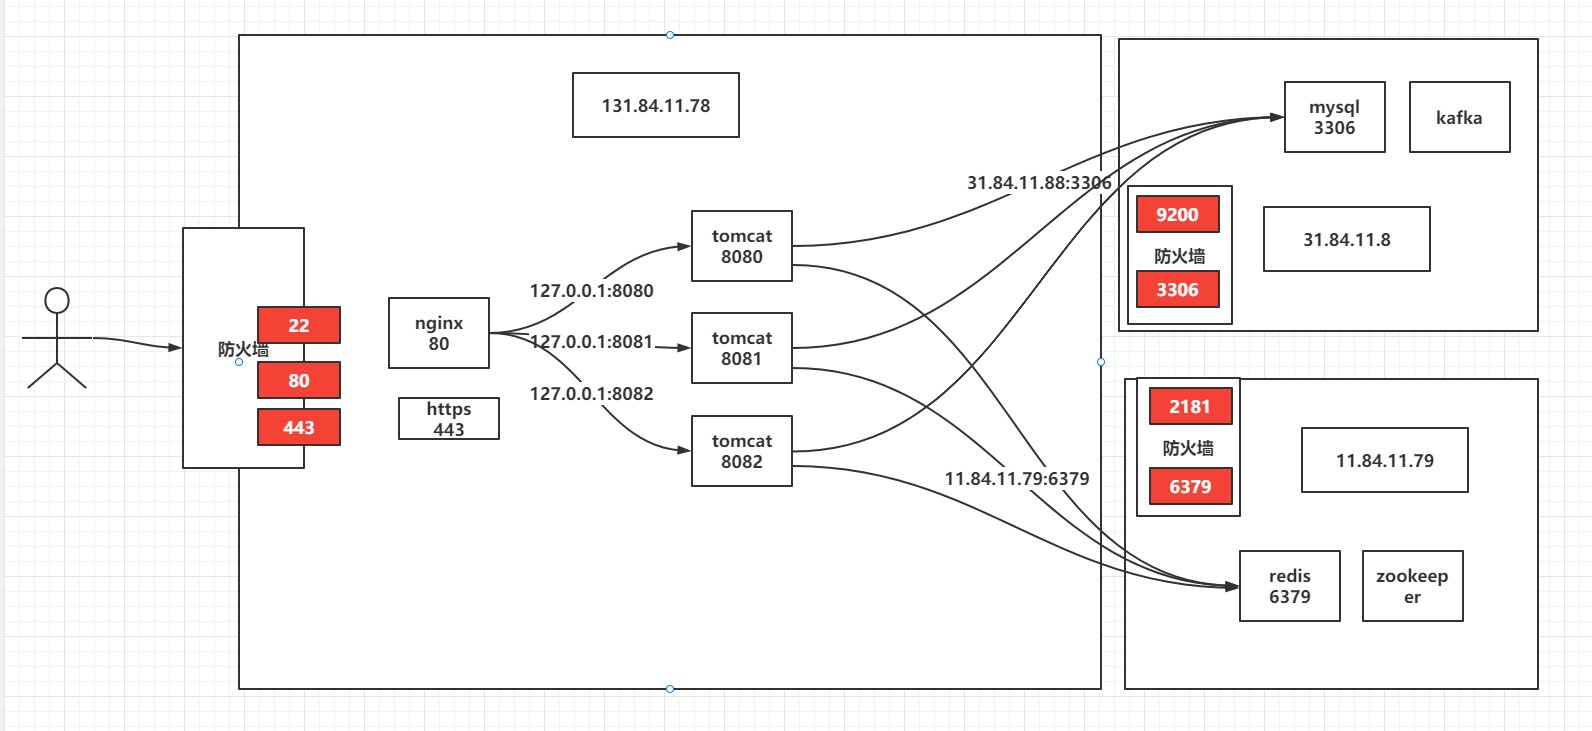
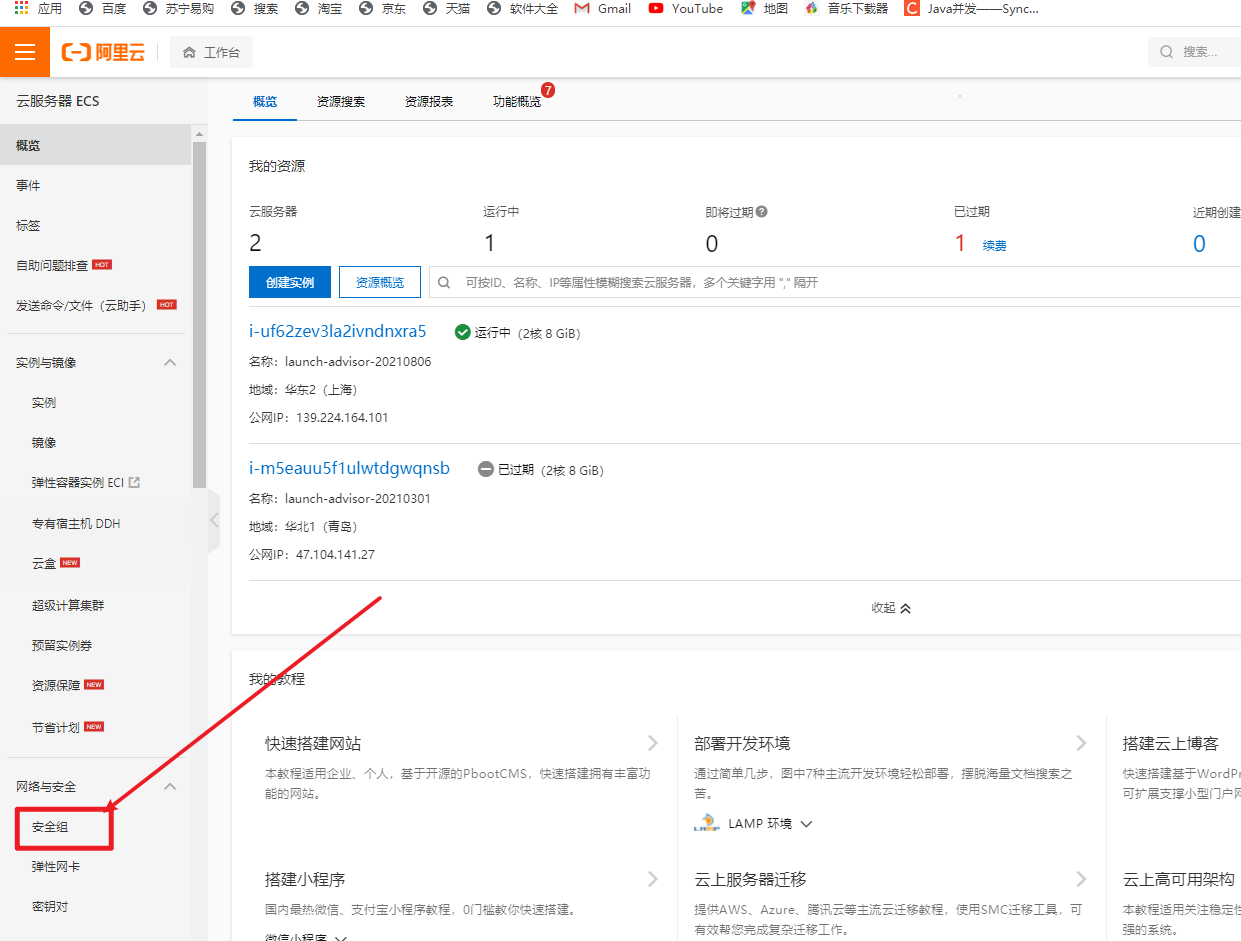
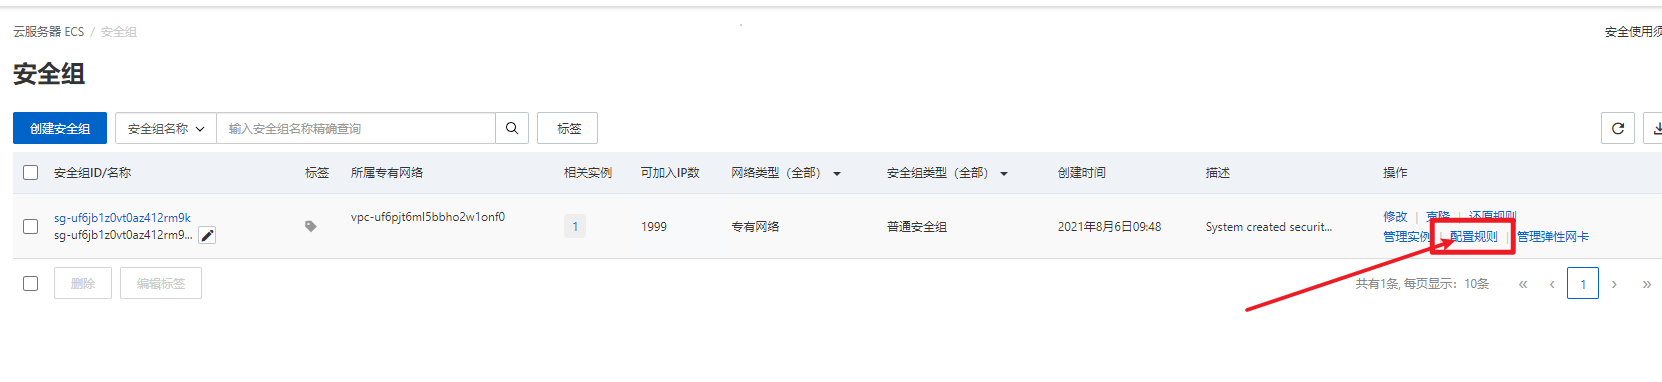
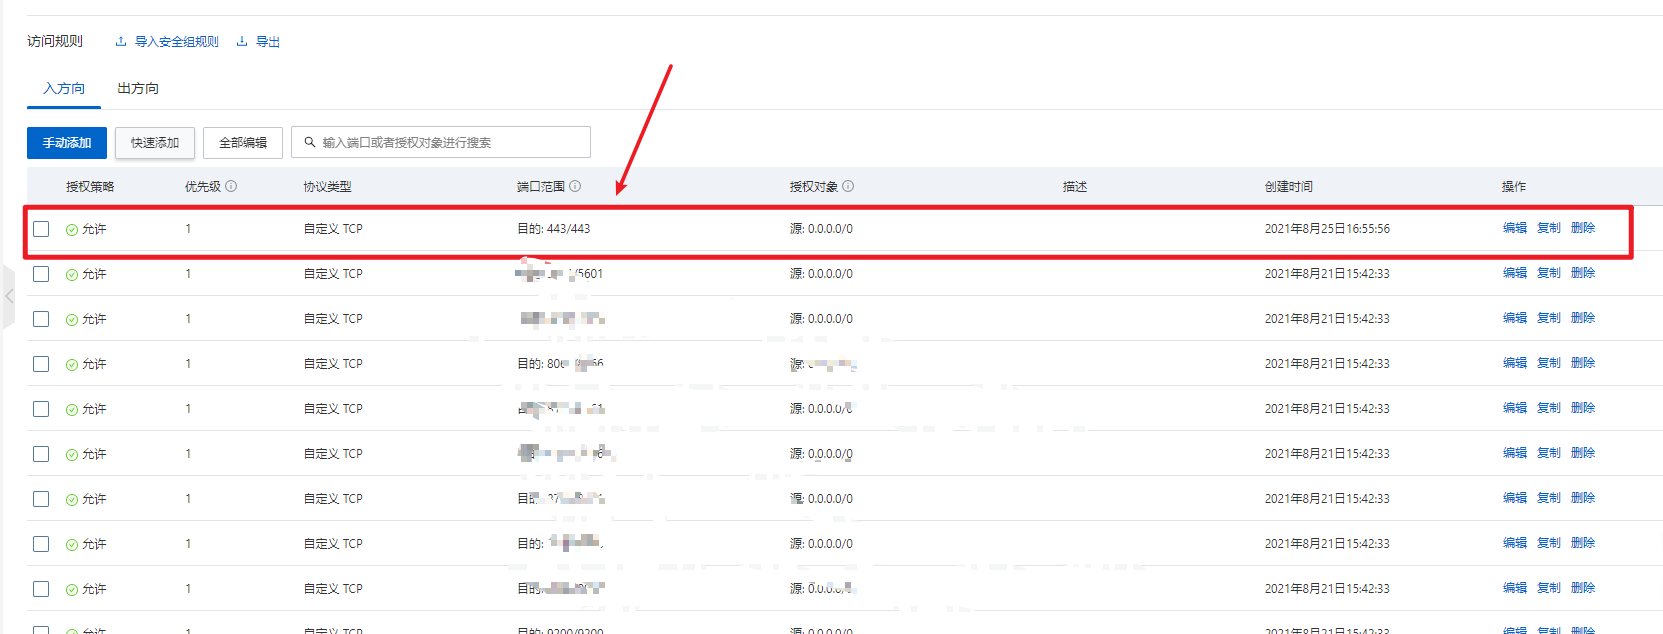
How to open up? In [security group] under esc server
Tips:
The principle of opening ports is: if you want to access your services (tomcat,nginx,mysql,kafka, etc.), you must configure and open the ports of these servers in the security group. That is to say, you must open them in the security group before you can access them. Otherwise, all are rejected.
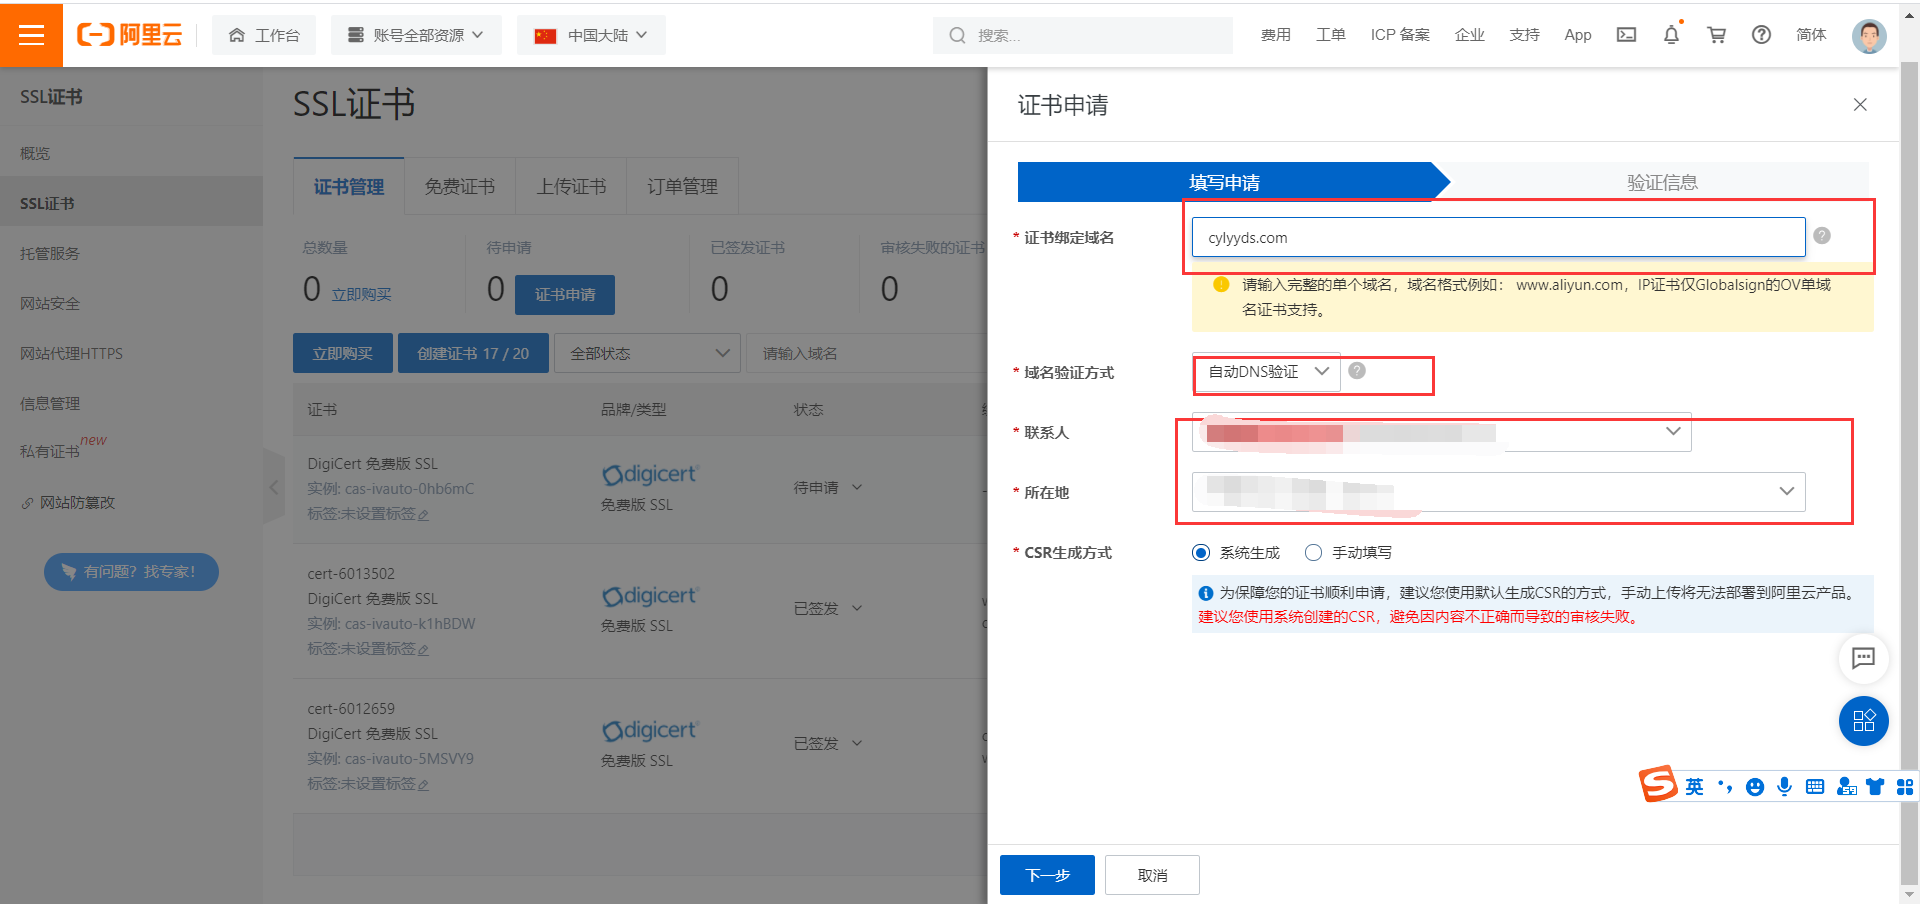
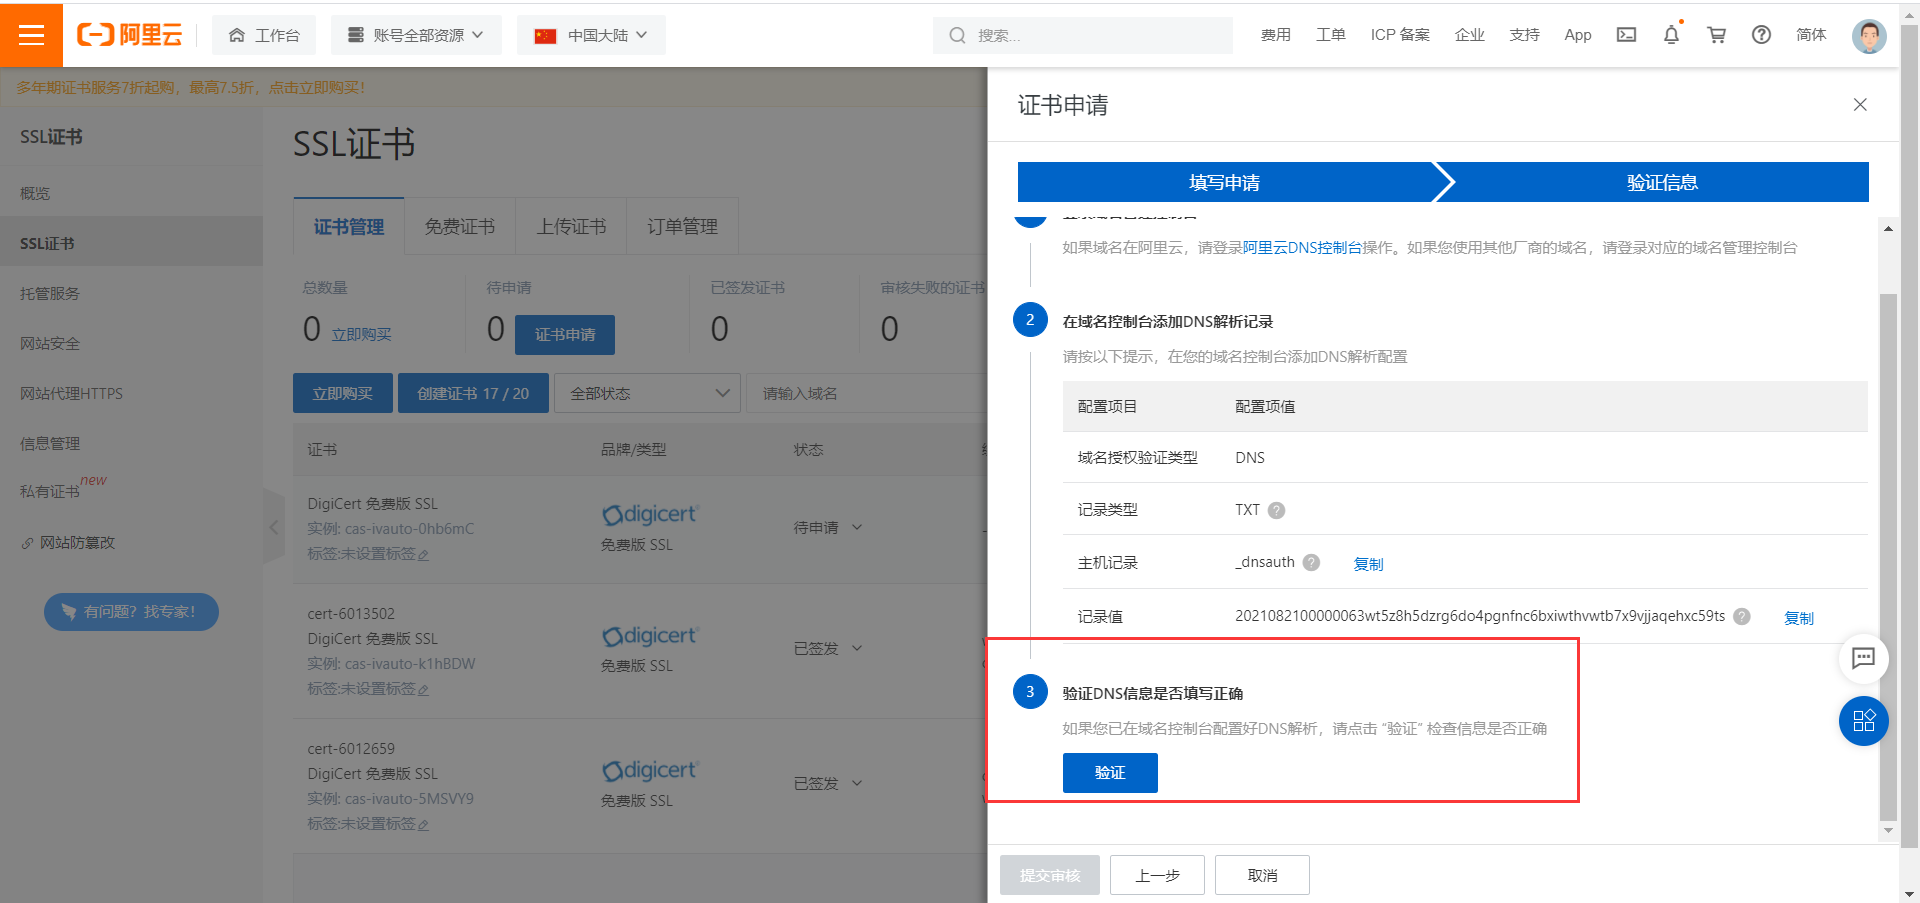
10. Request SSL certificate
Enter SSL in the search field

Apply for a free certificate and enter the corresponding domain name
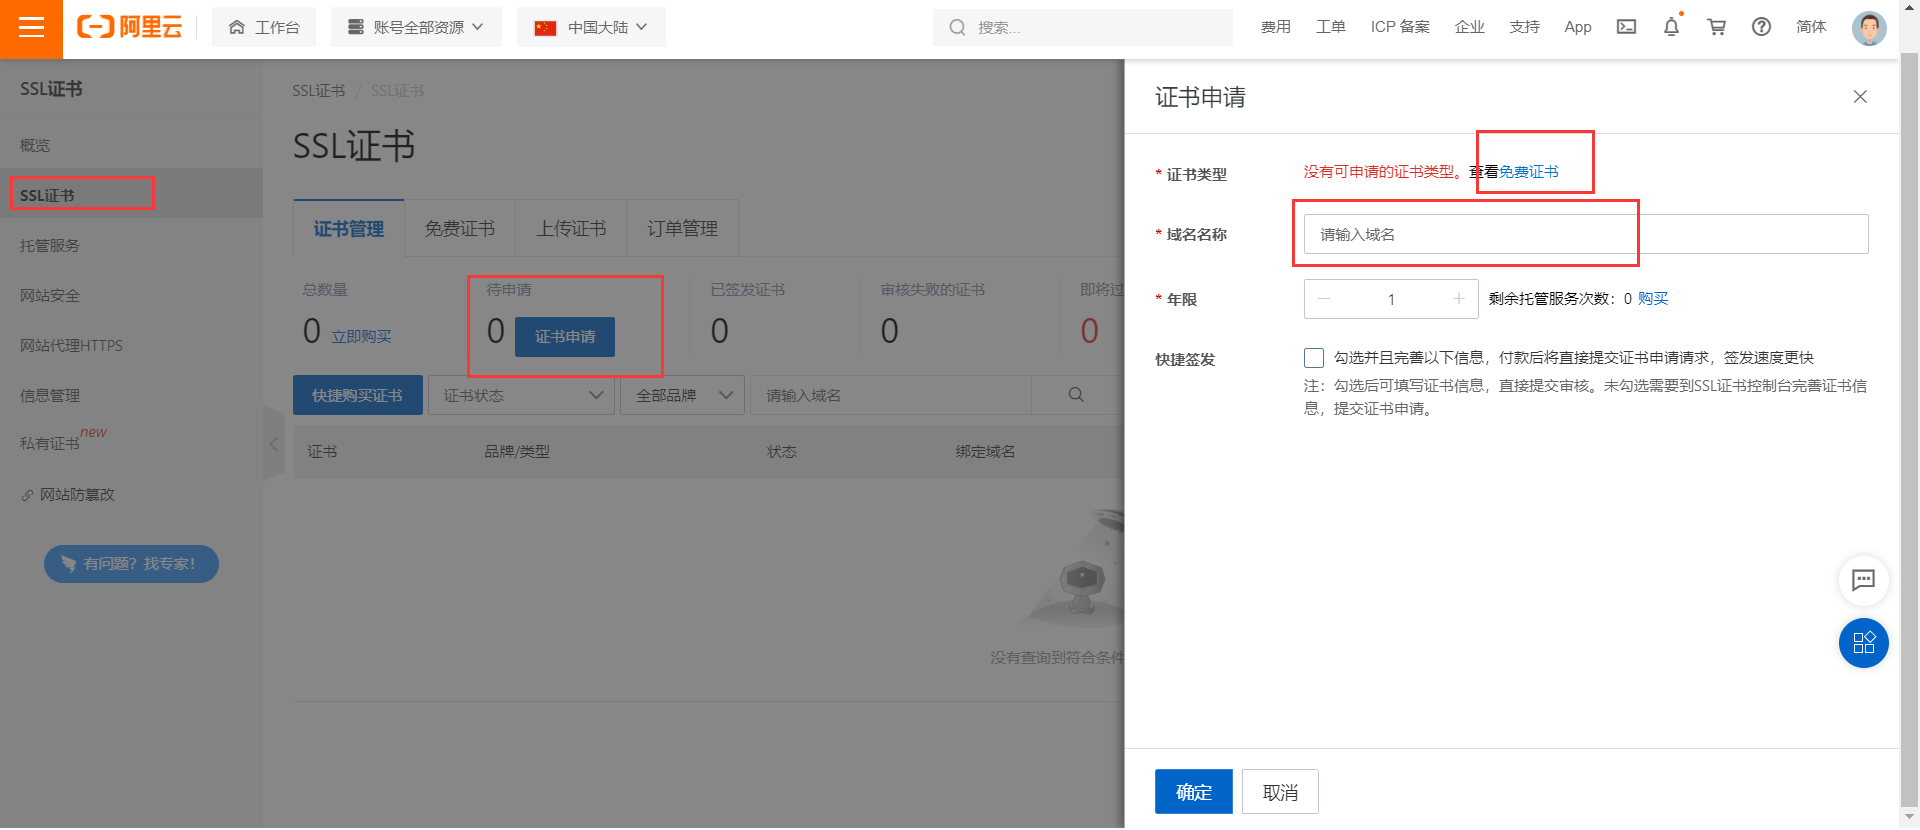
Create certificate
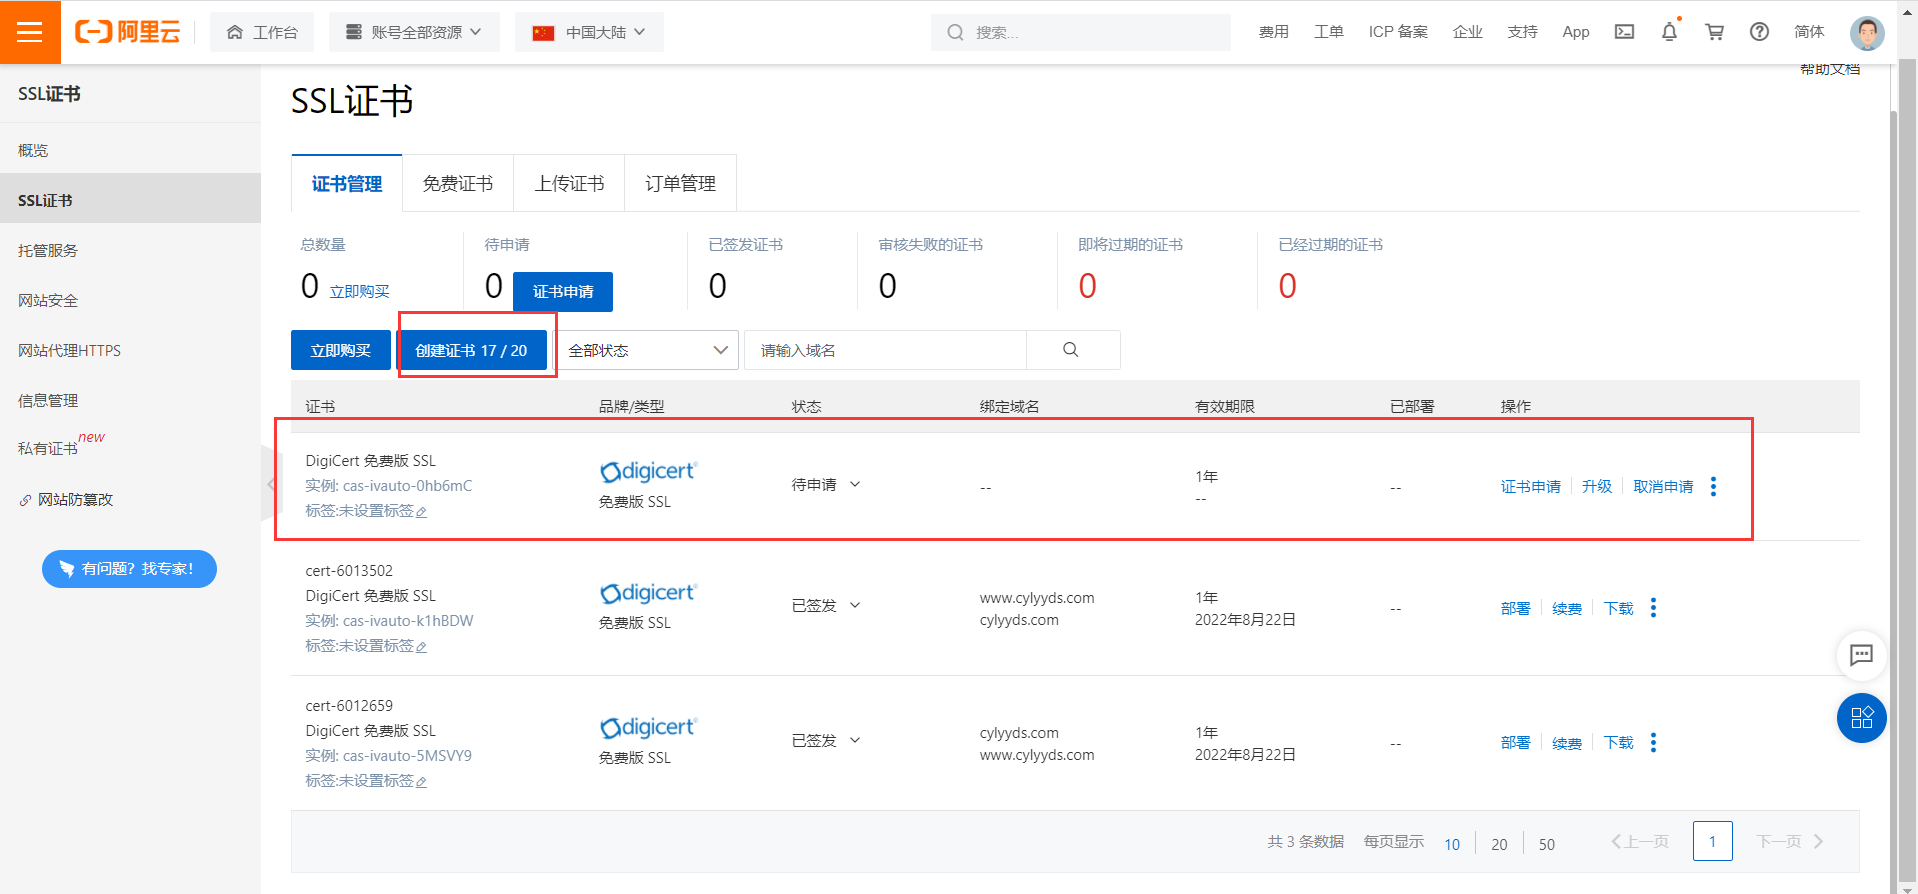
Fill in certificate application
Download the certificate

Select the type of server to deploy
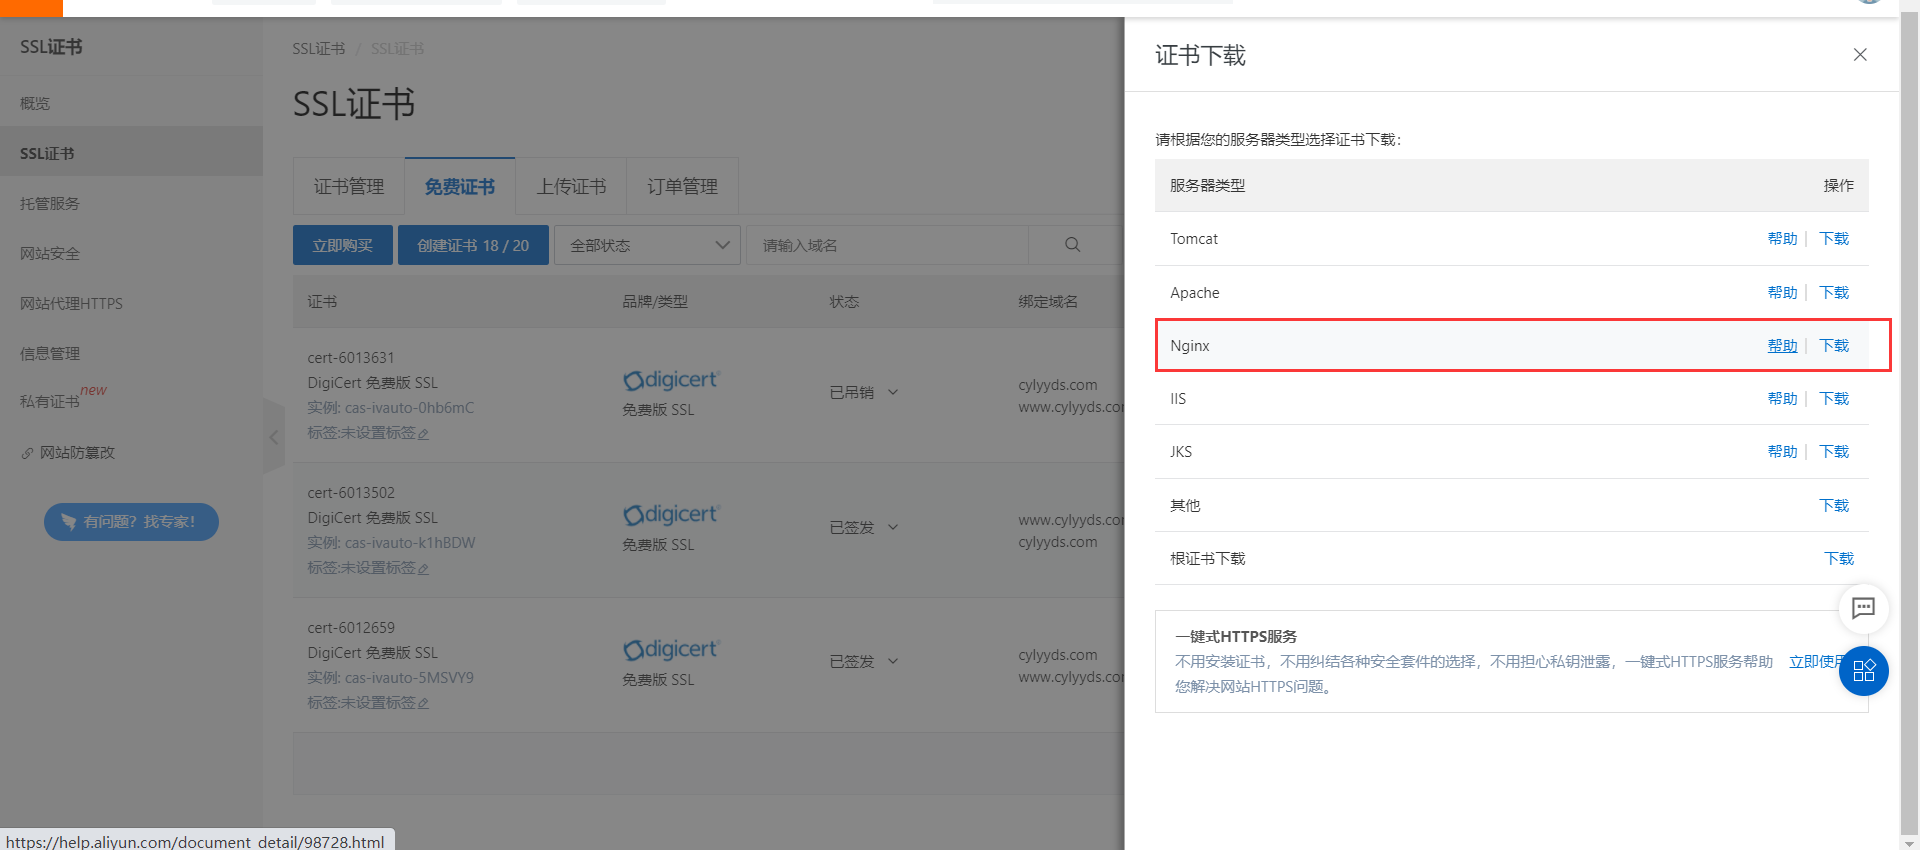
After downloading the certificate, unzip it to get two files

11. Install Nginx service
Nginx installation
Nginx Download: http://nginx.org/en/download.html
01. Create nginx server directory
mkdir -p /www/kuangstudy/nignx
cd /www/kuangstudy/nignx
02. Download and install
wget http://nginx.org/download/nginx-1.20.1.tar.gz
03. Install compilation tools and library files
yum -y install make zlib zlib-devel gcc-c++ libtool openssl openssl-devel
04. Unzip nginx
tar -zxvf nginx-1.20.1.tar.gz
05. Create a temporary directory of nginx
mkdir -p /var/temp/nginx
06. Enter the installation package directory
cd nginx-1.20.1
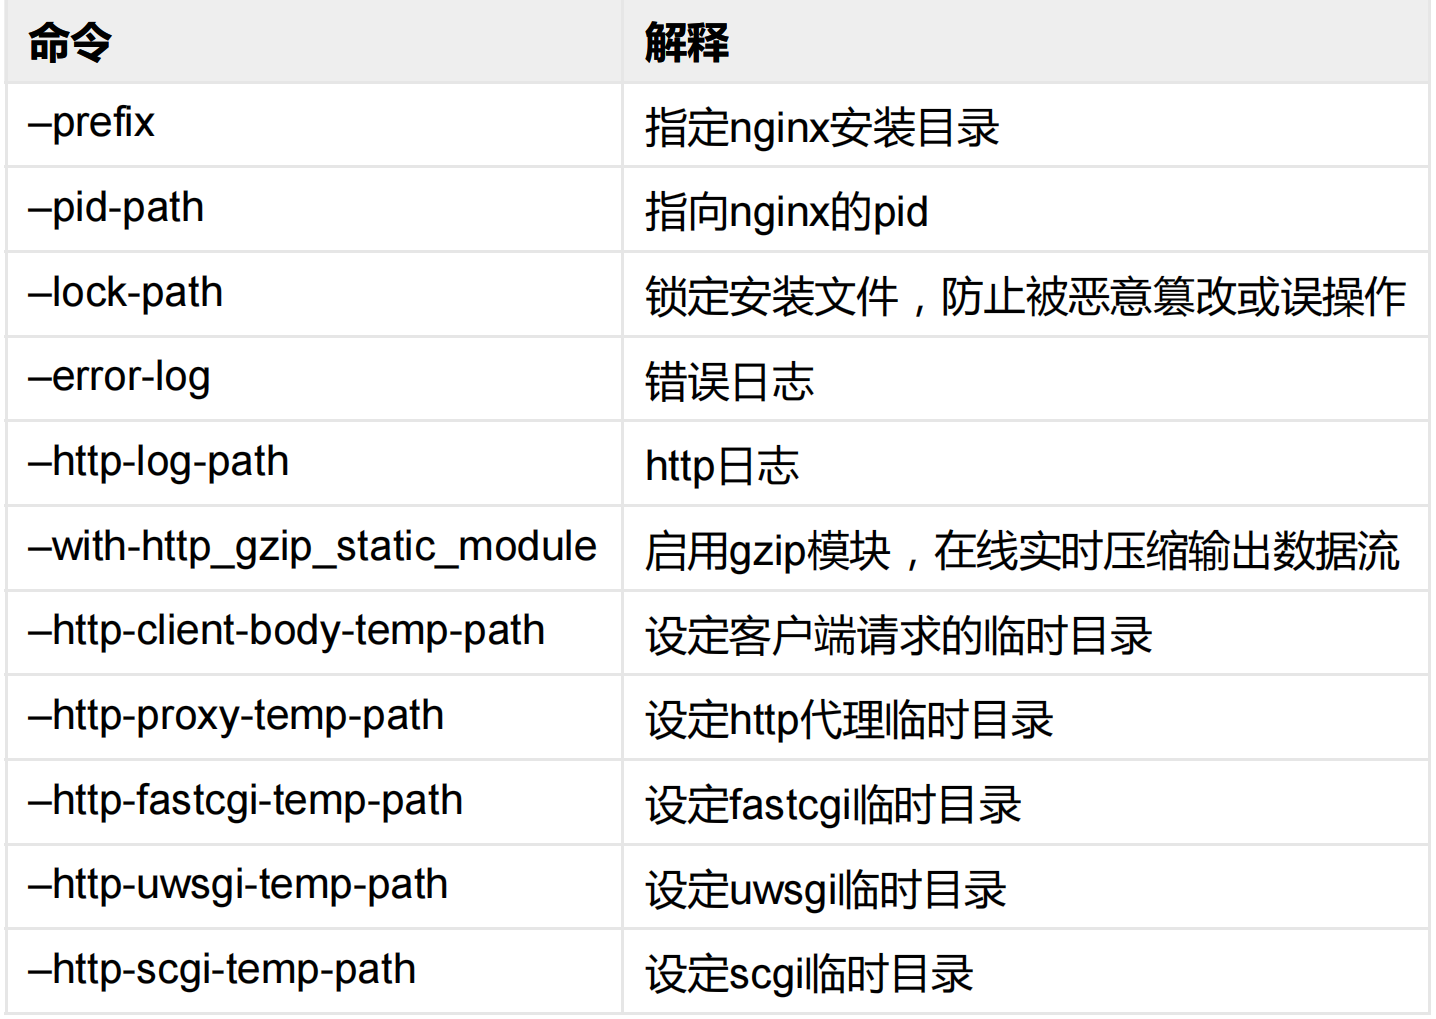
07. Compilation and installation
./configure \
--prefix=/usr/local/nginx \
--pid-path=/var/run/nginx.pid \
--lock-path=/var/lock/nginx.lock \
--error-log-path=/var/log/nginx/error.log \
--http-log-path=/var/log/nginx/access.log \
--with-http_gzip_static_module \
--http-client-body-temp-path=/var/temp/nginx/client \
--http-proxy-temp-path=/var/temp/nginx/proxy \
--http-fastcgi-temp-path=/var/temp/nginx/fastgi \
--http-uwsgi-temp-path=/var/temp/nginx/uwsgi \
--http-scgi-temp-path=/var/temp/nginx/scgi \
--with-http_stub_status_module \
--with-http_ssl_module \
--with-http_stub_status_module
Directory information after installation
nginx path prefix: "/usr/local/nginx" nginx binary file: "/usr/local/nginx/sbin/nginx" nginx modules path: "/usr/local/nginx/modules" nginx configuration prefix: "/usr/local/nginx/conf" nginx configuration file: "/usr/local/nginx/conf/nginx.conf" nginx pid file: "/var/run/nginx.pid" nginx error log file: "/var/log/nginx/error.log" nginx http access log file: "/var/log/nginx/access.log" nginx http client request body temporary files: "/var/temp/nginx/client" nginx http proxy temporary files: "/var/temp/nginx/proxy" nginx http fastcgi temporary files: "/var/temp/nginx/fastgi" nginx http uwsgi temporary files: "/var/temp/nginx/uwsgi" nginx http scgi temporary files: "/var/temp/nginx/scgi"
08. make compilation
make
09. Installation
make install
10. Enter sbin directory and start nginx
cd /usr/local/nginx/sbin
Execute nginx startup
./nginx
#stop it:
./nginx -s stop
#Reload:
./nginx -s reload
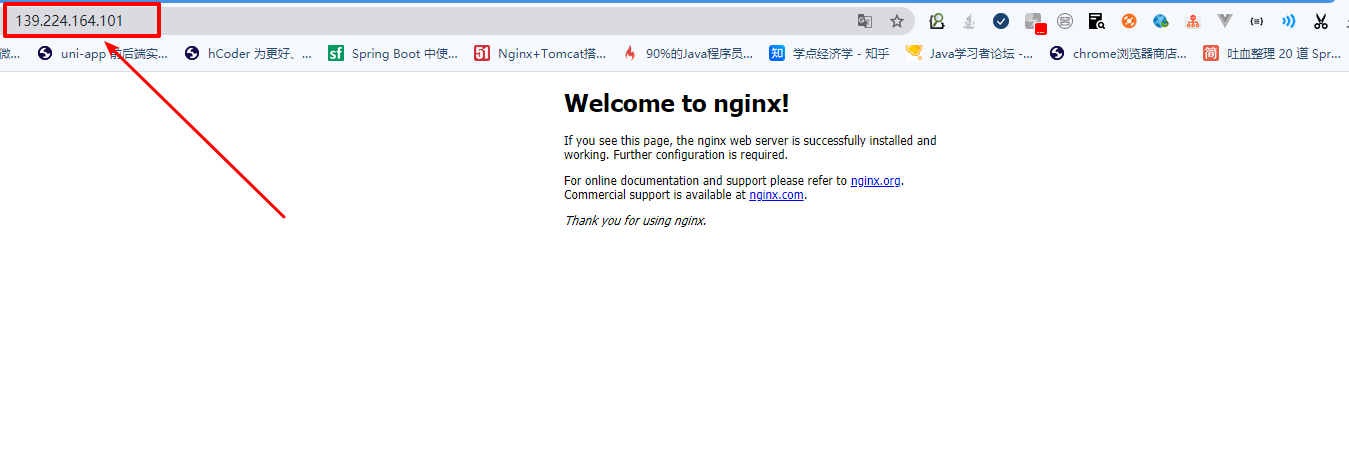
11. Open the browser and access the intranet ip of the virtual machine to open the nginx default page. The following shows that the installation is successful:
http://ip
12. Precautions
-
If you are installing on ECs, you need to open the default nginx port: 80
-
If you are installing in a virtual machine, you need to turn off the firewall
-
The local win or mac needs to turn off the firewall
-
The installation directory of nginx is: / usr/local/nginx/sbin
13. Configure environment variables for nginx
vim /etc/profile
Add the following at the end of the file:
export NGINX_HOME=/usr/local/nginx
export PATH=$NGINX_HOME/sbin:$PATH
Restart profile
source /etc/profile
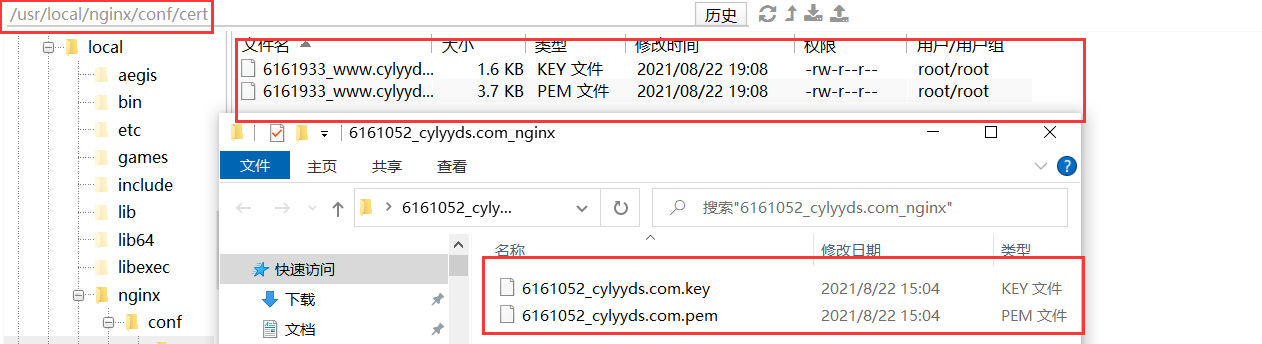
12. Upload of ssl security certificate
Create a new cert directory under the conf directory of nginx, and upload the two files to the cert directory
13. nginx and ssl configuration
# This server is http://www.itbooking.net Services
server {
    listen 80;
    server_name www.itbooking.net; #You need to add yourdomain COM is replaced by the domain name bound by the certificate.
    rewrite ^(.*)$ https://$host$1; # Redirect all HTTP requests to HTTPS through the rewrite instruction.
    location / {
        index index.html index.htm;
    }
}


# This server is https://www.itbooking.net Services
server {
    listen 443 ssl;
    #The default access port configured for HTTPS is 443.
    #If the default access port of HTTPS is not configured here, Nginx may not start.
    #If you use nginx 1.15 0 and above, please use listen 443 ssl instead of listen 443 and ssl on.
    server_name www.itbooking.net; #You need to add yourdomain COM is replaced by the domain name bound by the certificate.
    root html;
    index index.html index.htm;
    ssl_certificate cert/6179501_www.itbooking.net.pem;  #You need to set cert file name Replace PEM with the name of the uploaded certificate file.
    ssl_certificate_key cert/6179501_www.itbooking.net.key; #You need to set cert file name Key is replaced by the name of the uploaded certificate key file.
    ssl_session_timeout 5m;
    ssl_ciphers ECDHE-RSA-AES128-GCM-SHA256:ECDHE:ECDH:AES:HIGH:!NULL:!aNULL:!MD5:!ADH:!RC4;
    #Indicates the type of encryption suite used.
    ssl_protocols TLSv1 TLSv1.1 TLSv1.2; #Indicates the type of TLS protocol used.
    ssl_prefer_server_ciphers on;
    location / {
        root html;  #Site directory.
        index index.html index.htm;
    }
}
Check whether the configuration is incorrect as follows:
[root@iZuf62zev3la2ivndnxra5Z servers]# nginx -t
nginx: the configuration file /usr/local/nginx/conf/nginx.conf syntax is ok
nginx: configuration file /usr/local/nginx/conf/nginx.conf test is successful
Then restart the nginx service
nginx -s reload
Then access the server
https://www.itbooking.net/
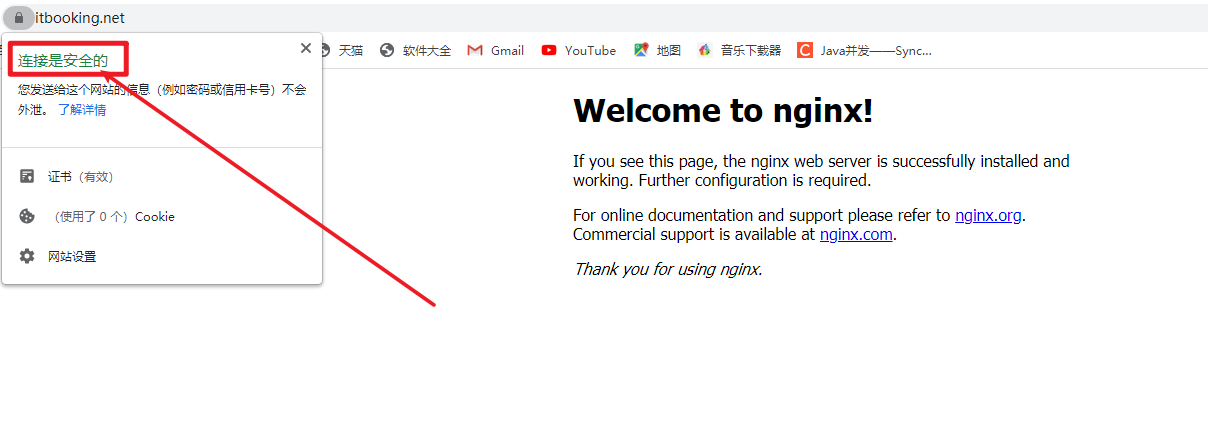
The installation is successful!
14. What if the https service of the application is configured?
1. Prepare a springboot project
2. Write a home page
3. Upload project to ECS
nohup java -jar springboot-app-0.0.1-SNAPSHOT.jar --server.port=8080 >>1.txt &
nohup java -jar springboot-app-0.0.1-SNAPSHOT.jar --server.port=8081 >>2.txt &;
nohup java -jar springboot-app-0.0.1-SNAPSHOT.jar --server.port=8082 >>3.txt &;
4. Configure the load balancing configuration of nginx and tomcat
5. Complete testing and configuration
15. Full configuration
upstream tomcatservers {
   server 127.0.0.1:8080;
   server 127.0.0.1:8081;
   server 127.0.0.1:8082;
}

server {
    listen 80;
    server_name www.itbooking.net; #You need to add yourdomain COM is replaced by the domain name bound by the certificate.
    rewrite ^(.*)$ https://$host$1; # Redirect all HTTP requests to HTTPS through the rewrite instruction.
    location / {
        proxy_pass http://tomcatservers;
    }
}


#Among the following attributes, attributes starting with ssl are related to certificate configuration.
server {
    listen 443 ssl;
    #The default access port configured for HTTPS is 443.
    #If the default access port of HTTPS is not configured here, Nginx may not start.
    #If you use nginx 1.15 0 and above, please use listen 443 ssl instead of listen 443 and ssl on.
    server_name www.itbooking.net; #You need to add yourdomain COM is replaced by the domain name bound by the certificate.
    root html;
    index index.html index.htm;
    ssl_certificate cert/6179501_www.itbooking.net.pem;  #You need to set cert file name Replace PEM with the name of the uploaded certificate file.
    ssl_certificate_key cert/6179501_www.itbooking.net.key; #You need to set cert file name Key is replaced by the name of the uploaded certificate key file.
    ssl_session_timeout 5m;
    ssl_ciphers ECDHE-RSA-AES128-GCM-SHA256:ECDHE:ECDH:AES:HIGH:!NULL:!aNULL:!MD5:!ADH:!RC4;
    #Indicates the type of encryption suite used.
    ssl_protocols TLSv1 TLSv1.1 TLSv1.2; #Indicates the type of TLS protocol used.
    ssl_prefer_server_ciphers on;
    location / {
        proxy_pass http://tomcatservers;
    }
}


#Among the following attributes, attributes starting with ssl are related to certificate configuration.
server {
    listen 443 ssl;
    #The default access port configured for HTTPS is 443.
    #If the default access port of HTTPS is not configured here, Nginx may not start.
    #If you use nginx 1.15 0 and above, please use listen 443 ssl instead of listen 443 and ssl on.
    server_name api.itbooking.net; #You need to add yourdomain COM is replaced by the domain name bound by the certificate.
    root html;
    index index.html index.htm;
    ssl_certificate cert/6184356_api.itbooking.net.pem;  #You need to set cert file name Replace PEM with the name of the uploaded certificate file.
    ssl_certificate_key cert/6184356_api.itbooking.net.key; #You need to set cert file name Key is replaced by the name of the uploaded certificate key file.
    ssl_session_timeout 5m;
    ssl_ciphers ECDHE-RSA-AES128-GCM-SHA256:ECDHE:ECDH:AES:HIGH:!NULL:!aNULL:!MD5:!ADH:!RC4;
    #Indicates the type of encryption suite used.
    ssl_protocols TLSv1 TLSv1.1 TLSv1.2; #Indicates the type of TLS protocol used.
    ssl_prefer_server_ciphers on;
    location / {
         proxy_pass http://tomcatservers;
    }
}
Remember: be sure to restart the nginx server.
16. Hidden dangers of Pagoda - hidden dangers of Nginx installation
Premise: the domain name should be filed. Nginx must be installed manually. If nginx has been installed in the pagoda before, reset the alicloud server directly and change the system, because the installation of nginx in the pagoda will be written into some environments. The uninstall is not clean. Remember!