This paper aims to describe the Framework of the Framework, mainly to record my learning about android framework for a period of time, hoping to attract jade and help readers.
preface
Write before:
1. Is it necessary to learn linux kernel?
I think it is necessary. Learning linux kernel helps us to deepen our understanding of some concepts, such as "process" and "thread". Recommended introductory course: the operating system course of Mr. Li Zhijun, MOOC, University of China
2. Is it necessary to compile the android source code yourself?
If you don't have to, you can directly use android studio to view the sdk source code, unless you want to debug some functions. But you have to practice yourself to be more familiar.
android framework is closely related to our development. This paper will start with startup, that is, the initialization of the framework, and then involve several use scenarios in the running process of Android. For example, the user starts the app (what happens after clicking the desktop icon), and the user uses the app (what does Android do with one touch). It involves some concepts that we often contact, such as the main thread, anr, handler, binder, zygote, what is the entry of the app, why the user-defined view should go in three steps, and answers them one by one. The source code involved is api 27.
1, Initialization article
When the boot key is pressed, the device first executes BootLoader, which is responsible for loading the Linux kernel from to memory and initializing the kernel. Finally, the kernel will read init RC file and start various service programs defined in the file. Android framework is just a Linux program for the kernel, and the program is in init Is defined in the RC file. The initialization process of the Android framework begins here.
The first one created is the zygote process, which is the first Dalvik virtual machine program running in the system. As the name suggests, all the later Dalvik virtual machine processes "hatch" through it (we all know that all human cells are divided by fertilized eggs, so I think this name is very accurate and ingenious).
The first Dalvik1 process hatched by zygote is called system server, which is a very important process of the Framework. SystemServer is only the alias of the process, and the corresponding program of the process is still app\_process, because SystemServer is from app\_ Hatched in process. Ams, Wms, Pms, etc. are all created in this process. It can be said that SystemServer manages all activities of the Framework.
Note 1: Andoird 4.4 introduces ART
A Socket2 client is created in the system server, and AmS is responsible for managing the client. After that, all Dalvik processes will be started indirectly through the Socket client. When you want to start a new APK process, AmS will send a start command to the Socket server of zygote process through the Socket client, and then zygote will hatch a new process.
Note 2: Socket, a method of communication in Android process, is involved here. Readers who have studied computer network should have a certain concept of it. pipe and binder are two process communication methods that will be mentioned later. In any case, their ultimate purpose is to make developers call across processes as if they were calling locally. As for their advantages, disadvantages and implementation methods, readers can explore them by themselves.
1. zygote startup
We mentioned earlier that when the kernel is initialized, it will start in init For the program configured in RC file, zygote relevant configuration information is as follows:
service zygote /system/bin/app\_process -Xzygote /system/bin --zygote --start-system-server
Briefly explain the meaning of this statement. The kernel will execute / system / bin / APP\_ The program in the process3 directory starts a service called zygote. The parameter -- start system server is valid only when the -- zygote parameter is specified, which means to tell Zygotelnit to hatch the first process SystemServer after startup. Therefore, one of the things zygote does after starting is to start the system server.
Note 3: after Android supports 64 bit, it will execute / system / bin / APP according to different ABI S\_ Process32 and / system/bin/app\_process64 directory.
When zygote service from App\_ After process starts, a Dalvik virtual machine will be started, and the first Java class executed by the virtual machine is ZygoteInit java. (APP process fork is from zygote process, so ZygoteInit.main is also the entry of app, but it will execute different logic according to different processes. This is why sometimes we can see "... ZygoteInit. Main" in the call stack of program error log... " The reason for this.) ZygoteInit will do two other things: first, as mentioned earlier, start a Socket service port, which is used to receive the command to start a new process; Second, most of the preloaded Framework classes and resources are used by subsequent apps. The zygote fork app process does not need to copy this part, but uses shared memory.
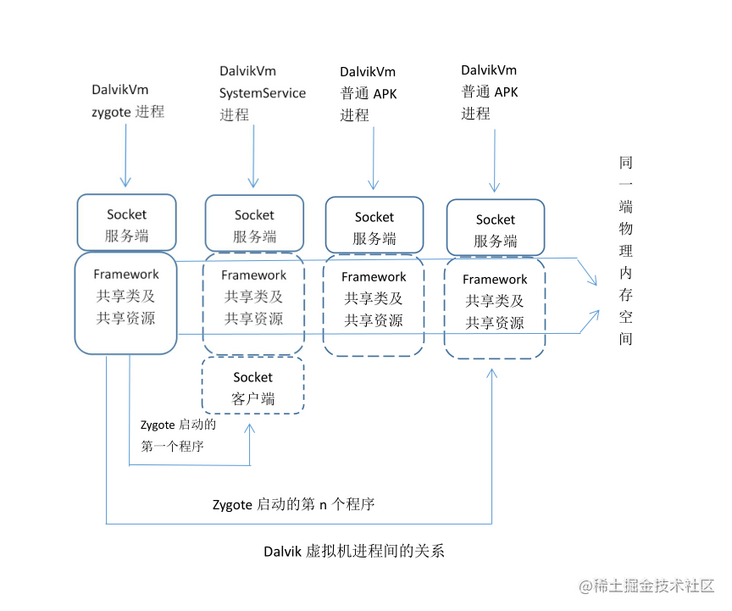
Summary: after zygote's process is started, it mainly does three things: start a Socket service to receive the command to start a new process, preload most of the Framework classes and resources, and start SystemServer.
2. Startup of SystemServer
System server is finally called to zygote in the zygote process Started by the forksystemserver method. After initialization, you will do some initial configuration, such as closing the Socket server (no zygote process does not need), configuring the SystemServer running environment, and then calling SystemServer.main.
After the system server is started, two things are mainly done: one is to start various service threads through the system server manager, such as AMS, WMS, PMS, etc, And register it with ServiceManager (AMS and WMS are closely related to the operation of app, and the specific contents will be expanded later); second, start HomeActivity, that is, start launcher. The startup of launcher is similar to that of ordinary app, which will be described in detail later.
3. Start of ServiceManager
The ServiceManager here is not in the java world, but in the native world. It is also through init RC configuration is started, and its function is equivalent to the DNS server of service4. Each service started by the system server will be registered in it. When making cross process calls with a binder, we first go back to query the ServiceManager to obtain the binder reference of the corresponding service, and then carry out subsequent operations. This process is similar to that we query DNS server through domain name to obtain ip and finally visit the website.
Note: when we check the Framework code, we will find the SystemServiceRegistry class. This class has nothing to do with the registration of system services. It just caches the tool classes for querying various services.
Note 4: this does not refer to Service, one of the four components of Android.
2, Runtime
When we use android devices, we are the runtime of the Framework. Next, I will start with two key scenarios: the first scenario, click the desktop icon. This scenario will involve android message mechanism, APP startup, activity creation, window creation and view drawing. In the second scenario, we are sliding the screen or clicking buttons. This scenario will involve how the Framework obtains hardware events and the event distribution mechanism of the app.
1. What happens when you click the desktop icon
Start of Activity
We all know that desktop programs, that is, launcher s, are basically no different from ordinary app s. When we click the desktop icon, we actually call the startActivity method of activity. Activity is a subclass 5 of Context, so it should have called the startActivity method of Context. However, activity overloads this method. The difference from Context is whether there is an intent FLAG\_ ACTIVITY\_ NEW\_ Task judgment. This is why we add intent when starting a Context (such as a Service) that is not an activity FLAG\_ ACTIVITY\_ NEW\_ TASK. Whether it is an activity or Context, it will eventually call the execStartActivity method of Instrumentation, and then call the startActivity method of Ams across processes through Binder.
Note 5: more precisely, Activity is a subclass of ContextWrapper, which is just a proxy class. In fact, the specific operations of an Activity are completed by its member variable mBase, which is a ContextImpl class (inheriting Context). Therefore, if the Context is an Interface, this is a standard static proxy mode.
Ams calls to the startActivityAsUser method and calls the startActivityMayWait method of ActivityStarter.
ActivityStarter.java
final int startActivityMayWait(...){
    ...
    //Find activity related information through PMS according to intent
    //How not in androidmanifest activity cannot be found after XML registration
    ResolveInfo rInfo = mSupervisor.resolveIntent(intent,                             resolvedType, userId);
    ...
    //See below
    int res = startActivityLocked(...);
    ...
}

int startActivityLocked(...){
    ...
    //See below
    mLastStartActivityResult = startActivity(...);
    ...
}

private int startActivity(...){
    ...
    //ActivityRecord is the record of activity in Ams, which corresponds to the activity of our app one by one,
    //It has a member variable, appToken is a binder class, and the activity of the following app is through this
    //Class communicates with the activity of Ams
    ActivityRecord r = new ActivityRecord(...);
    ...
    //Call another overload of startActivity, as shown below
    return startActivity(...);
}

private int startActivity(...){
    ...
    //See below
    result = startActivityUnchecked(...);
    ...
}

private int startActivityUnchecked(...){
    //Initialize some parameters, such as mlunchsingletop (whether launchMode is singletop), adjust mlunchflags, etc
    setInitialState(...);
    //Further adjust mlunchflags. For example, the original activity is singleinstance or the activity to be started is
    //When using singleinstance or singletask, make sure mlunchflags has FLAG_ACTIVITY_NEW_TASK properties
    computeLaunchingTaskFlags();
    ...
    //Find out if there are started activities
    ActivityRecord reusedActivity = getReusableIntentActivity();
    if (reusedActivity != null) {
        if ((mLaunchFlags & FLAG_ACTIVITY_CLEAR_TOP) != 0
                    || isDocumentLaunchesIntoExisting(mLaunchFlags)
                    || mLaunchSingleInstance || mLaunchSingleTask) {
                //Clean up the task so that the target activity is at the top. Here we can understand
                //FLAG_ ACTIVITY_ CLEAR_ The principle of top or singletask.
                ...
                if (top != null) {
                   ...
                   //Callback onNewIntent
                    deliverNewIntent(top);
                }
                ...
            }
    }
    ...
    //Adjust the stack and task
    mTargetStack.startActivityLocked(...);
    ...
    //See below
    mSupervisor.resumeFocusedStackTopActivityLocked(...);
}
So far, let's summarize that Ams searches activity related information through PMS according to intent, which explains why it is not in Android manifest XML registration cannot be started. Then find the appropriate stack and task for the activity according to the activity's launchMode, taskAffinity and intent's launchFlags. The relationship among stack, task and ActivityRecord is shown in the following figure. Ams saves various state information of the activity through the ActivityRecord, and communicates with the activity of the app through its member variable appToken(binder class).

Pictures from the Internet
We will continue to talk about the resumefocussedstacktopactivitylocked method of ActivityStackSupervisor. This method will then call the resumeTopActivityUncheckedLocked method of ActivityStack, then call the resumeTopActivityInnerLocked method, and then return to the startSpecificActivityLocked method of ActivityStackSupervisor.
ActivityStackSupervisor.java
void startSpecificActivityLocked(...) {
    if (app != null && app.thread != null) {
        ...
        //If the app corresponding to the activity has been started, start the activity directly
        //See later for details
        realStartActivityLocked(...);
        ...
    }
    //Start the process through Ams, as shown below
    mService.startProcessLocked(...);
}

final boolean realStartActivityLocked(...){
    //Here's the app Thread is a binder class used to communicate with the app's ActivityThread
    //The scheduleLaunchActivity method of ActivityThread is called across processes through binder.
    app.thread.scheduleLaunchActivity();
}
Here, let's start the process through Ams. After Ams calls startProcessLocked, it will call another startProcessLocked overload
ActivityManagerService.java
final ProcessRecord startProcessLocked(...){
    ...
    if (app != null && app.pid > 0) {
        //If the app has been started and some conditions are met, it will return directly
    }
    ...
    //See below
    startProcessLocked(...);
    ...
}
private final void startProcessLocked(...){
    ...
    //entryPoint will be passed as a parameter through the socket, which will become the entry for the process java code execution
    if (entryPoint == null) entryPoint = "android.app.ActivityThread";
    ...
    //See below
    startResult = Process.start(entryPoint,...);
    ...
}
The start method of Process will immediately call the start method of ZygoteProcess, and then call the startViaZygote method.
ZygoteProcess.java
private Process.ProcessStartResult startViaZygote(...){
    ...
    //The openzygotesocketifneed method is used to establish a socket connection with the zygote process
    //We mentioned earlier that the zygote process will play the role of socket server, accept commands, and then fork in and out
    return zygoteSendArgsAndGetResult(openZygoteSocketIfNeeded(abi), argsForZygote);
    ...
}

private static Process.ProcessStartResult zygoteSendArgsAndGetResult(...){
    //Send the fork command and other parameters mentioned above, such as entryPoint
    ...
}
We return to the zygote process. When the zygote process is started, we call the main method of ZygoteInit for initialization, which will start the runSelectLoop thread of ZygoteServer and receive commands circularly. The main method is the processOneCommand method of ZygoteConnection.
ZygoteConnection.java
Runnable processOneCommand(...){
    //Read commands and parameters
    ...
    //fork process
    pid = Zygote.forkAndSpecialize(...);
    ...
    //Friends who have a certain understanding of c programming under linux will know that the pid of the child process after fork is 0
    if (pid == 0) {
        ...
        //Process subprocesses, see below
        return handleChildProc(parsedArgs, descriptors, childPipeFd);
    }
}

private Runnable handleChildProc(...){
    ...
    return ZygoteInit.zygoteInit(...);
}

ZygoteInit.java
public static final Runnable zygoteInit(...){
    ...
    return RuntimeInit.applicationInit(...);
}

RuntimeInit.java
protected static Runnable applicationInit(...) {
    //args.startClass is the entryPoint we mentioned earlier, that is, "android.app.ActivityThread"
    //It can be seen that the first method called by app is the main method of ActivityThread, which is the entry of the application.
    return findStaticMain(args.startClass, args.startArgs, classLoader);
}
We have finally returned to our own process, and it is clear that the main method of ActivityThread (there is always an unspeakable intimacy when referring to the main method) is the entrance to the application. Then continue to explore.
ActivityThread.java
public static void main(String[] args) {
    //Create a looper. Looper is actually well understood, that is, it has been looping and taking instructions for execution.
    //(isn't the principle of our computer always refers to execution)
    Looper.prepareMainLooper();
    //Create an ActivityThread. At first, when we see the name, we will think it is a Thread class
    //In fact, it can also represent the main thread of the app, because it has sMainLooper,
    //Have sMainThreadHandler, which will deal with Ams and other system services
    //In my personal understanding, activity is the activity, and thread is the line. It is a line that connects the activities of all app s.
    ActivityThread thread = new ActivityThread();
    //Establish Binder channel with Ams, see below
    thread.attach(false);
    //Create a handler, which is actually a tool. Let's put messages into the MessageQueue, remove messages and process messages
    //looper is the protagonist. looper will always get messages from MessageQueue and execute them
    if (sMainThreadHandler == null) {
        sMainThreadHandler = thread.getHandler();
    }
    ...
    Looper.loop();
}

 private void attach(boolean system) {
    ...
    //mgr is a binder class used to communicate with Ams
    mgr.attachApplication(mAppThread);
    ...
 }
Seeing this, we already know what the main thread is. The thread on which the process initially runs is the main thread. And then we will find a "terrible" fact, Our app will always run in sMainLooper (that is, in the main process, excluding other threads we create), including starting activity, sending touch messages and key messages. We will hand them over to sMainLooper through sMainThreadHandler (this is also the principle of synchronization through handler during development). Now that we know the concept of main thread, the principle of anr is well understood. sMainLooper will anr if it processes this message for more than 5s (activity) or 20s (service). This is a way to ensure the user experience.
Next, we return to Ams, which will then call the attachApplicationLocked method.
ActivityManagerService.java
private final boolean attachApplicationLocked(...){
    ...
    //Notify ActivityThread to create Application through binder IPC
    thread.bindApplication(...);
    ...
    mStackSupervisor.attachApplicationLocked(app);
    ...
}

ActivityStackSupervisor.java
boolean attachApplicationLocked(...) throws RemoteException {
    ...
    //Look what we found, deja vu. Yes, that's the problem we left above.
    //The reason is very simple. When we start an activity, we find that the process is not started,
    //When we start the process, of course, we have to restart the activity
    realStartActivityLocked(...);
    ...
}

final boolean realStartActivityLocked(...){
    ...
    //The thread here is a binder class, which corresponds to the ActivityThread
    app.thread.scheduleLaunchActivity(...);
    ...
}
Back to the app process, let's first look at the process of creating an Application
ActivityThread$ApplicationThread.java
public final void bindApplication(...){
    //Call the handleBindApplication method through the handler, and then call the performLaunchActivity method
    sendMessage(H.BIND_APPLICATION, data);
}

ActivityThread.java
private void handleBindApplication(AppBindData data) {
    ...
    //Create Instrumentation
    mInstrumentation = new Instrumentation();
    ...
    //Create an Application and call back the attachBaseContext method
    app = data.info.makeApplication(data.restrictedBackupMode, null);
    ...
    //Callback onCreate method
    mInstrumentation.callApplicationOnCreate(app);
    ...
}
Next, let's look at the process of creating an Activity
ActivityThread$ApplicationThread.java
public final void scheduleLaunchActivity(...){
    //Call the handleLaunchActivity method through the handler, and then call the performLaunchActivity method
    sendMessage(H.LAUNCH_ACTIVITY, r);
}

ActivityThread.java
private Activity performLaunchActivity(...){
    //The real Context class is the mBase mentioned above
    ContextImpl appContext = createBaseContextForActivity(r);
    ...
    //Create activity with emission
    activity = mInstrumentation.newActivity(...);
    ...
    //Assign appContext to mBase and call back attachBaseContext(context);
    //getInstrumentation() mentioned earlier calling the execStartActivity method of Instrumentation
    //r.token is a binder class and corresponds to the ActivityRecord of Ams. Another article (see Note 6) mentioned that it plays an important role
    activity.attach(appContext, this, getInstrumentation(),r.token,...,app,...,window,...);
    ...
    //Callback onCreate
    mInstrumentation.callActivityOnCreate(...);
}
So far, the framework of startActivity has been described.
Drawing of View
This part is not about custom views, Instead, it creates windows (including adding and drawing). From the perspective of WmS, a Window is not a Window class, but a view class. When WmS receives a user's message, it needs to send the message to the Window. The view class itself cannot directly receive the message delivered by WmS. The IWindow class must really receive the user's message (binder class), and the IWindow class is implemented by the ViewRoot.W class. Each w contains a view variable. These two sentences are quoted from Android kernel analysis. From the later explanation, we can see that the Window class is more an abstraction of the Window, and the view is the content of the Window.
Three windows are defined in the Framework: application window, sub window and system window. The application window corresponds to an activity, The next step is to explain the application window The creation of the window (hereinafter referred to as window). Since the window corresponds to a Activity, the window is created in the process of startActivity. It is mentioned that the creation of Activity will callback onCreate, and we will call setContentView method when we develop it. SetContentView will call setContentView method of Window class, if you go to see attach of Activity. Method, you will find that the window class is actually a PhoneWindow class.
PhoneWindow.java
@Override
public void setContentView(int layoutResID) {
    ...
    installDecor();
    ...
    //Load the customized layout of the app. It can be seen from the following that our layout is wrapped with at least two view s,
    //First by mContentParent and then by mDecor
    mLayoutInflater.inflate(layoutResID, mContentParent);
    ...
}

private void installDecor() {
    ...
    //Create a decorview (inherited from FrameLayout). As the name suggests, all the contents of the window are displayed in this view,
    //This View is the root of all views of the Activity.
    //This is why we view the Activity view hierarchy, and the outermost layer is FrameLayout
    mDecor = generateDecor(-1);
    ...
    //Configure different xml layouts according to different style s,
    //These xml have a common feature: they all have an id of id_ ANDROID_ Content view
    //Therefore, ViewGroup contentParent = (ViewGroup)findViewById(ID_ANDROID_CONTENT) can be used
    //Assign value to contentParent
    mContentParent = generateLayout(mDecor);
    ...
}
This step only creates the View, and the next two steps will be involved: 1. Add the window to Wms, and Wms will manage the window in a certain form like Ams. 2. Convert the content to be displayed by the View into data, save it in the screen buffer memory, and hand it over to the system for drawing.
In the process of startActivity, handleResumeActivity will be called after the Activity is created.
ActivityThread.java
private void handleLaunchActivity(...){
    ...
    Activity a = performLaunchActivity(r, customIntent);
    if (a != null) {
        ...
        //See below
        handleResumeActivity(...);
        ...
    }
}

final void handleResumeActivity(...){
    ...
    //Callback onResume
    r = performResumeActivity(token, clearHide, reason);
    ...
    //Make decor invisible
    View decor = r.window.getDecorView();
    decor.setVisibility(View.INVISIBLE);
    ...
    //Call makeVisible of Activity
    r.activity.makeVisible();
    ...
}

Activity.java
void makeVisible() {
    if (!mWindowAdded) {
        ViewManager wm = getWindowManager();
        //Finally, addView of WindowManagerGlobal will be called
        wm.addView(mDecor, getWindow().getAttributes());
        mWindowAdded = true;
    }
    mDecor.setVisibility(View.VISIBLE);
    }

WindowManagerGlobal.java
public void addView(...) {
    ...
    //Create viewrootimpl (abstract of view root)
    root = new ViewRootImpl(view.getContext(), display);
    view.setLayoutParams(wparams);
    //Cache the view (mdecor in this case), root (an abstraction of view) and layoutParam
    mViews.add(view);
    mRoots.add(root);
    mParams.add(wparams);
    ...
    //See below
    root.setView(view, wparams, panelParentView);
    ...
}

ViewRootImpl.java
public void setView(...) {
    ...
    //The following section continues
    requestLayout();
    ...
    //ipc to Wms, and the Session class is the server
    //mInputChannel is an InputChannel class, which is the implementation of the pipeline in the java layer. It will be described in detail later when we talk about Android events
    res = mWindowSession.addToDisplay(...,mInputChannel);
    ...
}

Session.java
@Override
public int addToDisplay(...) {
    //See below
    return mService.addWindow(...);
}

WindowManagerService.java
public int addWindow(...) {
    //Create WindowState
    //Session is the Binder server of the session
    //Client is the Binder client of IWindow
    final WindowState win = new WindowState(..., session, client,...);
    ...
    //The windowsaddedlocked method of the Session will be called, as shown below
    win.attach();
    //Cache win
    mWindowMap.put(client.asBinder(), win);
    ...
    if (win.canReceiveKeys()) {
        //If the window is interactive (for example, Toast is non interactive), update the focus window
        focusChanged = updateFocusedWindowLocked(...);
        ...
    }
}

Session.java
void windowAddedLocked(String packageName) {
    ...
    if (mSurfaceSession == null) {
        //Create SurfaceSession, which is a class that directly interacts with surfacelinker,
        //Used to add, delete, transform windows to SurfaceFlinger. Each application corresponds to only one Session object,
        //Therefore, mSurfaceSession will actually be created only once,
        //That is, a SurfaceSession object will be constructed when the first window in the application is created,
        //Subsequent window additions in the same application will no longer construct the SurfaceSession object
        mSurfaceSession = new SurfaceSession();
        ...
        //Save Session
        mService.mSessions.add(this);
        ...
    }
    ...
}
Here you can see that Wms saves the information of the window, that is, manages it, which is the basis of event distribution.
Returning to the requestLayout method above, requestLayout calls the scheduleTraversals method, which initiates a View tree traversal message. The message is processed asynchronously, and the corresponding processing function is the performttraversals method.
ViewRootImpl.java
private void performTraversals() {
    final View host = mView;
    if (mFirst) {
        ...
        //If the window is displayed for the first time, initialize attachinfo and assign it to mView,
        //Call the dispatch method of the ViewGroup to recursively pass the attachinfo to the child View
        host.dispatchAttachedToWindow(mAttachInfo, 0);
    }
    ...
    //If the window size changes, call host Measure() recalculates the size of the view in the window
    //Android's View and ViewGroup are classic combination modes
    //The measure process will traverse the entire View tree and call the measure of each View and the callback onMeasure
    //The process of layout and draw is similar
    performMeasure(childWidthMeasureSpec, childHeightMeasureSpec);
    ...
    //According to the execution results of the seven steps, judge whether it is necessary to rearrange. For example, when the size of any view changes,
    //It affects the layout of other views
    performLayout(lp, mWidth, mHeight);
    ...
    //If it is judged that the painting is not cancelled and it is not a new surface, start painting
    //The meaning of newSurface variable pull means that a Surface object has been created in ViewRoot, but the object has not been allocated real video memory by WmS,
    //In ViewRoot, it is called windowsession Relayoutwindow() allocates real video memory in the Surface object,
    //In general, the newSurface here is false.
    performDraw();
    ...
}
For the first time, since the window setting is invisible, the previous code can see that the makeVisible method of Activity will call mdecor SetVisibility (View.VISIBLE), after a series of calls, will be called to the performTraversals method of ViewRootImpl again, then the performDraw method will be called.
Before we talk about drawing, we should first clarify several concepts.
- Surface:
Surface is a handle to the raw image buffer. That is to say, surface corresponds to a section of memory whose data is the content to be drawn. The surface class essentially represents a plane
- Canvas:
We know that drawing different patterns is obviously a work, not a piece of data. Android uses Canvas class to represent these operations, that is, Canvas is the function class drawn. Look at the description of Canvas: A Bitmap to hold the pixels, a Canvas to host the draw calls (writing into the bitmap) - the function of Canvas is to respond to the call of draw and write it into the bitmap, which is used to save all pixels, so you will know the concept of Canvas better.
ViewRootImpl.java
private void performDraw() {
    ...
    draw(fullRedrawNeeded);
    ...
}

private void draw(boolean fullRedrawNeeded) {
    //Previously applied to Wms
    Surface surface = mSurface;
    ...
    if (!drawSoftware(...)) {
        return;
    }
    ...
}

private boolean drawSoftware(...) {
    ...
    //Get canvas and lock
    canvas = mSurface.lockCanvas(dirty);
    ...
    //Traverse the draw of subclasses. Obviously, this process is to convert the contents of all subclasses into pixels and write them into the bitmap of Canvas
    mView.draw(canvas);
    ...
    //Submit the Canvas that saves all view contents to the surface and submit it to the bottom layer of the system for drawing.
    surface.unlockCanvasAndPost(canvas);
    ...
}
So far, the framework drawn by view has been described.
2. One touch, what did Android do
This title comes from One touch, what did Android do So much of the following will be quoted from this article.
What does a touch mean? In the process of using Android devices, clicking, long pressing, sliding (TouchEvent) and pressing the entity key (KeyEvent) can become "one touch". Therefore, one touch can represent all the operations we use.
Of course, our touch starts with the hardware, which will pass events to the kernel and the kernel to the Framework. As mentioned earlier, various services will be started when the system server is started:
SystemServer.java
public static void main(String[] args) {
new SystemServer().run();
}
private void run() {
...
startOtherServices();
...
}
private void startOtherServices() {
...
//Create InputManagerService
inputManager = new InputManagerService(context);
...
//Create WindowManagerService and hold InputManagerService
wm = WindowManagerService.main(..., inputManager,...);
...
//Set InputMonitor as callback and start InputManagerService
inputManager.setWindowManagerCallbacks(wm.getInputMonitor());
inputManager.start();
}
InputManagerService.java
public InputManagerService(Context context) {
...
//Initialize the native object (mPtr is long and saves the pointer of the native object, which is a common method used by jni to keep the native object)
//InputManagerService corresponds to the native inputmanager cpp
mPtr = nativeInit(this, mContext, mHandler.getLooper().getQueue());
...
}
public void start() {
...
//Used to start the two threads mentioned below
nativeStart(mPtr);
...
}
InputManager.cpp
InputManager::InputManager(...) {
mDispatcher = new InputDispatcher(dispatcherPolicy);
mReader = new InputReader(eventHub, readerPolicy, mDispatcher);
initialize();
}
void InputManager::initialize() {
mReaderThread = new InputReaderThread(mReader);
mDispatcherThread = new InputDispatcherThread(mDispatcher);
}
/**
From the above code, we can see that InputDispatcher and InputReader are created during InputManager initialization
And InputReaderThread and inputdispatcher thread. InputReader is used to read input information (i.e. various events),
InputDispatcher Used to distribute events. Two threads are obviously used to run these two functions.
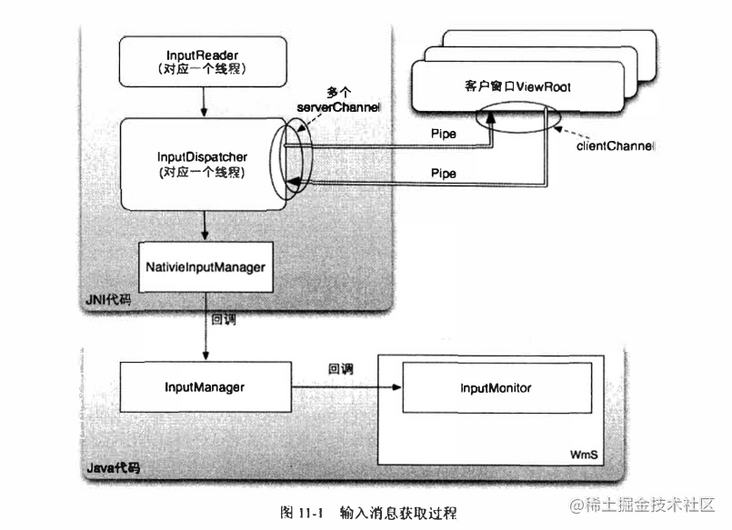
*/The InputReader thread will continuously call the driver of the input device to read all messages input by the user. Both the thread and the InputDispatcher thread run in the system \ _processspace. The InputDispatcher thread takes out the original message from its message queue. The extracted message may be distributed in two ways. The first method is to send it directly to the customer window through the pipe. The other method is to send it to the WmS first, and the WmS will process it. If the WmS does not process the message, it will be sent to the customer window. Otherwise, it will not be sent to the customer window (quoted from Android kernel analysis). As shown in the figure (the picture is also from Android kernel analysis):
If it is a key message, InputDispatcher will first call back the callback function defined in InputManager, which will not only call back the callback function in InputMonitor, but also call the related functions defined in WmS. For system key messages, such as "Home" key and telephone key, WmS will process them by default. If events are consumed, InputDispatcher will not continue to pass these key messages to the customer window. For touch screen messages, InputDispatcher will directly pass them to the customer window.
InputManagerService.java
//Callback of key events. We mentioned earlier that the callback object is InputMonitor
// Native callback.
private long interceptKeyBeforeDispatching(InputWindowHandle focus,
           KeyEvent event, int policyFlags) {
   return mWindowManagerCallbacks.interceptKeyBeforeDispatching(focus, event, policyFlags);
}

InputMonitor.java
@Override
public long interceptKeyBeforeDispatching(
           InputWindowHandle focus, KeyEvent event, int policyFlags) {
   WindowState windowState = focus != null ? (WindowState) focus.windowState : null;
   //Callback Wms. mPolicy is created during SystemServer initialization. It is a PhoneWindowManager class. You can see the processing of various keys
   return mService.mPolicy.interceptKeyBeforeDispatching(windowState, event, policyFlags);
}
When InputDispatcher is passed directly to the window, find the window that currently gets the focus through findtouchedwindow atlocked method, and then conduct ipc through Pipe. That is to say, a set of window related information will be maintained in the native layer. Let's go back to the process of adding windows in Wms:
WindowManagerService.java
public int addWindow(...) {
   //Create a WindowState, and the InputWindowHandle will be created in the construction method
   final WindowState win = new WindowState(...);
   ...
   //Establish pipeline communication, where outInputChannel is passed from app process
   win.openInputChannel(outInputChannel Is from app process);
   ...
   //Update the information of window focus change to the native layer. Similarly, it will be updated when the window is switched or destroyed
   mInputMonitor.updateInputWindowsLw(false /*force*/);
   ...
}

WindowState.java
void openInputChannel(InputChannel outInputChannel) {
   ...
   InputChannel[] inputChannels = InputChannel.openInputChannelPair(name);
   mInputChannel = inputChannels[0];
   mClientChannel = inputChannels[1];
   /*Channel[0]Save on the server side*/
   mInputWindowHandle.inputChannel = inputChannels[0];
   ...
   /* Channel[1]Return to ViewRootImpl end of app*/
   mClientChannel.transferTo(outInputChannel);
   ...
   /*Register to the InputManagerService native layer*/
   mService.mInputManager.registerInputChannel(mInputChannel, mInputWindowHandle);
}
It can be seen that a group of windowstates are maintained in Wms for window creation, destruction and switching, while a group of inputwindowhandles are maintained in InputManagerService for event distribution.
Let's go back to ViewRootImpl. When adding a window, we called the setView method.
ViewRootImpl.java
public void setView(...) {
    ...
    //InputChannel class is the implementation of pipeline in java layer
    mInputChannel = new InputChannel();
    ...
    //View iwindowsession Aidl will find that the mInputChannel here is marked out,
    //That is, changes in another process will be synchronized to this process
    res = mWindowSession.addToDisplay(...,mInputChannel);
    ...
    if (mInputChannel != null) {
        if (mInputQueueCallback != null) {
            mInputQueue = new InputQueue();
            mInputQueueCallback.onInputQueueCreated(mInputQueue);
        }
        //Create a callback for the pipeline, see below
        mInputEventReceiver = new WindowInputEventReceiver(mInputChannel,Looper.myLooper());
    }
}

ViewRootImpl$WindowInputEventReceiver.java
public WindowInputEventReceiver(InputChannel inputChannel, Looper looper) {
    //See below
    super(inputChannel, looper);
}

InputEventReceiver.java
public InputEventReceiver(InputChannel inputChannel, Looper looper) {
    ...
    //Establish a callback for the pipeline, and the native layer will call back to the InputEventReceiver when it receives the event
    mReceiverPtr = nativeInit(new WeakReference<InputEventReceiver>(this),
                    inputChannel, mMessageQueue);
    ...
}
When the InputDispatcher of InputManagerService passes messages to the app process through the pipeline, the pipeline of the app process will call back InputEventReceiver (i.e. WindowInputEventReceiver) for event distribution. The following code can be said to be the standard answer to the responsibility chain mode, which is very exciting. Readers can learn by themselves.
summary
Android Framework can be said to be a huge project. If we fall into details at the beginning, we can't go a way. Gentlemen are good at fake things. With the help of the research and learning results of big men, we can learn the overall framework first and break it individually when necessary. Thank you very much. The following references may be omitted. I apologize here! I hope this article is helpful to readers.
This article is transferred from https://juejin.cn/post/6844903717301387272 , in case of infringement, please contact to delete. This paper aims to describe the Framework of the Framework, mainly to record my learning about android framework for a period of time, hoping to attract jade and help readers.
preface
Write before:
1. Is it necessary to learn linux kernel?
I think it is necessary. Learning linux kernel helps us to deepen our understanding of some concepts, such as "process" and "thread". Recommended introductory course: the operating system course of Mr. Li Zhijun, MOOC, University of China
2. Is it necessary to compile the android source code yourself?
If you don't have to, you can directly use android studio to view the sdk source code, unless you want to debug some functions. But you have to practice yourself to be more familiar.
android framework is closely related to our development. This paper will start with startup, that is, the initialization of the framework, and then involve several use scenarios in the running process of Android. For example, the user starts the app (what happens after clicking the desktop icon), and the user uses the app (what does Android do with one touch). It involves some concepts that we often contact, such as the main thread, anr, handler, binder, zygote, what is the entry of the app, why the user-defined view should go in three steps, and answers them one by one. The source code involved is api 27.
1, Initialization article
When the boot key is pressed, the device first executes BootLoader, which is responsible for loading the Linux kernel from to memory and initializing the kernel. Finally, the kernel will read init RC file and start various service programs defined in the file. Android framework is just a Linux program for the kernel, and the program is in init Is defined in the RC file. The initialization process of the Android framework begins here.
The first one created is the zygote process, which is the first Dalvik virtual machine program running in the system. As the name suggests, all the later Dalvik virtual machine processes "hatch" through it (we all know that all human cells are divided by fertilized eggs, so I think this name is very accurate and ingenious).
The first Dalvik1 process hatched by zygote is called system server, which is a very important process of the Framework. SystemServer is only the alias of the process, and the corresponding program of the process is still app\_process, because SystemServer is from app\_ Hatched in process. Ams, Wms, Pms, etc. are all created in this process. It can be said that SystemServer manages all activities of the Framework.
Note 1: Andoird 4.4 introduces ART
A Socket2 client is created in the system server, and AmS is responsible for managing the client. After that, all Dalvik processes will be started indirectly through the Socket client. When you want to start a new APK process, AmS will send a start command to the Socket server of zygote process through the Socket client, and then zygote will hatch a new process.
Note 2: Socket, a method of communication in Android process, is involved here. Readers who have studied computer network should have a certain concept of it. pipe and binder are two process communication methods that will be mentioned later. In any case, their ultimate purpose is to make developers call across processes as if they were calling locally. As for their advantages, disadvantages and implementation methods, readers can explore them by themselves.
1. zygote startup
We mentioned earlier that when the kernel is initialized, it will start in init For the program configured in RC file, zygote relevant configuration information is as follows:
service zygote /system/bin/app\_process -Xzygote /system/bin --zygote --start-system-server
Briefly explain the meaning of this statement. The kernel will execute / system / bin / APP\_ The program in the process3 directory starts a service called zygote. The parameter -- start system server is valid only when the -- zygote parameter is specified, which means to tell Zygotelnit to hatch the first process SystemServer after startup. Therefore, one of the things zygote does after starting is to start the system server.
Note 3: after Android supports 64 bit, it will execute / system / bin / APP according to different ABI S\_ Process32 and / system/bin/app\_process64 directory.
When zygote service from App\_ After process starts, a Dalvik virtual machine will be started, and the first Java class executed by the virtual machine is ZygoteInit java. (APP process fork is from zygote process, so ZygoteInit.main is also the entry of app, but it will execute different logic according to different processes. This is why sometimes we can see "... ZygoteInit. Main" in the call stack of program error log... " The reason for this.) ZygoteInit will do two other things: first, as mentioned earlier, start a Socket service port, which is used to receive the command to start a new process; Second, most of the preloaded Framework classes and resources are used by subsequent apps. The zygote fork app process does not need to copy this part, but uses shared memory.
Summary: after zygote's process is started, it mainly does three things: start a Socket service to receive the command to start a new process, preload most of the Framework classes and resources, and start SystemServer.
2. Startup of SystemServer
System server is finally called to zygote in the zygote process Started by the forksystemserver method. After initialization, you will do some initial configuration, such as closing the Socket server (no zygote process does not need), configuring the SystemServer running environment, and then calling SystemServer.main.
After the system server is started, two things are mainly done: one is to start various service threads through the system server manager, such as AMS, WMS, PMS, etc, And register it with ServiceManager (AMS and WMS are closely related to the operation of app, and the specific contents will be expanded later); second, start HomeActivity, that is, start launcher. The startup of launcher is similar to that of ordinary app, which will be described in detail later.
3. Start of ServiceManager
The ServiceManager here is not in the java world, but in the native world. It is also through init RC configuration is started, and its function is equivalent to the DNS server of service4. Each service started by the system server will be registered in it. When making cross process calls with a binder, we first go back to query the ServiceManager to obtain the binder reference of the corresponding service, and then carry out subsequent operations. This process is similar to that we query DNS server through domain name to obtain ip and finally visit the website.
Note: when we check the Framework code, we will find the SystemServiceRegistry class. This class has nothing to do with the registration of system services. It just caches the tool classes for querying various services.
Note 4: this does not refer to Service, one of the four components of Android.
2, Runtime
When we use android devices, we are the runtime of the Framework. Next, I will start with two key scenarios: the first scenario, click the desktop icon. This scenario will involve android message mechanism, APP startup, activity creation, window creation and view drawing. In the second scenario, we are sliding the screen or clicking buttons. This scenario will involve how the Framework obtains hardware events and the event distribution mechanism of the app.
1. What happens when you click the desktop icon
Start of Activity
We all know that desktop programs, that is, launcher s, are basically no different from ordinary app s. When we click the desktop icon, we actually call the startActivity method of activity. Activity is a subclass 5 of Context, so it should have called the startActivity method of Context. However, activity overloads this method. The difference from Context is whether there is an intent FLAG\_ ACTIVITY\_ NEW\_ Task judgment. This is why we add intent when starting a Context (such as a Service) that is not an activity FLAG\_ ACTIVITY\_ NEW\_ TASK. Whether it is an activity or Context, it will eventually call the execStartActivity method of Instrumentation, and then call the startActivity method of Ams across processes through Binder.
Note 5: more precisely, Activity is a subclass of ContextWrapper, which is just a proxy class. In fact, the specific operations of an Activity are completed by its member variable mBase, which is a ContextImpl class (inheriting Context). Therefore, if the Context is an Interface, this is a standard static proxy mode.
Ams calls to the startActivityAsUser method and calls the startActivityMayWait method of ActivityStarter.
ActivityStarter.java
final int startActivityMayWait(...){
    ...
    //Find activity related information through PMS according to intent
    //How not in androidmanifest activity cannot be found after XML registration
    ResolveInfo rInfo = mSupervisor.resolveIntent(intent,                             resolvedType, userId);
    ...
    //See below
    int res = startActivityLocked(...);
    ...
}

int startActivityLocked(...){
    ...
    //See below
    mLastStartActivityResult = startActivity(...);
    ...
}

private int startActivity(...){
    ...
    //ActivityRecord is the record of activity in Ams, which corresponds to the activity of our app one by one,
    //It has a member variable, appToken is a binder class, and the activity of the following app is through this
    //Class communicates with the activity of Ams
    ActivityRecord r = new ActivityRecord(...);
    ...
    //Call another overload of startActivity, as shown below
    return startActivity(...);
}

private int startActivity(...){
    ...
    //See below
    result = startActivityUnchecked(...);
    ...
}

private int startActivityUnchecked(...){
    //Initialize some parameters, such as mlunchsingletop (whether launchMode is singletop), adjust mlunchflags, etc
    setInitialState(...);
    //Further adjust mlunchflags. For example, the original activity is singleinstance or the activity to be started is
    //When using singleinstance or singletask, make sure mlunchflags has FLAG_ACTIVITY_NEW_TASK properties
    computeLaunchingTaskFlags();
    ...
    //Find out if there are started activities
    ActivityRecord reusedActivity = getReusableIntentActivity();
    if (reusedActivity != null) {
        if ((mLaunchFlags & FLAG_ACTIVITY_CLEAR_TOP) != 0
                    || isDocumentLaunchesIntoExisting(mLaunchFlags)
                    || mLaunchSingleInstance || mLaunchSingleTask) {
                //Clean up the task so that the target activity is at the top. Here we can understand
                //FLAG_ ACTIVITY_ CLEAR_ The principle of top or singletask.
                ...
                if (top != null) {
                   ...
                   //Callback onNewIntent
                    deliverNewIntent(top);
                }
                ...
            }
    }
    ...
    //Adjust the stack and task
    mTargetStack.startActivityLocked(...);
    ...
    //See below
    mSupervisor.resumeFocusedStackTopActivityLocked(...);
}
So far, let's summarize that Ams searches activity related information through PMS according to intent, which explains why it is not in Android manifest XML registration cannot be started. Then find the appropriate stack and task for the activity according to the activity's launchMode, taskAffinity and intent's launchFlags. The relationship among stack, task and ActivityRecord is shown in the following figure. Ams saves various state information of the activity through the ActivityRecord, and communicates with the activity of the app through its member variable appToken(binder class).
Pictures from the Internet
We will continue to talk about the resumefocussedstacktopactivitylocked method of ActivityStackSupervisor. This method will then call the resumeTopActivityUncheckedLocked method of ActivityStack, then call the resumeTopActivityInnerLocked method, and then return to the startSpecificActivityLocked method of ActivityStackSupervisor.
ActivityStackSupervisor.java
void startSpecificActivityLocked(...) {
    if (app != null && app.thread != null) {
        ...
        //If the app corresponding to the activity has been started, start the activity directly
        //See later for details
        realStartActivityLocked(...);
        ...
    }
    //Start the process through Ams, as shown below
    mService.startProcessLocked(...);
}

final boolean realStartActivityLocked(...){
    //Here's the app Thread is a binder class used to communicate with the app's ActivityThread
    //The scheduleLaunchActivity method of ActivityThread is called across processes through binder.
    app.thread.scheduleLaunchActivity();
}
Here, let's start the process through Ams. After Ams calls startProcessLocked, it will call another startProcessLocked overload
ActivityManagerService.java
final ProcessRecord startProcessLocked(...){
    ...
    if (app != null && app.pid > 0) {
        //If the app has been started and some conditions are met, it will return directly
    }
    ...
    //See below
    startProcessLocked(...);
    ...
}
private final void startProcessLocked(...){
    ...
    //entryPoint will be passed as a parameter through the socket, which will become the entry for the process java code execution
    if (entryPoint == null) entryPoint = "android.app.ActivityThread";
    ...
    //See below
    startResult = Process.start(entryPoint,...);
    ...
}
The start method of Process will immediately call the start method of ZygoteProcess, and then call the startViaZygote method.
ZygoteProcess.java
private Process.ProcessStartResult startViaZygote(...){
    ...
    //The openzygotesocketifneed method is used to establish a socket connection with the zygote process
    //We mentioned earlier that the zygote process will play the role of socket server, accept commands, and then fork in and out
    return zygoteSendArgsAndGetResult(openZygoteSocketIfNeeded(abi), argsForZygote);
    ...
}

private static Process.ProcessStartResult zygoteSendArgsAndGetResult(...){
    //Send the fork command and other parameters mentioned above, such as entryPoint
    ...
}
We return to the zygote process. When the zygote process is started, we call the main method of ZygoteInit for initialization, which will start the runSelectLoop thread of ZygoteServer and receive commands circularly. The main method is the processOneCommand method of ZygoteConnection.
ZygoteConnection.java
Runnable processOneCommand(...){
    //Read commands and parameters
    ...
    //fork process
    pid = Zygote.forkAndSpecialize(...);
    ...
    //Friends who have a certain understanding of c programming under linux will know that the pid of the child process after fork is 0
    if (pid == 0) {
        ...
        //Process subprocesses, see below
        return handleChildProc(parsedArgs, descriptors, childPipeFd);
    }
}

private Runnable handleChildProc(...){
    ...
    return ZygoteInit.zygoteInit(...);
}

ZygoteInit.java
public static final Runnable zygoteInit(...){
    ...
    return RuntimeInit.applicationInit(...);
}

RuntimeInit.java
protected static Runnable applicationInit(...) {
    //args.startClass is the entryPoint we mentioned earlier, that is, "android.app.ActivityThread"
    //It can be seen that the first method called by app is the main method of ActivityThread, which is the entry of the application.
    return findStaticMain(args.startClass, args.startArgs, classLoader);
}
We have finally returned to our own process, and it is clear that the main method of ActivityThread (there is always an unspeakable intimacy when referring to the main method) is the entrance to the application. Then continue to explore.
ActivityThread.java
public static void main(String[] args) {
    //Create a looper. Looper is actually well understood, that is, it has been looping and taking instructions for execution.
    //(isn't the principle of our computer always refers to execution)
    Looper.prepareMainLooper();
    //Create an ActivityThread. At first, when we see the name, we will think it is a Thread class
    //In fact, it can also represent the main thread of the app, because it has sMainLooper,
    //Have sMainThreadHandler, which will deal with Ams and other system services
    //In my personal understanding, activity is the activity, and thread is the line. It is a line that connects the activities of all app s.
    ActivityThread thread = new ActivityThread();
    //Establish Binder channel with Ams, see below
    thread.attach(false);
    //Create a handler, which is actually a tool. Let's put messages into the MessageQueue, remove messages and process messages
    //looper is the protagonist. looper will always get messages from MessageQueue and execute them
    if (sMainThreadHandler == null) {
        sMainThreadHandler = thread.getHandler();
    }
    ...
    Looper.loop();
}

 private void attach(boolean system) {
    ...
    //mgr is a binder class used to communicate with Ams
    mgr.attachApplication(mAppThread);
    ...
 }
Seeing this, we already know what the main thread is. The thread on which the process initially runs is the main thread. And then we will find a "terrible" fact, Our app will always run in sMainLooper (that is, in the main process, excluding other threads we create), including starting activity, sending touch messages and key messages. We will hand them over to sMainLooper through sMainThreadHandler (this is also the principle of synchronization through handler during development). Now that we know the concept of main thread, the principle of anr is well understood. sMainLooper will anr if it processes this message for more than 5s (activity) or 20s (service). This is a way to ensure the user experience.
Next, we return to Ams, which will then call the attachApplicationLocked method.
ActivityManagerService.java
private final boolean attachApplicationLocked(...){
    ...
    //Notify ActivityThread to create Application through binder IPC
    thread.bindApplication(...);
    ...
    mStackSupervisor.attachApplicationLocked(app);
    ...
}

ActivityStackSupervisor.java
boolean attachApplicationLocked(...) throws RemoteException {
    ...
    //Look what we found, deja vu. Yes, that's the problem we left above.
    //The reason is very simple. When we start an activity, we find that the process is not started,
    //When we start the process, of course, we have to restart the activity
    realStartActivityLocked(...);
    ...
}

final boolean realStartActivityLocked(...){
    ...
    //The thread here is a binder class, which corresponds to the ActivityThread
    app.thread.scheduleLaunchActivity(...);
    ...
}
Back to the app process, let's first look at the process of creating an Application
ActivityThread$ApplicationThread.java
public final void bindApplication(...){
    //Call the handleBindApplication method through the handler, and then call the performLaunchActivity method
    sendMessage(H.BIND_APPLICATION, data);
}

ActivityThread.java
private void handleBindApplication(AppBindData data) {
    ...
    //Create Instrumentation
    mInstrumentation = new Instrumentation();
    ...
    //Create an Application and call back the attachBaseContext method
    app = data.info.makeApplication(data.restrictedBackupMode, null);
    ...
    //Callback onCreate method
    mInstrumentation.callApplicationOnCreate(app);
    ...
}
Next, let's look at the process of creating an Activity
ActivityThread$ApplicationThread.java
public final void scheduleLaunchActivity(...){
    //Call the handleLaunchActivity method through the handler, and then call the performLaunchActivity method
    sendMessage(H.LAUNCH_ACTIVITY, r);
}

ActivityThread.java
private Activity performLaunchActivity(...){
    //The real Context class is the mBase mentioned above
    ContextImpl appContext = createBaseContextForActivity(r);
    ...
    //Create activity with emission
    activity = mInstrumentation.newActivity(...);
    ...
    //Assign appContext to mBase and call back attachBaseContext(context);
    //getInstrumentation() mentioned earlier calling the execStartActivity method of Instrumentation
    //r.token is a binder class and corresponds to the ActivityRecord of Ams. Another article (see Note 6) mentioned that it plays an important role
    activity.attach(appContext, this, getInstrumentation(),r.token,...,app,...,window,...);
    ...
    //Callback onCreate
    mInstrumentation.callActivityOnCreate(...);
}
So far, the framework of startActivity has been described.
Drawing of View
This part is not about custom views, Instead, it creates windows (including adding and drawing). From the perspective of WmS, a Window is not a Window class, but a view class. When WmS receives a user's message, it needs to send the message to the Window. The view class itself cannot directly receive the message delivered by WmS. The IWindow class must really receive the user's message (binder class), and the IWindow class is implemented by the ViewRoot.W class. Each w contains a view variable. These two sentences are quoted from Android kernel analysis. From the later explanation, we can see that the Window class is more an abstraction of the Window, and the view is the content of the Window.
Three windows are defined in the Framework: application window, sub window and system window. The application window corresponds to an activity, The next step is to explain the application window The creation of the window (hereinafter referred to as window). Since the window corresponds to a Activity, the window is created in the process of startActivity. It is mentioned that the creation of Activity will callback onCreate, and we will call setContentView method when we develop it. SetContentView will call setContentView method of Window class, if you go to see attach of Activity. Method, you will find that the window class is actually a PhoneWindow class.
PhoneWindow.java
@Override
public void setContentView(int layoutResID) {
    ...
    installDecor();
    ...
    //Load the customized layout of the app. It can be seen from the following that our layout is wrapped with at least two view s,
    //First by mContentParent and then by mDecor
    mLayoutInflater.inflate(layoutResID, mContentParent);
    ...
}

private void installDecor() {
    ...
    //Create a decorview (inherited from FrameLayout). As the name suggests, all the contents of the window are displayed in this view,
    //This View is the root of all views of the Activity.
    //This is why we view the Activity view hierarchy, and the outermost layer is FrameLayout
    mDecor = generateDecor(-1);
    ...
    //Configure different xml layouts according to different style s,
    //These xml have a common feature: they all have an id of id_ ANDROID_ Content view
    //Therefore, ViewGroup contentParent = (ViewGroup)findViewById(ID_ANDROID_CONTENT) can be used
    //Assign value to contentParent
    mContentParent = generateLayout(mDecor);
    ...
}
This step only creates the View, and the next two steps will be involved: 1. Add the window to Wms, and Wms will manage the window in a certain form like Ams. 2. Convert the content to be displayed by the View into data, save it in the screen buffer memory, and hand it over to the system for drawing.
In the process of startActivity, handleResumeActivity will be called after the Activity is created.
ActivityThread.java
private void handleLaunchActivity(...){
    ...
    Activity a = performLaunchActivity(r, customIntent);
    if (a != null) {
        ...
        //See below
        handleResumeActivity(...);
        ...
    }
}

final void handleResumeActivity(...){
    ...
    //Callback onResume
    r = performResumeActivity(token, clearHide, reason);
    ...
    //Make decor invisible
    View decor = r.window.getDecorView();
    decor.setVisibility(View.INVISIBLE);
    ...
    //Call makeVisible of Activity
    r.activity.makeVisible();
    ...
}

Activity.java
void makeVisible() {
    if (!mWindowAdded) {
        ViewManager wm = getWindowManager();
        //Finally, addView of WindowManagerGlobal will be called
        wm.addView(mDecor, getWindow().getAttributes());
        mWindowAdded = true;
    }
    mDecor.setVisibility(View.VISIBLE);
    }

WindowManagerGlobal.java
public void addView(...) {
    ...
    //Create viewrootimpl (abstract of view root)
    root = new ViewRootImpl(view.getContext(), display);
    view.setLayoutParams(wparams);
    //Cache the view (mdecor in this case), root (an abstraction of view) and layoutParam
    mViews.add(view);
    mRoots.add(root);
    mParams.add(wparams);
    ...
    //See below
    root.setView(view, wparams, panelParentView);
    ...
}

ViewRootImpl.java
public void setView(...) {
    ...
    //The following section continues
    requestLayout();
    ...
    //ipc to Wms, and the Session class is the server
    //mInputChannel is an InputChannel class, which is the implementation of the pipeline in the java layer. It will be described in detail later when we talk about Android events
    res = mWindowSession.addToDisplay(...,mInputChannel);
    ...
}

Session.java
@Override
public int addToDisplay(...) {
    //See below
    return mService.addWindow(...);
}

WindowManagerService.java
public int addWindow(...) {
    //Create WindowState
    //Session is the Binder server of the session
    //Client is the Binder client of IWindow
    final WindowState win = new WindowState(..., session, client,...);
    ...
    //The windowsaddedlocked method of the Session will be called, as shown below
    win.attach();
    //Cache win
    mWindowMap.put(client.asBinder(), win);
    ...
    if (win.canReceiveKeys()) {
        //If the window is interactive (for example, Toast is non interactive), update the focus window
        focusChanged = updateFocusedWindowLocked(...);
        ...
    }
}

Session.java
void windowAddedLocked(String packageName) {
    ...
    if (mSurfaceSession == null) {
        //Create SurfaceSession, which is a class that directly interacts with surfacelinker,
        //Used to add, delete, transform windows to SurfaceFlinger. Each application corresponds to only one Session object,
        //Therefore, mSurfaceSession will actually be created only once,
        //That is, a SurfaceSession object will be constructed when the first window in the application is created,
        //Subsequent window additions in the same application will no longer construct the SurfaceSession object
        mSurfaceSession = new SurfaceSession();
        ...
        //Save Session
        mService.mSessions.add(this);
        ...
    }
    ...
}
Here you can see that Wms saves the information of the window, that is, manages it, which is the basis of event distribution.
Returning to the requestLayout method above, requestLayout calls the scheduleTraversals method, which initiates a View tree traversal message. The message is processed asynchronously, and the corresponding processing function is the performttraversals method.
ViewRootImpl.java
private void performTraversals() {
    final View host = mView;
    if (mFirst) {
        ...
        //If the window is displayed for the first time, initialize attachinfo and assign it to mView,
        //Call the dispatch method of the ViewGroup to recursively pass the attachinfo to the child View
        host.dispatchAttachedToWindow(mAttachInfo, 0);
    }
    ...
    //If the window size changes, call host Measure() recalculates the size of the view in the window
    //Android's View and ViewGroup are classic combination modes
    //The measure process will traverse the entire View tree and call the measure of each View and the callback onMeasure
    //The process of layout and draw is similar
    performMeasure(childWidthMeasureSpec, childHeightMeasureSpec);
    ...
    //According to the execution results of the seven steps, judge whether it is necessary to rearrange. For example, when the size of any view changes,
    //It affects the layout of other views
    performLayout(lp, mWidth, mHeight);
    ...
    //If it is judged that the painting is not cancelled and it is not a new surface, start painting
    //The meaning of newSurface variable pull means that a Surface object has been created in ViewRoot, but the object has not been allocated real video memory by WmS,
    //In ViewRoot, it is called windowsession Relayoutwindow() allocates real video memory in the Surface object,
    //In general, the newSurface here is false.
    performDraw();
    ...
}
For the first time, since the window setting is invisible, the previous code can see that the makeVisible method of Activity will call mdecor SetVisibility (View.VISIBLE), after a series of calls, will be called to the performTraversals method of ViewRootImpl again, then the performDraw method will be called.
Before we talk about drawing, we should first clarify several concepts.
- Surface:
Surface is a handle to the raw image buffer. That is to say, surface corresponds to a section of memory whose data is the content to be drawn. The surface class essentially represents a plane
- Canvas:
We know that drawing different patterns is obviously a work, not a piece of data. Android uses Canvas class to represent these operations, that is, Canvas is the function class drawn. Look at the description of Canvas: A Bitmap to hold the pixels, a Canvas to host the draw calls (writing into the bitmap) - the function of Canvas is to respond to the call of draw and write it into the bitmap, which is used to save all pixels, so you will know the concept of Canvas better.
ViewRootImpl.java
private void performDraw() {
    ...
    draw(fullRedrawNeeded);
    ...
}

private void draw(boolean fullRedrawNeeded) {
    //Previously applied to Wms
    Surface surface = mSurface;
    ...
    if (!drawSoftware(...)) {
        return;
    }
    ...
}

private boolean drawSoftware(...) {
    ...
    //Get canvas and lock
    canvas = mSurface.lockCanvas(dirty);
    ...
    //Traverse the draw of subclasses. Obviously, this process is to convert the contents of all subclasses into pixels and write them into the bitmap of Canvas
    mView.draw(canvas);
    ...
    //Submit the Canvas that saves all view contents to the surface and submit it to the bottom layer of the system for drawing.
    surface.unlockCanvasAndPost(canvas);
    ...
}
So far, the framework drawn by view has been described.
2. One touch, what did Android do
This title comes from One touch, what did Android do So much of the following will be quoted from this article.
What does a touch mean? In the process of using Android devices, clicking, long pressing, sliding (TouchEvent) and pressing the entity key (KeyEvent) can become "one touch". Therefore, one touch can represent all the operations we use.
Of course, our touch starts with the hardware, which will pass events to the kernel and the kernel to the Framework. As mentioned earlier, various services will be started when the system server is started:
SystemServer.java
public static void main(String[] args) {
    new SystemServer().run();
}
private void run() {
    ...
    startOtherServices();
    ...
}
private void startOtherServices() {
    ...
    //Create InputManagerService
    inputManager = new InputManagerService(context);
    ...
    //Create WindowManagerService and hold InputManagerService
    wm = WindowManagerService.main(..., inputManager,...);
    ...
    //Set InputMonitor as callback and start InputManagerService
    inputManager.setWindowManagerCallbacks(wm.getInputMonitor());
    inputManager.start();
}

InputManagerService.java
public InputManagerService(Context context) {
    ...
    //Initialize the native object (mPtr is long and saves the pointer of the native object, which is a common method used by jni to keep the native object)
    //InputManagerService corresponds to the native inputmanager cpp
    mPtr = nativeInit(this, mContext, mHandler.getLooper().getQueue());
    ...
}
public void start() {
    ...
    //Used to start the two threads mentioned below
    nativeStart(mPtr);
    ...
}

InputManager.cpp
InputManager::InputManager(...) {
    mDispatcher = new InputDispatcher(dispatcherPolicy);
    mReader = new InputReader(eventHub, readerPolicy, mDispatcher);
    initialize();
}

void InputManager::initialize() {
    mReaderThread = new InputReaderThread(mReader);
    mDispatcherThread = new InputDispatcherThread(mDispatcher);
}
/**
From the above code, we can see that InputDispatcher and InputReader are created during InputManager initialization
 And InputReaderThread and inputdispatcher thread. InputReader is used to read input information (i.e. various events),
InputDispatcher Used to distribute events. Two threads are obviously used to run these two functions.
*/
The InputReader thread will continuously call the driver of the input device to read all messages input by the user. Both the thread and the InputDispatcher thread run in the system \ _processspace. The InputDispatcher thread takes out the original message from its message queue. The extracted message may be distributed in two ways. The first method is to send it directly to the customer window through the pipe. The other method is to send it to the WmS first, and the WmS will process it. If the WmS does not process the message, it will be sent to the customer window. Otherwise, it will not be sent to the customer window (quoted from Android kernel analysis). As shown in the figure (the picture is also from Android kernel analysis):
If it is a key message, InputDispatcher will first call back the callback function defined in InputManager, which will not only call back the callback function in InputMonitor, but also call the related functions defined in WmS. For system key messages, such as "Home" key and telephone key, WmS will process them by default. If events are consumed, InputDispatcher will not continue to pass these key messages to the customer window. For touch screen messages, InputDispatcher will directly pass them to the customer window.
InputManagerService.java
//Callback of key events. We mentioned earlier that the callback object is InputMonitor
// Native callback.
private long interceptKeyBeforeDispatching(InputWindowHandle focus,
           KeyEvent event, int policyFlags) {
   return mWindowManagerCallbacks.interceptKeyBeforeDispatching(focus, event, policyFlags);
}

InputMonitor.java
@Override
public long interceptKeyBeforeDispatching(
           InputWindowHandle focus, KeyEvent event, int policyFlags) {
   WindowState windowState = focus != null ? (WindowState) focus.windowState : null;
   //Callback Wms. mPolicy is created during SystemServer initialization. It is a PhoneWindowManager class. You can see the processing of various keys
   return mService.mPolicy.interceptKeyBeforeDispatching(windowState, event, policyFlags);
}
When InputDispatcher is passed directly to the window, find the window that currently gets the focus through findtouchedwindow atlocked method, and then conduct ipc through Pipe. That is to say, a set of window related information will be maintained in the native layer. Let's go back to the process of adding windows in Wms:
WindowManagerService.java
public int addWindow(...) {
   //Create a WindowState, and the InputWindowHandle will be created in the construction method
   final WindowState win = new WindowState(...);
   ...
   //Establish pipeline communication, where outInputChannel is passed from app process
   win.openInputChannel(outInputChannel Is from app process);
   ...
   //Update the information of window focus change to the native layer. Similarly, it will be updated when the window is switched or destroyed
   mInputMonitor.updateInputWindowsLw(false /*force*/);
   ...
}

WindowState.java
void openInputChannel(InputChannel outInputChannel) {
   ...
   InputChannel[] inputChannels = InputChannel.openInputChannelPair(name);
   mInputChannel = inputChannels[0];
   mClientChannel = inputChannels[1];
   /*Channel[0]Save on the server side*/
   mInputWindowHandle.inputChannel = inputChannels[0];
   ...
   /* Channel[1]Return to ViewRootImpl end of app*/
   mClientChannel.transferTo(outInputChannel);
   ...
   /*Register to the InputManagerService native layer*/
   mService.mInputManager.registerInputChannel(mInputChannel, mInputWindowHandle);
}
It can be seen that a group of windowstates are maintained in Wms for window creation, destruction and switching, while a group of inputwindowhandles are maintained in InputManagerService for event distribution.
Let's go back to ViewRootImpl. When adding a window, we called the setView method.
ViewRootImpl.java
public void setView(...) {
    ...
    //InputChannel class is the implementation of pipeline in java layer
    mInputChannel = new InputChannel();
    ...
    //View iwindowsession Aidl will find that the mInputChannel here is marked out,
    //That is, changes in another process will be synchronized to this process
    res = mWindowSession.addToDisplay(...,mInputChannel);
    ...
    if (mInputChannel != null) {
        if (mInputQueueCallback != null) {
            mInputQueue = new InputQueue();
            mInputQueueCallback.onInputQueueCreated(mInputQueue);
        }
        //Create a callback for the pipeline, see below
        mInputEventReceiver = new WindowInputEventReceiver(mInputChannel,Looper.myLooper());
    }
}

ViewRootImpl$WindowInputEventReceiver.java
public WindowInputEventReceiver(InputChannel inputChannel, Looper looper) {
    //See below
    super(inputChannel, looper);
}

InputEventReceiver.java
public InputEventReceiver(InputChannel inputChannel, Looper looper) {
    ...
    //Establish a callback for the pipeline, and the native layer will call back to the InputEventReceiver when it receives the event
    mReceiverPtr = nativeInit(new WeakReference<InputEventReceiver>(this),
                    inputChannel, mMessageQueue);
    ...
}
When the InputDispatcher of InputManagerService passes messages to the app process through the pipeline, the pipeline of the app process will call back InputEventReceiver (i.e. WindowInputEventReceiver) for event distribution. The following code can be said to be the standard answer to the responsibility chain mode, which is very exciting. Readers can learn by themselves.
summary
Android Framework can be said to be a huge project. If we fall into details at the beginning, we can't go a way. Gentlemen are good at fake things. With the help of the research and learning results of big men, we can learn the overall framework first and break it individually when necessary. Thank you very much. The following references may be omitted. I apologize here! I hope this article is helpful to readers.
This article is transferred from https://juejin.cn/post/6844903717301387272 , in case of infringement, please contact to delete.