Android activity
An activity represents a single screen with a user interface, such as a Java window or frame. Android activities are subclasses of the ContextThemeWrapper class.
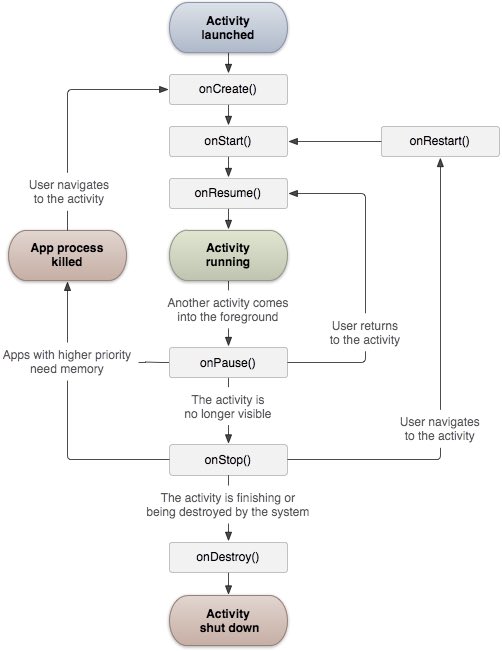
If you have ever programmed in C,C + + or Java, you should know that these programs start with the main() function. Similarly, the Android system initializes its program by calling the onCreate() callback in the activity. There is a sequence of callback methods to start an activity and a sequence of methods to close an activity, as shown in the following activity declaration cycle diagram:

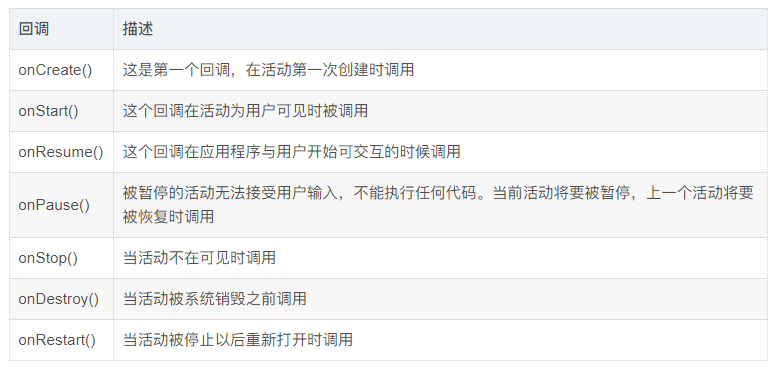
The Activity class defines the following callback. You don't have to implement all callback methods. But it is very important to understand each of them. Implementing these can ensure that your application behavior is as expected by users.

example
This example shows the life cycle of Android application activities in simple steps. Follow the steps below to modify the Android application we created in the Hello World instance chapter.

The following is the modified content of the main activity file src/com.example.helloworld/MainActivity.java. It contains every basic life cycle method. The Log.d() method is used to generate log information:
package com.example.helloworld;

import android.os.Bundle;
import android.app.Activity;
import android.util.Log;

public class MainActivity extends Activity {
   String msg = "Android : ";

   /** Called when the activity is first created */
   @Override
   public void onCreate(Bundle savedInstanceState) {
      super.onCreate(savedInstanceState);
      setContentView(R.layout.activity_main);
      Log.d(msg, "The onCreate() event");
   }

   /** Called when the activity is about to be visible */
   @Override
   protected void onStart() {
      super.onStart();
      Log.d(msg, "The onStart() event");
   }

   /** Called when the activity is visible */
   @Override
   protected void onResume() {
      super.onResume();
      Log.d(msg, "The onResume() event");
   }

   /** Called when other activities gain focus */
   @Override
   protected void onPause() {
      super.onPause();
      Log.d(msg, "The onPause() event");
   }

   /** Called when the activity is no longer visible */
   @Override
   protected void onStop() {
      super.onStop();
      Log.d(msg, "The onStop() event");
   }

   /** Called when the activity is about to be destroyed */
   @Override
   public void onDestroy() {
      super.onDestroy();
      Log.d(msg, "The onDestroy() event");
   }
}
The activity class loads all UI components from the XML file in the res/layout of the project. The following statement from res/layout / activity_ Load UI components in main.xml file:
setContentView(R.layout.activity_main);
An application can have one or more activities without any restrictions. Each activity defined for an application needs to be declared in AndroidManifest.xml. The MAIN activities of the application need to be declared in the list, and the intention filter label needs to contain the MAIN action and LAUNCHER category. As follows:
<manifest xmlns:android="http://schemas.android.com/apk/res/android"
   package="com.example.helloworld"
   android:versionCode="1"
   android:versionName="1.0" >

   <uses-sdk
      android:minSdkVersion="8"
      android:targetSdkVersion="22" />

   <application
       android:icon="@drawable/ic_launcher"
       android:label="@string/app_name"
       android:theme="@style/AppTheme" >

       <activity
          android:name=".MainActivity"
          android:label="@string/title_activity_main" >

          <intent-filter>
             <action android:name="android.intent.action.MAIN" />
             <category android:name="android.intent.category.LAUNCHER"/>
          </intent-filter>

       </activity>

   </application>
</manifest>
If either the MAIN action or the LAUNCHER category is not declared in the activity, the icon of the application will not appear in the application list of the MAIN screen.
Let's run the "Hello world!" application we just modified. Suppose you have created AVD when setting up the environment. Run the application from Eclipse, open the active file in a project, and click run from the toolbar

Icon. Eclipse installs the application on AVD and starts it. If everything goes well, the simulator screen will be displayed as follows, and you can see the log information in the LogCat window of the Eclipse IDE:
07-19 15:00:43.405: D/Android :(866): The onCreate() event
07-19 15:00:43.405: D/Android :(866): The onStart() event
07-19 15:00:43.415: D/Android :(866): The onResume() event
Let's click the red button on the Android simulator

, it will generate the following event message in the LogCat window of the Eclipse IDE:
<code>07-19 15:01:10.995: D/Android :(866): The onPause() event
07-19 15:01:12.705: D/Android :(866): The onStop() event
</code>
Let's click the menu button on the Android simulator again

, it will generate the following event message in the LogCat window of the Eclipse IDE:
<code>07-19 15:01:13.995: D/Android :(866): The onStart() event
07-19 15:01:14.705: D/Android :(866): The onResume() event
</code>
Next, let's click the back button on the Android simulator

, it will generate the following event message in the LogCat window of the Eclipse IDE, and the whole life cycle of the activity on the Android application is completed.
07-19 15:33:15.687: D/Android :(992): The onPause() event
07-19 15:33:15.525: D/Android :(992): The onStop() event
07-19 15:33:15.525: D/Android :(992): The onDestroy() event