1, Android animation overview
Android animation can be divided into three categories: Frame Animation, Tweened Animation and attribute animation. Among them, Frame Animation and gap animation belong to traditional animation, Android 3 For the attribute animation after 0, all the contents of the gap animation can be realized through the attribute animation.
2, Frame animation
Frame animation is the easiest kind of animation to realize. This kind of animation depends more on perfect UI resources. Its principle is to play individual pictures consecutively, so as to produce an animation effect visually; It is a bit similar to the way some software makes gif animation.
use
<?xml version="1.0" encoding="utf-8"?>
<animation-list xmlns:android="http://schemas.android.com/apk/res/android">
    <item
        android:drawable="@drawable/a_0"
        android:duration="100" />
    <item
        android:drawable="@drawable/a_1"
        android:duration="100" />
    <item
        android:drawable="@drawable/a_2"
        android:duration="100" />
</animation-list>
ImageView img = (ImageView) findViewById(R.id.animation1); img.setImageResource(R.drawable.frame_anim1); AnimationDrawable animationDrawable1 = (AnimationDrawable) img.getDrawable(); animationDrawable1.start();
In some code, we will also see android: oneshot="false". This oneshot means whether the animation is executed once (true) or repeatedly.
3, Make up animation
Make up animation can be divided into four forms: alpha, translate, scale and rotate.
The realization of make-up animation generally adopts the form of xml file; Code is easier to read and write.
use
Realize the animation effect of transparent change of ImageView alpha
XML implementation
First, define in the res/anim / folder
alpha_anim.xml
<?xml version="1.0" encoding="utf-8"?>
<alpha xmlns:android="http://schemas.android.com/apk/res/android"
    android:duration="1000"
    android:fromAlpha="1.0"
    android:interpolator="@android:anim/accelerate_decelerate_interpolator"
    android:toAlpha="0.0" />
scale.xml
<?xml version="1.0" encoding="utf-8"?>
<scale xmlns:android="http://schemas.android.com/apk/res/android"
    android:duration="1000"
    android:fromXScale="0.0"
    android:fromYScale="0.0"
    android:pivotX="50%"
    android:pivotY="50%"
    android:toXScale="1.0"
    android:toYScale="1.0"/>
Then, in the Activity
Animation animation = AnimationUtils.loadAnimation(mContext, R.anim.alpha_anim);
img = (ImageView) findViewById(R.id.img);
img.startAnimation(animation);
You can also use the set tag to combine multiple animations, which can be nested
<?xml version="1.0" encoding="utf-8"?>
<set xmlns:android="http://schemas.android.com/apk/res/android"
    android:interpolator="@[package:]anim/interpolator_resource"
    android:shareInterpolator=["true" | "false"] >
    <alpha
        android:fromAlpha="float"
        android:toAlpha="float" />
    <scale
        android:fromXScale="float"
        android:toXScale="float"
        android:fromYScale="float"
        android:toYScale="float"
        android:pivotX="float"
        android:pivotY="float" />
    <translate
        android:fromXDelta="float"
        android:toXDelta="float"
        android:fromYDelta="float"
        android:toYDelta="float" />
    <rotate
        android:fromDegrees="float"
        android:toDegrees="float"
        android:pivotX="float"
        android:pivotY="float" />
    <set>
        ...
    </set>
</set>
interpolator and pivot
Interpolator is mainly used to control the change rate of animation, that is, the speed of animation.
Android system has provided us with some interpolators, such as accelerate_decelerate_interpolator,accelerate_interpolator et al. More interpolators and their meanings can be viewed in the Android SDK. At the same time, this interpolator can also be customized.
Pivot determines the reference position of the current animation execution. Pivot attribute is mainly used in translate and scale animations. Both animations involve changes in the "physical position" of the view, so a reference point is required. Pivot X and pivot y jointly determine this point; its value can be float or percentage value.
code implementation
Sometimes, the attribute value of animation may need to be adjusted dynamically. At this time, it is not appropriate to use xml and need to use java code.
private void RotateAnimation() {
	animation = new RotateAnimation(-deValue, deValue, Animation.RELATIVE_TO_SELF,
			pxValue, Animation.RELATIVE_TO_SELF, pyValue);
	animation.setDuration(timeValue);

	if (keep.isChecked()) {
		animation.setFillAfter(true);
	} else {
		animation.setFillAfter(false);
	}
	if (loop.isChecked()) {
		animation.setRepeatCount(-1);
	} else {
		animation.setRepeatCount(0);
	}

	if (reverse.isChecked()) {
		animation.setRepeatMode(Animation.REVERSE);
	} else {
		animation.setRepeatMode(Animation.RESTART);
	}
	img.startAnimation(animation);
}
Here is animation Setfillafter determines whether the animation remains in the final state at the end of playback; animation.setRepeatCount and animation Setrepeatmode determines the number of repetitions and how the animation is repeated.
4, Attribute animation
brief introduction
Property animation is very powerful. It makes up for some defects of the previous gap animation and can almost completely replace the gap animation.
Attribute animation can realize the animation effect of the object on the attribute by constantly changing the value and assigning the value to the attribute of the object (any attribute of any object) within a certain time interval.
There are two main usage classes: ValueAnimator class & objectanimator class, and two auxiliary usage classes: interpolator & estimator
characteristic
- Action object: any Java object, that is, it is no longer limited to the View object
- Animation effects: various animation effects can be customized, that is, it is no longer limited to four basic transformations: translation, rotation, scaling & transparency
- Scope of action: introduced after API11
Common settings for attribute animation
//Set attribute animation duration
animator.setDuration(2000);
//Set attribute interpolator
animator.setInterpolator(new AccelerateInterpolator());
//Set attribute animation repeat mode
animator.setRepeatMode(ValueAnimator.REVERSE);
//Sets the number of repetitions of the attribute animation
animator.setRepeatCount(0);
//Sets the time to delay the playback of the attribute animation
animator.setStartDelay(0);
//Set the playback time point to jump to for attribute animation
animator.setCurrentFraction(0.5f);
//Set the current playback time, and its value is within the Duration range
animator.setCurrentPlayTime(1000);
//Animate the attribute estimator to control the final attribute value
animator.setEvaluator(new IntEvaluator());
//Set attribute animation monitor
animator.addUpdateListener(new ValueAnimator.AnimatorUpdateListener() {
    @Override
    public void onAnimationUpdate(ValueAnimator animation) {
        Log.i(TAG, animation.getAnimatedValue() + "");
        //
    }
});
ValueAnimator class
Definition: ValueAnimator is the core class of attribute animation mechanism.
The principle of realizing Animation: the animation effect is realized by continuously controlling the change of values and continuously manually assigning attributes to objects.
Note: the default interpolator used by ValueAnimator is acceleratedeelerateinterpolator, which means that the animation is slow at the beginning and end, and the animation is accelerated in the middle.
There are three important methods in the ValueAnimator class
- ValueAnimator.ofInt(int values)
- ValueAnimator.ofFloat(float values)
- ValueAnimator.ofObject(int values)
You can pass in any number of parameters in the ofFloat() method
//A value transitions from 0 to 5, then to 3, and then to 10 in 5 seconds
ValueAnimator anim = ValueAnimator.ofFloat(0f, 5f, 3f, 10f);
use
Next, take translation animation as an example to illustrate the use of ValueAnimator, which is similar to other uses such as scaling and rotation.
Create with code
private void translation(){
    ValueAnimator valueAnimator = ValueAnimator.ofInt(0, 100);
    valueAnimator.setDuration(2000);
    valueAnimator.setInterpolator(new AccelerateInterpolator());
    valueAnimator.setRepeatMode(ValueAnimator.REVERSE);
    valueAnimator.setRepeatCount(0);
    valueAnimator.setStartDelay(0);
//    valueAnimator.setCurrentFraction(0.5f);
//    valueAnimator.setCurrentPlayTime(1000);
    valueAnimator.setEvaluator(new IntEvaluator());

    valueAnimator.addUpdateListener(new ValueAnimator.AnimatorUpdateListener() {
        @Override
        public void onAnimationUpdate(ValueAnimator animation) {
            Log.i(TAG, animation.getAnimatedValue() + "");
            int x = (int) animation.getAnimatedValue();
            ivImage.setTranslationX(x);
            ivImage.setTranslationY(x);
        }
    });

    valueAnimator.start();
}
Create using xml
Create test in res/animator folder_ animator. XML file
<?xml version="1.0" encoding="utf-8"?>
<animator xmlns:android="http://schemas.android.com/apk/res/android"
    android:valueFrom="0"
    android:valueTo="100"
    android:valueType="intType"

    android:duration="2000"
    android:startOffset ="0"
    android:repeatMode = "reverse"
    android:repeatCount = "0"
    android:interpolator = "@android:anim/accelerate_interpolator">
</animator>
Then get ValueAnimator in Activity, set the target object and start the animation
private void translation(){
    ValueAnimator animator = (ValueAnimator) AnimatorInflater.loadAnimator(this,R.animator.test_animator);
    animator.setTarget(ivImage);
    animator.start();
    animator.addUpdateListener(new ValueAnimator.AnimatorUpdateListener() {
        @Override
        public void onAnimationUpdate(ValueAnimator animation) {
            Log.i(TAG, animation.getAnimatedValue() + "");
            int x = (int) animation.getAnimatedValue();
            ivImage.setTranslationX(x);
            ivImage.setTranslationY(x);
        }
    });
}
ObjectAnimator class
Introduction to ObjectAnimator
ObjectAnimator inherits from ValueAnimator class, that is, the underlying animation implementation mechanism is based on ValueAnimator class
Essential principle: the animation effect can be realized by continuously controlling the change of values and automatically assigning attributes to objects.
Differences between ObjectAnimator and ValueAnimator classes:
ValueAnimator class is to change the value first, and then assign it to the attribute of the object manually, so as to realize animation; It is to operate on object attributes indirectly;
ObjectAnimator class is to change the value first, and then automatically assign it to the attribute of the object to realize animation; Directly operate on object attributes; ObjectAnimator is smarter and more automated.
use
//TextView changes from normal to fully transparent and then from fully transparent to normal in 5 seconds
ObjectAnimator animator = ObjectAnimator.ofFloat(textview, "alpha", 1f, 0f, 1f);//The second parameter can be any value and refers to an attribute in the object
animator.setDuration(5000);
animator.start();

//Move the TextView out of the screen to the left and back again
float curTranslationX = textview.getTranslationX();
ObjectAnimator animator = ObjectAnimator.ofFloat(textview, "translationX", curTranslationX, -500f, curTranslationX);
animator.setDuration(5000);
animator.start();
Interpolator
The time interpolator represents the change law of the animation during the whole animation, such as acceleration, deceleration and so on.
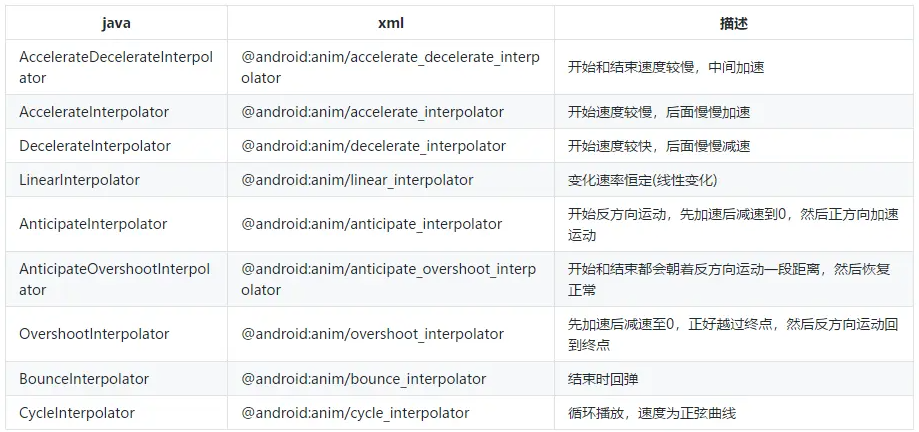
Android has many built-in interpolators, which basically cover most situations in actual development, as follows:
If the built-in interpolator does not meet the requirements, you can also customize the interpolator.
Estimator
The type evaluator represents the specific changes of attribute values at each time during the whole animation.
Function: calculate the changed attribute value according to the percentage of the current attribute change.
Existing estimators of the system
- IntEvaluator: for integer attributes
- FloatEvaluator: for floating point attributes
- ArgbEvaluator: for Color attribute
If the built-in estimator does not meet the requirements, you can also customize the estimator.
Combined animation
To realize the function of composite animation, we mainly need the class AnimatorSet, which provides a play() method. If we pass an Animator object (ValueAnimator or ObjectAnimator) into this method, an AnimatorSet will be returned An instance of builder.
AnimatorSet. The builder includes the following four methods:
- after(Animator anim) inserts an existing animation into the incoming animation and executes it
- after(long delay) delays the execution of an existing animation by a specified millisecond
- before(Animator anim) inserts an existing animation before the incoming animation
- with(Animator anim) executes the existing animation and the incoming animation at the same time
use
Realize the TextView to move into the screen from outside the screen first, and then start rotating 360 degrees, and fade in and out at the same time
Implementation using code
ObjectAnimator moveIn = ObjectAnimator.ofFloat(textview, "translationX", -500f, 0f);
ObjectAnimator rotate = ObjectAnimator.ofFloat(textview, "rotation", 0f, 360f);
ObjectAnimator fadeInOut = ObjectAnimator.ofFloat(textview, "alpha", 1f, 0f, 1f);
AnimatorSet animSet = new AnimatorSet();
animSet.play(rotate).with(fadeInOut).after(moveIn);
animSet.setDuration(5000);
animSet.start();
Implementation using XML
Writing animation through XML may be slower than writing animation through code, but it will become easier to maintain in terms of reuse
1. Create a new animator folder under the res directory
<animator>  In the corresponding code ValueAnimator
<objectAnimator>  In the corresponding code ObjectAnimator
<set>  In the corresponding code AnimatorSet

<set xmlns:android="http://schemas.android.com/apk/res/android"
    android:ordering="sequentially" >

    <objectAnimator
        android:duration="2000"
        android:propertyName="translationX"
        android:valueFrom="-500"
        android:valueTo="0"
        android:valueType="floatType" >
    </objectAnimator>

    <set android:ordering="together" >
        <objectAnimator
            android:duration="3000"
            android:propertyName="rotation"
            android:valueFrom="0"
            android:valueTo="360"
            android:valueType="floatType" >
        </objectAnimator>

        <set android:ordering="sequentially" >
            <objectAnimator
                android:duration="1500"
                android:propertyName="alpha"
                android:valueFrom="1"
                android:valueTo="0"
                android:valueType="floatType" >
            </objectAnimator>
            <objectAnimator
                android:duration="1500"
                android:propertyName="alpha"
                android:valueFrom="0"
                android:valueTo="1"
                android:valueType="floatType" >
            </objectAnimator>
        </set>
    </set>

</set>
2. Load the file in the code and start the animation
Animator animator = AnimatorInflater.loadAnimator(context, R.animator.anim_file);
animator.setTarget(view);
animator.start();
Animator listener
The Animator class provides an addListener() method. ObjectAnimator inherits from ValueAnimator, and ValueAnimator inherits from Animator. Therefore, both ValueAnimator and ObjectAnimator can use the addListener() method. In addition, AnimatorSet also inherits from Animator, so addListener() is a general method.
The code to add a listener is as follows:
anim.addListener(new AnimatorListener() {
	@Override
	public void onAnimationStart(Animator animation) {
	}

	@Override
	public void onAnimationRepeat(Animator animation) {
	}

	@Override
	public void onAnimationEnd(Animator animation) {
	}

	@Override
	public void onAnimationCancel(Animator animation) {
	}
});
Many times, we don't want to monitor so many events. Maybe I just want to monitor the end of the animation. It's very cumbersome to implement all four interfaces every time. It doesn't matter. Android provides an adapter class called AnimatorListenerAdapter. Using this class can solve the problem of cumbersome interface implementation.
Here, we pass this adapter object into the addListener() method. Since each interface has been implemented in the AnimatorListenerAdapter, there is no need to implement any method and there will be no error. Then, if I want to monitor the end of animation, I just need to rewrite this method separately, as shown below:
anim.addListener(new AnimatorListenerAdapter() {
	@Override
	public void onAnimationEnd(Animator animation) {
	}
});
Listen for values during attribute animation
animator.addUpdateListener(new ValueAnimator.AnimatorUpdateListener() {
    @Override
    public void onAnimationUpdate(ValueAnimator animation) {
        Log.i(TAG, animation.getAnimatedValue() + "");
        //
    }
});
Add a listener through addUpdateListener. In the result returned from the listener, use animation Getanimatedvalue() gets the current value.
Reference link
https://www.jianshu.com/p/420629118c10
https://blog.csdn.net/guolin_blog/article/details/43536355
https://www.jianshu.com/p/2412d00a0ce4
https://segmentfault.com/a/1190000038347874