From: Android APP_ Control (2) -- Button
Author: and pursung
Release time: 2021-03-29 14:20:54
website: https://blog.csdn.net/weixin_44742824/article/details/115290501
Opening: Android APP_ Control (1) -- TestView
StateListDrawable is a kind of drawable resource. You can set different picture effects according to different states. For the key node < selector >, we only need to change the background attribute of the Button to drawable resource, which can be easily realized. When you press the Button, different Button colors or backgrounds are available.
The implementation effect is shown in the figure: the default state is black off flight mode, and when pressed, it is cyan flight mode.

In one, two, three, no operation java files are all in operation xml file, the so-called xml is responsible for layout, and java is responsible for background logic.
1, Use of Drawable resources
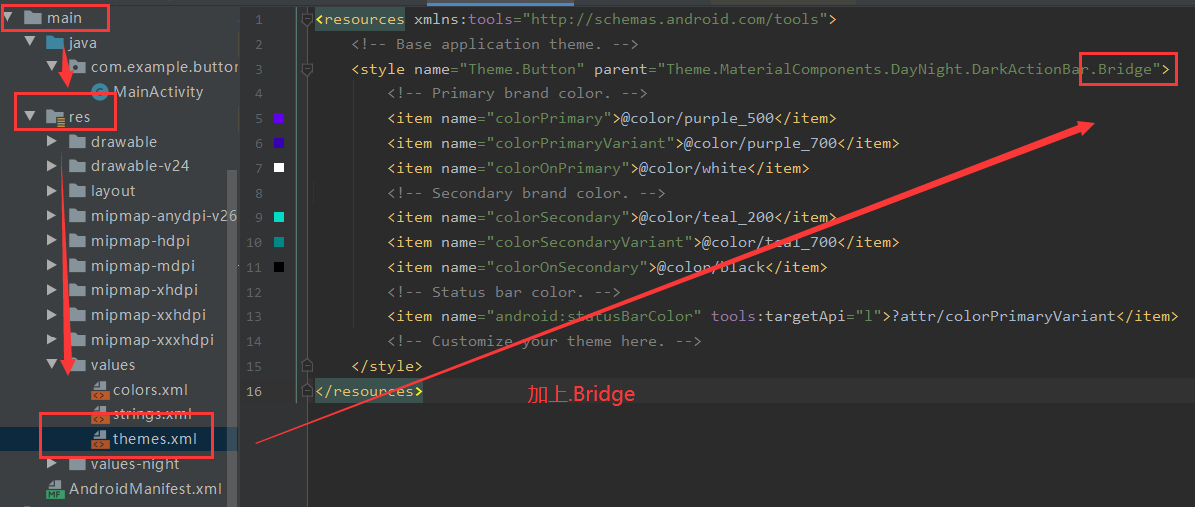
First, modify according to the following figure, otherwise the background color of the button will not change (no problem with the old version, not after version 29, which needs to be modified.)
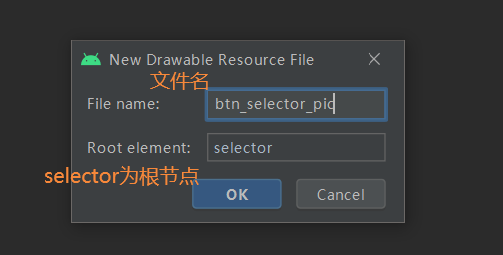
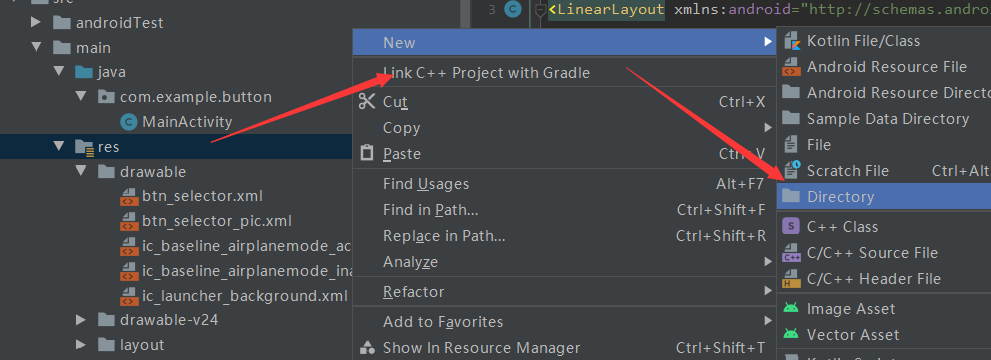
(1) Create a new picture selector
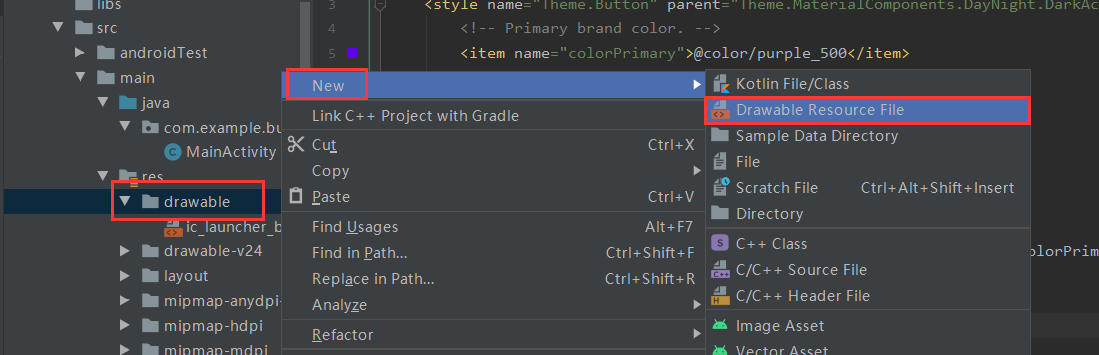 name
name
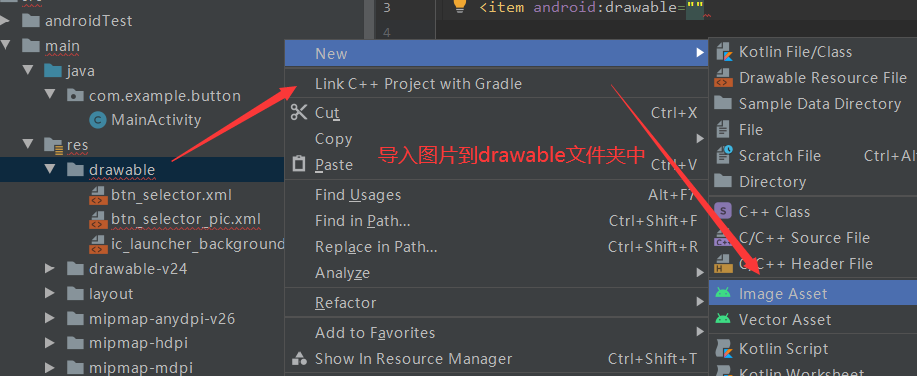
Import two draw pictures into the drawable folder,
(2) Set different state effects of keys
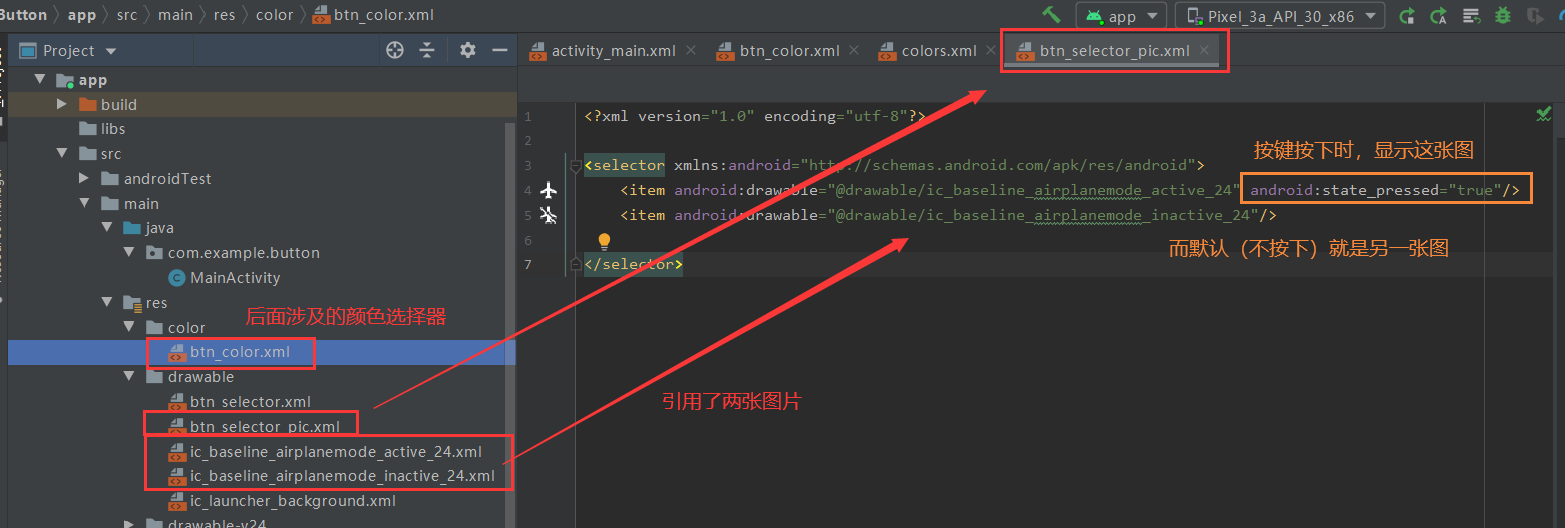
In the Drawable file BTN just created_ selector_ pic. In XML:
<?xml version="1.0" encoding="utf-8"?>

<selector xmlns:android="http://schemas.android.com/apk/res/android">
    <item android:drawable="@drawable/ic_baseline_airplanemode_active_24" android:state_pressed="true"/>
    <item android:drawable="@drawable/ic_baseline_airplanemode_inactive_24"/>

</selector>
Code analysis:
(3) In main Reference in XML
Then in activity_ main. Reference in XML: android:background="@drawable/btn_selector_pic", as follows:
<?xml version="1.0" encoding="utf-8"?>

<LinearLayout xmlns:android="http://schemas.android.com/apk/res/android"
    android:layout_width="match_parent"
    android:layout_height="match_parent"
    android:orientation="vertical">

<!--    Click to enter Button Found that he inherited TextView,therefore TV yes , we have Button Also  -->
<!--    For height and width, you can directly drag the rendering settings, which is more intuitive  -->
    <Button
        android:layout_width="309dp"
        android:layout_height="316dp"
        android:background="@drawable/btn_selector_pic"
        android:text="I'm the button"
        android:textSize="30sp" />

</LinearLayout>
At this time, it has been completed. Pressing the button is one picture and releasing it is another picture. Let's continue to add color changes.
2, Use of color resources
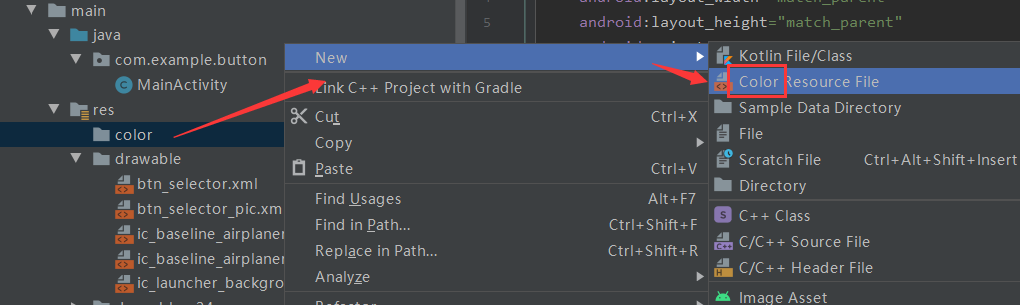
(1) Create a new color selector
 Choose to create a Color selector. I name it btn_color.xml
(2) Set different state effects of keys
The code form is the same as the picture selector: in BTN_ color. In XML, pressing is one color, and releasing is another color.
<?xml version="1.0" encoding="utf-8"?>
<selector xmlns:android="http://schemas.android.com/apk/res/android">

    <item android:color="@color/teal_200" android:state_pressed="true" />
    <item android:color="@color/black"/>

</selector>
(3) In main Reference in XML
Like the reference method of image selector, in activity_ main. Reference in XML:
android:backgroundTint="@color/btn_color"
- 1
In this way, the color will change with the status of the button.
3, Less used foreground
There is also a parameter called foreground color. When this parameter is set, the color of backgroundTint and the background image will be covered together. Therefore, it is called foreground color. You can only see it.
In main References in XML:
android:foreground="#ff00ff00"
- 1
Among them, the parameter #ff00ff00 means: the color represented is green, corresponding to RGB three primary colors from left to right, which can be adjusted in the range of 00~ff.
| ff | 00 | ff | 00 |
|---|---|---|---|
| Set the transparency to ff, that is, opaque | Set Red to 00 and the proportion of Red to 0 | Set Green to FF and the proportion of Green to 100 | Set Blue to 00 and the proportion of Blue to 0 |
4, Button event handling
The new key id in < button / > is BTN_ one
android:id="@+id/btn_1"
- 1
Main. Call three Button events in Java at the same time and observe their operation
package com.example.button;

import androidx.appcompat.app.AppCompatActivity;

import android.nfc.Tag;
import android.os.Bundle;
import android.util.Log;
import android.view.MotionEvent;
import android.view.View;
import android.widget.Button;

import javax.security.auth.login.LoginException;

public class MainActivity extends AppCompatActivity {

	//Before using the callback method, define the static constant TAG (callback method alt+enter)
    private static final String TAG = "zhua";

    @Override
    protected void onCreate(Bundle savedInstanceState) {
        super.onCreate(savedInstanceState);
        setContentView(R.layout.activity_main);

		//Create Button object by id: BTN_ one
        Button btn_1 = findViewById(R.id.btn_1);

        //Click event
        btn_1.setOnClickListener(new View.OnClickListener() {
            @Override
            //Callback method: it will be called back when triggered (supplementary below)
            public void onClick(View v) {
                Log.e(MainActivity.TAG, "onClick: ");
            }
        });

        //Long press event
        btn_1.setOnLongClickListener(new View.OnLongClickListener() {
            @Override
            //Callback method: it will be called back when triggered (supplementary below)
            public boolean onLongClick(View v) {
                Log.e(TAG, "onLongClick: ");
                return false;
            }
        });

        //Touch event
        btn_1.setOnTouchListener(new View.OnTouchListener() {
            @Override
            //Callback method: it will be called back when triggered (supplementary below)
            public boolean onTouch(View v, MotionEvent event) {
                Log.e(TAG, "onTouch: "+event.getAction());
                return false;
            }
        });
    }
}
log.e is to enter directly after typing the loge and complete it automatically.
Use of callback method loge:
Place the cursor at the wrong position and alt+enter to create a constant TAG in the class MainActivity
 As shown in the figure:
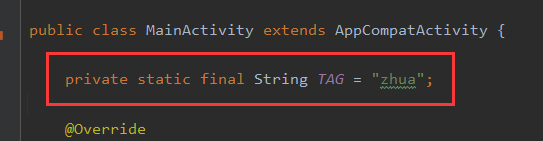
Static members can restrict external access, because static members belong to a class and do not belong to any object instance. (because static members are created when the class is first loaded, static members can be accessed by using the class name instead of an object outside the class;
The names of constants are generally modified by capital letters, and all constants are defined by final.
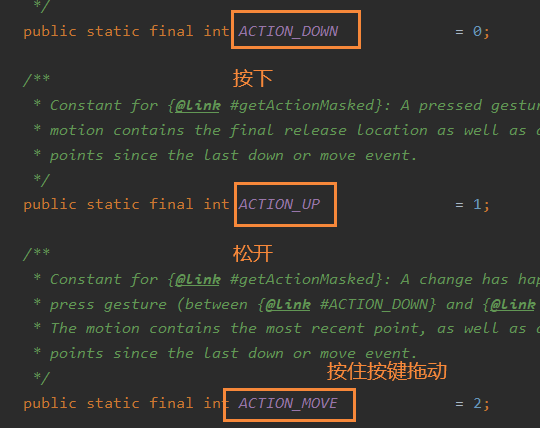
There are three kinds of touch events, which can be viewed in MotionEvent
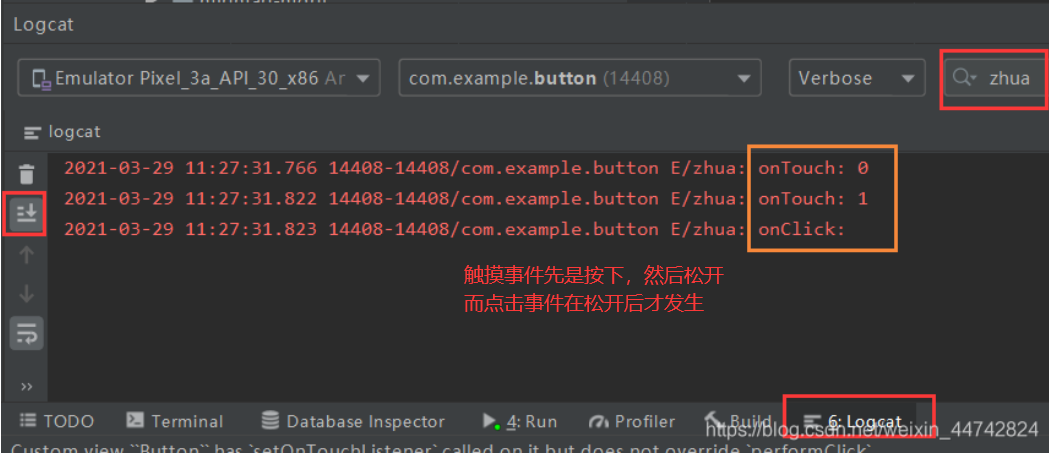
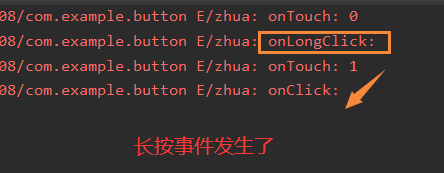
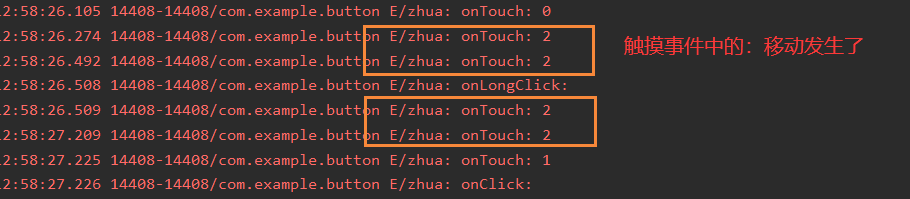
The program runs, and studies the execution of these three events by observing the information printed by the callback method,
Event execution sequence
(1) Release immediately after clicking:
(2) Long press
(3) Long press and drag
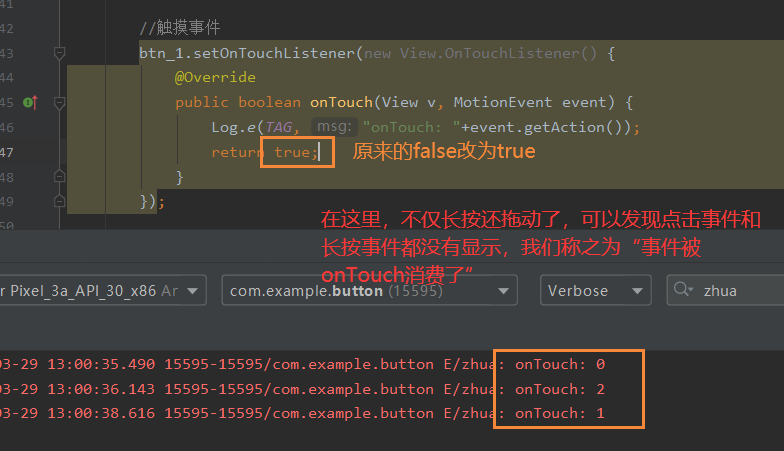
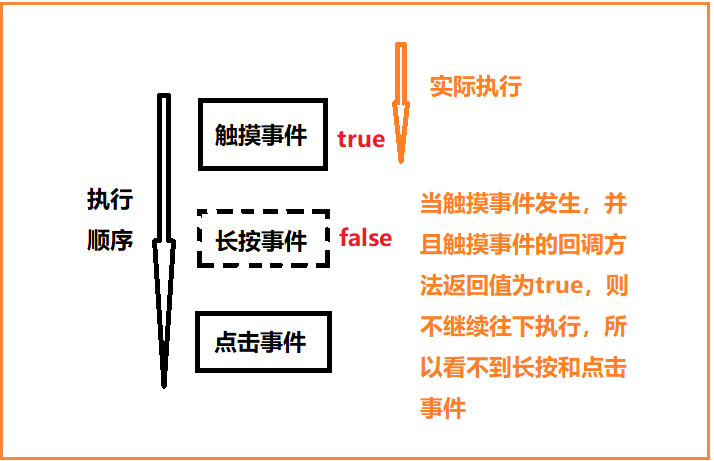
Modify callback method return value
1. Only change the return value of the touch event callback method to true
We call it: events are consumed by onTouch and no longer transmitted to
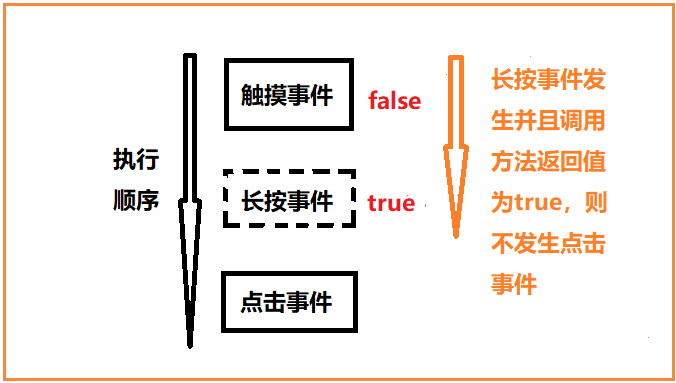
2. Only change the return value of the long press event callback method to true
(1) Quick release after one click:

(2) Quick release after long press
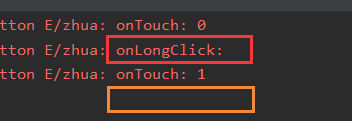
Long press and release quickly. Here you can see a very interesting phenomenon!!
① Why did the click event disappear?
② Think about changing the return value to true in the touch event, and then the click event and long press event are absorbed
③ Think of another phenomenon. The execution sequence of the three events must be: first there is a touch event, then if there is a long press, there will be a long press, and finally there must be a click event when you let go.
I realized it when I thought of these people together!!
The touch event mentioned above is true
The long press event is true, and the model is released after long press
The processing of key events can also be put in xml
The processing of key events can also be set in xml. Below, take the click event as an example, in main In xml:
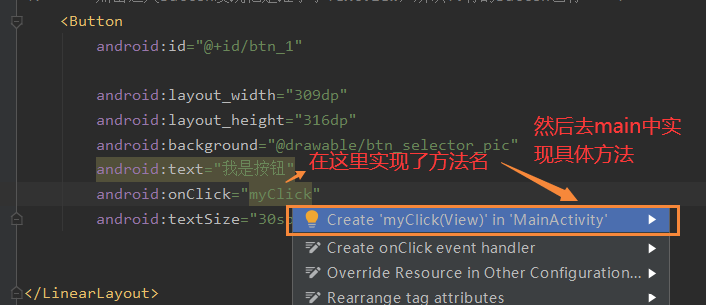 In main Implementation method body in Java:
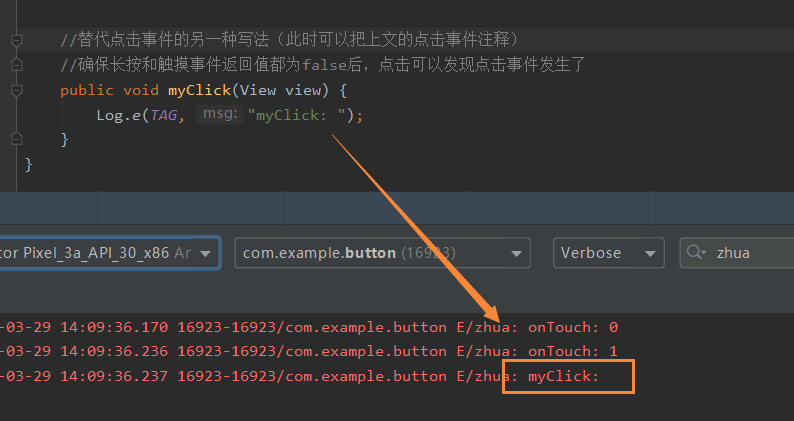
As you can see, myClick happened.