Copyright Statement: LooperJing Original articles can not be reprinted without the permission of the blogger!
In the previous articles, I summarized MVP, MVVM, using generics for MVP to avoid class explosion. To some extent, the implementation of these schemes has successfully separated View from business logic. However, for a complex interface, a layout.xml can use thousands of lines even with <include/> and custom controls. Yes. So this blog, mainly records how to write business view module, of course, this is not a textbook, but to share my thoughts on this.
Complex View Analysis
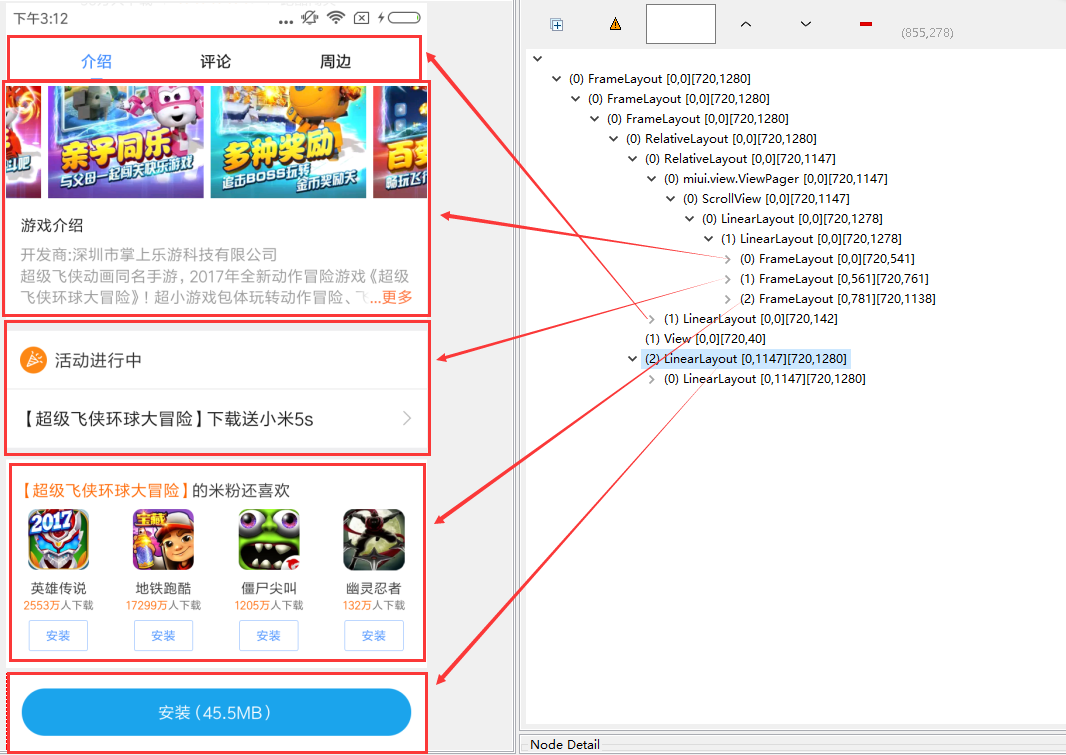
First of all, let's look at two pictures. Here's the details page of the millet game. Skip from Figure 1 to Figure 2.


It seems that this page is very complicated. Analyzing the UI structure, it is not fully developed. It is divided into five parts. The top three TAB s (introduction, comment, peripheral), game sliding map Banner, game activities, game recommendation bits and game installation.

Imagine that if all the sub-business logic is written in the page carrier, from data acquisition, view settings, error handling, interactive jump, then the Activity volume is very large, maintenance is very difficult. If you decouple the business logic and view control with a reasonable architecture, the volume of Activity will be significantly reduced, but the volume is still very large. In the coding specification of JAVA, each class can not be longer than 1000 lines, and the length of a method can be controlled as much as 50 lines, 1000 can easily exceed. So for complex problems, the idea of "Divide and Conquer" (divide and conquer) has been tried again and again. By splitting it according to business function level, we can get multiple view slices. Thus, a sub-service-granularity mapping is generated between view layer and business logic layer. Business view module encapsulates such mapping, and each module encapsulates such mapping. It encapsulates view slice configuration and business logic for specific sub-services. Based on this idea, I divide this complex view into four parts, as shown below.

II. Realization
We use Holder to manage views. For each view, the basic functions include getting data, refreshing data, setting data, finding ViewById, returning the whole view to external use, etc. So I write the following base classes.
public abstract class ViewBaseHolder<T> {

    private T mBaseData;
    private Context mContext;
    private View mRootView;

    public ViewBaseHolder(Context pContext) {
        this(pContext, null, 0);
    }

    public ViewBaseHolder(Context pContext, ViewGroup pViewParent) {
        this(pContext, pViewParent, 0);
    }

    public ViewBaseHolder(Context pContext, ViewGroup pViewParent, int pResId) {
        this(pContext, pViewParent, pResId == 0 ? null : LayoutInflater.from(pContext).inflate(pResId, pViewParent, false));
    }

    public ViewBaseHolder(Context pContext, ViewGroup pViewParent, View pRootView) {
        mContext = pContext;
        mRootView = initView(pViewParent, pRootView);
        initEvent(mRootView);
    }

    /**
     * get data
     *
     * @return
     */
    public T getData() {
        return mBaseData;
    }

    /**
     * Setting up data
     * @param pData
     */
    public void setDateAndRefreshView(T pData) {
        mBaseData = pData;
        refreshView(pData);
    }

    /**
     * Used to notify refresh data
     */
    public void notifyDataSetChange() {
        refreshView(getData());
    }

    /**
     * Used to refresh data
     */
    public abstract void refreshView(T pData);

     /**
     *findViewById
     */
    public abstract View initView(ViewGroup pViewParent, View pRootView);


     /**
      Return the entire View to the outside
    */
    public View getRootView() {
        return mRootView;
    }


    public void initEvent(View pBaseRootView) {}


    public Context getContext() {
        return mContext;
    }

    public Activity getActivity() {
        if (mContext instanceof Activity) {
            return (Activity) mContext;
        }
        return null;
    }
}
To recommend this View slice with the game, we need to manage it with Detail Recommend Holer. Considering the interactive jump, we need the server to get some information and pass in the Presenter in Activity. Detail Recommend Holer needs to set the View information, return the View root View to the outside, refresh the View, set listening events, and so on.
public class DetailRecommendHoler extends ViewBaseHolder<GameEntry> {

    private GameDetailPresenter mPresenter;


    private TextView mGameName;

    private ImageView mGameIcno;

    public DetailRecommendHoler(Context pContext, ViewGroup pViewParent, GameDetailPresenter pPresenter) {
        super(pContext, pViewParent);
        mPresenter = pPresenter;
    }

    @Override
    public void initEvent(View pBaseRootView) {
        super.initEvent(pBaseRootView);
        mGameIcno.setOnClickListener(new View.OnClickListener() {
            @Override
            public void onClick(View v) {
                //mPresenter.toDownLoadGameActivity(getContext());
            }
        });
    }

    public DetailRecommendHoler(Context pContext, ViewGroup pViewParent, int pResId, GameDetailPresenter pPresenter) {
        super(pContext, pViewParent, pResId);
        mPresenter = pPresenter;
    }

    @Override
    public void refreshView(GameEntry pData) {
        mGameIcno.setImageResource(pData.url);
        mGameName.setText(pData.name);
    }

    @Override
    public View initView(ViewGroup pViewParent, View pRootView) {
        View rootView;
        if (pRootView == null) {
            rootView = LayoutInflater.from(getContext()).inflate(R.layout.game_recommend_holder, null);
        } else {
            rootView = pRootView;
        }
        mGameIcno = (ImageView) pRootView.findViewById(R.id.game_inco);
        mGameName = (TextView) pRootView.findViewById(R.id.game_name);
        return rootView;
    }

    public GameDetailPresenter getPresenter() {
        return mPresenter;
    }
}
Similarly, one view slice in game details can be managed by Detail Banner Holer, two view slices in game details can be managed by Detail Activity Holer, and four view slices in game details can be managed by Detail Down LoadHoler. By dividing and conquering it, we can avoid the impact of too heavy a page. A view slice has less code and is easy to maintain. For example, for the three slices above, if other modules need to be used, it can be used directly. Correspondingly, after "divide and conquer", layout is also divided into several parts, as follows.
<?xml version="1.0" encoding="utf-8"?>
<RelativeLayout xmlns:android="http://schemas.android.com/apk/res/android"
    xmlns:app="http://schemas.android.com/apk/res-auto"
    android:id="@+id/activity_main"
    android:layout_width="match_parent"
    android:layout_height="match_parent"
    android:fitsSystemWindows="true">

    <FrameLayout
        android:id="@+id/game_banner_container"
        android:layout_width="match_parent"
        android:layout_height="200dp"
        android:layout_marginTop="60dp"
     />

    <FrameLayout
        android:id="@+id/game_activity_container"
        android:layout_width="match_parent"
        android:layout_height="300dp"
        android:layout_below="@id/game_banner_container"
        />

    <FrameLayout
        android:id="@+id/game_recomend_container"
        android:layout_width="match_parent"
        android:layout_height="50dp"
        android:layout_below="@+id/game_activity_container"
     />

    <FrameLayout
        android:id="@+id/game_download_container"
        android:layout_width="match_parent"
        android:layout_height="50dp"
        android:layout_below="@+id/game_recomend_container"
       />

</RelativeLayout>
OK, now see how to use it and see how it works. There's too much to understand below, need to know, MVP (poke me)[ http://www.jianshu.com/p/3a17382d44de]
public class GameDetailActivity extends BaseActivity<GameDetailPresenter, GameDtailModel> implements GameContract.GameDetailView {


    private FrameLayout mGameRecommendFly;

    private FrameLayout mGameActivityFly;

    private FrameLayout mGameDownLoadFly;

    private FrameLayout mGameBannerFly;

    private DetailRecommendHoler mDetailRecommendHoler;

    private DetailBannerHoler mDetailBannerHoler;

    private ProgressBar mLoadingBar;

    private ListView mListView;

    @Override
    public int getLayoutResId() {
        return R.layout.activity_main;
    }

    @Override
    public void initView() {

        mPresenter.requestGameEntry(1, 1);

        mGameRecommendFly = (FrameLayout) findViewById(R.id.game_recomend_container);
        mDetailRecommendHoler = new DetailRecommendHoler(this, mGameRecommendFly, mPresenter);
        mGameRecommendFly.addView(mDetailRecommendHoler.getRootView());

        mGameBannerFly = (FrameLayout) findViewById(R.id.game_banner_container);
        mDetailRecommendHoler = new DetailBannerHoler(this, mGameBannerFly, mPresenter);
        mGameBannerFly.addView(mDetailBannerHoler.getRootView());

        ...
    }


    @Override
    public void showLoading() {
        mLoadingBar.setVisibility(View.VISIBLE);
    }

    @Override
    public void hideLoading() {
        mLoadingBar.setVisibility(View.INVISIBLE);
    }

    @Override
    public void showError() {
        TextView errorView = new TextView(this);
        errorView.setTextSize(20);
        errorView.setText("The request failed.");
        mListView.setEmptyView(errorView);
    }


    @Override
    public void setGameEntry(GameEntry pGameEntry) {

        mDetailRecommendHoler.refreshView(pGameEntry.listone);
        mDetailRecommendHoler.refreshView(pGameEntry.listtwo);
        .......

    }
}
This way of writing, Activity/Fragment itself no longer carries any view business logic, but only needs to maintain the internal parasitic module Activity/Fragment's responsibilities degenerate into module container and data media. The role of data media is reflected in that Activity/Fragment in some cases acts as the entrance and distributor of page data. Upon arrival at Activity, Activity redistributes the Data to the internal modules that really need the data. The view business module is simple and straightforward, and has a good structure, because this step divides the boundary and makes the page structure clear. The difficulty of using this idea is the granularity division of view slices. It is too fine to write a lot of code, too little to achieve the effect. This needs to be grasped according to the needs. The idea is alive, and the modes are mutually flexible. Only in this way can we write a good system structure and reduce the cost of development and maintenance.
Recommended reading:
Android Architecture Design - Basic Confirmation of MVP Model Chapter 1
Android Architecture Design - MVP Patterns Part 2, How to Reduce Class Explosion
Android Architecture Design--Discussion on MVVM Model
Please accept mybest wishes for your happiness and success !