What is TextView
Displays text to users and optionally allows them to edit the text. TextView is a complete text editor, but the base class is, and editing is not allowed; Its subclass EditText allows text editing.
Let's first look at the inheritance relationship of TextView in the previous figure: 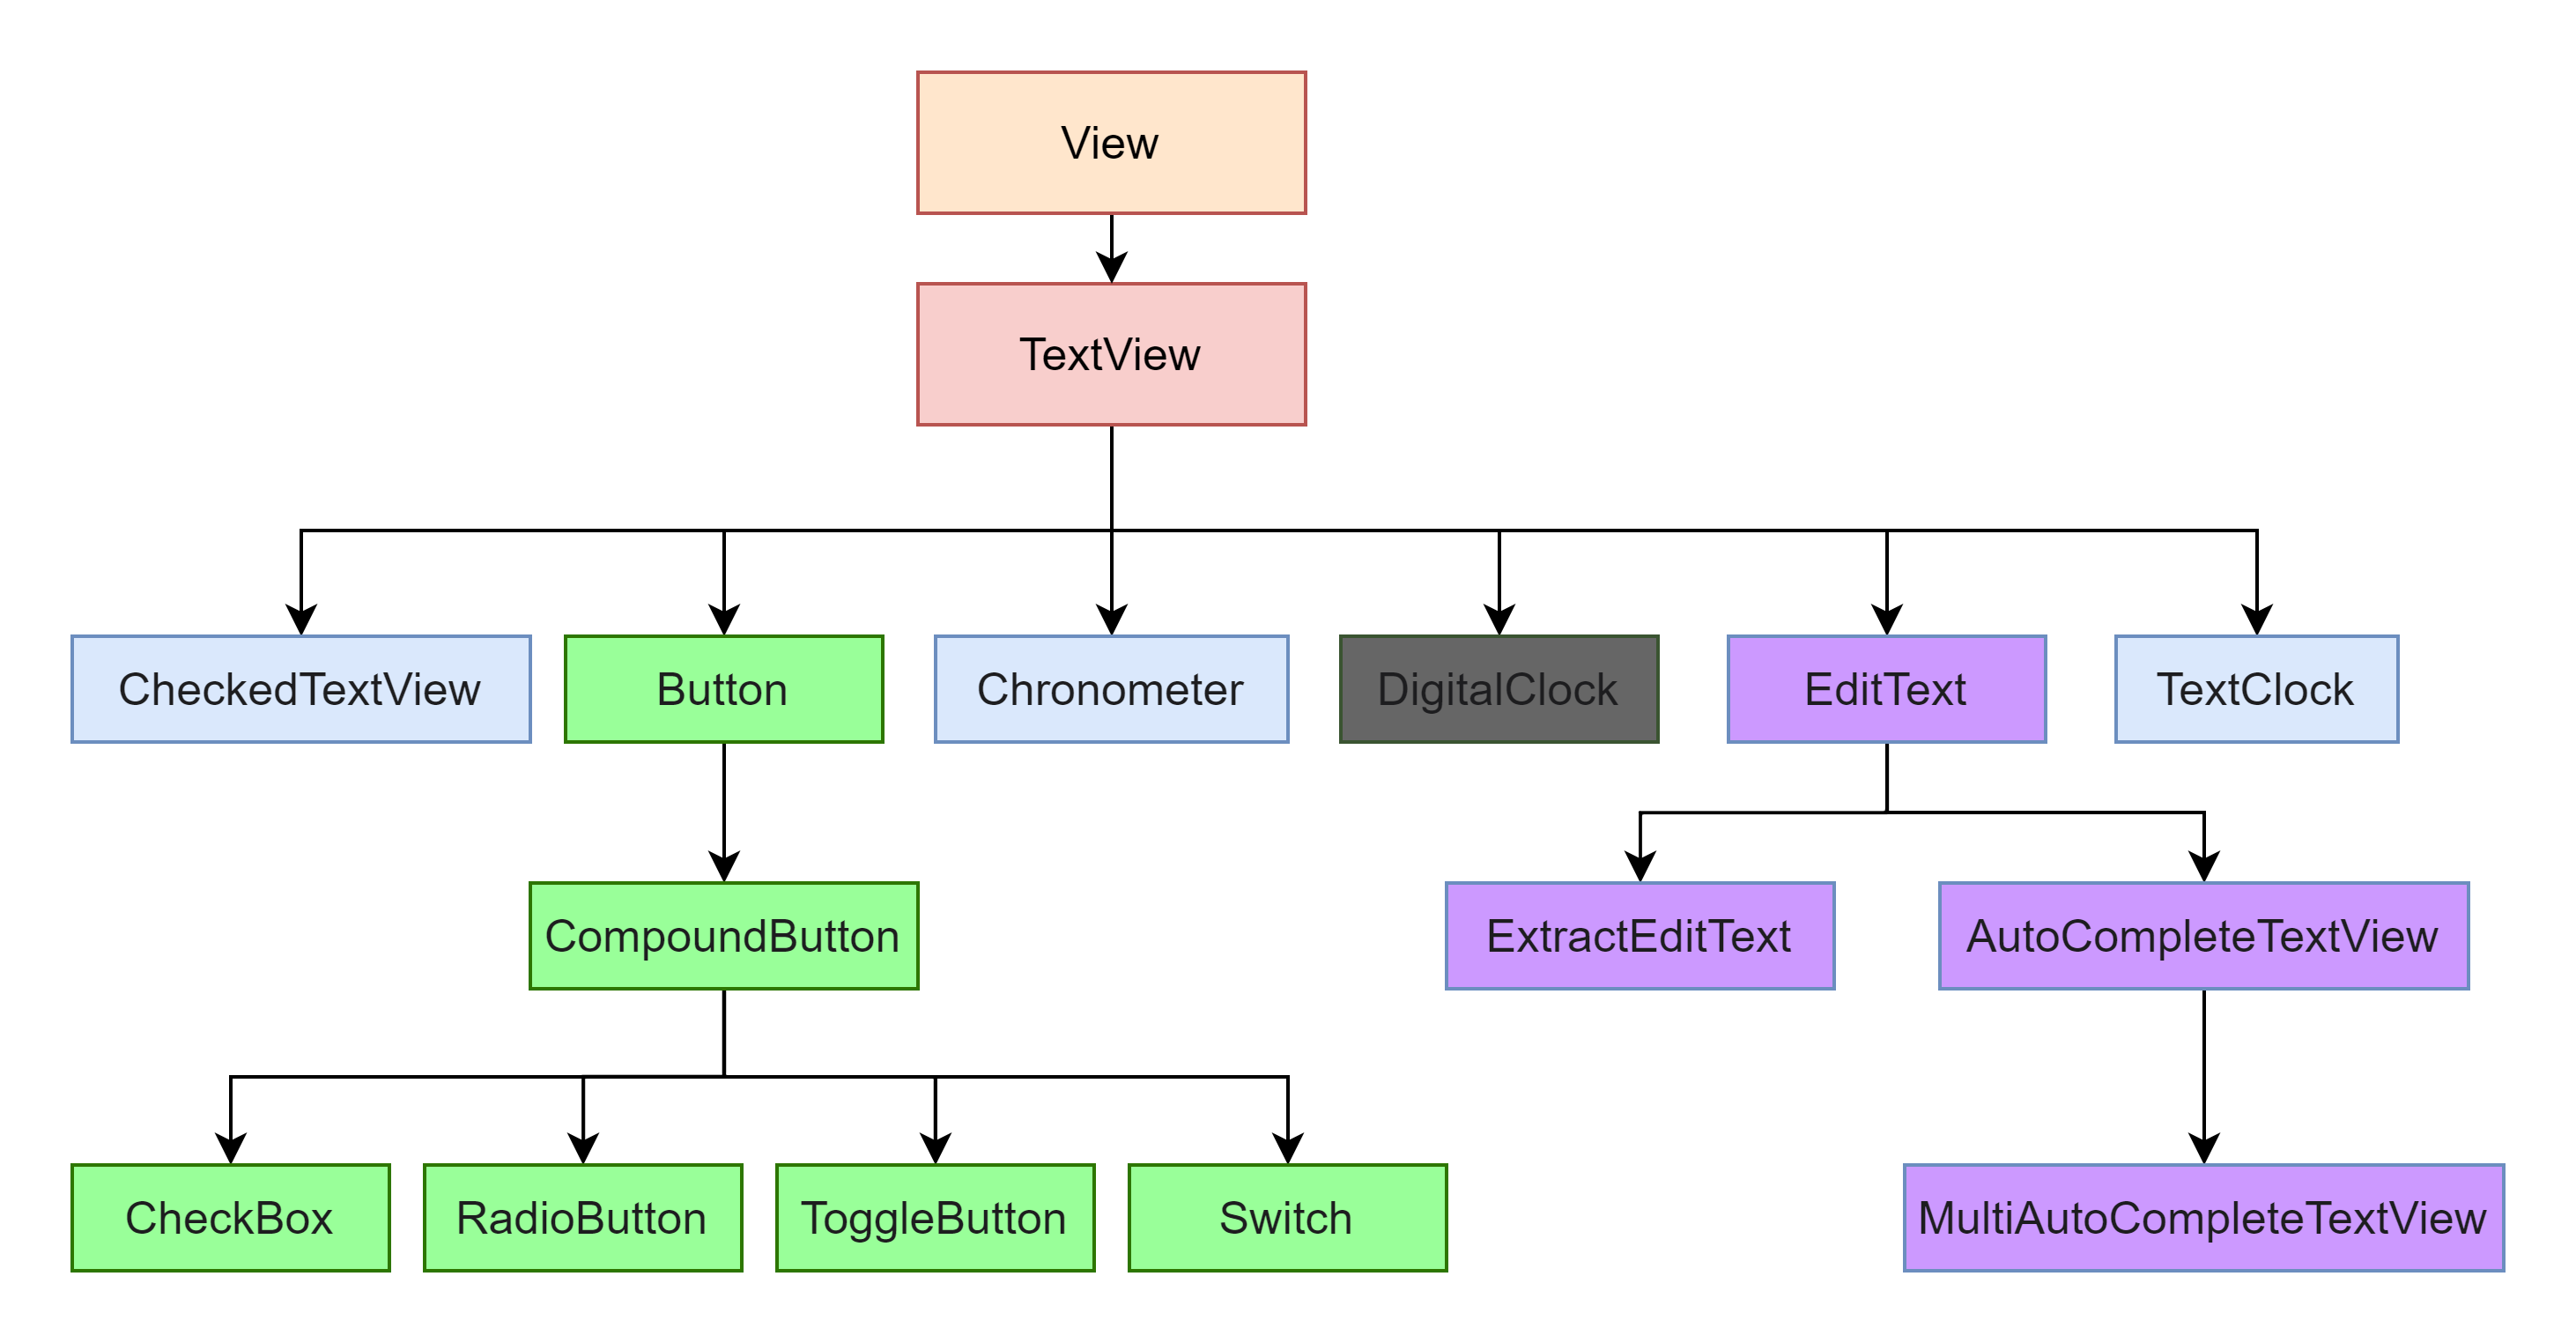
As can be seen from the above figure, TxtView inherits View, which is also the parent class of Button, EditText and other component classes. Let's see what these subclasses do.
- Button: a user interface element that the user can click or click to perform an action.
- CheckedTextView:TextView supports the extension of Checkable interface and display.
- Chrome: a class that implements a simple timer.
- DigitalClock:API17 is deprecated and can be replaced by TextClock.
- EditText: user interface element for entering and modifying text.
- TextClock: you can display the current date and / or time as a formatted string.
Look at his sons, not to mention his father. Today, let's take a look at this father level component: TextView.
Using TextView
1. Create and set attributes in xml
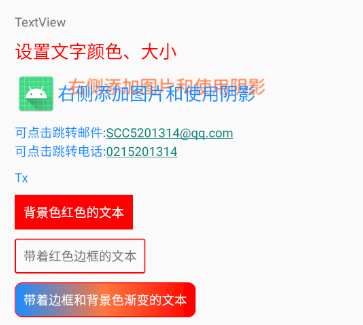
Let's look at the picture and talk. The text shown in the figure above is diverse, but it only contains some functions of TextView. It's interesting to see these diverse displays.
Let's look at the code practice:
<?xml version="1.0" encoding="utf-8"?>
<LinearLayout xmlns:android="http://schemas.android.com/apk/res/android"
    android:layout_width="match_parent"
    android:layout_height="match_parent"
    android:layout_margin="@dimen/dimen_20"
    android:orientation="vertical">
    <!--stay Design It means that you can drag from the left control display to the layout file to create a simple one TextView. -->
    <TextView
        android:id="@+id/textView"
        android:layout_width="match_parent"
        android:layout_height="wrap_content"
        android:text="TextView" />
    <!--Modify color and size-->
    <!--Set color @color/color_ff0000 Location: app/values/colors-->
    <!--Set size @dimen/text_size_18 Location: app/values/dimens-->
    <!--Set content @string/str_setting_color_size Location: app/values/strings-->
    <TextView
        android:layout_width="match_parent"
        android:layout_height="wrap_content"
        android:text="@string/str_setting_color_size"
        android:layout_marginTop="@dimen/dimen_10"
        android:textColor="@color/color_ff0000"
        android:textSize="@dimen/text_size_20" />
    <!--Add pictures and use shadows-->
    <!--Add picture:drawableTop,drawableBottom,drawableLeft(drawableStart),drawableRight(drawableEnd)-->
    <!--Use shadows:shadowColor(Shadow color) shadowDx(tv_2 Based on the position, the larger the number, the more to the right),
    shadowDy(tv_2 Based on the position, the larger the number, the lower it will go),shadowRadius((the larger the number, the more blurred it is)-->
    <!--picture @mipmap/ic_launcher Location: app/mipmap/Any directory can be found-->
    <TextView
        android:layout_width="match_parent"
        android:layout_height="wrap_content"
        android:drawableLeft="@mipmap/ic_launcher"
        android:layout_marginTop="@dimen/dimen_10"
        android:gravity="center_vertical"
        android:shadowColor="@color/color_FF773D"
        android:shadowDx="30"
        android:shadowDy="-20"
        android:shadowRadius="2"
        android:text="Add pictures and use shadows on the right"
        android:textColor="@color/color_188FFF"
        android:textSize="@dimen/text_size_20" />
    <!--Add links to calls and emails-->
    <!--autoLink Automatically add text content E-mail Add hyperlink to address and phone number-->
    <TextView
        android:layout_width="match_parent"
        android:layout_height="wrap_content"
        android:autoLink="email|phone"
        android:gravity="center_vertical"
        android:layout_marginTop="@dimen/dimen_10"
        android:text="Click to jump to mail:SCC5201314@qq.com\n Click to jump to the phone:0215201314"
        android:textColor="@color/color_188FFF"
        android:textSize="@dimen/text_size_14" />
    <!--Too much content-->
    <!--maxLength Up to a few lines are displayed, and a single line is also available android:singleline="true"-->
    <!--ellipsize,When the content cannot be displayed, it is displayed...(The position can be the first, middle and last), and the line number limit should be added here-->
    <!--lineSpacingMultiplier,row spacing-->
    <TextView
        android:layout_width="match_parent"
        android:layout_height="wrap_content"
        android:ellipsize="end"
        android:gravity="center_vertical"
        android:lineSpacingMultiplier="1.2"
        android:layout_marginTop="@dimen/dimen_10"
        android:maxLength="2"
        android:text="TxtView Inherited View,It's still Button,EditText Two UI The parent class of the component class. Its function is to display text elements on the user interface. Functionally TextView It's a text editor, just Android Turn off its editable function. If you need an editable text box, you need to use its subclass Editext Well, Editext Allows the user to edit the contents of the text box. TextView and Editext The biggest difference between them is TextView Users are not allowed to edit text content, Editext Allows users to edit text content.
Let's write a few examples to learn more about it TextView of"
        android:textColor="@color/color_188FFF"
        android:textSize="@dimen/text_size_14" />
    <!--background Set background color-->
    <!--padding Inner margin (distance from edge to available range)-->
    <TextView
        android:layout_width="wrap_content"
        android:layout_height="wrap_content"
        android:background="@color/color_ff0000"
        android:layout_marginTop="@dimen/dimen_10"
        android:padding="10dp"
        android:text="Text with red background"
        android:textColor="@color/white" />

    <!--Bordered text-->
    <!--layout_margin Outer margin( TextView Distance to other controls)-->
    <TextView
        android:layout_width="wrap_content"
        android:layout_height="wrap_content"
        android:layout_marginTop="@dimen/dimen_10"
        android:background="@drawable/bg_tv_frame_red"
        android:padding="10dp"
        android:text="Text with red border" />
    <!--Text background color gradient with border-->
    <!--The code can realize the gradient of text-->
    <TextView
        android:layout_width="wrap_content"
        android:layout_height="wrap_content"
        android:layout_marginTop="@dimen/dimen_10"
        android:background="@drawable/bg_tv_frame_gradient"
        android:padding="10dp"
        android:textColor="@color/white"
        android:text="Text with border and background color gradient" />

</LinearLayout>
Background setting border file android:background="@drawable/bg_tv_frame_red"
<?xml version="1.0" encoding="utf-8"?>
<shape xmlns:android="http://schemas.android.com/apk/res/android">
    <!--radius The four fillets can be set uniformly or individually. Example: topLeftRadius-->
    <corners android:radius="2dp"/>
    <!--Border width width,colour color-->
    <stroke android:width="4px" android:color="@color/color_ff0000" />
</shape>
android:background="@drawable/bg_tv_frame_gradient" with border and background color gradient
<?xml version="1.0" encoding="utf-8"?>
<shape xmlns:android="http://schemas.android.com/apk/res/android">
    <!--radius The four fillets can be set uniformly or individually. Example: topLeftRadius-->
    <corners android:radius="8dp"/>
    <!--Border width width,colour color-->
    <stroke android:width="1dp" android:color="@color/color_ff0000" />
    <!--The color of the gradient is set from start to end-->
    <gradient
        android:startColor="@color/color_188FFF"
        android:centerColor="@color/color_FF773D"
        android:endColor="@color/color_ff0000"
        android:type="linear"
        />
</shape>
2. Create in xml and set attributes in the code
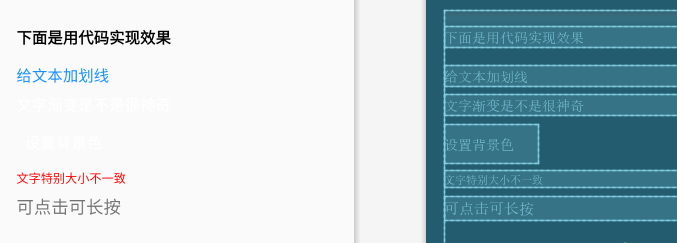
- Layout file
<?xml version="1.0" encoding="utf-8"?>
<LinearLayout xmlns:android="http://schemas.android.com/apk/res/android"
   android:layout_width="match_parent"
   android:layout_height="match_parent"
   android:layout_margin="@dimen/dimen_20"
   android:orientation="vertical">
   <TextView
       android:layout_width="match_parent"
       android:layout_height="wrap_content"
       android:text="The following is the code to achieve the effect"
       android:textSize="@dimen/text_size_18"
       android:layout_marginTop="@dimen/dimen_20"
       android:layout_marginBottom="@dimen/dimen_10"
       android:textColor="@color/black"
       android:textStyle="bold" />

   <TextView
       android:id="@+id/tv_flag"
       android:layout_width="match_parent"
       android:layout_height="wrap_content"
       android:textColor="@color/color_188FFF"
       android:layout_marginTop="@dimen/dimen_10"
       android:text="Underline text"
       android:textSize="@dimen/text_size_18" />

   <TextView
       android:id="@+id/tv_gradient"
       android:layout_width="match_parent"
       android:layout_height="wrap_content"
       android:layout_marginTop="@dimen/dimen_10"
       android:textColor="@color/white"
       android:text="Isn't the text gradient amazing"
       android:textSize="@dimen/text_size_18" />

   <TextView
       android:id="@+id/tv_bg"
       android:layout_width="wrap_content"
       android:layout_height="wrap_content"
       android:layout_marginTop="@dimen/dimen_10"
       android:padding="10dp"
       android:text="Set background color"
       android:textColor="@color/white"
       android:textSize="@dimen/text_size_18" />

   <TextView
       android:id="@+id/tv_size"
       android:layout_width="match_parent"
       android:layout_height="wrap_content"
       android:layout_marginTop="@dimen/dimen_10"
       android:textColor="@color/color_ff0000"
       android:text="The text size is inconsistent" />

   <TextView
       android:id="@+id/tv_onclick"
       android:layout_width="match_parent"
       android:layout_marginTop="@dimen/dimen_10"
       android:layout_height="wrap_content"
       android:textSize="@dimen/dimen_20"
       android:text="Click and long press" />
</LinearLayout>
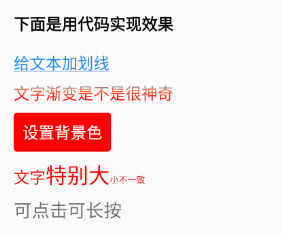
- Operation results
- Implemented in code
        //Underline and make clear
        tv_flag.getPaint().setFlags(Paint.UNDERLINE_TEXT_FLAG | Paint.ANTI_ALIAS_FLAG);
        tv_flag.getPaint().setAntiAlias(true);//Anti-Aliasing

        int[] colors = {0xff188fff, 0xffff773D, 0xffff0000};//Array color
        LinearGradient mLinearGradient = new LinearGradient(0, 0, 0,
                tv_gradient.getPaint().getTextSize(), colors, null, Shader.TileMode.CLAMP);
        tv_gradient.getPaint().setShader(mLinearGradient);
        tv_gradient.invalidate();

        int fillColor = Color.parseColor("#ff0000 "); / / internal fill color
        GradientDrawable gd = new GradientDrawable();//Create drawable
        gd.setColor(fillColor);//Set background color
        gd.setCornerRadius(10);//Set fillet
        tv_bg.setBackground(gd);//Set background

        Spannable wordtoSpan = new SpannableString(tv_size.getText().toString());
        //setSpan: parameter 1: set the text size; Parameter 2, starting text position; Parameter 3, end changing the text position, excluding this position
        wordtoSpan.setSpan(new AbsoluteSizeSpan(DensityUtil.dip2px(this, 18)), 0, 2, Spannable.SPAN_EXCLUSIVE_EXCLUSIVE);
        wordtoSpan.setSpan(new AbsoluteSizeSpan(DensityUtil.dip2px(this, 24)), 2, 5, Spannable.SPAN_EXCLUSIVE_EXCLUSIVE);
        wordtoSpan.setSpan(new AbsoluteSizeSpan(DensityUtil.dip2px(this, 10)), 5, tv_size.length(), Spannable.SPAN_EXCLUSIVE_EXCLUSIVE);
        tv_size.setText(wordtoSpan);

        //TextView actually has click events. After all, its father, Veiew
        tv_onclick.setOnClickListener(new View.OnClickListener() {
            @Override
            public void onClick(View v) {
                MLog.e("Here is the click event");
                Toast.makeText(TextViewActivity.this,"Here is the click event",Toast.LENGTH_SHORT).show();
            }
        });
        tv_onclick.setOnLongClickListener(new View.OnLongClickListener() {
            @Override
            public boolean onLongClick(View v) {
                MLog.e("Long press event here");
                Toast.makeText(TextViewActivity.this,"Long press event here",Toast.LENGTH_SHORT).show();
                //true indicates that the event has been consumed
                return true;
            }
});-
Operation result analysis
- Most of the TextView attributes that can be used in xml can also be implemented in code. It depends on how you like to use them.
- Because TextView inherits View, you can use the method of View. Such as View Onclicklistener() and View Onlongclicklistener() and explore it slowly.
3. Create and set properties in the code
- Look at the renderings first:
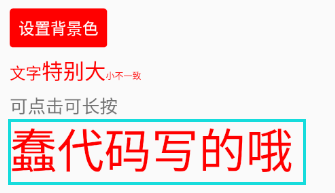
- The following is the code used for the implementation:
  //ll_act_tv layout file root layout id
  LinearLayout ll_act_tv = findViewById(R.id.ll_act_tv);
  TextView textView = new TextView(this);//Create control
  textView.setText("Stupid code");//Set control content
  textView.setTextColor(Color.RED);//Set control color
  textView.setTextSize(DensityUtil.dip2px(this, 20));//Sets the font size of the control
  ll_act_tv.addView(textView);
That's all for TextView today. There are its subclasses later. Comparing subclasses is also powerful and can't be done in a single article. Have you learned? hey