Reference resources:
Android animation summary
1. Frame animation
That is, play a series of pictures in order to achieve the animation effect.
design sketch:


Implementation method:
- Create three bitmaps in the drawable directory, which are three pictures to play
a_0.xml
<vector xmlns:android="http://schemas.android.com/apk/res/android"
        android:width="24dp"
        android:height="24dp"
        android:viewportWidth="24"
        android:viewportHeight="24">
    <path
        android:pathData="M17.6,11.48 L19.44,8.3a0.63,0.63 0,0 0,-1.09 -0.63l-1.88,3.24a11.43,11.43 0,0 0,-8.94 0L5.65,7.67a0.63,0.63 0,0 0,-1.09 0.63L6.4,11.48A10.81,10.81 0,0 0,1 20L23,20A10.81,10.81 0,0 0,17.6 11.48ZM7,17.25A1.25,1.25 0,1 1,8.25 16,1.25 1.25,0 0,1 7,17.25ZM17,17.25A1.25,1.25 0,1 1,18.25 16,1.25 1.25,0 0,1 17,17.25Z"
        android:fillColor="#FF000000"/>
</vector>
a_1.xml
<vector xmlns:android="http://schemas.android.com/apk/res/android"
    android:width="24dp"
    android:height="24dp"
    android:viewportWidth="24"
    android:viewportHeight="24"
    android:tint="?attr/colorControlNormal">
  <path
      android:fillColor="@android:color/white"
      android:pathData="M5,16c0,3.87 3.13,7 7,7s7,-3.13 7,-7v-4L5,12v4zM16.12,4.37l2.1,-2.1 -0.82,-0.83 -2.3,2.31C14.16,3.28 13.12,3 12,3s-2.16,0.28 -3.09,0.75L6.6,1.44l-0.82,0.83 2.1,2.1C6.14,5.64 5,7.68 5,10v1h14v-1c0,-2.32 -1.14,-4.36 -2.88,-5.63zM9,9c-0.55,0 -1,-0.45 -1,-1s0.45,-1 1,-1 1,0.45 1,1 -0.45,1 -1,1zM15,9c-0.55,0 -1,-0.45 -1,-1s0.45,-1 1,-1 1,0.45 1,1 -0.45,1 -1,1z"/>
</vector>
a_2.xml
<vector xmlns:android="http://schemas.android.com/apk/res/android"
        android:width="24dp"
        android:height="24dp"
        android:viewportWidth="24"
        android:viewportHeight="24"
        android:tint="?attr/colorControlNormal">
    <path
        android:pathData="M17.6,11.48 L19.44,8.3a0.63,0.63 0,0 0,-1.09 -0.63l-1.88,3.24a11.43,11.43 0,0 0,-8.94 0L5.65,7.67a0.63,0.63 0,0 0,-1.09 0.63L6.4,11.48A10.81,10.81 0,0 0,1 20L23,20A10.81,10.81 0,0 0,17.6 11.48ZM7,17.25A1.25,1.25 0,1 1,8.25 16,1.25 1.25,0 0,1 7,17.25ZM17,17.25A1.25,1.25 0,1 1,18.25 16,1.25 1.25,0 0,1 17,17.25Z"
        android:fillColor="@android:color/white"/>
</vector>
- Create anim1.0 in the drawable directory XML file, which is used to set the display order and duration of pictures
<?xml version="1.0" encoding="utf-8"?>
<animation-list xmlns:android="http://schemas.android.com/apk/res/android">
    <item
        android:drawable="@drawable/a_0"
        android:duration="100" />
    <item
        android:drawable="@drawable/a_1"
        android:duration="300" />
    <item
        android:drawable="@drawable/a_2"
        android:duration="100" />
</animation-list>
- In the layout file activity_ main. Add ImageView component to XML to display animation
<?xml version="1.0" encoding="utf-8"?>
<androidx.constraintlayout.widget.ConstraintLayout xmlns:android="http://schemas.android.com/apk/res/android"
    xmlns:app="http://schemas.android.com/apk/res-auto"
    xmlns:tools="http://schemas.android.com/tools"
    android:layout_width="match_parent"
    android:layout_height="match_parent"
    tools:context=".MainActivity">

    <ImageView
        android:id="@+id/animation1"
        android:layout_width="wrap_content"
        android:layout_height="wrap_content"
        app:layout_constraintBottom_toBottomOf="parent"
        app:layout_constraintLeft_toLeftOf="parent"
        app:layout_constraintRight_toRightOf="parent"
        app:layout_constraintTop_toTopOf="parent" />

</androidx.constraintlayout.widget.ConstraintLayout>
- Animating in java code
public class MainActivity extends AppCompatActivity {

    @Override
    protected void onCreate(Bundle savedInstanceState) {
        super.onCreate(savedInstanceState);
        setContentView(R.layout.activity_main);
        ImageView animationImg1 = findViewById(R.id.animation1);
        animationImg1.setImageResource(R.drawable.anim1);
        AnimationDrawable animationDrawable1 = (AnimationDrawable) animationImg1.getDrawable();
        animationDrawable1.start();
    }
}
2. Make up animation
Different from the previous frame animation, frame animation simulates the animation effect by continuously playing pictures, while the gap animation developer only needs to specify the "key frame" for the beginning and end of the animation, while the "intermediate frame" of the animation change is calculated and supplemented by the system!
Andoird supports the following four kinds of gap animation effects:
- AlphaAnimation: transparency gradient effect, specifying the start and end transparency when creating, as well as the duration of the animation, the variation range of transparency [0, 1], 0 is completely transparent and 1 is completely opaque; Corresponding alpha label!
- ScaleAnimation: scale the gradient effect. When creating, you need to specify the start and end scaling ratios, scaling reference points, and animation duration; Corresponding scale label!
- TranslateAnimation: displacement gradient effect. When creating, specify the start and end positions and the duration of the animation; Corresponding to translate label!
- RotateAnimation: rotate the gradient effect. When creating, specify the rotation angle at the beginning and end of the animation, as well as the animation duration and the axis of rotation; Corresponding to the rotate tag!
AlphaAnimation: transparency animation (used to achieve transparency gradient effect)
design sketch:


- First, create an animated alpha under src/main/res/anim_ 1.xml
<?xml version="1.0" encoding="utf-8"?>
<alpha xmlns:android="http://schemas.android.com/apk/res/android"
    android:duration="1000"
    android:fromAlpha="1"
    android:toAlpha="0" />
- Add an ImageView to the layout file
slightly - Animate ImageView
public class MainActivity extends AppCompatActivity {

    @Override
    protected void onCreate(Bundle savedInstanceState) {
        super.onCreate(savedInstanceState);
        setContentView(R.layout.activity_main);
        ImageView imageView = findViewById(R.id.animation1);
        imageView.setImageResource(R.drawable.p1);
        Animation animation = AnimationUtils.loadAnimation(this, R.anim.alpha_1);
        // Repeat animation INFINITE loop
        animation.setRepeatCount(Animation.INFINITE);
        imageView.startAnimation(animation);
    }
}
ScaleAnimation: scale animation (used to achieve scale gradient effect)
design sketch:


- Create animation file anim/scale_anim.xml to achieve the effect of equal magnification of images from no to 1.5 times of the original
<?xml version="1.0" encoding="utf-8"?>
<scale xmlns:android="http://schemas.android.com/apk/res/android"
    android:interpolator="@android:anim/accelerate_interpolator"
    android:fromXScale="0"
    android:toXScale="1.5"
    android:fromYScale="0"
    android:toYScale="1.5"
    android:pivotX="50%"
    android:pivotY="50%"
    android:duration="3000"/>
- Add an ImageView to the layout file
slightly - Animate ImageView
slightly
TranslateAnimation: translation animation (used to achieve displacement gradient effect)
- Create animation file anim/translate_anim.xml to realize the Diagonal displacement of the picture
The coordinate origin should be the upper left corner of the View, as if it were.
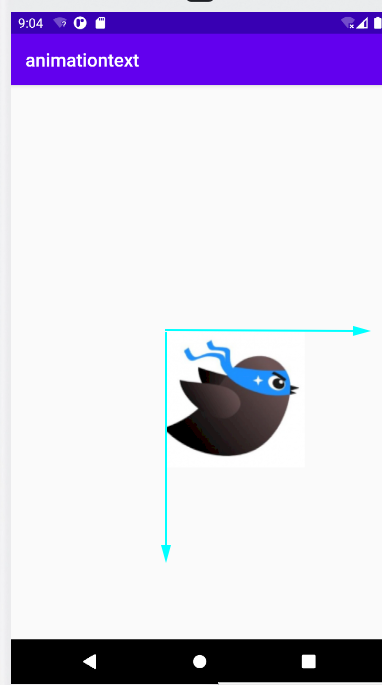
- Create animation file anim/translate_anim.xml to realize the Diagonal displacement of the picture
<?xml version="1.0" encoding="utf-8"?>
<translate xmlns:android="http://schemas.android.com/apk/res/android"
    android:duration="2000"
    android:fromXDelta="0"
    android:fromYDelta="0"
    android:toXDelta="500"
    android:toYDelta="500" />
- Add an ImageView to the layout file
slightly - Animate ImageView
slightly
design sketch:
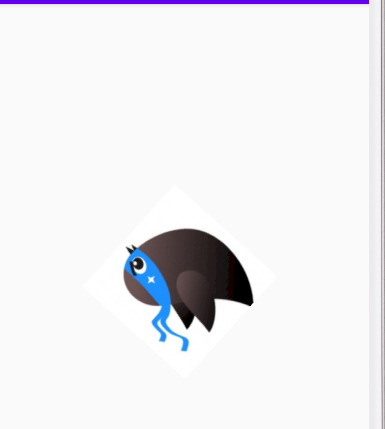
RotateAnimation: rotation animation (used to achieve rotation gradient effect)
- Create animation file anim/rotate_anim.xml to realize picture center rotation
<?xml version="1.0" encoding="utf-8"?>
<rotate xmlns:android="http://schemas.android.com/apk/res/android"
    android:duration="2000"
    android:fromDegrees="360"
    android:pivotX="50%"
    android:pivotY="50%"
    android:toDegrees="0" />
- Add an ImageView to the layout file
slightly - Animate ImageView
slightly
design sketch:
AnimationSet: you can use multiple animation combinations at the same time
If the transparency is from 0 to 1 and from 0 to 1.5 times the original, the animation is as follows.
<?xml version="1.0" encoding="utf-8"?>
<set xmlns:android="http://schemas.android.com/apk/res/android">
    <scale
        android:duration="2000"
        android:fromXScale="0.2"
        android:fromYScale="0.2"
        android:pivotX="50%"
        android:pivotY="50%"
        android:toXScale="1.5"
        android:toYScale="1.5" />
    <alpha
        android:duration="2000"
        android:fromAlpha="0"
        android:toAlpha="1" />
</set>