This is the loading animation:
 case MSG_TOP_DRAW:
        if (mTopCircleAnimaRadius < mTopCircleMaxRadius - 2 * topIntervalDistance) {
            mTopCircleAnimaRadius += topIntervalDistance;
        } else {
            mTopCircleAnimaRadius = mTopSmallCircleRadius + topIntervalDistance;
        }

        drawTimingThread.removeMessages(MSG_TOP_DRAW);
        drawTimingThread.sendEmptyMessageDelayed(MSG_TOP_DRAW, animaTopIntervalTime);
        invalidate();
        break;
This is the bottom ripple diffusion Animation:
 case MSG_RIPPLE_DRAW:
       if (mBotCircleAnimaRadius < mBotCircleMaxRadius) {
            mBotCircleAnimaRadius += topIntervalDistance * 8;
            drawTimingThread.removeMessages(MSG_RIPPLE_DRAW);
            drawTimingThread.sendEmptyMessageDelayed(MSG_RIPPLE_DRAW, animaBotIntervalTime);
            // transparency
            mBotCirclePaint.setAlpha(getAlphaOfRipple());
            invalidate();
        } else {
            mBotCircleAnimaRadius = 0;
            drawTimingThread.removeMessages(MSG_RIPPLE_DRAW);
        }
        break;
The jump animation of View is a composite animation using AnimatorSet. The dot text effect of the upper point is simple drawing, so it is not detailed.
 ...
    // translationY up and down
    AnimatorSet mSet1 = new AnimatorSet();
    mSet1.play(mTAnimator1).before(mTAnimator2);
    mSet1.start();
Chestnuts β
This animation effect is realized through View continuous drawing, using the drawing api of arc, bitmap and text. The scale line is drawn by constantly rotating the canvas.
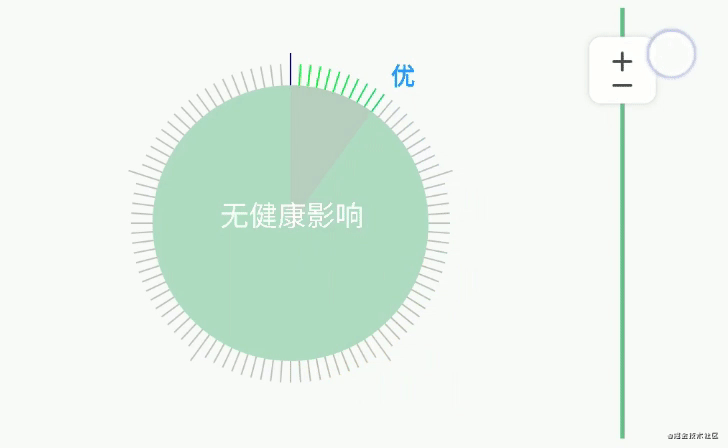
The difficulty is to confirm the coordinate position during the surrounding process of the peripheral text, that is, how to calculate the X and Y coordinates of the intersection of the fan-shaped final ray and the arc through the center coordinates, radius and fan-shaped angle. Fortunately, the solution and the mathematical model behind it can be found on the Internet. See the code below:
 private void paintOutWord(Canvas canvas, String state) {
        PointF progressPoint = CommentUtil.calcArcEndPointXY
                (radius + getPaddingLeft() + specialScaleLineLength + scaleToRingSpace + wordWith
                        , radius + getPaddingTop() + specialScaleLineLength + scaleToRingSpace + wordHeigh
                        , radius + specialScaleLineLength + scaleToRingSpace
                        , progress * (360 / 100f), -90);
        int left = (int) progressPoint.x;
        int top = (int) progressPoint.y;
        wordPaint.getTextBounds(state, 0, state.length(), rect);
        if (left < radius + getPaddingLeft() + specialScaleLineLength + scaleToRingSpace + wordWith) {
            left -= rect.width();
        }
        if (top > radius + getPaddingTop() + specialScaleLineLength + scaleToRingSpace + wordHeigh) {
            top += rect.height();
        }
        canvas.drawText(state, left, top, wordPaint);
    }
The function of this method is to obtain the X and Y coordinates of the intersection of the sector end ray and the circular arc. Those interested can study the following:
 /**
     * @param cirX       Circle centerX
     * @param cirY       Circle centerY
     * @param radius     Circle radius
     * @param cirAngle   Current arc angle
     * @param orginAngle Starting arc angle
     *
     * @return xy coordinates of the intersection of sector end ray and arc
     */
    public static PointF calcArcEndPointXY(float cirX, float cirY, float radius,
            float cirAngle, float orginAngle) {
        cirAngle = (orginAngle + cirAngle) % 360;
        return calcArcEndPointXY(cirX, cirY, radius, cirAngle);
    }

    /*
     * @param cirAngle Current arc angle
     */
    public static PointF calcArcEndPointXY(float cirX, float cirY,
            float radius, float cirAngle) {
        float posX = 0.0f;
        float posY = 0.0f;
        // Convert angles to radians
        float arcAngle = (float) (Math.PI * cirAngle / 180.0);
        if (cirAngle < 90) {
            posX = cirX + (float) (Math.cos(arcAngle)) * radius;
            posY = cirY + (float) (Math.sin(arcAngle)) * radius;
        } else if (cirAngle == 90) {
            posX = cirX;
            posY = cirY + radius;
        } else if (cirAngle > 90 && cirAngle < 180) {
            arcAngle = (float) (Math.PI * (180 - cirAngle) / 180.0);
            posX = cirX - (float) (Math.cos(arcAngle)) * radius;
            posY = cirY + (float) (Math.sin(arcAngle)) * radius;
        } else if (cirAngle == 180) {
            posX = cirX - radius;
            posY = cirY;
        } else if (cirAngle > 180 && cirAngle < 270) {
            arcAngle = (float) (Math.PI * (cirAngle - 180) / 180.0);
            posX = cirX - (float) (Math.cos(arcAngle)) * radius;
            posY = cirY - (float) (Math.sin(arcAngle)) * radius;
        } else if (cirAngle == 270) {
            posX = cirX;
            posY = cirY - radius;
        } else {
            arcAngle = (float) (Math.PI * (360 - cirAngle) / 180.0);
            posX = cirX + (float) (Math.cos(arcAngle)) * radius;
            posY = cirY - (float) (Math.sin(arcAngle)) * radius;
        }
        return new PointF(posX, posY);
    }
The realization of color gradient effect is to obtain the equal proportion of hexadecimal color value in the color segment corresponding to each scale. The code is as follows:
 /**
     * Gets the current gradient color value through the scale
     * @param p Current scale
     * @param specialScaleCorlors Color value for each range
     * @return Currently required color value
     */
    public static int evaluateColor(int p, int[] specialScaleCorlors) {
        // Defined color range
        int startInt = 0xFFbebebe;
        int endInt = 0xFFbebebe;
        float fraction = 0.5f;

        if (p != 0 && p != 100) {
            startInt = specialScaleCorlors[p / 20];
            endInt = specialScaleCorlors[p / 20 + 1];
            fraction = (p - (p / 20) * 20) / 20f;
        }
        int startA = (startInt >> 24) & 0xff;
        int startR = (startInt >> 16) & 0xff;
        int startG = (startInt >> 8) & 0xff;
        int startB = startInt & 0xff;

        int endA = (endInt >> 24) & 0xff;
        int endR = (endInt >> 16) & 0xff;
        int endG = (endInt >> 8) & 0xff;
        int endB = endInt & 0xff;

        return (int) ((startA + (int) (fraction * (endA - startA))) << 24)
                | (int) ((startR + (int) (fraction * (endR - startR))) << 16)
                | (int) ((startG + (int) (fraction * (endG - startG))) << 8)
                | (int) ((startB + (int) (fraction * (endB - startB))));
    }
The rest of the details and methods are not posted. They are more conventional methods.
Chestnuts γ
This effect is very similar to the above, except that this control can drag to select the scale, as shown below:
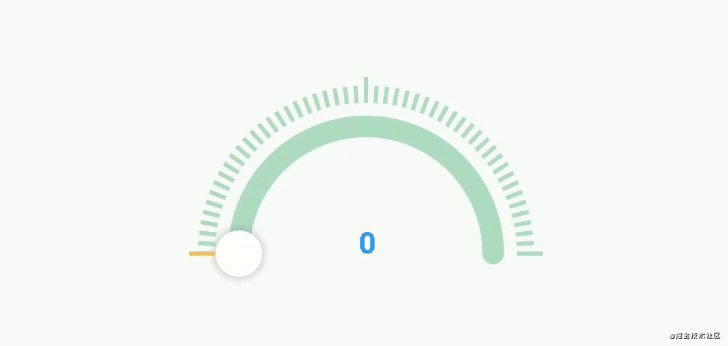
When drawing the "drag button" bitmap, the difficulty is to determine the coordinates of the bitmap, that is, calculate the X and Y coordinates of the intersection of the sector end ray and the arc according to the center coordinates, radius and sector angle. Has it been said above, so that we can calculate the upper left corner of the bitmap.
The drag effect is to continuously draw the corresponding progress p when the finger is pressed, the finger slides and the finger bounces up within the allowed area, giving people the illusion that the ring is dragged by animation. In fact, this is only the result of continuous redrawing. Here, we need to use the onTouchEvent method to listen for gestures and obtain the current coordinates. The difficulty is that this is an arc track. How can we obtain the angle through the current coordinates, and then obtain the corresponding progress according to the angle. Code examples are as follows:
 @Override
    public synchronized boolean onTouchEvent(MotionEvent event) {

        int action = event.getAction();
        int x = (int) event.getX();
        int y = (int) event.getY();

        switch (action) {
            case MotionEvent.ACTION_DOWN:
            	// See the following for the notes of isOnRing
                if (isOnRing(x, y) && y <= radius + getPaddingTop() + specialScaleLineLength + scaleToRingSpace) {
                    updateProgress(x, y);
                    return true;
                }
                break;
            case MotionEvent.ACTION_MOVE:
                if (y <= radius + getPaddingTop() + specialScaleLineLength + scaleToRingSpace) {
                    updateProgress(x, y);
                }
                return true;
            case MotionEvent.ACTION_UP:
                invalidate();
                break;
        }

        return super.onTouchEvent(event);
    }
This is the method to calculate the angle according to the position of the current point, and then convert it into the current progress:
 private void updateProgress(int eventX, int eventY) {

        double angle = Math.atan2(eventY - (radius + getPaddingLeft() + specialScaleLineLength + scaleToRingSpace)
                , eventX - (radius + getPaddingLeft() + specialScaleLineLength + scaleToRingSpace)) / Math.PI;
        angle = ((2 + angle) % 2 + (-beginLocation / 180f)) % 2;

        if ((int) Math.round(angle * 100) >= 0) {
            progress = (int) Math.round(angle * 100);
            realShowProgress = getShowProgress(progress);
        }

        invalidate();
    }
It should be noted that when we drag the "drag button", we need to set a specific area for receiving events. Only when the user presses within the specified sliding area can the user drag the progress bar. It is not possible to drag small icons at any position to change the progress, This is a method to judge whether the position of the current touch screen is within the slidable area:
 private boolean isOnRing(float eventX, float eventY) {

        boolean result = false;
        double distance = Math.sqrt(Math.pow(eventX - (radius + getPaddingLeft() + specialScaleLineLength + scaleToRingSpace), 2)
                + Math.pow(eventY - (radius+getPaddingLeft() + specialScaleLineLength + scaleToRingSpace), 2));

        if (distance < (2 * radius+getPaddingLeft() + getPaddingRight() + 2 * (specialScaleLineLength + scaleToRingSpace))
                && distance > radius - slideAbleLocation) {
            result = true;
        }

        return result;
    }
The rest of the details and methods are not posted. They are more conventional methods.
Chestnuts δ
This is the effect of ripple diffusion and ball rotation reduction, as shown below:

This effect is drawn continuously by an overall custom View. Among them, the ripple diffusion animation is realized by regularly changing the ripple radius. This ripple is composed of two hollow circles successively. In the implementation process, pay attention to the changes of time and respective dimensions. The core code is shown below:
 public void startAnima() {
        if (drawTimingThread != null) {
            drawTimingThread.sendEmptyMessage(MSG_DRAW0); // Start 1 ripple
            float time = (mRMaxRadius - mRMinRadius) / distance * 0.5f; // Take the whole first and then the middle
            drawTimingThread.sendEmptyMessageDelayed(MSG_DRAW1, (int)(animaBotIntervalTime * time));//Timing opening 2 ripple
        }
    }
This is the radius change of ripple 1. The reference code is as follows:
 if (mCurRadius0 <= mRMaxRadius) {
        mCurRadius0 += distance;
    } else {
        mCurRadius0 = mRMinRadius + distance;
    }
    circlePointF0 = drawCircleOnRipple(MSG_DRAW0, curIndex0);

    mRPaint0.setAlpha(getAlphaOfRipple(curIndex0));//transparency
    mCirclePaint0.setAlpha(getAlphaOfRipple(curIndex0));
    curRadius0 = getRadiusOnRipple(curIndex0);
    curIndex0++;
    if (curIndex0 > (mRMaxRadius - mRMinRadius) / distance)
        curIndex0 = 0;

    cancleHandle(MSG_DRAW0);
Here, the ball animation effect is drawn at the corresponding position every 200ms. Because the ripple diffusion period is short, I set the rotation period of the ball to 45 degrees, which can be modified by myself. The difficulty here also lies in how to find the center coordinates of the sphere, that is, to find the X and Y coordinates of the intersection of the sector end ray and the circular arc according to the center coordinates, radius and sector angle. As mentioned above, the code is shown below:
 private PointF drawCircleOnRipple(int msg, int index) {

        // Period start, random initial angle
        if (index == 0 && msg == MSG_DRAW0) {
            cirAngel0 = (float) (Math.random() * -360 + 180);
        } else if (index == 0) {
            cirAngel1 = (float) (Math.random() * -360 + 180);
        }

        return CommentUtil.calcArcEndPointXY(
                mRMaxRadius + getPaddingLeft() + mStrokeWidth
                    , mRMaxRadius + getPaddingTop() + mStrokeWidth
                    , msg == MSG_DRAW0 ? mCurRadius0 : mCurRadius1
                    // Rotate 45 degrees per cycle
                    , (msg == MSG_DRAW0 ? curIndex0 : curIndex1) * 1.0f
                        / ((mRMaxRadius - mRMinRadius) / distance) * 45f
                    , msg == MSG_DRAW0 ? cirAngel0 : cirAngel1);
    }
For the color gradient effect of ripple and sphere, since it is not gradient to full transparency, my alpha value range is 105-255, and the code is shown below:
private int getAlphaOfRipple(int curIndex) {
final int alpha = curIndex * 150 * distance / (mRMaxRadius - mRMinRadius); // Take only 150 binary
### Design pattern learning notes

### Design pattern series learning video
**[CodeChina Open source projects:< Android Summary of study notes+Mobile architecture video+Real interview questions for large factories+Project practice source code](https://codechina.csdn.net/m0_60958482/android_p7)**
final int alpha = curIndex * 150 * distance / (mRMaxRadius - mRMinRadius); // Take only 150 binary
### Design pattern learning notes
[External chain picture transfer...(img-pJtA6S6i-1630559867859)]
### Design pattern series learning video
[External chain picture transfer...(img-jd1QEJmM-1630559867861)]
**[CodeChina Open source projects:< Android Summary of study notes+Mobile architecture video+Real interview questions for large factories+Project practice source code](https://codechina.csdn.net/m0_60958482/android_p7)**