Android We are provided with a large number of View controls, but this is still far from meeting our requirements. Sometimes the form of control needed for development does not exist in the control provided by Android, which requires us to define one ourselves. So how to customize controls?
To learn about custom controls, you first need to master the use of Canvas classes.
Canvas
Canvas, which we call "canvas", is mainly suitable for drawing views.
Canvas provides a large number of graphics methods:
Draw sector:
-
drawArc(RectF oval, float startAngle, float sweepAngle, boolean useCenter, Paint paint):
The first parameter, RectF object, specifies the sector area; the second parameter is the starting angle; the third parameter is the rotation angle, clockwise rotation; the fourth parameter is whether to fill, true is filled, false is not filled, that is, an arc; the fifth parameter is the drawing brush object Paint.
RectF:
RectF object is created by RectF(float left, float top, float right, float bottom) constructor. We understand the meaning of each parameter through the following figure. RectF object refers to a rectangular area. We construct rectangular regions by these four parameters.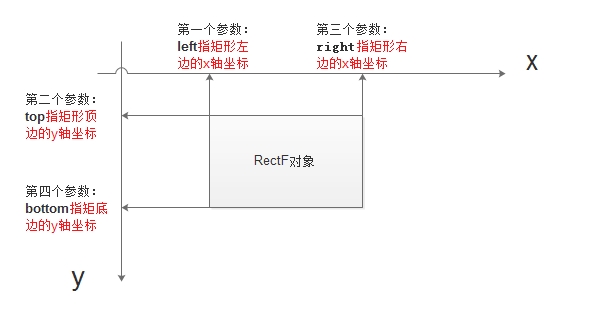
Paint:
It's a brush used to draw all the figures. We'll talk about it later. -
drawArc(float left, float top, float right, float bottom, float startAngle, float sweepAngle, boolean useCenter, Paint paint)
This is to input the coordinates of the left, top, right and bottom of the sector directly, rather than through the RectF object. The other parameters are the same as above.
Draw a circle:
-
drawCircle(float cx, float cy, float radius, Paint paint)
The first and second parameters refer to the X and Y coordinates of the circle; the third parameter is the radius; and the fourth parameter is the brush Paint object.
Draw a straight line:
-
drawLine(float startX, float startY, float stopX, float stopY, Paint paint)
Two points determine a straight line. The first and second parameters are the coordinates of the starting point; the third and fourth parameters are the coordinates of the ending point; and the fifth parameter is the Paint object. -
drawLines(float[] pts, Paint paint)
Multiple points determine a straight line, the first parameter is the array of points, and the second parameter is the brush Paint object. - drawLines(float[] pts, int offset, int count, Paint paint)
Draw an ellipse:
-
drawOval(float left, float top, float right, float bottom, Paint paint)
The first four parameters are the coordinates of the left, top, right and bottom of the ellipse, and the fifth is the brush Paint object. -
drawOval(RectF oval, Paint paint)
The first parameter is the RectF object, and the second parameter is the Brush Paint object.
Draw a rectangle:
-
drawRect(RectF rect, Paint paint)
The first parameter is the RectF object, and the second parameter is the Brush Paint object.
Draw points:
-
drawPoint(float x, float y, Paint paint)
The coordinates of the first and second parameter points, and the third parameter is the Paint object.
Rendering text:
- drawText(String text, float x, floaty, Paint paint)
- drawText(CharSequence text, int start, int end, float x, float y, Paint paint)
- drawText(char[] text, int index, int count, float x, float y, Paint paint)
-
drawText(String text, int start, int end, float x, float y, Paint paint)
Canvas also gives us a lot of ways to draw other graphics. Here we do not list them one by one. Let's take a look at Paint's "brush".
Paint
Paint is a drawing brush. Canvas is like our drawing paper. We need a pen to complete a whole picture. Paint provides us with a lot of settings (we will only list the commonly used methods here):
-
setARGB(int a, int r, int g, int b)
Set Paint object color, parameter 1 is alpha transparent value -
setAlpha(int a)
Set alpha opacity, ranging from 0 to 255 -
setAntiAlias(boolean aa)
Whether anti-aliasing or not, this is usually set. -
setColor(int color)
Setting colors, where Android's internal Color class contains some common Color definitions -
setTextScaleX(float scaleX)
Set the text zoom multiple, 1.0f as original -
setTextSize(float textSize)
Setting font size -
setUnderlineText(booleanunderlineText)
Setting underscores -
setStrokeCap(Paint.Cap cap)
When the brush style is STROKE or FILL_OR_STROKE, set the graphic style of the brush, such as the circular style Cap.ROUND, or the square style Cap.SQUARE. -
setSrokeJoin(Paint.Join join)
Set the way to combine the graphics when drawing, such as smoothing effect, etc.
Custom View
Now let's customize a View control using the Canvas class. Custom control steps are as follows:
1. Customize View. First, define a MyView class to inherit View class.
2. Rewrite the two constructors of View.
View contains four constructors, and we have to rewrite the MyWidgetView(Context context, AttributeSet attrs) constructor, because the second parameter of the constructor is associated with the xml layout file, and without rewriting the constructor, the control cannot be used in the layout. Here we rewrite his two constructors:
    public MyView(Context context) {
        super(context);
    }
    public MyView(Context context, AttributeSet attrs) {
        super(context, attrs);
}- 1
- 2
- 3
- 4
- 5
- 6
- 1
- 2
- 3
- 4
- 5
- 6
3. Rewrite the onMeasure(int widthMeasureSpec, int heightMeasureSpec) method to define the size of the control: width and height. When the control is used in the layout, the size of the control is passed in. Only when the size is passed in and onMesure is invoked will the control have width and height.
    @Override
    protected void onMeasure(int widthMeasureSpec, int heightMeasureSpec) {
        super.onMeasure(widthMeasureSpec, heightMeasureSpec);
        width = getDefaultSize(getSuggestedMinimumWidth(), widthMeasureSpec);
        height = getDefaultSize(getSuggestedMinimumHeight(), heightMeasureSpec);
        setMeasuredDimension(width, height);//Set width and height
}- 1
- 2
- 3
- 4
- 5
- 6
- 7
- 1
- 2
- 3
- 4
- 5
- 6
- 7
- Override the onDraw(Canvas canvas) method, in which we define the drawing View. When we make the control in Activity or elsewhere, the UI main thread calls the onDraw method to draw.
    @Override
    protected void onDraw(Canvas canvas) {
        super.onDraw(canvas);
}- 1
- 2
- 3
- 4
- 1
- 2
- 3
- 4
In onDraw(Canvas canvas) method, a Canvas object is passed in. When we define the control, we use Canvas to draw.
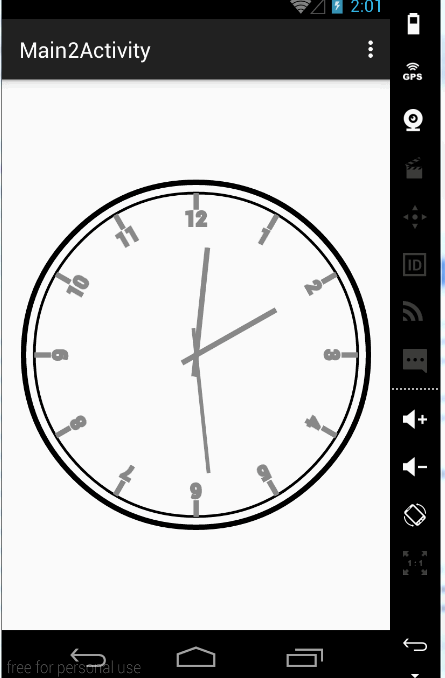
Drawing Clock
Here we consolidate the use of custom controls and Canvas classes by drawing a clock.
1. Define a MyView inheritance View.
2. Rewrite the MyView(Context context, AttributeSet attrs) constructor.
3. Rewrite onMeasureh and onDraw methods.
4. Drawing in onDraw method.
That's the general procedure. Let's stick up the code and explain it step by step.
public class MyView extends View {
    private int width;//Set high
    private int height;//Set high

    private Paint mPaintLine;//Define a brush for drawing straight lines
    private Paint mPaintSecondLine;//Define a brush for drawing straight lines
    private Paint mPaintInterCircle;//Define a brush for drawing circles
    private Paint mPaintOutSideCircle;//Define a brush for drawing circles
    private Paint mPaintText;//Define a brush that draws text

    private Calendar mCalendar;//Create a time class
    private static final int NEED_INVALIDATE=0X6666;
    //Operating UI main thread
    private Handler handler = new Handler() {
        @Override
        public void handleMessage(Message msg) {
            super.handleMessage(msg);
            switch (msg.what){
                case NEED_INVALIDATE:
                    //Keep up with the New Times
                    mCalendar=Calendar.getInstance();
                    invalidate();
                    sendEmptyMessageDelayed(NEED_INVALIDATE,1000);
                    break;
            }

        }
    };

    public MyView(Context context) {
        super(context);
    }

    public MyView(Context context, AttributeSet attrs) {
        super(context, attrs);
        //Initialization of Linear Brushes
        mPaintLine = new Paint();
        mPaintLine.setAntiAlias(true);//Anti-aliased
        mPaintLine.setColor(Color.GRAY);//setpc
        mPaintLine.setStyle(Paint.Style.STROKE);//Set to Hollow
        mPaintLine.setStrokeWidth(10);//Set width
        // Initialize the second hand brush
        mPaintSecondLine = new Paint();
        mPaintSecondLine.setAntiAlias(true);//Anti-aliased
        mPaintSecondLine.setColor(Color.GRAY);//setpc
        mPaintSecondLine.setStyle(Paint.Style.STROKE);//Set to Hollow
        mPaintSecondLine.setStrokeWidth(7);//Set width

        //Initialize the inner circle of the brush
        mPaintInterCircle = new Paint();
        mPaintInterCircle.setAntiAlias(true);//Anti-aliased
        mPaintInterCircle.setColor(Color.BLACK);
        mPaintInterCircle.setStyle(Paint.Style.STROKE);//Set to Hollow
        mPaintInterCircle.setStrokeWidth(5);
        //Initialize the brush of the outer circle
        mPaintOutSideCircle = new Paint();
        mPaintOutSideCircle.setAntiAlias(true);//Anti-aliased
        mPaintOutSideCircle.setColor(Color.BLACK);
        mPaintOutSideCircle.setStyle(Paint.Style.STROKE);//Set to Hollow
        mPaintOutSideCircle.setStrokeWidth(10);

        //A Brush for Drawing Texts
        mPaintText = new Paint();
        mPaintText.setAntiAlias(true);//Anti-aliased
        mPaintText.setColor(Color.GRAY);
        mPaintText.setStyle(Paint.Style.STROKE);//Set to Hollow
        mPaintText.setTextAlign(Paint.Align.CENTER);
        mPaintText.setTextSize(40);
        mPaintText.setStrokeWidth(6);

        //Initialize calendar
        mCalendar = Calendar.getInstance();
        //Send a message to the UI main thread
        handler.sendEmptyMessageDelayed(NEED_INVALIDATE,2000);


    }

    @Override
    protected void onMeasure(int widthMeasureSpec, int heightMeasureSpec) {
        super.onMeasure(widthMeasureSpec, heightMeasureSpec);
        width = getDefaultSize(getSuggestedMinimumWidth(), widthMeasureSpec);
        height = getDefaultSize(getSuggestedMinimumHeight(), heightMeasureSpec);
        setMeasuredDimension(width, height);//Set width and height
    }

    @Override
    protected void onDraw(Canvas canvas) {
        super.onDraw(canvas);
        // Automatic call of main thread
        canvas.drawCircle(width / 2, height / 2, 300, mPaintInterCircle);
        canvas.drawCircle(width / 2, height / 2, 320, mPaintOutSideCircle);
        for(int i=1; i<=12;i++){
            canvas.save();//Save the current state
            canvas.rotate(360 / 12 * i, width / 2, height / 2);
            canvas.drawLine(width / 2, height / 2 - 300, width / 2, height / 2 - 270, mPaintLine);
            canvas.drawText("" + i, width / 2, height / 2 - 240, mPaintText);
            canvas.restore();//Go back to the state saved by the save() method
        }

        //Drawing minute needle
        int minute=  mCalendar.get(Calendar.MINUTE);
        float minuteDegree =  minute/60f*360;
        canvas.save();
        canvas.rotate(minuteDegree, width / 2, height / 2);
        canvas.drawLine(width / 2, height / 2 - 200, width / 2, height / 2 + 40, mPaintLine);
        canvas.restore();
        //Drawing Clocks
        int hour=  mCalendar.get(Calendar.HOUR);
        float hourDegree = (hour*60+minute)//(12f*60)*360;
        canvas.save();
        canvas.rotate(hourDegree, width / 2, height / 2);
        canvas.drawLine(width / 2, height / 2 - 170, width / 2, height / 2 + 30, mPaintLine);
        canvas.restore();
        //Drawing the second hand
        int second =  mCalendar.get(Calendar.SECOND);
        float secondDegree = second*6;//A second is six degrees.
        canvas.save();
        canvas.rotate(secondDegree, width / 2, height / 2);
        canvas.drawLine(width / 2, height / 2 - 220, width / 2, height / 2 + 50, mPaintSecondLine);
        canvas.restore();
    }
}- 1
- 2
- 3
- 4
- 5
- 6
- 7
- 8
- 9
- 10
- 11
- 12
- 13
- 14
- 15
- 16
- 17
- 18
- 19
- 20
- 21
- 22
- 23
- 24
- 25
- 26
- 27
- 28
- 29
- 30
- 31
- 32
- 33
- 34
- 35
- 36
- 37
- 38
- 39
- 40
- 41
- 42
- 43
- 44
- 45
- 46
- 47
- 48
- 49
- 50
- 51
- 52
- 53
- 54
- 55
- 56
- 57
- 58
- 59
- 60
- 61
- 62
- 63
- 64
- 65
- 66
- 67
- 68
- 69
- 70
- 71
- 72
- 73
- 74
- 75
- 76
- 77
- 78
- 79
- 80
- 81
- 82
- 83
- 84
- 85
- 86
- 87
- 88
- 89
- 90
- 91
- 92
- 93
- 94
- 95
- 96
- 97
- 98
- 99
- 100
- 101
- 102
- 103
- 104
- 105
- 106
- 107
- 108
- 109
- 110
- 111
- 112
- 113
- 114
- 115
- 116
- 117
- 118
- 119
- 120
- 121
- 122
- 123
- 1
- 2
- 3
- 4
- 5
- 6
- 7
- 8
- 9
- 10
- 11
- 12
- 13
- 14
- 15
- 16
- 17
- 18
- 19
- 20
- 21
- 22
- 23
- 24
- 25
- 26
- 27
- 28
- 29
- 30
- 31
- 32
- 33
- 34
- 35
- 36
- 37
- 38
- 39
- 40
- 41
- 42
- 43
- 44
- 45
- 46
- 47
- 48
- 49
- 50
- 51
- 52
- 53
- 54
- 55
- 56
- 57
- 58
- 59
- 60
- 61
- 62
- 63
- 64
- 65
- 66
- 67
- 68
- 69
- 70
- 71
- 72
- 73
- 74
- 75
- 76
- 77
- 78
- 79
- 80
- 81
- 82
- 83
- 84
- 85
- 86
- 87
- 88
- 89
- 90
- 91
- 92
- 93
- 94
- 95
- 96
- 97
- 98
- 99
- 100
- 101
- 102
- 103
- 104
- 105
- 106
- 107
- 108
- 109
- 110
- 111
- 112
- 113
- 114
- 115
- 116
- 117
- 118
- 119
- 120
- 121
- 122
- 123
Drawing two circular nests is simple, needless to say. Then the scale is drawn using the rotation of Canvas canvas canvas. This is a good understanding. When we draw, sometimes we have to draw some difficult angles. We all rotate the canvas instead of changing our own angles. When drawing a clock, we need to draw the scale of each time of the clock. We can rotate the position of the scale to the vertical direction, and then draw it.
        for(int i=1; i<=12;i++){
            canvas.save();//Save the current state
            canvas.rotate(360 / 12 * i, width / 2, height / 2);
            canvas.drawLine(width / 2, height / 2 - 300, width / 2, height / 2 - 270, mPaintLine);
            canvas.drawText("" + i, width / 2, height / 2 - 240, mPaintText);
            canvas.restore();//Go back to the state saved by the save() method
}- 1
- 2
- 3
- 4
- 5
- 6
- 7
- 1
- 2
- 3
- 4
- 5
- 6
- 7
Then draw the hour hand, minute hand and second hand, they all draw a line. Then, by acquiring the current time, the line points to the right time point, that is, the right angle of deflection. The deflection here is still the deflection of the canvas.
After that, our clocks were almost finished, but we found that our watches did not go. The way to turn the clock we draw is to make our clock onDraw once a second, so that our clock works. OnDraw is the UI main thread that constantly calls the redraw interface, so we need to use Handler to redraw the MyView control every second by sending a message to the Handler object. The redraw cannot call the onDraw() method amount, but the invalidate() method, which calls the onDraw() method.
      //Operating UI main thread
    private Handler handler = new Handler() {
        @Override
        public void handleMessage(Message msg) {
            super.handleMessage(msg);
            switch (msg.what){
                case NEED_INVALIDATE:
                    //Keep up with the New Times
                    mCalendar=Calendar.getInstance();
                    invalidate();
                    sendEmptyMessageDelayed(NEED_INVALIDATE,1000);
                    break;
            }

        }
};- 1
- 2
- 3
- 4
- 5
- 6
- 7
- 8
- 9
- 10
- 11
- 12
- 13
- 14
- 15
- 16
- 1
- 2
- 3
- 4
- 5
- 6
- 7
- 8
- 9
- 10
- 11
- 12
- 13
- 14
- 15
- 16
So our clocks turn...