This article is based on:
androidx.databinding:databinding-runtime:3.4.1
1. Introduction to Data-Binding
A data binding library is a supporting library that allows you to bind interface components in a layout to data sources in your application using declarative formats rather than programmatically. Detailed documentation reference:
https://developer.android.com/topic/libraries/data-binding
2. DataBinding Principle
1. Examples
This example simply displays user information through TextView with the following layout:
<?xml version="1.0" encoding="utf-8"?>
<layout xmlns:android="http://schemas.android.com/apk/res/android"
    xmlns:tools="http://schemas.android.com/tools">
    <data>
        <variable name="user" type="com.xiaomi.zxm.databinding.User"/>
    </data>
    <LinearLayout
        android:layout_width="match_parent"
        android:layout_height="match_parent"
        android:layout_marginTop="20dp"
        android:orientation="horizontal"
        tools:context=".databinding.DataBindingActivity1">
        <TextView
            android:id="@+id/btn_db_firstname"
            android:layout_width="wrap_content"
            android:layout_height="wrap_content"
            android:layout_marginStart="5dp"
            android:background="#FFD56B"
            android:text="@{user.firstName}" />

        <TextView
            android:id="@+id/btn_db_lastname"
            android:layout_width="wrap_content"
            android:layout_height="wrap_content"
            android:layout_marginStart="5dp"
            android:background="#FFD56B"
            android:text="@{user.lastName}" />
    </LinearLayout>
</layout>
The layout file needs to be wrapped in a layout file, with two tag s, one data and one real layout LinearLayout underneath it. You can see that we used an expression @{user.lastName} on the text property to specify that its value is bound by the previously defined data. Continue reading the other files:
public class DataBindingActivity1 extends AppCompatActivity {
    @Override
    protected void onCreate(Bundle savedInstanceState) {
        super.onCreate(savedInstanceState);
        UserDataBinding binding =
            DataBindingUtil.setContentView(this, R.layout.user_data);
        User user = new User("zhang", "xinming");
        binding.setUser(user);
    }
}

public class User {
    private final String mFirstName;
    private final String mLastName;
    public User(String firstName, String lastName) {
        this.mFirstName = firstName;
        this.mLastName = lastName;
    }

    public String getFirstName() {
        return mFirstName;
    }

    public String getLastName() {
        return mLastName;
    }
}
In Activity, through DataBindingUtil.setContentView sets the layout and returns a UserDataBinding object through which setUser can set the User object and display it on the bound TextView. If you are not using data binding in an activity, such as Fragment s or some RecyclerView adapters, you can also use this:
UserDataBinding binding =
    UserDataBinding.inflate(getLayoutInflater(), R.layout.user_data, false);
UserDataBinding binding =
    DataBindingUtil.inflate(getLayoutInflater(), R.layout.user_data, parent, false);
2. Data-Binding internal implementation
2.1 Data-Binding Class Diagram
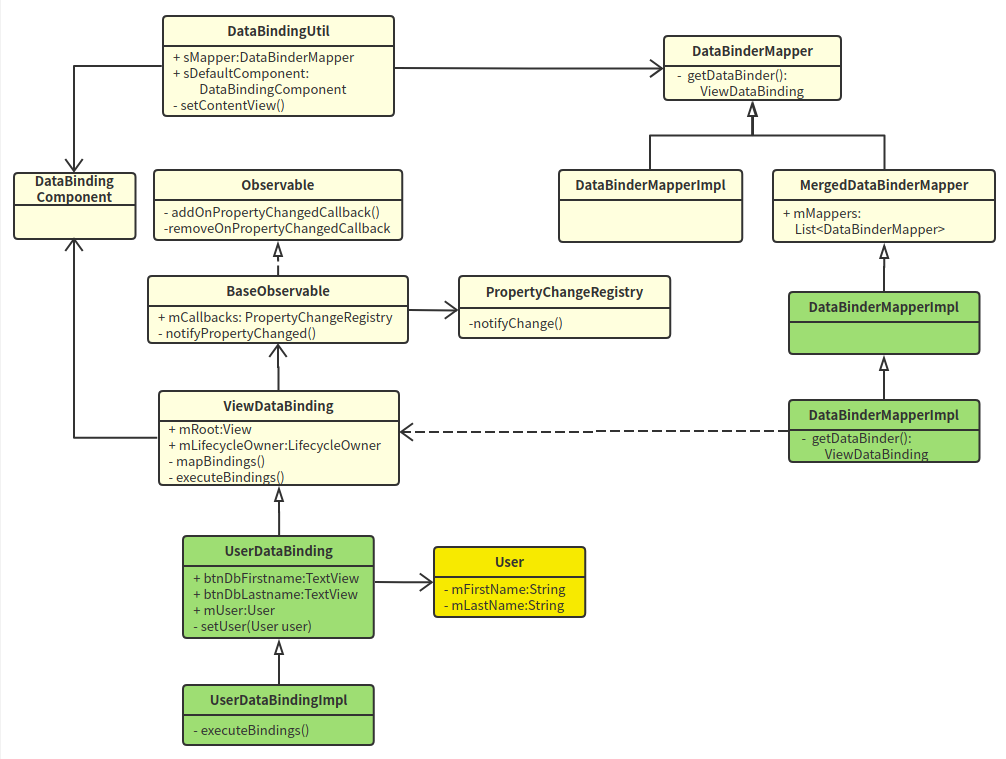
The yellow class is the User we defined, and the green class is the data-binding s generated class.
The name of UserDataBinding is related to our layout file name:user_data.xml generates UserDataBinding and UserDataBindingImpl with the following paths:
./app/build/generated/source/apt/debug/com/xiaomi/zxm/databinding/UserDataBindingImpl.java
./app/build/generated/data_binding_base_class_source_out/debug/dataBindingGenBaseClassesDebug/out/com/xiaomi/zxm/databinding/UserDataBinding.java
The rest are the classes in the data-binding class library. DataBindingUtil is the entire entry. It holds a DataBinderMapper, which records each DataBinding in the mapper. Note that there are three classes called DataBinderMapperImpl, which directly inherit the classes in DataBinderMapper's data-binding. MergedDataBinderMapper has a list of Mappers and androidx.databinding.DataBinderMapperImpl is generated by aapt and has only one constructor in its code:
DataBinderMapperImpl() {
    addMapper(new com.xiaomi.zxm.DataBinderMapperImpl());
}
Its purpose is to new a separate DataBinderMapperImpl (note its package name) and add it to the Mapper list of MergedDataBinderMapper, which means that the real work is com.xiaomi.zxm.DataBinderMapperImpl.
2.2 Data-Binding creation process
The entry to the program is setContentView, and the layout file passed in is a special layout wrapped file, which is actually split into two after compilation:
./app/build/intermediates/incremental/mergeDebugResources/stripped.dir/layout/user_data.xml:
<?xml version="1.0" encoding="utf-8"?>
<LinearLayout
    xmlns:android="http://schemas.android.com/apk/res/android"
    xmlns:tools="http://schemas.android.com/tools"
    android:layout_width="match_parent"
    android:layout_height="match_parent"
    android:layout_marginTop="20dp"
    android:orientation="horizontal"
    tools:context=".databinding.DataBindingActivity1"
    android:tag="layout/user_data_0">
    <TextView
        android:id="@+id/btn_db_firstname"
        android:layout_width="wrap_content"
        android:layout_height="wrap_content"
        android:layout_marginStart="5dp"
        android:background="#FFD56B"
        android:tag="binding_1" />
    <TextView
        android:id="@+id/btn_db_lastname"
        android:layout_width="wrap_content"
        android:layout_height="wrap_content"
        android:layout_marginStart="5dp"
        android:background="#FFD56B"
        android:tag="binding_2" />
</LinearLayout>
This is the real layout file, but tag s every view that needs to be bound, and the root view is layout/user_data_0, binding_on both TextView s 1 and binding_2. The other is:
./app/build/intermediates/data_binding_layout_info_type_merge/debug/mergeDebugResources/out/user_data-layout.xml:
<?xml version="1.0" encoding="utf-8" standalone="yes"?>
<Layout absoluteFilePath="/home/zhangxinming/projects/AndroidStudio/MyDemo/app/src/main/res/layout/user_data.xml" directory="layout"
    isMerge="false"
    layout="user_data" modulePackage="com.xiaomi.zxm">
    <Variables name="user" declared="true" type="com.xiaomi.zxm.databinding.User">
        <location endLine="5" endOffset="69" startLine="5" startOffset="8" />
    </Variables>
    <Variables name="address" declared="true"
        type="com.xiaomi.zxm.databinding.Address">
        <location endLine="6" endOffset="75" startLine="6" startOffset="8" />
    </Variables>
    <Targets>
      <Target tag="layout/user_data_0" view="LinearLayout">
          <Expressions />
          <location endLine="32" endOffset="18" startLine="9" startOffset="4" />
      </Target>
      <Target id="@+id/btn_db_firstname" tag="binding_1" view="TextView">
        <Expressions>
          <Expression attribute="android:text" text="user.firstName">
            <Location endLine="22" endOffset="43" startLine="22" startOffset="12" />
            <TwoWay>false</TwoWay>
            <ValueLocation endLine="22" endOffset="41" startLine="22"
                startOffset="28" />
          </Expression>
        </Expressions>
        <location endLine="22" endOffset="46" startLine="16" startOffset="8" />
      </Target>
      <Target id="@+id/btn_db_lastname" tag="binding_2" view="TextView">
        <Expressions>
          <Expression attribute="android:text" text="user.lastName">
            <Location endLine="30" endOffset="42" startLine="30" startOffset="12" />
              <TwoWay>false</TwoWay>
              <ValueLocation endLine="30" endOffset="40" startLine="30"
                  startOffset="28" />
           </Expression>
         </Expressions>
         <location endLine="30" endOffset="45" startLine="24" startOffset="8" />
       </Target>
    </Targets>
</Layout>
The configuration file details the data-related information we specified in the original layout file, the global variables we declared, and the absolute path to the data type that the variable points to.
<Target id="@+id/btn_db_firstname" tag="binding_1" view="TextView">, the corresponding View type of tag.
<Expression attribute="android:text" text="user.lastName">, control binds specific properties and specific properties in Model.
Whether <TwoWay>true</TwoWay>is a two-way binding (android:text="@{user.lastName}" is a one-way binding, android:text="@={user.lastName}" is a two-way binding with an equal sign)
2.2.1 Procedure of setContentView
public static <T extends ViewDataBinding> T setContentView(
    @NonNull Activity activity, int layoutId,
    @Nullable DataBindingComponent bindingComponent) {
    activity.setContentView(layoutId);
    View decorView = activity.getWindow().getDecorView();
    ViewGroup contentView =
        (ViewGroup) decorView.findViewById(android.R.id.content);
    return bindToAddedViews(bindingComponent, contentView, 0, layoutId);
}
Actually, the code is divided into two parts, the previous function is the same as the normal setContentView, and the last sentence is data-binding related.
The bindToAddedView is last called to bind:
static <T extends ViewDataBinding> T bind(
    DataBindingComponent bindingComponent, View root, int layoutId) {
    return (T) sMapper.getDataBinder(bindingComponent, root, layoutId);
}
The sMapper is the DataBinderMapper, which is an abstract class implemented as MergedDataBinderMapper:
public ViewDataBinding getDataBinder(
    DataBindingComponent bindingComponent, View view, int layoutId) {
    for(DataBinderMapper mapper : mMappers) {
        ViewDataBinding result = mapper.getDataBinder(bindingComponent, view, layoutId);
        if (result != null) {
            return result;
        }
    }
    if (loadFeatures()) {
        return getDataBinder(bindingComponent, view, layoutId);
    }
    return null;
}
Loop inside each Mapper to call getDataBinder, noting the previous add:
DataBinderMapperImpl() {
    addMapper(new com.xiaomi.zxm.DataBinderMapperImpl());
}
That is, com is called last. Xiaomi. Zxm. getDataBinder for DataBinderMapperImpl:
public ViewDataBinding getDataBinder(
    DataBindingComponent component, View view, int layoutId) {
    int localizedLayoutId = INTERNAL_LAYOUT_ID_LOOKUP.get(layoutId);
    if(localizedLayoutId > 0) {
        final Object tag = view.getTag();
        if(tag == null) {
          throw new RuntimeException("view must have a tag");
        }
        switch(localizedLayoutId) {
          case  LAYOUT_USERDATA: {
            if ("layout/user_data_0".equals(tag)) {
               return new UserDataBindingImpl(component, view);
            }
          throw new IllegalArgumentException("The tag for company_data is invalid.
             Received: " + tag);
         }
       }
    }
    return null;
}
You can see if the tag is layout/user_data_0 returns the UserDataBindingImpl object.
2.2.2 Construction of UserDataBindingImpl
public UserDataBindingImpl(@Nullable androidx.databinding.DataBindingComponent
    bindingComponent, @NonNull View root) {
    this(bindingComponent, root,
        mapBindings(bindingComponent, root, 3, sIncludes, sViewsWithIds));
}

private UserDataBindingImpl(androidx.databinding.DataBindingComponent
    bindingComponent, View root, Object[] bindings) {
    super(bindingComponent, root, 0, (android.widget.TextView) bindings[1]
            , (android.widget.TextView) bindings[2]);
    this.btnDbFirstname.setTag(null);
    this.btnDbLastname.setTag(null);
    this.mboundView0 = (android.widget.LinearLayout) bindings[0];
    this.mboundView0.setTag(null);
    setRootTag(root);
    // listeners
    invalidateAll();
}
Before the constructor executes, the mappingBindings method is executed, which essentially replaces the previous findViewById work. The mappingBindings code is longer, not listed here, and will eventually start all tag s with layout s or binding_ The starting view s are found and stored in the bindings array, which is the return value of the mappingBindings method. When the super is called in the constructor of UserDataBindingImpl, the bindings array is separated: bindings[1],bindings[2] are the two TextView s that need to be bound to see what their super does:
protected UserDataBinding(Object _bindingComponent, View _root, int _localFieldCount,
      TextView btnDbFirstname, TextView btnDbLastname) {
    super(_bindingComponent, _root, _localFieldCount);
    this.btnDbFirstname = btnDbFirstname;
    this.btnDbLastname = btnDbLastname;
}
Simply putting two TextView s in a member variable is exactly the same as saving directly with findViewById.
The final execution of the constructor is setRootTag:
protected void setRootTag(View view) {
    view.setTag(R.id.dataBinding, this);
}
Set tag on the rootview of the layout, ID is R.id.dataBinding, object is the current ViewDataBinding object, recall that there is also a tag on the rootview, set when the xml is split, is the version without key, and its value is layout/user_data_0.
2.3 Execute Binding
Summarize the steps above:
- SetTag is layout/user_on rootView first Data_ 0, set setTag to bind_on the child view that needs to be bound 1, binding_2
- Execute the mappingBindings method to save the view previously set tag as a member variable.
- Construct UserDataBindingImpl and set key=R.id.dataBinding, value=tag of UserDataBindingImpl object on rootview.
With the previous steps, the next and final step is to perform the specific binding. In ViewDataBinding, there is a static piece of code:
static {
    if (VERSION.SDK_INT < VERSION_CODES.KITKAT) {
        ROOT_REATTACHED_LISTENER = null;
    } else {
        ROOT_REATTACHED_LISTENER = new OnAttachStateChangeListener() {
            @TargetApi(VERSION_CODES.KITKAT)
            @Override
            public void onViewAttachedToWindow(View v) {
                // execute the pending bindings.
                final ViewDataBinding binding = getBinding(v);
                binding.mRebindRunnable.run();
                v.removeOnAttachStateChangeListener(this);
            }
        };
    }
}
When the rootview is attach ed, mRebindRunnable is executed, where getBinding is the tag that finds the ID on the rootview is R.id.dataBinding, and then mRebindRunnable, which ultimately calls executePending BindingsInternal, which executes the executeBindings method internally, which is an abstract method implemented specifically in UserDataBindingImpl:
protected void executeBindings() {
   long dirtyFlags = 0;
   synchronized(this) {
     dirtyFlags = mDirtyFlags;
     mDirtyFlags = 0;
   }
   java.lang.String userFirstName = null;
   com.xiaomi.zxm.databinding.User user = mUser;
   java.lang.String userLastName = null;
   com.xiaomi.zxm.databinding.Address address = mAddress;
   java.lang.String addressCountry = null;
   java.lang.String addressCity = null;

   if ((dirtyFlags & 0x5L) != 0) {
     if (user != null) {
        // read user.firstName
        userFirstName = user.getFirstName();
        // read user.lastName
        userLastName = user.getLastName();
      }
   }
   if ((dirtyFlags & 0x6L) != 0) {
    if (address != null) {
     // read address.country
       addressCountry = address.getCountry();
       // read address.city
        addressCity = address.getCity();
     }
  }
  // batch finished
  if ((dirtyFlags & 0x6L) != 0) {
    // api target 1
    androidx.databinding.adapters.TextViewBindingAdapter.setText(
        this.btnDbCity, addressCity);
    androidx.databinding.adapters.TextViewBindingAdapter.setText(
        this.btnDbCountry, addressCountry);
  }
  if ((dirtyFlags & 0x5L) != 0) {
    // api target 1
    androidx.databinding.adapters.TextViewBindingAdapter.setText(
        this.btnDbFirstname, userFirstName);
    androidx.databinding.adapters.TextViewBindingAdapter.setText(
        this.btnDbLastname, userLastName);
  }
}
dirtyFlag is used to identify the view that needs to be refreshed. Here I only bind User in demo. To clarify the purpose of this flag, add another Address data to demo to bind. Finally, the flag is as follows:
// dirty flag
private  long mDirtyFlags = 0xffffffffffffffffL;
/* flag mapping
flag 0 (0x1L): user
flag 1 (0x2L): address
  flag 2 (0x3L): null
flag mapping end*/
It's clear from the comment that flag=0 refreshes user-related views, flag=1 refreshes address-related views, flag=2 refreshes all views, and viewing the source code can give a flag value (note that the dirtyFlag value is the flag power of 2):
public void invalidateAll() {
    synchronized(this) {
        mDirtyFlags = 0x4L;
    }
    requestRebind();
}
public void setUser(@Nullable com.xiaomi.zxm.databinding.User User) {
    this.mUser = User;
    synchronized(this) {
        mDirtyFlags |= 0x1L;
    }
    notifyPropertyChanged(BR.user);
    super.requestRebind();
}
public void setAddress(@Nullable com.xiaomi.zxm.databinding.Address Address) {
    this.mAddress = Address;
    synchronized(this) {
        mDirtyFlags |= 0x2L;
    }
    ...
}
Back to the refresh section, dirtyFlags & 0x5L!= 0 means either refresh all or user, dirtyFlags & 0x6L!= 0 means either refresh all or address, if user is refreshed, fetch data from mUser first, and bind by calling setText:
androidx.databinding.adapters.TextViewBindingAdapter.setText(
    this.btnDbFirstname, userFirstName);
The first parameter is TextView, and the second parameter is the field in user. Note that the TextViewBindingAdapter is androidx. Databinding. Under the adapters package, this package has many similar adapters, such as AbsListViewBindingAdapter, CardViewBindingAdapter waiting, which are no longer listed here.
In the setUser implementation above, the last two lines of code are:
notifyPropertyChanged(BR.user);
super.requestRebind();
NotifyPropertyChanged notifies some callbacks, and requestRebind executes the executeBindings refresh. Looking at notifyPropertyChanged first, in fact, ViewDataBinding inherits BaseObservable, implements observer mode, and after our Activity gets the desired binding object, you can set callback:
protected void onCreate(Bundle savedInstanceState) {
    super.onCreate(savedInstanceState);
    UserDataBinding binding =
        DataBindingUtil.setContentView(this, R.layout.user_data);
    User user = new User("zhang", "xinming");
    binding.setUser(user);
    binding.addOnPropertyChangedCallback(...);
}
ViewDataBinding continues to look at requestRebind:
protected void requestRebind() {
   if (mContainingBinding != null) {
      mContainingBinding.requestRebind();
   } else {
      final LifecycleOwner owner = this.mLifecycleOwner;
      if (owner != null) {
          Lifecycle.State state = owner.getLifecycle().getCurrentState();
          if (!state.isAtLeast(Lifecycle.State.STARTED)) {
            return; // wait until lifecycle owner is started
          }
      }
      synchronized (this) {
        if (mPendingRebind) {
          return;
        }
        mPendingRebind = true;
      }
      if (USE_CHOREOGRAPHER) {
        mChoreographer.postFrameCallback(mFrameCallback);
      } else {
        mUIThreadHandler.post(mRebindRunnable);
      }
   }
}
Ignore the branch of mContainingBinding first. The code first determines if there is a Lifecycle Owner. If there is one, it must now be at least in the STARTED state (relationship with lifecycle, binding can set setLifecycle Owner to refer to the subsequent binding LiveData). Next, it is to determine if it is still in mPending Rebind, USE_ CHOREOGRAPHER = sdk_ INT >= 16, when sdk is greater than or equal to 16, use Choreographer to schedule, FrameCallback can be called back when the next frame is rendered, otherwise it will be directly post ed on the main thread. Anyway, it ends up with mRebindRunnable.run().
3. binding Details
3.1 binding mechanism
When binding a data in a layout file, such as the text property of the TextView above, the method corresponding to a parameter of compatible type is automatically received when binding. For example, with the expression android:text="@{user.name}", the library looks for an accepted user. setText(arg) method of the type returned by getName(). If user. If getName() returns a String, the library looks for a setText() method that accepts the String parameter. If the expression returns an int, the library searches for the setText() method that accepts the int parameter. The expression must return the correct type, and the type of the returned value can be cast as needed.
When properties are set in the layout file, the databinding library automatically looks for the relevant setter methods to set them, that is, if you take TextView as an example, only one setter method can be found to verify it, and there is a setError(error) method in TextView as follows:
@android.view.RemotableViewMethod
public void setError(CharSequence error) {
    if (error == null) {
        setError(null, null);
    } else {
        Drawable dr = getContext().getDrawable(
                com.android.internal.R.drawable.indicator_input_error);
        dr.setBounds(0, 0, dr.getIntrinsicWidth(), dr.getIntrinsicHeight());
        setError(error, dr);
    }
}
This method is mainly used to prompt error information, which is generally used in code. Here we can configure this method in demo to use in the layout file as follows:
<TextView
    android:layout_width="wrap_content"
    android:layout_height="wrap_content"
    android:text="@{user.name}"
    app:error="@{user.name}"/>
3.2 BindingMethods
This is a comment provided by the DataBindings library to map an attribute in the View when it does not correspond to its corresponding setter method name, such as the property android:textColorHint of TextView works the same way as the setHintTextColor method, where the property name is not consistent with the corresponding setter method name. This requires binding the property to the corresponding setter method using the BindingMethods annotations so that DataBindings can find the corresponding setter method according to the value of the property. Databindings have handled cases in native Views where such attributes do not match the setter method. See how TextViewBindingAdapter handles these mismatched attributes in the source code. References are as follows:
@BindingMethods({
    @BindingMethod(type = TextView.class,
        attribute = "android:autoLink", method = "setAutoLinkMask"),
    @BindingMethod(type = TextView.class,
        attribute = "android:drawablePadding", method = "setCompoundDrawablePadding"),
    @BindingMethod(type = TextView.class,
        attribute = "android:editorExtras", method = "setInputExtras"),
    @BindingMethod(type = TextView.class,
        attribute = "android:inputType", method = "setRawInputType"),
    @BindingMethod(type = TextView.class,
        attribute = "android:scrollHorizontally", method = "setHorizontallyScrolling"),
    @BindingMethod(type = TextView.class,
        attribute = "android:textAllCaps", method = "setAllCaps"),
    @BindingMethod(type = TextView.class,
        attribute = "android:textColorHighlight", method = "setHighlightColor"),
    @BindingMethod(type = TextView.class,
        attribute = "android:textColorHint", method = "setHintTextColor"),
    @BindingMethod(type = TextView.class,
        attribute = "android:textColorLink", method = "setLinkTextColor"),
    @BindingMethod(type = TextView.class,
        attribute = "android:onEditorAction", method = "setOnEditorActionListener"),
})
So, for some of the attributes in the View in the Android framework, the databinding library has already used BindingMethods to automatically find and match attributes, so how to customize the setter method when using databinding when some attributes do not have a corresponding setter method is now the time to use BindingAdapter.
3.3 BindingAdapter
You saw earlier that executeBindings finally passed through the TextView BindingAdapter
androidx.databinding.adapters.TextViewBindingAdapter.setText(this.btnDbFirstname, userFirstName) binds.
BindingAdapter is based on APT annotation technology, which enables APT to generate specific code to perform certain specified functions based on the relevant writing rules during project construction. BindingAdapter has two attributes, value is a String[], requireAll is a boolean type: value is used to describe the associated attributes of interest in XML, here is an array, indicating that an extension method can focus on multiple XML attributes at the same time. The value requireAll adds to the value, which defaults to true, meaning that the annotation must declare in the XML that it cares about all the property values, or it will compile with errors, whereas false does not. It allows the rule to be used with only some or all of the properties it cares about.
With the function signature described by the BindingAdapter, the parameter list must appear in the following fixed form:
//Class building is arbitrary, APT scans global code at build time
public class ViewAttrAdapter {
    //Notice how many XML tags are concerned with, and the list of parameters requires several corresponding acceptance parameters to be written. And the control class must be in the first parameter.
    @BindingAdapter({xml Attribute Label, ...})
    public static void Function name(Control class of interest view, xml Attribute Label Value value, ...){
        // behavior
    }
}
In an XML layout, we should use the tag type corresponding to the BindingAdapter tag to assign values, and we must use @{} as a value package, in order to provide APT with a way to parse XML that distinguishes common assignments.
<View
 android:layout_width="match_parent"
 android:layout_height="175dp"
 app:xml Attribute Label="@{Function parameters accept values of type}" />
Note the trigger rules for binding resolution:
// This qualification must be used with android:src to match
@BindingAdapter("android:src")
// Both app:src and android:src can match when using this qualification, note that Android must be customized
// Attribute declarations are described in the XML, such as attrs. In XML
@BindingAdapter("src")
Attributes triggering resolution must have label="@{value}" where @{} must not be dropped.
The setText of TextView BindingAdapter performs a check to determine if the content has changed. Only when the content has changed will the setText method of TextView be actually called. The code is no longer listed here. If we have a need to automatically capitalize TextView text, we can customize the BindingAdapter:
@BindingAdapter("android:text")
public static void setText(TextView view, CharSequence text) {
    final CharSequence oldText = view.getText();
    if (text == oldText || (text == null && oldText.length() == 0)) {
       return;
    }
    view.setText(text.toString().toUpperCase());
}
Note that it is important to use the static method with the BindingAdapter annotation so that the resulting binding code is as follows:
if ((dirtyFlags & 0x3L) != 0) {
    // api target 1
    com.xiaomi.zxm.databinding.DataBindingActivity1.setText(
        this.btnDbFirstname, userFirstName);
    this.btnDbFirstname.setError(userFirstName);
    com.xiaomi.zxm.databinding.DataBindingActivity1.setText(
        this.btnDbLastname, userLastName);
}
3.4 Binding Custom Properties
Take binding imageUrl as an example, using BindingAdater first, single parameter version:
@BindingAdapter("imageUrl")
public static void setImageUrl(ImageView view, String url) {
    Glide.with(view).load(url).into(view);
}
Multi-parameter version:
@BindingAdapter(value = {"imageUrl", "placeholder"}, requireAll = false)
 public static void setImageUrl(ImageView view, String url, Drawable placeHolder) {
     Glide.with(view.getContext())
          .load(url)
          .placeholder(placeHolder)
          .into(view);
 }
Then use imageUrl in the layout file:
<?xml version="1.0" encoding="utf-8"?>
<layout xmlns:android="http://schemas.android.com/apk/res/android"
    xmlns:app="http://schemas.android.com/apk/res-auto">
    <data> </data>
    <LinearLayout
        android:layout_width="match_parent"
        android:layout_height="match_parent"
        android:orientation="vertical"
        android:gravity="center_horizontal">
        <!--Customize individual properties-->
      <ImageView
          android:layout_width="100dp"
          android:layout_height="100dp"
          app:imageUrl="@{user.photo}"
          app:placeholder="@{@drawable/ic_launcher_background}" />
    </LinearLayout>
</layout>
3.5 Binding events
Define a callback to listen for events:
public class UserEventListener {
    public void clickText(View view) {
        Toast.makeText(view.getContext(), "Clicked on the text", Toast.LENGTH_LONG).show();
    }
    public void clickImage(View view) {
        Toast.makeText(view.getContext(), "Clicked on the picture", Toast.LENGTH_LONG).show();
    }
}
Add data variable information and click bindings to xml:
<data>
    <variable name="user" type="com.xiaomi.zxm.databinding.User"/>
    <variable name="userevent" type="com.xiaomi.zxm.databinding.UserEventListener"/>
    </data>
<TextView
    android:id="@+id/btn_db_lastname"
    android:layout_width="wrap_content"
    android:layout_height="wrap_content"
    android:layout_marginStart="5dp"
    android:background="#FFD56B"
    android:onClick="@{userevent.clickText}"
    android:text="@{user.lastName}" />
Event bindings are similar to property bindings, so let's look at the generated binding code:
protected void executeBindings() {
    ...
    if ((dirtyFlags & 0x6L) != 0) {
        if (userevent != null) {
          // read userevent::clickText
          usereventClickTextAndroidViewViewOnClickListener =
           (((mUsereventClickTextAndroidViewViewOnClickListener == null)
            ? mUsereventClickTextAndroidViewViewOnClickListener =
            new OnClickListenerImpl()) :
          mUsereventClickTextAndroidViewViewOnClickListener).setValue(userevent));
      }
   }
   ...
   if ((dirtyFlags & 0x6L) != 0) {
      // api target 1
     this.btnDbLastname.setOnClickListener(
         usereventClickTextAndroidViewViewOnClickListener);
    }
   ...
}

// Listener Stub Implementations
public static class OnClickListenerImpl implements android.view.View.OnClickListener{
    private com.xiaomi.zxm.databinding.UserEventListener value;
    public OnClickListenerImpl setValue(
        com.xiaomi.zxm.databinding.UserEventListener value) {
        this.value = value;
        return value == null ? null : this;
  }
  @Override
  public void onClick(android.view.View arg0) {
     this.value.clickText(arg0);
  }
}
It's basically set OnClickListener on TextView, but its Listener wraps our own defined UserEventListener and when onClick calls the clickText of UserEventListener.
3.6 BindingConversion
In some cases, custom conversion between specific types is required. For example, the android:background attribute of a view requires Drawable, but the color value specified is an integer. Let's look at a simple example, with a suffix after each string:
@BindingConversion
public static String conversionString(String text) {
   return text + "--BindingConversion";
}
Like the BindingAdapter, you need to convert by static and annotating the BindingConversion declaration. The code retains the part that was previously capitalized by the BindingAdapter. After running, you find that the zhang entered by TextView has been converted to ZHANG-BINDINGCONVERSION. You can see that both BindingAdapter and BindingConversion are in effect and BindingConversion are executed first. Execute the BindingAdapter and take another example of color conversion:
<TextView
   android:id="@+id/btn_db_firstname"
   android:layout_width="wrap_content"
   android:layout_height="wrap_content"
   android:layout_marginStart="5dp"
   android:background='@{"gules"}'
   android:text="@{user.firstName}"
   app:error="@{user.firstName}"/>
The background color of background is written in red in xml, which is obviously not compilable. If we add a conversion code, it will work:
@BindingConversion
public static Drawable convertStringToDrawable(String str) {
    if (str.equals("gules")) {
        return new ColorDrawable(Color.parseColor("#FF0000"));
    }
    return new ColorDrawable(Color.parseColor("#FFD56B"));
}
3.7 Observable data
As mentioned earlier, ViewDataBinding inherits BaseObservable, implements observer mode, and when setUser is called, the following code is called to refresh:
public void setUser(@Nullable com.xiaomi.zxm.databinding.User User) {
    this.mUser = User;
    synchronized(this) {
        mDirtyFlags |= 0x1L;
    }
    notifyPropertyChanged(BR.user);
    super.requestRebind();
}
Calling here actually just binds the whole User's stuff. If the content of the User object changes, how do I refresh the display of the interface? For example, if we set the click event on Text earlier, clickText will be executed to modify the content in its implementation:
public class UserEventListener {
    private User mUser;
    public UserEventListener(User user) {
        mUser = user;
    }
    public void clickText(View view) {
        mUser.setLastName("xiaoai");
        Toast.makeText(view.getContext(), "Clicked on the text", Toast.LENGTH_LONG).show();
    }
}
After running, you can see that the interface has not been modified, so here we need to make a modification to User so that it inherits BaseObserver and adds Bindable to the fields that need to be listened on:
public class ObservableUser extends BaseObservable {
    @Bindable
    private String mFirstName;
    @Bindable
    private String mLastName;
    public ObservableUser(String firstName, String lastName) {
        this.mFirstName = firstName;
        this.mLastName = lastName;
    }

    public String getFirstName() {
        return mFirstName;
    }

    public void setFirstName(String firstName) {
        mFirstName = firstName;
        notifyPropertyChanged(BR.firstName);
    }

    public String getLastName() {
        return mLastName;
    }

    public void setLastName(String lastName) {
        mLastName = lastName;
        notifyPropertyChanged(BR.lastName);
    }
}
Looking at the setUser implementation, updateRegistration will associate this generated UserDataBindingImpl with ObservableUser (note that the Observable interface is implemented):
 public void setUser(@Nullable com.xiaomi.zxm.databinding.ObservableUser User) {
    updateRegistration(0, User);
    this.mUser = User;
    synchronized(this) {
        mDirtyFlags |= 0x1L;
    }
    notifyPropertyChanged(BR.user);
    super.requestRebind();
}
When notifyPropertyChanged(BR.lastName) of ObservableUser is called, the following methods of UserDataBindingImpl are triggered:
@Override
protected boolean onFieldChange(int localFieldId, Object object, int fieldId) {
  switch (localFieldId) {
     case 0 :
      return onChangeUser((com.xiaomi.zxm.databinding.ObservableUser) object, fieldId);
  }
  return false;
}
private boolean onChangeUser(com.xiaomi.zxm.databinding.ObservableUser User,
    int fieldId) {
  if (fieldId == BR._all) {
    synchronized(this) {
      mDirtyFlags |= 0x1L;
     }
     return true;
  } else if (fieldId == BR.firstName) {
     synchronized(this) {
       mDirtyFlags |= 0x4L;
     }
     return true;
  } else if (fieldId == BR.lastName) {
     synchronized(this) {
       mDirtyFlags |= 0x8L;
     }
     return true;
   }
   return false;
}

private void handleFieldChange(int mLocalFieldId, Object object, int fieldId) {
  if (mInLiveDataRegisterObserver) {
    // We're in LiveData registration, which always results in a field change
    // that we can ignore. The value will be read immediately after anyway, so
    // there is no need to be dirty.
    return;
  }
  boolean result = onFieldChange(mLocalFieldId, object, fieldId);
    if (result) {
      requestRebind();
    }
}
Ultimately, requestRebind refreshes due to field changes. The updateRegistration logic is complex and no longer detailed. It handles Field, List, Map, Live-Data differently. The previous example deals with Field.
Inheriting BaseObservable and adding Binderable annotations to the field and set ting methods that require notifyPropertyChanged calls are cumbersome, and data-binding provides a simplified way: ObservableField, again, modify User first:
public class ObservableFieldUser {
    private final ObservableField<String> mFirstName;
    private final ObservableField<String> mLastName;
    private final String mPhoto;
    public ObservableFieldUser(ObservableField<String> firstName,
        ObservableField<String> lastName, String photo) {
        this.mFirstName = firstName;
        this.mLastName = lastName;
        this.mPhoto = photo;
    }

    public ObservableField<String> getFirstName() {
        return mFirstName;
    }

    public ObservableField<String> getLastName() {
        return mLastName;
    }

    public String getPhoto() {
        return mPhoto;
    }
}
Change the field to ObservableField, noting that there is no need to provide a set method or inherit BaseObservable. Where Activity calls:
ObservableFieldUser user = new ObservableFieldUser(
          new ObservableField<String>("zhang"),
          new ObservableField<String>("xinming"),
          "https://www.baidu.com/img/PCtm_d9c8750bed0b3c7d089fa7d55720d6cf.png");
binding.setUser(user);
Finally, look at where the click event responded:
public void clickText(View view) {
    mUser.getLastName().set("xiaoai");
    Toast.makeText(view.getContext(), "Clicked on the text", Toast.LENGTH_LONG).show();
}
mUer is of ObservableFieldUser type, the interface refreshes when getLastName gets ObservableFieldand calls set directly. The resulting UserDataBindingImpl is much the same, except that the location of the updateRegistration is not in setUser and is not listed here in executeBinding.
3.8 InverseBindingAdapter and Binding
Binding displays the object's data on the View. With the method in the previous section, we can refresh the View after the object is updated. This is a one-way binding. When the data of two-way binding changes, the data stored in the object changes. To perform two-way binding, simply modify the xml as follows:
<EditText
    android:id="@+id/btn_db_firstname"
    android:layout_width="wrap_content"
    android:layout_height="wrap_content"
    android:layout_marginStart="5dp"
    android:background='@{"gules"}'
    android:text="@={user.firstName}"
    app:error="@{user.firstName}"/>
Bind with an = sign and change to EditText, then if EditText changes you can modify the data on the object at the same time. Or take a look at the generated code for UserDataBindingImpl:
protected void executeBindings() {
    ...
    if ((dirtyFlags & 0x10L) != 0) {
    // api target 1
    androidx.databinding.adapters.ViewBindingAdapter.setBackground(
        this.btnDbFirstname,
       com.xiaomi.zxm.databinding.DataBindingActivity1.convertStringToDrawable("gules"));
    androidx.databinding.adapters.TextViewBindingAdapter.setTextWatcher
     (this.btnDbFirstname,
     (androidx.databinding.adapters.TextViewBindingAdapter.BeforeTextChanged)null,
     (androidx.databinding.adapters.TextViewBindingAdapter.OnTextChanged)null,
     (androidx.databinding.adapters.TextViewBindingAdapter.AfterTextChanged)null,
     btnDbFirstnameandroidTextAttrChanged);
   }
   private androidx.databinding.InverseBindingListener
     btnDbFirstnameandroidTextAttrChanged = new
        androidx.databinding.InverseBindingListener() {
        @Override
        public void onChange() {
            java.lang.String callbackArg_0 =
             androidx.databinding.adapters.TextViewBindingAdapter.getTextString(
               btnDbFirstname);
            boolean userJavaLangObjectNull = false;
            androidx.databinding.ObservableField<java.lang.String> userFirstName = null;
            com.xiaomi.zxm.databinding.ObservableFieldUser user = mUser;
            java.lang.String userFirstNameGet = null;
            boolean userFirstNameJavaLangObjectNull = false;
            userJavaLangObjectNull = (user) != (null);
            if (userJavaLangObjectNull) {
                userFirstName = user.getFirstName();
                userFirstNameJavaLangObjectNull = (userFirstName) != (null);
                if (userFirstNameJavaLangObjectNull) {
                    userFirstName.set(((java.lang.String) (callbackArg_0)));
                }
            }
        }
    };
}
As you can see, TextWatcher is added to EditText via TextViewBindingAdapter, notice that the last parameter is a callback, so let's see when TextWatcher calls back:
public static void setTextWatcher(TextView view, final BeforeTextChanged before,
            final OnTextChanged on, final AfterTextChanged after,
            final InverseBindingListener textAttrChanged) {
    newValue = new TextWatcher() {
    @Override
    public void beforeTextChanged(CharSequence s, int start, int count, int after) {
       ...
    }
    @Override
    public void onTextChanged(CharSequence s, int start, int before, int count) {
        if (on != null) {
            on.onTextChanged(s, start, before, count);
        }
        if (textAttrChanged != null) {
            textAttrChanged.onChange();
        }
    }
    ...
}
When onTextChanged is executed, callback onChange, noting that BindingAdapter and BindingConversion have been added to the previous examples:
@BindingAdapter("android:text")
public static void setText(TextView view, CharSequence text) {
    final CharSequence oldText = view.getText();
    if (text == oldText || (text == null && oldText.length() == 0)) {
      return;
    }
    view.setText(text.toString().toUpperCase());
}

@BindingConversion
public static String conversionString(String text) {
    return text + "--BindingConversion";
}
Must be removed, otherwise the loop will be dead. Take BindingAdapter as an example, the starting text is zhang, through BindingAdapter, becomes ZHANG, triggers the field change of mUser. This change triggers BindingAdapter, and then modifies mUser, so the cycle will be dead. Of course, the root cause is that the BindingAdapter we implemented does not make oldText and text strings to determine whether they are equal, The onTextChanged interface of TextWatcher in TextViewBindingAdapter does not determine whether the text is the same.
The InverseBindingAdapter is similar to the BindingAdapter but is used for reverse binding. No further examples are given here.
3.9 Bind Live-Data
The first two sections describe how to implement one-way and two-way bindings. Careful students find that ObservableField is similar to the LiveData described earlier. In fact, LiveData objects can be used as data binding sources to automatically notify the interface of changes in data.
Unlike objects that implement Observable, such as observable fields, LiveData objects understand the life cycle of observers subscribing to data changes. There are many benefits to knowing this, and see Advantages of using LiveData for more details. In Android Studio version 3.1 and later, you can replace observable fields with LiveData objects in your data binding code.
To use a LiveData object with a binding class, you need to specify a life cycle owner to define the scope of the LiveData object. Here's an example, starting with LiveData objects:
public class LiveDataUserModel extends ViewModel {
    private static final String TAG = "LiveDataUserModel";
    private MutableLiveData<String> mFirstName;
    private MutableLiveData<String> mLastName;

    public LiveDataUserModel() {
        this("zhang", "xinming");
    }
    public LiveDataUserModel(String firstName, String lastName) {
        mFirstName = new MutableLiveData<>();
        mFirstName.setValue(firstName);
        mLastName = new MutableLiveData<>();
        mLastName.setValue(lastName);
    }

    public MutableLiveData<String> getFirstName() {
        return mFirstName;
    }
    public void setFirstName(String firstName) {
        mFirstName.postValue(firstName);
    }

    public MutableLiveData<String> getLastName() {
        return mLastName;
    }
    public void setLastName(String lastName) {
        mLastName.postValue(lastName);
    }

    @Override
    protected void onCleared() {
        super.onCleared();
        Log.d(TAG, "onCleared()");
   }
}
You need to inherit the ViewModel and wrap the data you need to observe into MutableLiveData, and see how it works in Activity:
public class LiveDataBindingActivity extends AppCompatActivity {
private static final String TAG = "LiveDataBindingActivity";
  @Override
  protected void onCreate(Bundle savedInstanceState) {
    super.onCreate(savedInstanceState);
    LiveUserDataBinding binding = DataBindingUtil.setContentView(
       this, R.layout.live_user_data);
    binding.setLifecycleOwner(this);

    ViewModelProvider vmp = new ViewModelProvider(this,
         ViewModelProvider.AndroidViewModelFactory.getInstance(
         this.getApplication()));
    LiveDataUserModel liveDataUserModel = vmp.get(LiveDataUserModel.class);
    binding.setUser(liveDataUserModel);

    final MutableLiveData<String> liveFirstName = liveDataUserModel.getFirstName();
    liveFirstName.observe(this, new Observer<String>() {
        @Override
        public void onChanged(@Nullable String firstName) {
            Log.d(TAG, "firstName=" + firstName);
        }
    });
 }
}
SetLifecycle Owner, if not set, can actually run without life cycle management.
The xml section is exactly the same as before, just modify the type of the variable under data to be the latest LiveDataUserModel.
As for background implementations, it is still the LiveUserDataBindingImpl class that actually injects a callback from InverseBindingListener into TextWatcher. The code is no longer listed here. The only difference is that in the executeBindings method, the fields of DataBindings and LiveData are associated through updateLiveDataRegistration (not updateRegistration).
3.10 Expression
Reference resources: https://developer.android.com/topic/libraries/data-binding/expressions
3. summary
Databinding is a data binding framework to implement MVVM mode. It has the advantages of MVVM naturally. What are the disadvantages of databinding?
1. The View layer UI display of DataBindings is implemented in XML files. When problems arise, it is not possible to determine whether it is a Model or an XML problem, and it is not easy to debug in xml.
2. Based on data-driven databinding, the Model layer data may be larger in larger modules. Also, unlike other modes, data from different views cannot be released based on the life cycle of their respective views, but is released uniformly when the entire page is destroyed, thus consuming more memory.
3. It may be easier for developers to accept this MVVM mode of binding rather than directly binding data and events in the layout file.
In Databindings, ViewModel holds data such as ObservableFieldetc. View listens for data changes in ObservableFieldand notifies UI to update accordingly when the ObservableFielddata changes in ViewModel. LiveData can do the same thing without using databindings.