8.1 run the program on the mobile phone
Turn on the developer mode of the mobile phone and select USB debugging.
8.2 notice of use
When the application wants to send a prompt message to the user, but the program is not running in the foreground, you can use the notification.
8.2.1 basic usage of notice
Notifications can be created in activities, broadcast receivers, or services in the next chapter. There are fewer opportunities to create in activities than broadcast receivers and services. General procedures need to use notifications only when they enter the background.
But the way they are created is similar everywhere. We need to get a NotificationManager to manage notifications, which can be obtained by calling the getSystemService method of Context. The getSystemService method passes in a string to determine which system service to obtain. Here, pass in Context NOTIFICATION_ Service is enough. Get instance can write:
NotificationManager manager = (NotificationManager) getSystemService(Context.NOTIFICATION_SERVICE);
Next, use the Build constructor to construct the Notification object. However, each version of Android will modify this part, resulting in unstable API. We can only use the NotificationCompat class provided by the support library to construct Notification objects:
Notification notification = new NotificationCompat.Builder(context).build();
The above code just creates an empty Notification object and has no practical effect. We can set multiple affixes to create a rich Notification object:
Notification notification = new NotificationCompat.Builder(context)
    .setContentTitle("This is content Title")
    .setContentText("This is content Text")
    .setWhen(System.currentTimeMillis())
    .setSmallIcon(R.drawable.small_icon)
    .setLargeIcon(BitmapFactory.decodeResource(getResource(),R.drawable.large_icon))
    .build();
setContentTitle specifies the title content of the notification, setContentText specifies the body content, and setWhen specifies the time when the notification is created, in milliseconds. The specified time will be displayed on the notification. setSmallIcon the small icon set on the status bar must be a pure alpha layer. setLargeIcon sets the large icon, which can be seen after the drop-down.
After the above work is completed, use the notify method to display the notification and receive two parameters. Parameter 1 is id. to ensure that each notification id is different, parameter 2 is the notification object.
public class MainActivity extends AppCompatActivity implements View.OnClickListener{

    @Override
    protected void onCreate(Bundle savedInstanceState) {
        super.onCreate(savedInstanceState);
        setContentView(R.layout.activity_main);
        Button sendNotice = (Button) findViewById(R.id.send_notice);
        sendNotice.setOnClickListener(this);
    }

    @Override
    public void onClick(View v) {
        switch (v.getId()){
            case R.id.send_notice:
                NotificationManager manager = (NotificationManager) getSystemService(NOTIFICATION_SERVICE);
                if(Build.VERSION.SDK_INT >= android.os.Build.VERSION_CODES.O){
                    NotificationChannel notificationChannel = new NotificationChannel("channelid1","channelname",NotificationManager.IMPORTANCE_HIGH);
                    manager.createNotificationChannel(notificationChannel);
                }
                Notification notification = new NotificationCompat.Builder(this,"channelid1").setContentTitle("This is Content Title").setContentText("This is Content Text").setWhen(System.currentTimeMillis()).setSmallIcon(R.mipmap.ic_launcher).setLargeIcon(BitmapFactory.decodeResource(getResources(),R.mipmap.ic_launcher)).build();
                manager.notify(1,notification);
                break;
            default:
                break;
        }
    }
}
Note: in Android O and above, you must create your own channel to use notifications, that is, NotificationChannel. ChannelId needs to be passed in. This parameter will be used as the second parameter in Builder, and channelname will also be passed in. This is something that does not exist in the original textbook.
But this notice can't be clicked. We need to join PendingIntent. The so-called PendingIntent is similar to Intent. It is an intention, but PendingIntent only performs actions at the right time, which can be simply understood as delayed Intent.
The usage is very simple. Several static methods are provided to obtain the instance of PendingIntent. You can choose whether to use getActivity method, getBroadcast method or getService method according to your needs. The parameters are exactly the same. The first parameter is still Context. The second parameter is generally unavailable. Pass in 0, the third parameter is Intent, and the fourth parameter is to determine the behavior of PendingIntent. There are four values available: flag_ ONE_ SHOT,FLAG_ CANCEL_ CURRENT,FLAG_ NO_ CREATE,FLAG_ UPDATE_ Four values of current can be selected. Generally, 0 can be passed in.
FLAG_CANCEL_CURRENT: if the PendingIntent to be created already exists, the intent in the existing PendingIntent will not be used before creating a new PendingIntent.
FLAG_NO_CREATE: if the PendingIntent to be created does not exist, a new PendingIntent will not be created and null will be returned directly.
FLAG_ONE_SHOT: the same PendingIntent can only be used once, and the content of the extra part of the encapsulated Intent in the PendingIntent will not be updated when the same PendingIntent is encountered.
FLAG_UPDATE_CURRENT: if the PendingIntent to be created already exists, while retaining the original PendingIntent, replace the extra part in the intent encapsulated by the original PendingIntent with the extra content in the intent of the newly created PendingIntent.
Add click function to the notification:
public void onClick(View v) {
        switch (v.getId()){
            case R.id.send_notice:
                Intent intent = new Intent(this,NotifcationActivity.class);
                PendingIntent pi = PendingIntent.getActivity(this,0,intent,0);
                NotificationManager manager = (NotificationManager) getSystemService(NOTIFICATION_SERVICE);
                if(Build.VERSION.SDK_INT >= android.os.Build.VERSION_CODES.O){
                    NotificationChannel notificationChannel = new NotificationChannel("channelid1","channelname",NotificationManager.IMPORTANCE_HIGH);
                    manager.createNotificationChannel(notificationChannel);
                }
                Notification notification = new NotificationCompat.Builder(this,"channelid1").setContentTitle("This is Content Title").setContentText("This is Content Text").setWhen(System.currentTimeMillis()).setSmallIcon(R.mipmap.ic_launcher).setLargeIcon(BitmapFactory.decodeResource(getResources(),R.mipmap.ic_launcher)).setContentIntent(pi).build();
                manager.notify(1,notification);
                break;
            default:
                break;
        }
    }
We use the setContentIntent function to set our intent. However, our notification was not cancelled after clicking. There are two solutions. One is in notificationcompat The builder method is concatenated with a setAutoCancel method. One is to explicitly call the cancel method of NotificationManager to cancel.
The first way to write:
 Notification notification = new NotificationCompat.Builder(this,"channelid1").
 ...
 .setAutoCancel(true).build();
The second way to write:
public class NotifcationActivity extends AppCompatActivity {

    @Override
    protected void onCreate(Bundle savedInstanceState) {
        super.onCreate(savedInstanceState);
        setContentView(R.layout.activity_notification);
        NotificationManager manager = (NotificationManager) getSystemService(NOTIFICATION_SERVICE);
        manager.cancel(1);
    }
}
1 is the specified id of the Notification we passed in.
8.2.2 advanced techniques for notification
NotificationCompat.Builder provides rich API s for us to use.
We can use the setSound method to set the sound for better notification. There are many audio files under / system/media/audio/ringtone of each mobile phone, which can be used as follows:
.setSound(Uri.fromFile(new File("/system/media/audio/ringtone/Luna.ogg")))
Setvibration can set vibration. The parameter is an array of long type. No. 0 of the array is the static time, No. 1 is the vibration time, No. 2 is the static time, and so on. The unit is milliseconds.
.setVibrate(new long[] {0,1000,1000,1000})
Of course, you need permission to control mobile phone vibration. Add the following in AndroidManifest:
<users-permission android:name = "android.permission.VIBRATE" />
setLights can control LED lights. The first parameter specifies the color, the second parameter specifies the light duration, and the third parameter specifies the dark duration. The unit of time is milliseconds.
.setLights(Color.GREEN,1000,1000)
If you don't want complex settings, you can also use the system default effect:
.setDefaults(NotificationCompat.DEFAULT_ALL)
8.2.3 advanced functions of notification
NotificationCompat.Builder supports rich text, and setStyle can build rich text content.
Long text function:
.setStyle(new NotificationCompat.BigTextStyle().bigText("Hello,World!Hello,World!Hello,World!Hello,World!Hello,World!"))
Show enlarged picture:
.setStyle(new NotificationCompat.BigPictureStyle().bigPicture(BitmapFactory.decodeResource(getResources(),R.drawable.ic_launcher_background)))
It is parsed into a Bitmap object through the decodeResource method of BitmapFactory, and then passed into the bigPicture method.
setPriority can set priority. The parameters are as follows:
PRIORITY_DEFAULT: the default level. If it is not set, this is it
PRIORITY_MIN: at least, the notification will be displayed on specific occasions, such as the drop-down status bar
PRIORITY_LOW: at a lower level, it will be reduced or changed in order
PRIORITY_HIGH: to a higher degree, it will be enlarged or placed in front
PRIORITY_MAX: at the highest level, you must see it immediately and respond.
8.3 calling cameras and albums
8.3.1 call the camera to take photos
Create a new project and add a Button and an ImageView.
public class MainActivity extends AppCompatActivity {

    public static final int TAKE_PHOTO = 1;

    private ImageView picture;

    private Uri imageUri;

    @Override
    protected void onCreate(Bundle savedInstanceState) {
        super.onCreate(savedInstanceState);
        setContentView(R.layout.activity_main);
        Button takePhoto = (Button) findViewById(R.id.take_photo);
        picture = (ImageView) findViewById(R.id.picture);
        takePhoto.setOnClickListener(new View.OnClickListener() {
            @Override
            public void onClick(View v) {
                File outputImage = new File(getExternalCacheDir(),"output_image.jpg");
                try {
                    if(outputImage.exists()){
                        outputImage.delete();
                    }
                    outputImage.createNewFile();
                } catch (IOException e){
                    e.printStackTrace();
                }
                if(Build.VERSION.SDK_INT >= 24) {
                    imageUri = FileProvider.getUriForFile(MainActivity.this,"com.example.cameraalbumtest.fileprovider",outputImage);
                } else {
                    imageUri = Uri.fromFile(outputImage);
                }
                Intent intent = new Intent("android.media.action.IMAGE_CAPTURE");
                intent.putExtra(MediaStore.EXTRA_OUTPUT,imageUri);
                startActivityForResult(intent,TAKE_PHOTO);
            }
        });
    }

    @Override
    protected void onActivityResult(int requestCode, int resultCode, @Nullable Intent data) {
        switch (requestCode){
            case TAKE_PHOTO:
                if(resultCode == RESULT_OK){
                    try {
                        Bitmap bitmap = BitmapFactory.decodeStream(getContentResolver().openInputStream(imageUri));
                        picture.setImageBitmap(bitmap);
                    } catch (FileNotFoundException e){
                        e.printStackTrace();
                    }
                }
                break;
            default:
                break;
        }
    }
}
First, a File object is created to store the pictures taken by the camera. We named the picture output_image.jpg and cache it in the application associated cache directory. The application associated cache directory refers to the location dedicated to storing the current application data cache data. This directory can be obtained using the getExternalCacheDir method. The specific path is / sdcard / Android / data / < package name > / cache. The reason for saving here is that starting with Android 6.0 system, reading and writing SD card is a dangerous permission. If you put it in another directory, you need run-time permission, and you can skip this step by using the application associated directory.
Then it will enter a judgment. If the system version of the running device is less than 7.0, call the fromFile method of Uri to convert the File object into Uri object. Otherwise, call the getUriForFile method of FileProvider to convert the File object into an encapsulated Uri. Parameter 1 is the context object, the second parameter is any unique string, and parameter 3 is the File object. The reason for this conversion is that after Android 7.0, it is considered unsafe to directly use the local real path Uri, and FileUriExposedException will be thrown. FileProvider is a special content provider to protect data and selectively share the encapsulated Uri to the outside, so as to improve the security of applications.
Next, we construct a Intent, putExtra specifies the address of the picture output, and finally calls startActivityForResult to activate the activity. Because it is an implicit activity, the system will find a responsive camera activity to start. The result is returned to onActivityResult for processing, parsed into a Bitmap object and displayed in ImageView.
The content provider mentioned just now needs to be registered in Android manifest:
<provider
            android:authorities="com.example.cameraalbumtest.fileprovider"
            android:name="androidx.core.content.FileProvider"
            android:exported="false"
            android:grantUriPermissions="true">
            <meta-data android:name="android.support.FILE_PROVIDER_PATHS"
                android:resource="@xml/file_paths" />
        </provider>
The value of the name attribute is fixed, and the value of authorities and fileprovider Geturiforfile() is consistent with the second parameter. Meta data is used internally to specify the Uri share path and reference @ xml/file_paths resource, we want to create resources.
res → New → Dictionary → "XML" → New → File → "file_paths.xml", the modification is as follows:
<?xml version="1.0" encoding="utf-8"?>
<paths xmlns:android="http://schemas.android.com/apk/res/android">
    <external-path
        name="my_images"
        path=""
        />
</paths>
External path specifies the Uri share. name can be filled in casually. Path indicates the specific shared path. Set a null value to share the entire SD card. You can also share only the path where we store pictures. Before Android 4.4, you also need to declare the permission to access the application associated directory. Later, you don't need it. In order to be compatible, we need to declare the permission to access SD card in Android manifest.
<uses-permission android:name="android.permission.WRITE_EXTERNAL_STORAGE"/>
8.3.2 select photos from album
Modify the layout add button, and then write the following code:
public class MainActivity extends AppCompatActivity {

    public static final int TAKE_PHOTO = 1;

    public static final int CHOOSE_PHOTO = 2;

    private ImageView picture;

    private Uri imageUri;

    @Override
    protected void onCreate(Bundle savedInstanceState) {
        super.onCreate(savedInstanceState);
        setContentView(R.layout.activity_main);
        Button takePhoto = (Button) findViewById(R.id.take_photo);
        picture = (ImageView) findViewById(R.id.picture);
        takePhoto.setOnClickListener(new View.OnClickListener() {
            @Override
            public void onClick(View v) {
                File outputImage = new File(getExternalCacheDir(),"output_image.jpg");
                try {
                    if(outputImage.exists()){
                        outputImage.delete();
                    }
                    outputImage.createNewFile();
                } catch (IOException e){
                    e.printStackTrace();
                }
                if(Build.VERSION.SDK_INT >= 24) {
                    imageUri = FileProvider.getUriForFile(MainActivity.this,"com.example.cameraalbumtest.fileprovider",outputImage);
                } else {
                    imageUri = Uri.fromFile(outputImage);
                }
                Intent intent = new Intent("android.media.action.IMAGE_CAPTURE");
                intent.putExtra(MediaStore.EXTRA_OUTPUT,imageUri);
                startActivityForResult(intent,TAKE_PHOTO);
            }
        });
        Button chooseFromAlbum = (Button) findViewById(R.id.choose_from_album);
        chooseFromAlbum.setOnClickListener(new View.OnClickListener() {
            @Override
            public void onClick(View v) {
                if(ContextCompat.checkSelfPermission(MainActivity.this,Manifest.permission.WRITE_EXTERNAL_STORAGE) != PackageManager.PERMISSION_GRANTED) {
                    ActivityCompat.requestPermissions(MainActivity.this,new String[] {Manifest.permission.WRITE_EXTERNAL_STORAGE}, 1);
                } else {
                    openAlbum();
                }
            }
        });
    }

    @Override
    protected void onActivityResult(int requestCode, int resultCode, @Nullable Intent data) {
        switch (requestCode){
            case TAKE_PHOTO:
                if(resultCode == RESULT_OK){
                    try {
                        Bitmap bitmap = BitmapFactory.decodeStream(getContentResolver().openInputStream(imageUri));
                        picture.setImageBitmap(bitmap);
                    } catch (FileNotFoundException e){
                        e.printStackTrace();
                    }
                }
                break;
            case CHOOSE_PHOTO:
                if(resultCode == RESULT_OK) {
                    if(Build.VERSION.SDK_INT >=19){
                        handleImageOnKitKat(data);
                    } else {
                        handleImageBeforeKitKat(data);
                    }
                }
                break;
            default:
                break;
        }
    }

    private void openAlbum(){
        Intent intent = new Intent("android.intent.action.GET_CONTENT");
        intent.setType("image/*");
        startActivityForResult(intent,CHOOSE_PHOTO);
    }

    @Override
    public void onRequestPermissionsResult(int requestCode, @NonNull String[] permissions, @NonNull int[] grantResults) {
        switch (requestCode){
            case 1:
                if(grantResults.length > 0 && grantResults[0] == PackageManager.PERMISSION_GRANTED) {
                    openAlbum();
                } else {
                    Toast.makeText(this,"You denined the Permission",Toast.LENGTH_SHORT).show();
                }
                break;
            default:
        }
    }

    @TargetApi(19)
    private void handleImageOnKitKat(Intent data){
        String imagePath = null;
        Uri uri = data.getData();
        if(DocumentsContract.isDocumentUri(this,uri)){
            String docId = DocumentsContract.getDocumentId(uri);
            if("com.android.providers.media.ducuments".equals(uri.getAuthority())) {
                String id = docId.split(":")[1];
                String selection = MediaStore.Images.Media._ID+"="+id;
                imagePath = getImagePath(MediaStore.Images.Media.EXTERNAL_CONTENT_URI,selection;
            } else if ("com.android.providers.downloads.documents".equals(uri.getAuthority())) {
                Uri contentUri = ContentUris.withAppendedId(Uri.parse("content://downloads/public_downloads"),Long.valueOf(docId));
                imagePath = getImagePath(contentUri,null);
            }
        } else if("content".equalsIgnoreCase(uri.getScheme())) {
            imagePath = getImagePath(uri,null);
        } else if("file".equalsIgnoreCase(uri.getScheme())) {
            imagePath = uri.getPath();
        }
        display(imagePath);
    }

    private void handleImageBeforeKitKat(Intent data){
        Uri uri = data.getData();
        String imagePath = getImagePath(uri, null);
        display(imagePath);
    }

    private String getImagePath(Uri uri, String selection){
        String path = null;
        Cursor cursor = getContentResolver().query(uri,null,selection,null,null);
        if(cursor != null) {
            if(cursor.moveToFirst()){
                path = cursor.getString(cursor.getColumnIndex(MediaStore.Images.Media.DATA));
            }
            cursor.close();
        }
        return path;
    }

    private void display(String imagePath) {
        if(imagePath != null) {
            Bitmap bitmap = BitmapFactory.decodeFile(imagePath);
            picture.setImageBitmap(bitmap);
        } else {
            Toast.makeText(this, "fail to load image", Toast.LENGTH_SHORT).show();
        }
    }
}
First, when clicking, we apply for runtime permission and dynamically apply for WRITE_ETERNAL_STORAGE is a dangerous privilege. Grant SD card reading and writing ability.
After the application, the openAlbum method is called to construct the Intent object, and action is designated as android.. intent. action. GET_ CONTENT. And set some necessary parameters, call startActivityForResult to open the album and select pictures. After returning, call CHOOSE_. Photo logic. Next, the logic is complex. If it is handled by handleImageOnKitKat in a system above 4.4, otherwise, handleImageBeforeKitKat is used. This is because after version 4.4, the system no longer returns the real Uri, but the encapsulated Uri, which needs to be parsed and used.
The logic in the handleImageOnKitKat method is to parse the Uri. There are several cases here. If the returned Uri is of document type, take out the document id for processing. If not, use the normal method. In addition, the Authority of Uri is in media format, and the document has to be parsed again. The real digital id can only be obtained by string segmentation. The extracted id is used to build a new Uri and condition statement, and then these values are passed into the getImagePath method as parameters to obtain the real path of the file. Then call the display method to display the picture.
The logic of the handleImageBeforeKitKat method is much simpler. It is not encapsulated and does not need parsing. It is directly passed into getImagePath to obtain the image path.
8.4 playing multimedia files
8.4.1 playing audio
The playing audio files provided by Android are implemented through MediaPlayer, which provides a very comprehensive control method for audio in various formats, making it easy to play music.
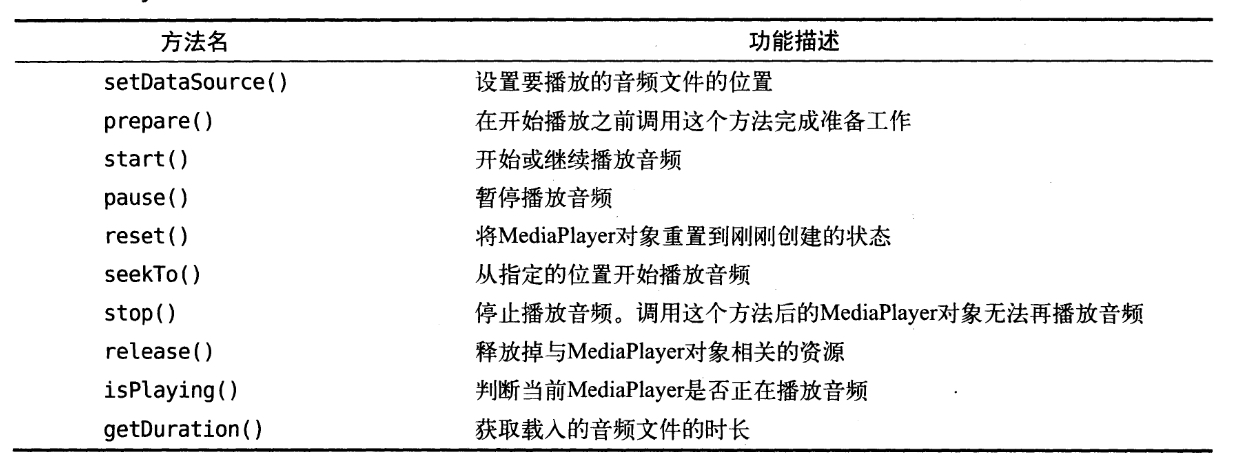
The workflow of MediaPlayer. First, create an instance, then call the setDataSource method to set the file path. The prepare method makes MediaPlayer enter the preparation state, the start method starts playing, the pause method pauses playing, and the reset method stops playing.
We create a new project and then add three buttons for start playback, pause and stop operations. Modification code:
public class MainActivity extends AppCompatActivity implements View.OnClickListener {

    private MediaPlayer mediaPlayer = new MediaPlayer();

    @Override
    protected void onCreate(Bundle savedInstanceState) {
        super.onCreate(savedInstanceState);
        setContentView(R.layout.activity_main);
        Button play = (Button) findViewById(R.id.play);
        Button pause = (Button) findViewById(R.id.pause);
        Button stop = (Button) findViewById(R.id.stop);
        play.setOnClickListener(this);
        pause.setOnClickListener(this);
        stop.setOnClickListener(this);
        if(ContextCompat.checkSelfPermission(MainActivity.this, Manifest.permission.WRITE_EXTERNAL_STORAGE) != PackageManager.PERMISSION_GRANTED) {
            ActivityCompat.requestPermissions(MainActivity.this,new String[] {Manifest.permission.WRITE_EXTERNAL_STORAGE}, 1);
        } else {
            initMediaPlayer();
        }
    }

    private void initMediaPlayer() {
        try{
            File file = new File(Environment.getExternalStorageDirectory(),"music.mp3");
            mediaPlayer.setDataSource(file.getPath());
            mediaPlayer.prepare();
        } catch (Exception e) {
            e.printStackTrace();
        }
    }

    @Override
    public void onRequestPermissionsResult(int requestCode, @NonNull String[] permissions, @NonNull int[] grantResults) {
        switch (requestCode){
            case 1:
                if(grantResults.length > 0 && grantResults[0] == PackageManager.PERMISSION_GRANTED) {
                    initMediaPlayer();
                } else {
                    Toast.makeText(this,"Permission denied, unable to use program",Toast.LENGTH_SHORT).show();
                    finish();
                }
                break;
            default:
        }
    }

    @Override
    public void onClick(View v) {
        switch (v.getId()){
            case R.id.play:
                if(!mediaPlayer.isPlaying()){
                    mediaPlayer.start();
                }
                break;
            case R.id.pause:
                if(mediaPlayer.isPlaying()) {
                    mediaPlayer.pause();
                }
                break;
            case R.id.stop:
                if(mediaPlayer.isPlaying()) {
                    mediaPlayer.reset();
                }
                break;
            default:
                break;
        }
    }

    @Override
    protected void onDestroy() {
        super.onDestroy();
        if(mediaPlayer!=null){
            mediaPlayer.stop();
            mediaPlayer.release();
        }
    }
}
Initialize a MediaPlayer class, add runtime permission processing in onCreate, and obtain the right to access the audio files in the SD card. If the user rejects the permission request, it will directly call finish to close the program. Specify the path of the audio File through the File object. Finally, we need to declare the permissions we use in Manifest.
<uses-permission android:name="android.permission.WRITE_EXTERNAL_STORAGE"/>
8.4.2 playing video
It is mainly realized through VideoView, which is basically similar to the audio playback code, but needs to add a View. The main common methods are as follows:
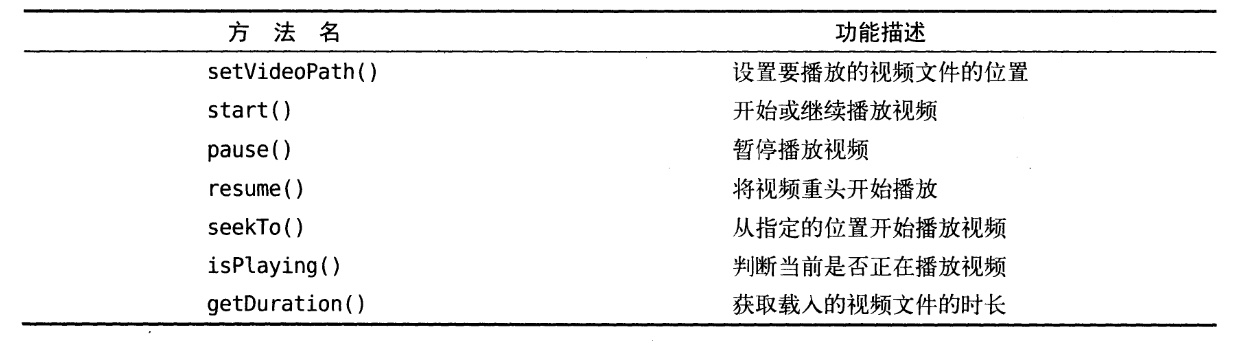
Finally, onDestroy calls the suspend method to release the resources occupied by VideoView.