1. Like mobile phone numbers and payment passwords, you only need to input numbers, not even punctuation marks. However, even if the soft keyboard is switched to 123 digital mode, it still displays redundant keys including punctuation marks.
2. The soft keyboard of the system is fixed at the bottom of the screen and pops up. It can not be embedded into the page layout as a control, nor can it specify the display position of the soft keyboard.
3. Soft keyboards automatically respond to EditText focus change events, often popping up unexpectedly, making developers either deprive EditText of focus or forcibly shut down the display of soft keyboards, but it is inconvenient for developers to force ** in either way.
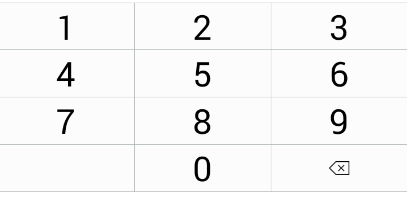
Based on the above situation, in order to meet these customization requirements, you can only customize the soft keyboard for the input method. Full digital soft keyboard interface is also simple, the following is a digital keyboard effect map.

This keyboard has only 0-9 10 digits, plus a backspace key, it can be described as ten brothers and family members, it is perfectly straightforward. So how does this soft keyboard work? In fact, it is basically similar to the usual custom control, only in details, the following step-by-step description of the process of customizing the soft keyboard.
1. We know that custom controls either rewrite the onDraw method to draw the control interface or load the control interface from the layout file. The soft keyboard takes the latter approach, except that its layout files are not stored in res/layout directory, but in res/xml directory.
2. The main task of the custom control is to write the custom control class, and the custom soft keyboard is no exception. With the custom control class, we can deal with the key-press action of ten numeric keys, and embedded the soft keyboard as a common control in other layout files.
3. Soft keyboard is not an isolated control. Its key-press action needs to display the number in a real-time edit box, so it has to be bound to an EditText when using it, so that the soft keyboard knows that my key is to be output to this EditText, not to that EditText.
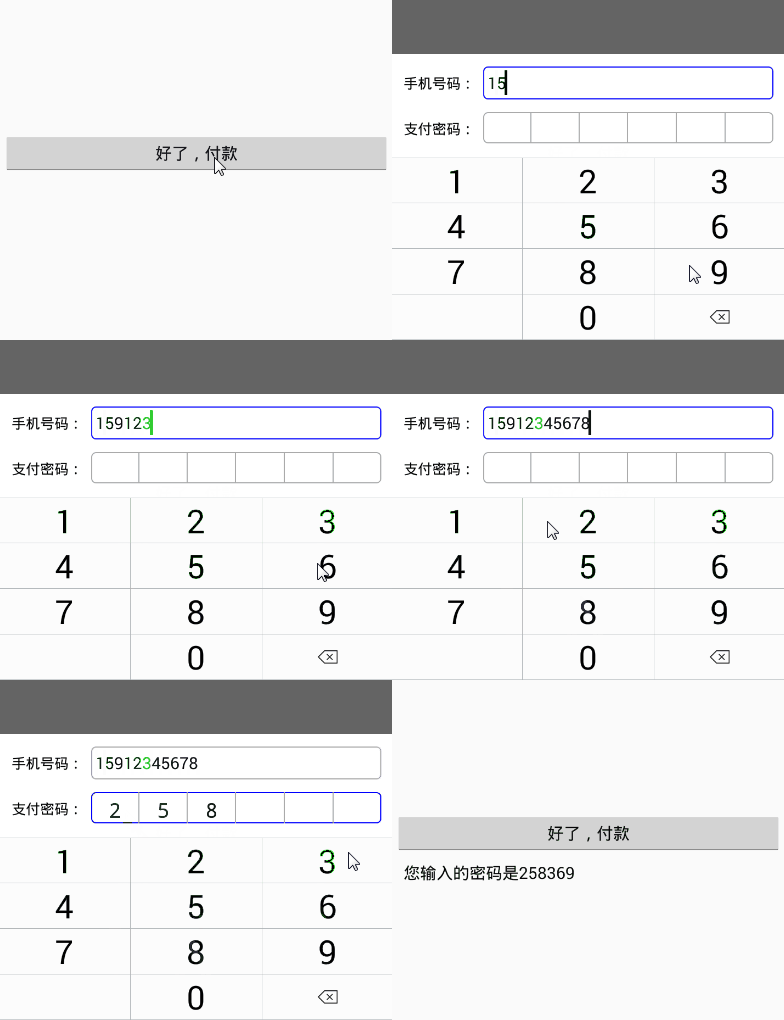
As the saying goes, it's better to see everything at once, so before explaining the concrete implementation steps, it's better to look at the final soft keyboard using motion map, and take this perceptual knowledge to learn.

Next, the three steps of customizing the soft keyboard are described. Firstly, the layout file of the soft keyboard is defined. A file named inputkeyboard.xml is created in the res/xml directory. The inner root node is Keyboard. Four Row nodes are hung under it to represent four rows, and three Key nodes are hung under each Row node to indicate three keys per row. The complete keyboard layout file is as follows:
The above XML keyboard layout will then be passed to the soft keyboard control as a custom attribute, so add the following attribute configurations in res/values/attrs.xml:<Keyboard xmlns:android="http://schemas.android.com/apk/res/android" android:keyWidth="34%p" android:horizontalGap="1px" android:verticalGap="1px" android:keyHeight="55dp"> <Row> <Key android:codes="49" android:keyLabel="1"/> <Key android:codes="50" android:keyLabel="2" /> <Key android:codes="51" android:keyLabel="3"/> </Row> <Row> <Key android:codes="52" android:keyLabel="4" /> <Key android:codes="53" android:keyLabel="5" /> <Key android:codes="54" android:keyLabel="6" /> </Row> <Row> <Key android:codes="55" android:keyLabel="7" /> <Key android:codes="56" android:keyLabel="8" /> <Key android:codes="57" android:keyLabel="9" /> </Row> <Row> <Key android:codes="-3" android:keyEdgeFlags="left" android:keyIcon="@drawable/sym_keyboard_done" /> <Key android:codes="48" android:keyLabel="0" /> <Key android:codes="-5" android:isRepeatable="true" android:keyEdgeFlags="right" android:keyIcon="@drawable/sym_keyboard_delete" /> </Row> </Keyboard>
    <declare-styleable name="keyboard">
        <attr name="xml" format="reference" />
    </declare-styleable>
The key here is to replace the default keyboard layout with the customized keyboard layout. The customized code is as follows:
public class KeyboardLayout extends LinearLayout {
	private KeyboardView mKeyboardView;
	private Keyboard mKeyboard;

	public KeyboardLayout(Context context, AttributeSet attrs, int defStyle) {
		super(context, attrs, defStyle);
		initKeyboard(context, attrs);
	}

	private void initKeyboard(Context context, AttributeSet attrs){
		TypedArray a = context.obtainStyledAttributes(attrs, R.styleable.keyboard);
		if (a.hasValue(R.styleable.keyboard_xml)) {
			//Get the keyboard layout from the xml file
			int xmlid = a.getResourceId(R.styleable.keyboard_xml,0);
			mKeyboard = new Keyboard(context, xmlid);
			mKeyboardView = (KeyboardView)LayoutInflater.from(context).inflate(R.layout.keyboardview, null);
			//Set up custom keyboard layout for keyboard view
			mKeyboardView.setKeyboard(mKeyboard);
			mKeyboardView.setEnabled(true);
			mKeyboardView.setPreviewEnabled(false);
			addView(mKeyboardView);
		}
	}
}
Finally, we need to bind the corresponding EditText object to the soft keyboard, that is, when the soft keyboard button action occurs, which EditText to display the keyboard results. This operation is to call the setOnKeyboardActionListener method of KeyboardView and set up a keyboard event listener. The onKey method is mainly implemented inside the listener. Whenever a legitimate key event (0-9 and backspace) is found, the text of the EditText object is synchronously modified. This part of the code complements the previous custom control class KeyboardLayout:
	public void setInputWidget(EditText et) {
		mKeyboardView.setOnKeyboardActionListener(new KeyboardListener(et));
	}

	private class KeyboardListener implements OnKeyboardActionListener {
		private EditText et;

		public KeyboardListener(EditText et) {
			this.et = et;
		}

		@Override
		public void onKey(int primaryCode, int[] keyCodes) {
			Editable editable = et.getText();
			int start = et.getSelectionStart();
			if (primaryCode == Keyboard.KEYCODE_DELETE) { //Backspace key
				if (editable != null && editable.length() > 0) {
					if (start > 0) {
						editable.delete(start - 1, start);
					}
				}
			} else if(primaryCode>='0' && primaryCode<='9') {
				//Characters that can be entered directly (such as 0-9), whose keycode values in keyboard mapping xml must be configured as ASCII codes for that character
				editable.insert(start, Character.toString((char) primaryCode));
			}
		}

		//Other Override functions that do not require specific implementation are omitted here.
	};
At this point, we can add the soft keyboard to the page layout just like other controls, and pay attention to the customized attributes of the specified keyboard layout:
    <com.example.exmtextinput.widget.KeyboardLayout
        android:id="@+id/kl_input"
        android:layout_width="match_parent"
        android:layout_height="wrap_content"
        android:orientation="vertical"
        mykeyboard:xml="@xml/inputkeyboard" />
Click here to see the full directory of Android Development Notes
__________________________________________________________________________
This article has been published to the Wechat public number "Old Ou Says Android", open the Wechat to scan the two-dimensional code below, or directly search the public number "Old Ou Says Android" to add attention, so as to read the technical dry goods faster and more conveniently.
