In addition to sending multimedia messages, a file provider is also required to install applications. Not only the attached pictures of MMS can be queried in the media library, but also the APK installation package of the application can be found in the media library. The content parser is still used to find the installation package. The specific implementation process is similar to the query image. For example, the following object variables are declared in advance:
private List<ApkInfo> mApkList = new ArrayList<ApkInfo>(); // Installation package list
private Uri mFilesUri = MediaStore.Files.getContentUri("external"); // Uri of memory card
private String[] mFilesColumn = new String[]{ // Array of field names for media library
        MediaStore.Files.FileColumns._ID, // number
        MediaStore.Files.FileColumns.TITLE, // title
        MediaStore.Files.FileColumns.SIZE, // file size
        MediaStore.Files.FileColumns.DATA, // File path
        MediaStore.Files.FileColumns.MIME_TYPE}; // media type
Another example is to find the installation package list in the media library through the content parser. The specific loading code example is as follows:
// Load installation package list
private void loadApkList() {
    mApkList.clear(); // Empty the installation package list
    // Find all apk files on the memory card, including mime_type specifies the file type of apk, or determines whether the file path is in apk end
    Cursor cursor = getContentResolver().query(mFilesUri, mFilesColumn,
            "mime_type='application/vnd.android.package-archive' or _data like '%.apk'", null, null);
    if (cursor != null) {
        // Next, traverse the result set and add it to the installation package list one by one. For simplicity, select only the first ten documents
        for (int i=0; i<10 && cursor.moveToNext(); i++) {
            ApkInfo apk = new ApkInfo(); // Create an installation package information object
            apk.setId(cursor.getLong(0)); // Set installation package number
            apk.setName(cursor.getString(1)); // Set installation package name
            apk.setSize(cursor.getLong(2)); // Set the file size of the installation package
            apk.setPath(cursor.getString(3)); // Set the file path of the installation package
            mApkList.add(apk); // Add to installation package list
        }
        cursor.close(); // Close database cursor
    }
}
After finding the installation package, you usually need to obtain its package name, version name, version number and other information. At this time, you can call the getPackageArchiveInfo method of the application package manager to extract the PackageInfo package information from the installation package file. The packageName attribute value of the package information object is the application package name, the versionName attribute value is the version name, and the versionCode attribute value is the version number. The following is a code example of displaying package information using a pop-up window:
// Displays the prompt dialog box for installing apk
private void showAlert(final ApkInfo apkInfo) {
    PackageManager pm = getPackageManager(); // Get app package manager
    // Get package information of apk file
    PackageInfo pi = pm.getPackageArchiveInfo(apkInfo.getPath(), PackageManager.GET_ACTIVITIES);
    if (pi != null) { // Can find package information
        String desc = String.format("App package name:%s\n Version Name:%s\n Version code:%s\n File path:%s",
                pi.packageName, pi.versionName, pi.versionCode, apkInfo.getPath());
        AlertDialog.Builder builder = new AlertDialog.Builder(this);
        builder.setTitle("Do you want to install this app?"); // Set the title of the reminder dialog box
        builder.setMessage(desc); // Set the message content of the reminder dialog box
        builder.setPositiveButton("yes", new DialogInterface.OnClickListener() {
            public void onClick(DialogInterface dialog, int which) {
                installApk(apkInfo.getPath()); // Install APK of specified path
            }
        });
        builder.setNegativeButton("no", null);
        builder.create().show(); // Show reminder dialog box
    } else { // Package information not found
        ToastUtil.show(this, "The installation package has been damaged. Please select another installation package");
    }
}
With the file path of the installation package, you can open the system installer to perform the installation operation. At this time, you should also pass the Uri object of the installation package. The detailed calling code of application installation is as follows:
// Install APK of specified path
private void installApk(String path) {
    Uri uri = Uri.parse(path); // Creates a Uri object based on the specified path
    // Compatible with Android 7 0, change the Uri method of accessing the file to FileProvider
    if (Build.VERSION.SDK_INT >= Build.VERSION_CODES.N) {
        // Obtain the Uri access method of the installation package file through the FileProvider
        uri = FileProvider.getUriForFile(this,
                BuildConfig.APPLICATION_ID + ".fileProvider", new File(path));
    }
    Intent intent = new Intent(Intent.ACTION_VIEW); // The intention of creating a browse action
    intent.setFlags(Intent.FLAG_ACTIVITY_NEW_TASK); // In addition, open a new page
    intent.setFlags(Intent.FLAG_GRANT_READ_URI_PERMISSION); // Read permission required
    // Set the data type of Uri to APK file
    intent.setDataAndType(uri, "application/vnd.android.package-archive");
    startActivity(intent); // Start the application installer that comes with the system
}
Note that Android 8 0 needs to apply for permission request to start installing apps_ INSTALL_ Packages, so open androidmanifest XML to supplement the following permission application configuration:
<!-- Install app request, Android8.0 need -->
<uses-permission android:name="android.permission.REQUEST_INSTALL_PACKAGES" />
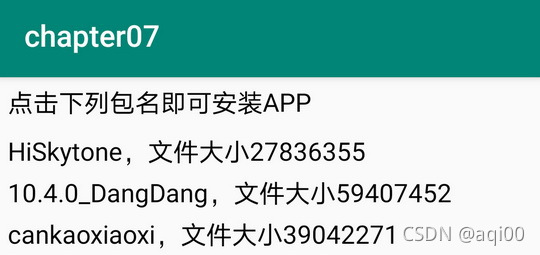
Now you're done, compile and run the App, open the test page, and automatically load the installation package list, as shown in the following figure.
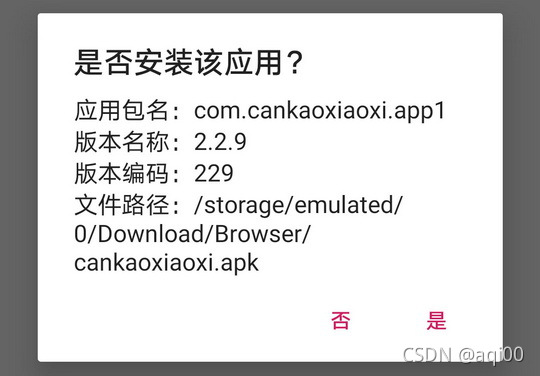
Click an installation package to pop up the confirmation dialog box as shown in the figure below.
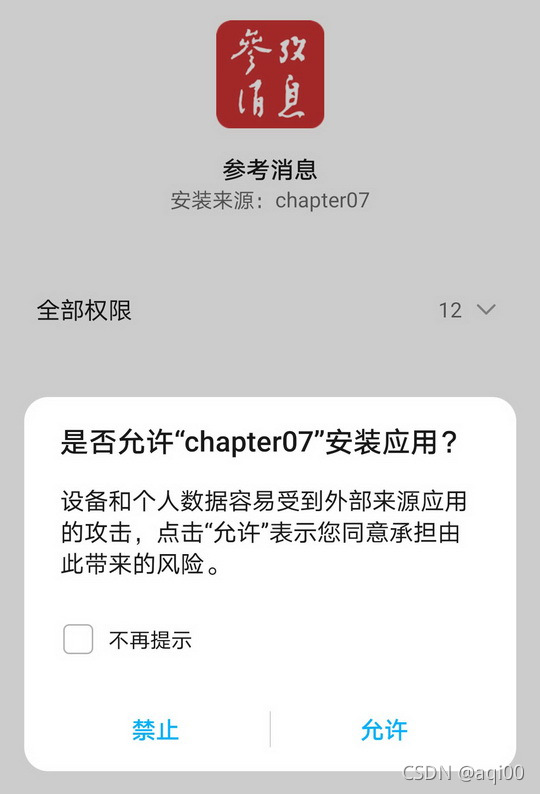
Click the "yes" button in the confirmation dialog box to jump to the application installation page as shown in the figure below, and the remaining installation operations will be handed over to the system.
Click here to view the full directory of Android Development notes