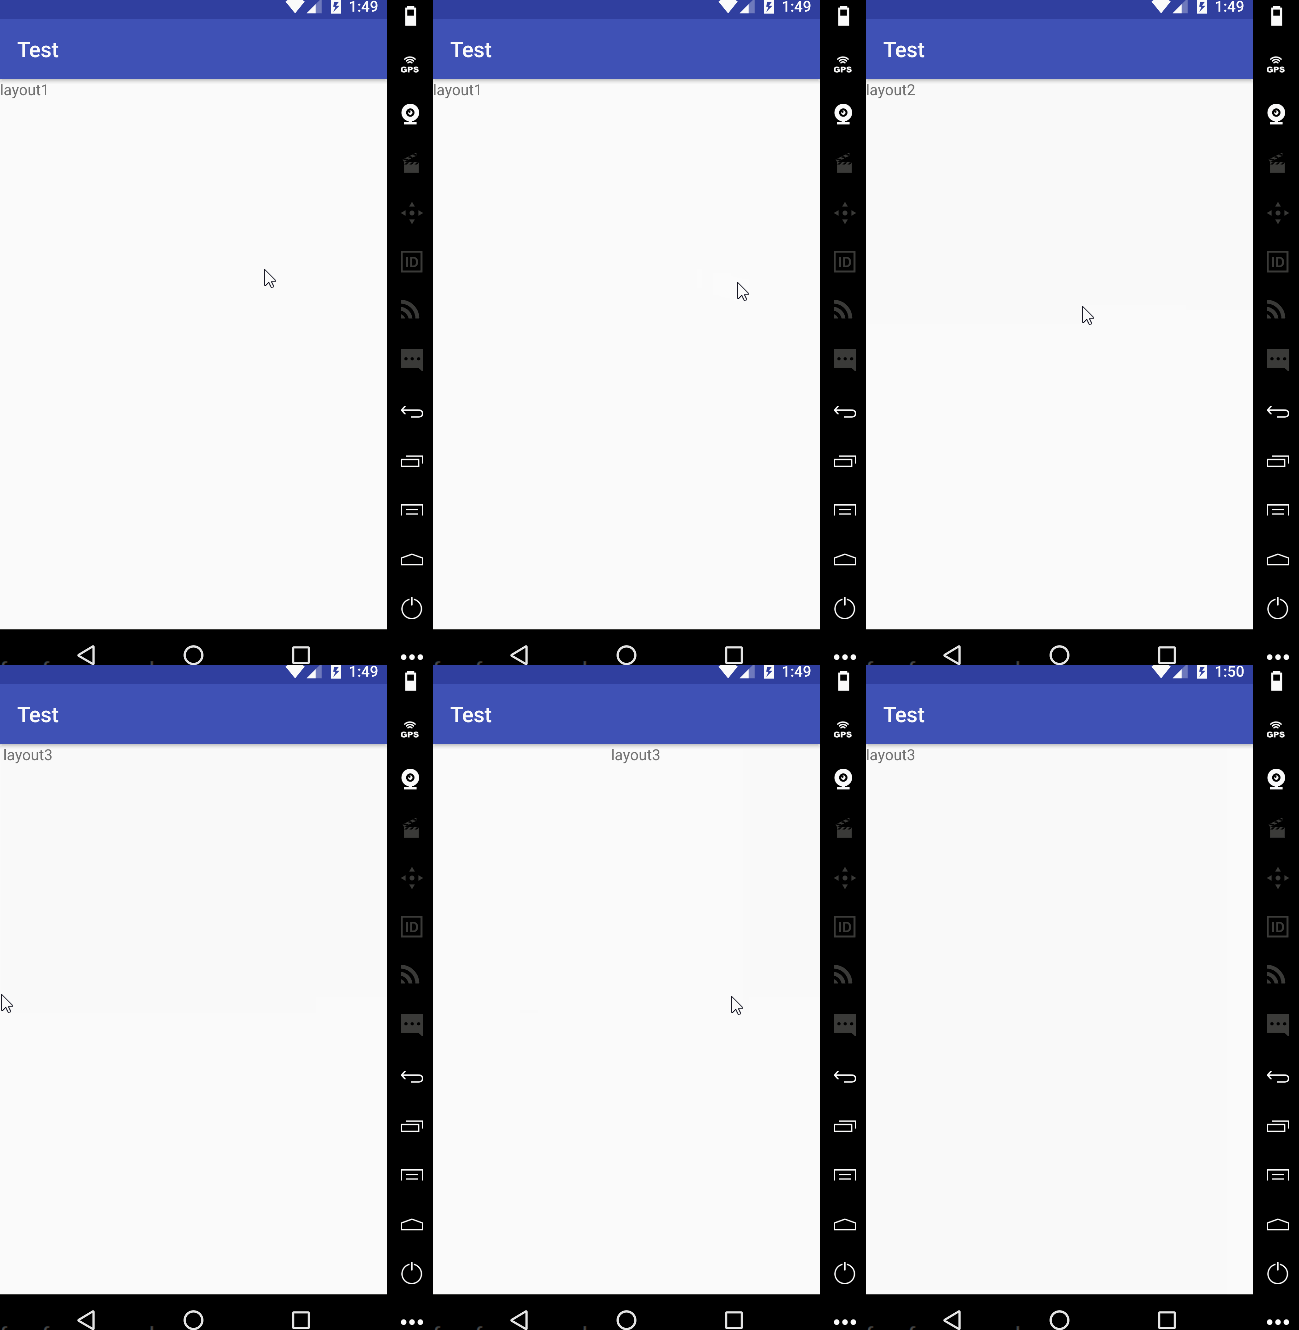
** (Note: The example in this article uses Constraint Layout layout)
ViewPage can be used in two ways, one is to load the layout file directly (using the Pager Adapter) and the other is to load the fragment (using the Fragment Pager Adapter). * *
Design sketch: 
I. Direct Loading of Layout Files
1. Add ViewPage to the main layout
<?xml version="1.0" encoding="utf-8"?>
<android.support.constraint.ConstraintLayout xmlns:android="http://schemas.android.com/apk/res/android"
    xmlns:app="http://schemas.android.com/apk/res-auto"
    xmlns:tools="http://schemas.android.com/tools"
    android:layout_width="match_parent"
    android:layout_height="match_parent"
    tools:context="com.example.test.MainActivity">

    <android.support.v4.view.ViewPager
        android:id="@+id/viewPage"
        android:layout_width="0dp"
        android:layout_height="0dp"
        app:layout_constraintBottom_toBottomOf="parent"
        app:layout_constraintLeft_toLeftOf="parent"
        app:layout_constraintRight_toRightOf="parent"
        app:layout_constraintTop_toTopOf="parent"></android.support.v4.view.ViewPager>

</android.support.constraint.ConstraintLayout>
2. New three layout s
To make it easier for us to create three basically identical layout s.
layout1:
<?xml version="1.0" encoding="utf-8"?>
<android.support.constraint.ConstraintLayout xmlns:android="http://schemas.android.com/apk/res/android"
    xmlns:app="http://schemas.android.com/apk/res-auto"
    xmlns:tools="http://schemas.android.com/tools"
    android:orientation="vertical"
    android:layout_width="match_parent"
    android:layout_height="match_parent">

    <TextView
        android:layout_width="0dp"
        android:layout_height="0dp"
        android:text="layout1"
        app:layout_constraintBottom_toBottomOf="parent"
        app:layout_constraintLeft_toLeftOf="parent"
        app:layout_constraintRight_toRightOf="parent"
        app:layout_constraintTop_toTopOf="parent"
        app:layout_constraintVertical_bias="0.498"
        tools:layout_constraintBottom_creator="1"
        tools:layout_constraintLeft_creator="1"
        tools:layout_constraintRight_creator="1"
        tools:layout_constraintTop_creator="1"
        android:layout_marginLeft="0dp" />
</android.support.constraint.ConstraintLayout>
layout2:
<?xml version="1.0" encoding="utf-8"?>
<android.support.constraint.ConstraintLayout xmlns:android="http://schemas.android.com/apk/res/android"
    xmlns:app="http://schemas.android.com/apk/res-auto"
    xmlns:tools="http://schemas.android.com/tools"
    android:orientation="vertical"
    android:layout_width="match_parent"
    android:layout_height="match_parent">

    <TextView
        android:layout_width="0dp"
        android:layout_height="0dp"
        android:text="layout2"
        app:layout_constraintBottom_toBottomOf="parent"
        app:layout_constraintLeft_toLeftOf="parent"
        app:layout_constraintRight_toRightOf="parent"
        app:layout_constraintTop_toTopOf="parent"
        app:layout_constraintVertical_bias="0.0"
        tools:layout_constraintBottom_creator="1"
        tools:layout_constraintLeft_creator="1"
        tools:layout_constraintRight_creator="1"
        tools:layout_constraintTop_creator="1"
        android:layout_marginLeft="0dp"
        app:layout_constraintHorizontal_bias="0.0" />
</android.support.constraint.ConstraintLayout>
layout3:
<?xml version="1.0" encoding="utf-8"?>
<android.support.constraint.ConstraintLayout xmlns:android="http://schemas.android.com/apk/res/android"
    xmlns:app="http://schemas.android.com/apk/res-auto"
    xmlns:tools="http://schemas.android.com/tools"
    android:orientation="vertical"
    android:layout_width="match_parent"
    android:layout_height="match_parent">

    <TextView
        android:layout_width="0dp"
        android:layout_height="0dp"
        android:text="layout3"
        app:layout_constraintBottom_toBottomOf="parent"
        app:layout_constraintLeft_toLeftOf="parent"
        app:layout_constraintRight_toRightOf="parent"
        app:layout_constraintTop_toTopOf="parent"
        app:layout_constraintVertical_bias="0.498"
        tools:layout_constraintBottom_creator="1"
        tools:layout_constraintLeft_creator="1"
        tools:layout_constraintRight_creator="1"
        tools:layout_constraintTop_creator="1"
        android:layout_marginLeft="0dp" />
</android.support.constraint.ConstraintLayout>
These three layouts are added to the ViewPage, which is very simple, of course, we just want to test, you can add more things to it.
3. Adapter Pager Adapter
New ViewPage Adapter inherits from Pager Adapter:
package com.example.test;

import android.support.v4.view.PagerAdapter;
import android.view.View;
import android.view.ViewGroup;

import java.util.List;


/**
 * Created by Administrator on 2017/7/11.
 */

public class ViewPageAdapter extends PagerAdapter {
    private List<View> list;

    public ViewPageAdapter(List<View> list) {
        this.list = list;
    }


    /**
     * @return Returns the number of VIew s to slide
     */
    @Override
    public int getCount() {
        return list.size();
    }

    /**
     * @param view
     * @param object
     * @return
     */
    @Override
    public boolean isViewFromObject(View view, Object object) {
        return view == object;
    }

    /**
     * @param container
     * @param position
     * @return There are two things to do: first, add the current View to the container, and second, return to the current View.
     */
    @Override
    public Object instantiateItem(ViewGroup container, int position) {
        container.addView(list.get(position));
        return list.get(position);
    }

    /**
     * @param container Delete the View at the specified position from the current container
     * @param position
     * @param object
     */
    @Override
    public void destroyItem(ViewGroup container, int position, Object object) {
        container.removeView(list.get(position));
    }
}
4. Configure ViewPage in Activity
package com.example.test;

import android.support.v4.view.ViewPager;
import android.support.v7.app.AppCompatActivity;
import android.os.Bundle;
import android.view.LayoutInflater;
import android.view.View;

import java.util.ArrayList;
import java.util.List;

public class MainActivity extends AppCompatActivity {

    private View view1, view2, view3;
    private ViewPager viewPager;  //The corresponding viewPager

    private List<View> viewList;//view array

    @Override
    protected void onCreate(Bundle savedInstanceState) {
        super.onCreate(savedInstanceState);
        setContentView(R.layout.activity_main);
        viewPager = (ViewPager) findViewById(R.id.viewPage);
        LayoutInflater inflater=getLayoutInflater();
        view1 = inflater.inflate(R.layout.layout1, null);
        view2 = inflater.inflate(R.layout.layout2,null);
        view3 = inflater.inflate(R.layout.layout3, null);

        viewList = new ArrayList<View>();// Load the View to be paginated into an array
        viewList.add(view1);
        viewList.add(view2);
        viewList.add(view3);

        ViewPageAdapter adapter = new ViewPageAdapter(viewList);
        viewPager.setAdapter(adapter);
    }
}
The above code loads layout into view, puts view into an array and sets it to the Adapter, and finally sets the Adapter to the ViewPage. The first way to implement ViewPage is done here.
Loading fragment
Setting the ViewPage by loading fragment s is the same as the first two steps in the first way. Loading the main layout and creating three layouts are omitted to go directly to the third step.
3. New fragment
fragment1:
package com.example.test;


import android.os.Bundle;
import android.support.v4.app.Fragment;
import android.view.LayoutInflater;
import android.view.View;
import android.view.ViewGroup;
import android.widget.TextView;

/**
 * A simple {@link Fragment} subclass.
 */
public class Fragment1 extends Fragment {


    public Fragment1() {
        // Required empty public constructor
    }

    @Override
    public View onCreateView(LayoutInflater inflater, ViewGroup container,
                             Bundle savedInstanceState) {
        View rootView=inflater.inflate(R.layout.layout1, container, false);
        return rootView;
    }

}
fragment2:
package com.example.test;


import android.os.Bundle;
import android.support.v4.app.Fragment;
import android.view.LayoutInflater;
import android.view.View;
import android.view.ViewGroup;

/**
 * A simple {@link Fragment} subclass.
 */
public class Fragment2 extends Fragment {


    public Fragment2() {
        // Required empty public constructor
    }

    @Override
    public View onCreateView(LayoutInflater inflater, ViewGroup container,
                             Bundle savedInstanceState) {
        View rootView=inflater.inflate(R.layout.layout2, container, false);
        return rootView;
    }

}
fragment3:
package com.example.test;


import android.os.Bundle;
import android.support.v4.app.Fragment;
import android.view.LayoutInflater;
import android.view.View;
import android.view.ViewGroup;

/**
 * A simple {@link Fragment} subclass.
 */
public class Fragment3 extends Fragment {


    public Fragment3() {
        // Required empty public constructor
    }

    @Override
    public View onCreateView(LayoutInflater inflater, ViewGroup container,
                             Bundle savedInstanceState) {
        View rootView=inflater.inflate(R.layout.layout3, container, false);
        return rootView;
    }

}
The code is very simple. Here, three fragment s are created and three layout s are loaded.
4. Adapter FragmentPager Adapter
New ViewPage Fragment Adapter inherits from Fragment Pager Adapter:
package com.example.test;

import android.support.v4.app.Fragment;
import android.support.v4.app.FragmentManager;
import android.support.v4.app.FragmentPagerAdapter;

import java.util.ArrayList;
import java.util.List;

/**
 * Created by Administrator on 2017/7/11.
 */

public class ViewPageFragmentAdapter extends FragmentPagerAdapter {

    private List<Fragment> fragmentList = new ArrayList<>();

    public ViewPageFragmentAdapter(FragmentManager fm) {
        super(fm);
    }

    public void addFragment(Fragment fragment) {
        fragmentList.add(fragment);
    }

    @Override
    public Fragment getItem(int position) {
        return fragmentList.get(position);
    }

    @Override
    public int getCount() {
        return fragmentList.size();
    }
}
In addition to several methods that must be implemented, here I customize a method addFragment(), which is used to pass fragment s in.
5. Configure ViewPage in Activity
package com.example.test;

import android.support.v4.view.ViewPager;
import android.support.v7.app.AppCompatActivity;
import android.os.Bundle;
import android.view.LayoutInflater;
import android.view.View;

import java.util.ArrayList;
import java.util.List;

public class MainActivity extends AppCompatActivity {

    private ViewPager viewPager;  //The corresponding viewPager

    @Override
    protected void onCreate(Bundle savedInstanceState) {
        super.onCreate(savedInstanceState);
        setContentView(R.layout.activity_main);
        viewPager = (ViewPager) findViewById(R.id.viewPage);

        ViewPageFragmentAdapter adapter = new ViewPageFragmentAdapter(getSupportFragmentManager());
        adapter.addFragment(new Fragment1());
        adapter.addFragment(new Fragment2());
        adapter.addFragment(new Fragment3());
        viewPager.setAdapter(adapter);
    }
}
Create a new adapter, add fragment s to the adapter, and set the adapter for ViewPage. The second way to use ViewPage here is also finished. My next article will write about the combination of ViewPage with TabLayout and Bottom Navigation View, which interested partners can continue to read.