
Preface
This is a semi-technical article.It is well known that now Google is the main developer for Android Studio and Eclipse has been idle for a while, but many of the Eclipse projects have not yet been migrated to AS; now some of the new libraries are packaged in AS Grade and published to public repositories, which Eclipse cannot use directly. In this article, we will explain how to import one or more libraries into Eclipse.Use in se.
objective
Eclipse is basically a waste state. That's not to say that Eclipse is bad. After all, Eclipse is here; it's just a new and old Valentine.Old Valentine must have a special flavor for her, so not all of them are migrating to AS now, and a large part of them are on Eclipse.
The problem here is that many developers'libraries on AS are not typically packaged as Jar packages, but rather generate AAR libraries directly and then publish them to public repositories. AS users can use this library in a single line of code, download-load-compile-run using Gradle, and Eclipse is not happy with it ~~
Eclipse is in an embarrassing situation and wants to use a new library, but it can't ~~
In this article, you will explain how to use a library in a public repository in Eclipse.
Gradle Publishing Process
Introduction to warehouses
Publishing libraries in AS are all published to the corresponding public warehouse using using Gradle, there are many warehouses, you can also use the server to build the warehouse yourself; there are two special OK s in the public warehouse:
The default repository used in the original google framework was mavencentral, but because the publishing process of the mavencentral repository was more rigorous and less user-friendly, it was later changed to jcenter.
So jcenter is recommended, of course, if you publish your library in mavencentral, it will be synchronized to jcenter within 24 hours of successful publishing, and libraries published in jcenter can also be published to mavencentral repository via one-click operation.
Because of the warehouse differences above, if you are using AS you will see configurations such as:
repositories { jcenter() }repositories {
jcenter {
url "http://jcenter.bintray.com/" }
}repositories { mavenLocal() }This is the source of the libraries used in your project. AS will identify the libraries more to find the files needed, of course, both repositories can be written to the project configuration at the same time.
Publish to repository
There is an article in my article about publishing to the mavencentral repository: [Publish AAR To Maven] Publish AAR to Maven repository using Gradle
The process described above is to publish to the mavencentral repository, while the process for jcenter is basically the same, except that the file encryption process is done on the server.
Overall:
- First we need a copy of the library's code
- Compile the source code to get Jar, R, JNI, xml and other source files.
- Package all files as one aar file
- autograph
- Publish to repository
- Verify and publish
How to use
Using this library, it is also easy to download the corresponding version of the AR file, add it to the project, and compile it into the project.
It can be seen from this that the actual use of android is the aar file, but at this time the aar file will be unpacked and compiled.
In the project configuration of AS, we add the following sentence:
dependencies { compile 'net.qiujuer.genius:ui:1.3.0' } After compiling, let's look at the Build folder of the project: 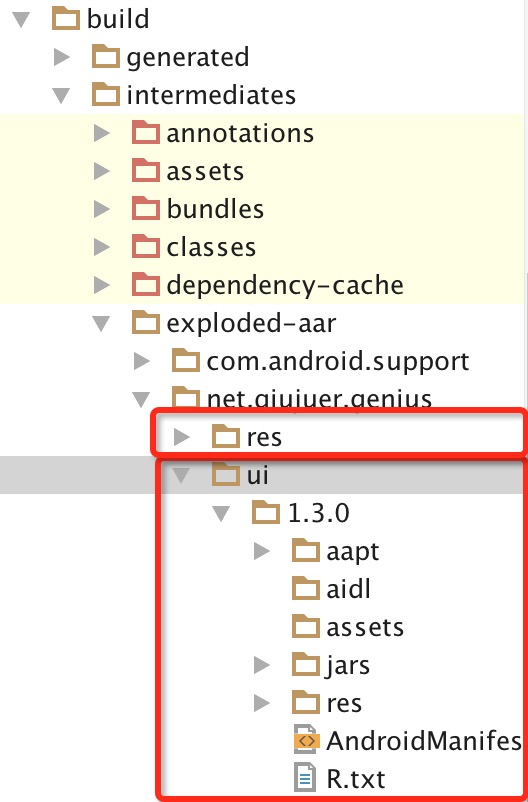
Here we can see that the actual use is exactly what we thought.
Of course, the "res" package is here because the "genius-res" package is referenced by default in the "genius-ui" package, so when we use the "UI" package, the "res" package is downloaded synchronously.Detailed open source projects are available: Genius-Android
OK, a simple process for a library; let's see how to use it in Eclipse.
problem
From the process of the above library, you can see that an AAR library can include data such as jar, aidl, assets, res, R files, etc., while only jar files can be referenced by default when referencing libraries in Eclipse.
If we just put the jar file in eclipse, the corresponding resource file will not work properly.Does that solve the problem by placing resource files in eclipse at the same time?Not really!
It is well known that when a resource file is compiled, an int value is generated in the R file, which is replaced by the int value in the actual code; then all the resource files added above will generate a new value corresponding to it, and the corresponding resource will still not be found in the jar of the library, which will eventually cause the APP to crash.
At this point, one solution is to solidify the INT value corresponding to the resource so that the change resource generates the INT value we specified each time it is compiled.Here we use a file unique to android:'public.xml'
public.xml: The INT value for curing the resource.
Implementation
download
First we need to prepare a corresponding aar file, where I use the UI package of the genius-android library to do this.
Download points are:
We go into mavencentral and search genius to find the ui package:
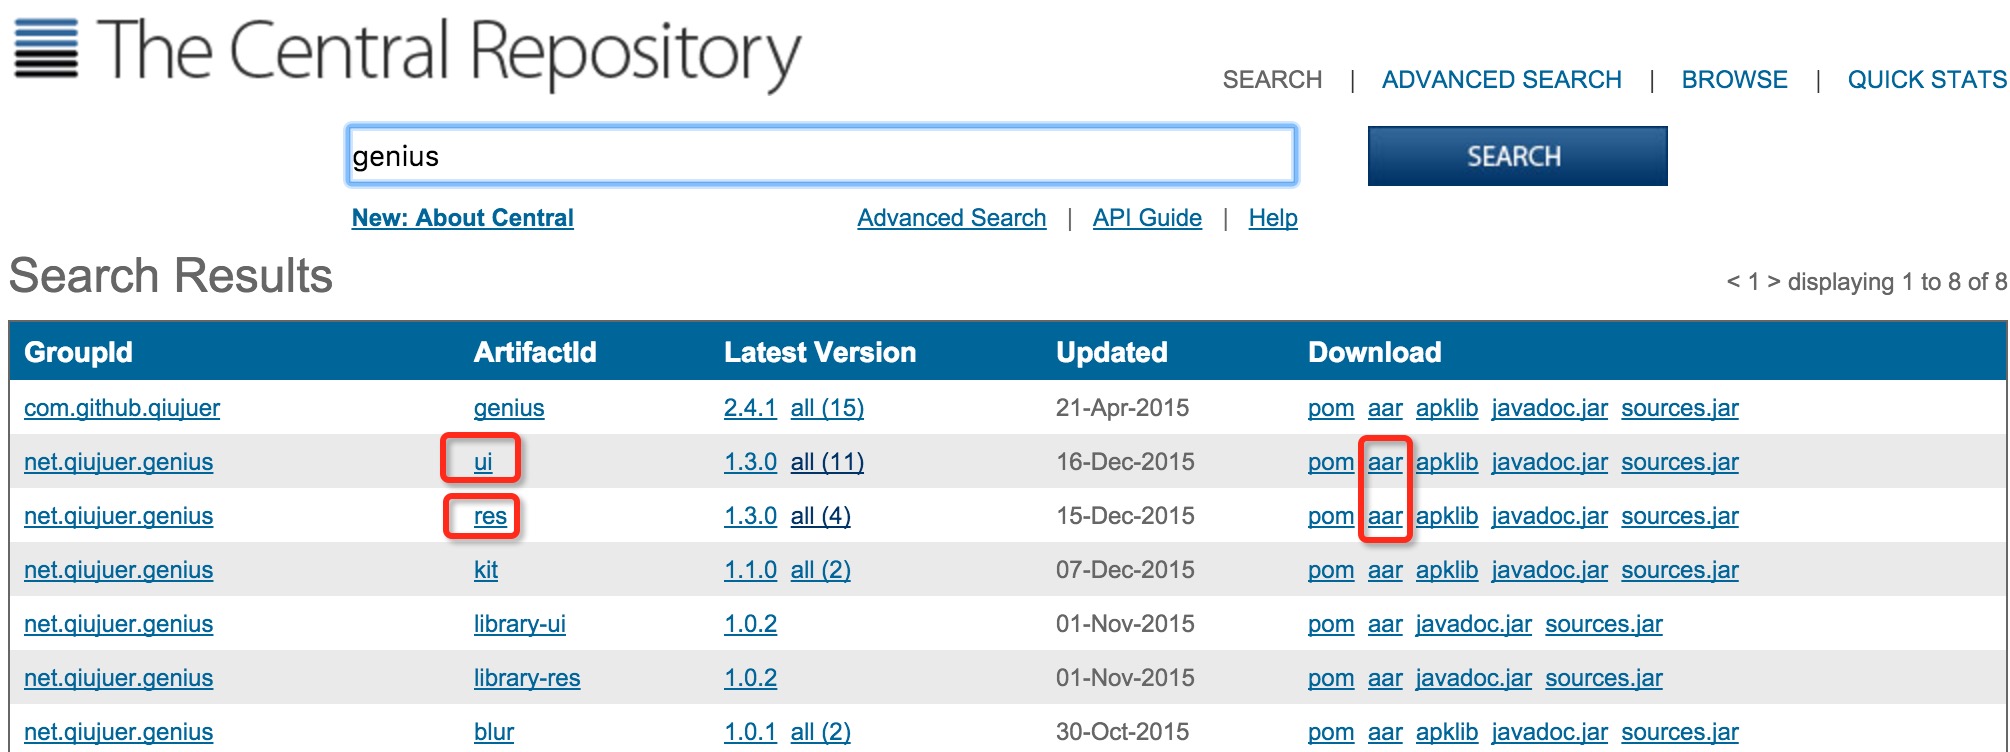
Because the res package is referenced in the UI package, we download both the UI and the res package.
Unpack
Change the suffix to zip and unzip:

- AndroidManifest.xml: Contains information such as permissions-service declaration-broadcast registration-activity declaration, etc. Copy the data directly into your own project on OK.
- aidl: This is usually something that serves independently, so it's good to set up a file in the project according to its location.
- assets: This is typically font, html, etc.
- classes.jar This is the jar package we need to use directly
- R.txt This is the int value for the resource. The main work we need to do is convert it to a public.xml file
- The contents of the Res folder can be copied intact to the project's res folder.
Create Project
To avoid conflicts between this project and your own, we first need to set up a project:
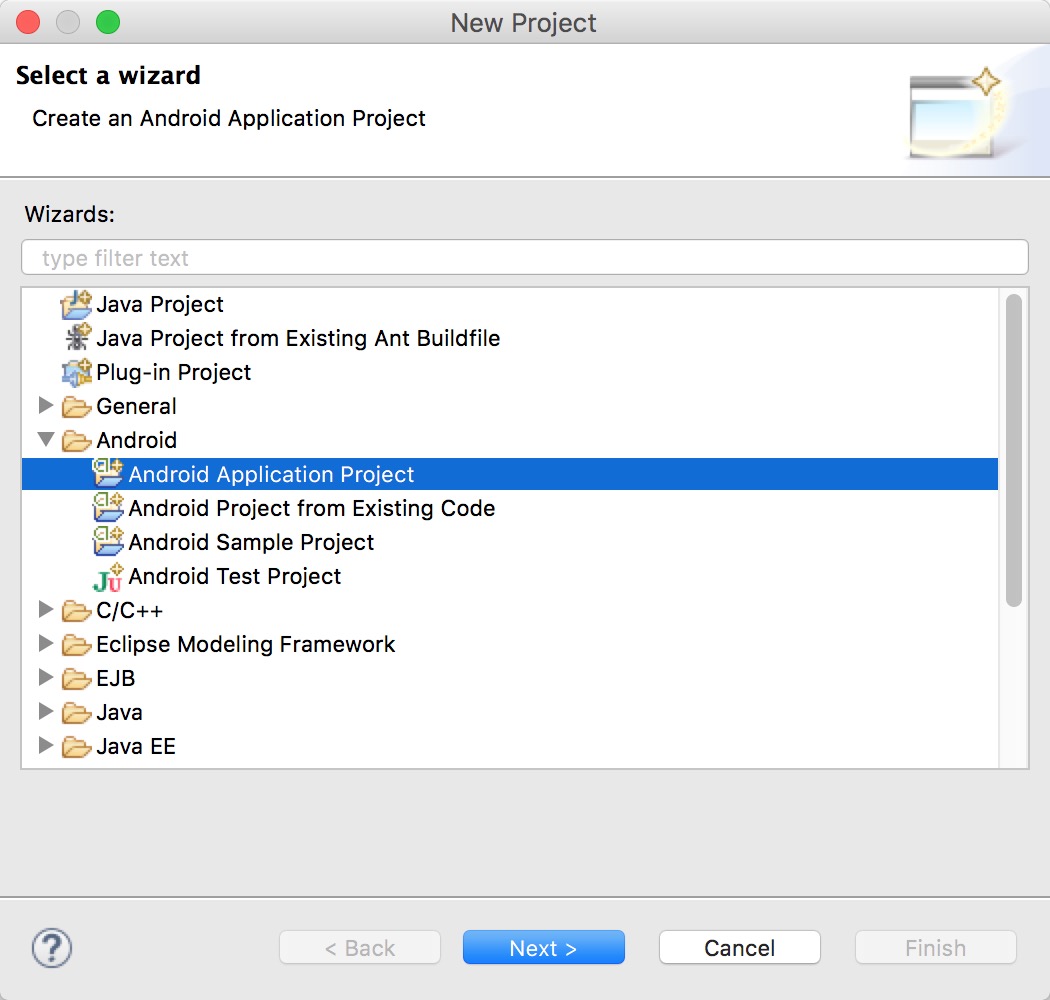
Name it GeniusUI here and specify the package name:'net.qiujuer.genius.ui'
Why?Because the package name is specified in the AndroidManifest.xml extracted above:
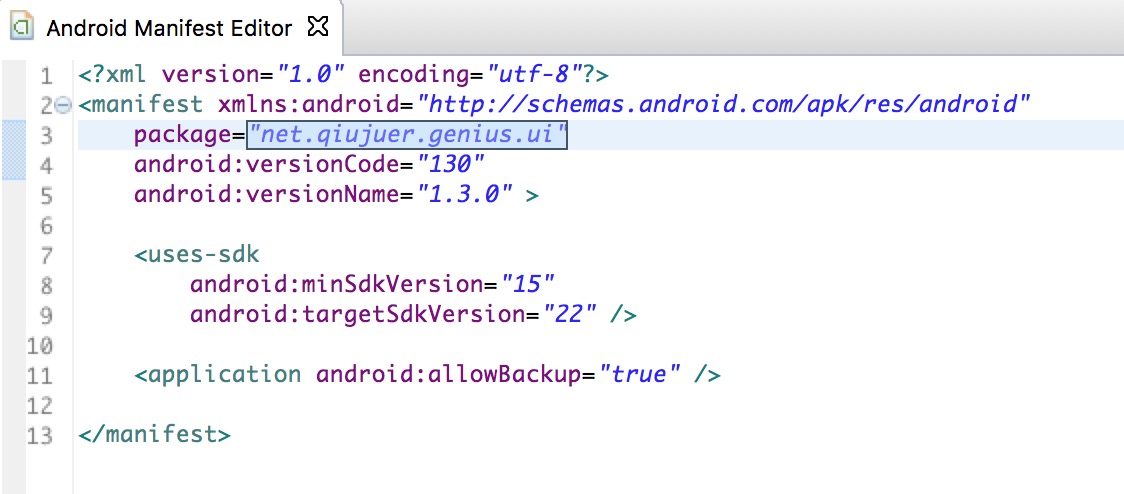
If you don't specify a package name here, even if we later wrote the public.xml file, it solidifies the INT value, but it doesn't fit on our package name, in other words, we still can't find the corresponding resource file in our jar file.
Enter Properties - Android - Check Is Library to make it a library project.
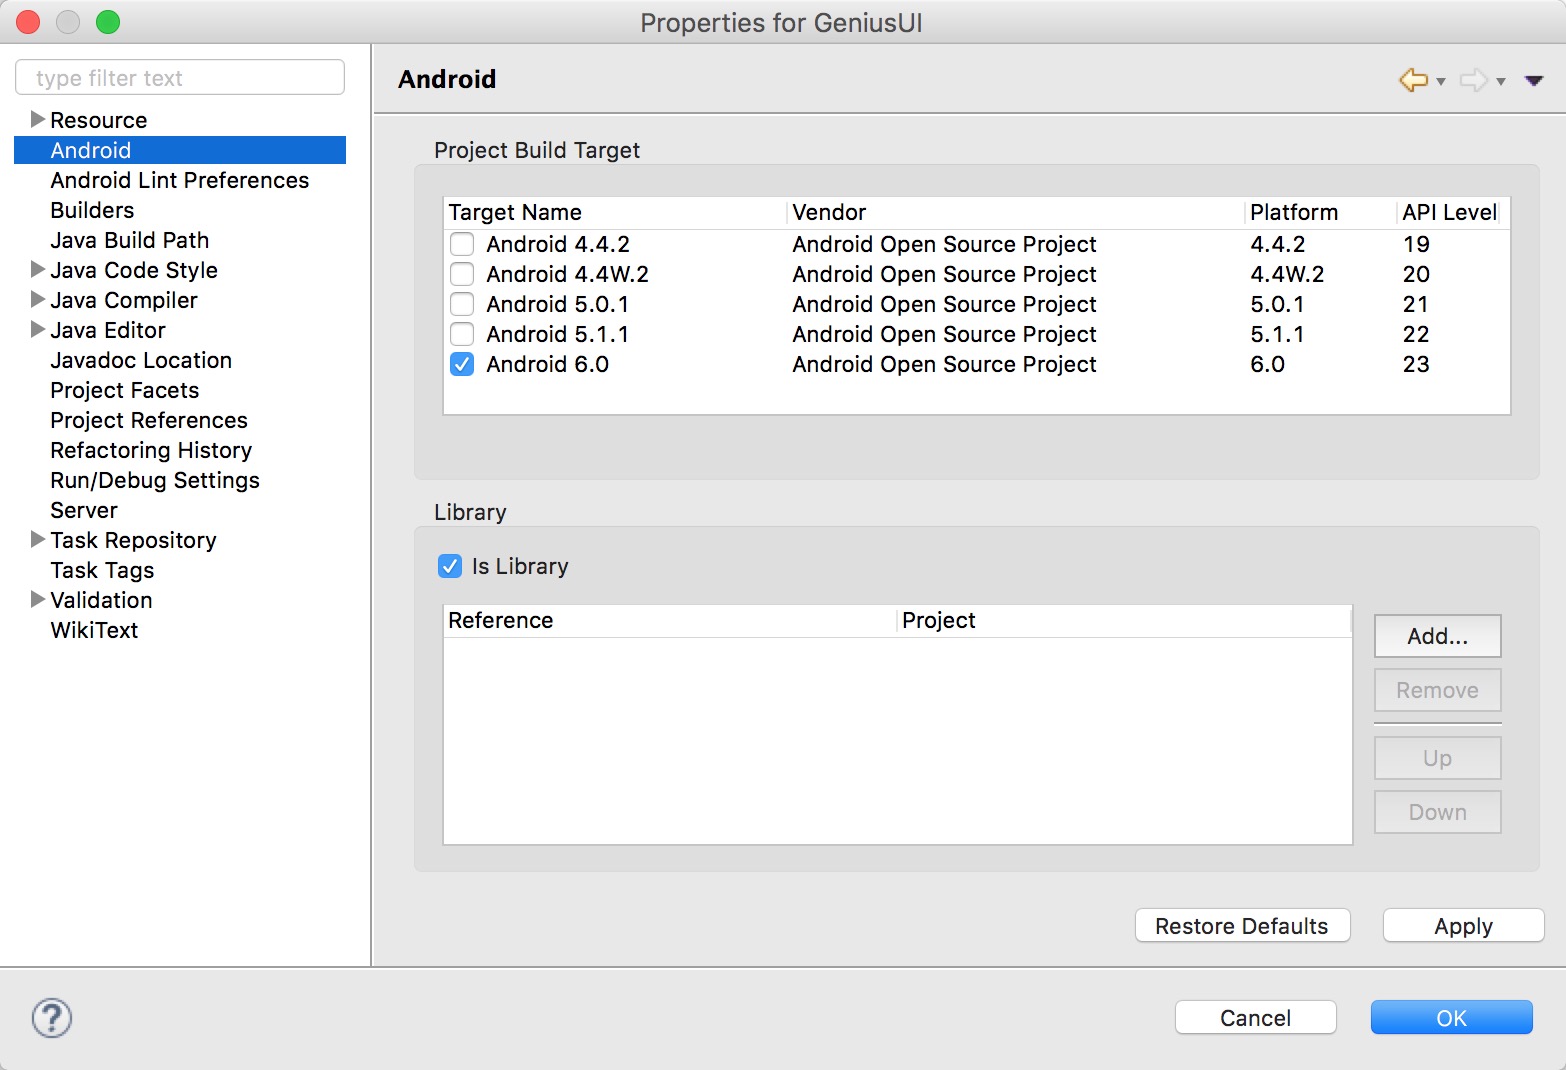
Keep in mind that we do not create a separate project for the RES package here; since the resources in the RES package are referenced in the UI library, a new resource INT value for the Res library will be recalculated when the UI library is generated.
The only reason to download the Res package here is the resource files.
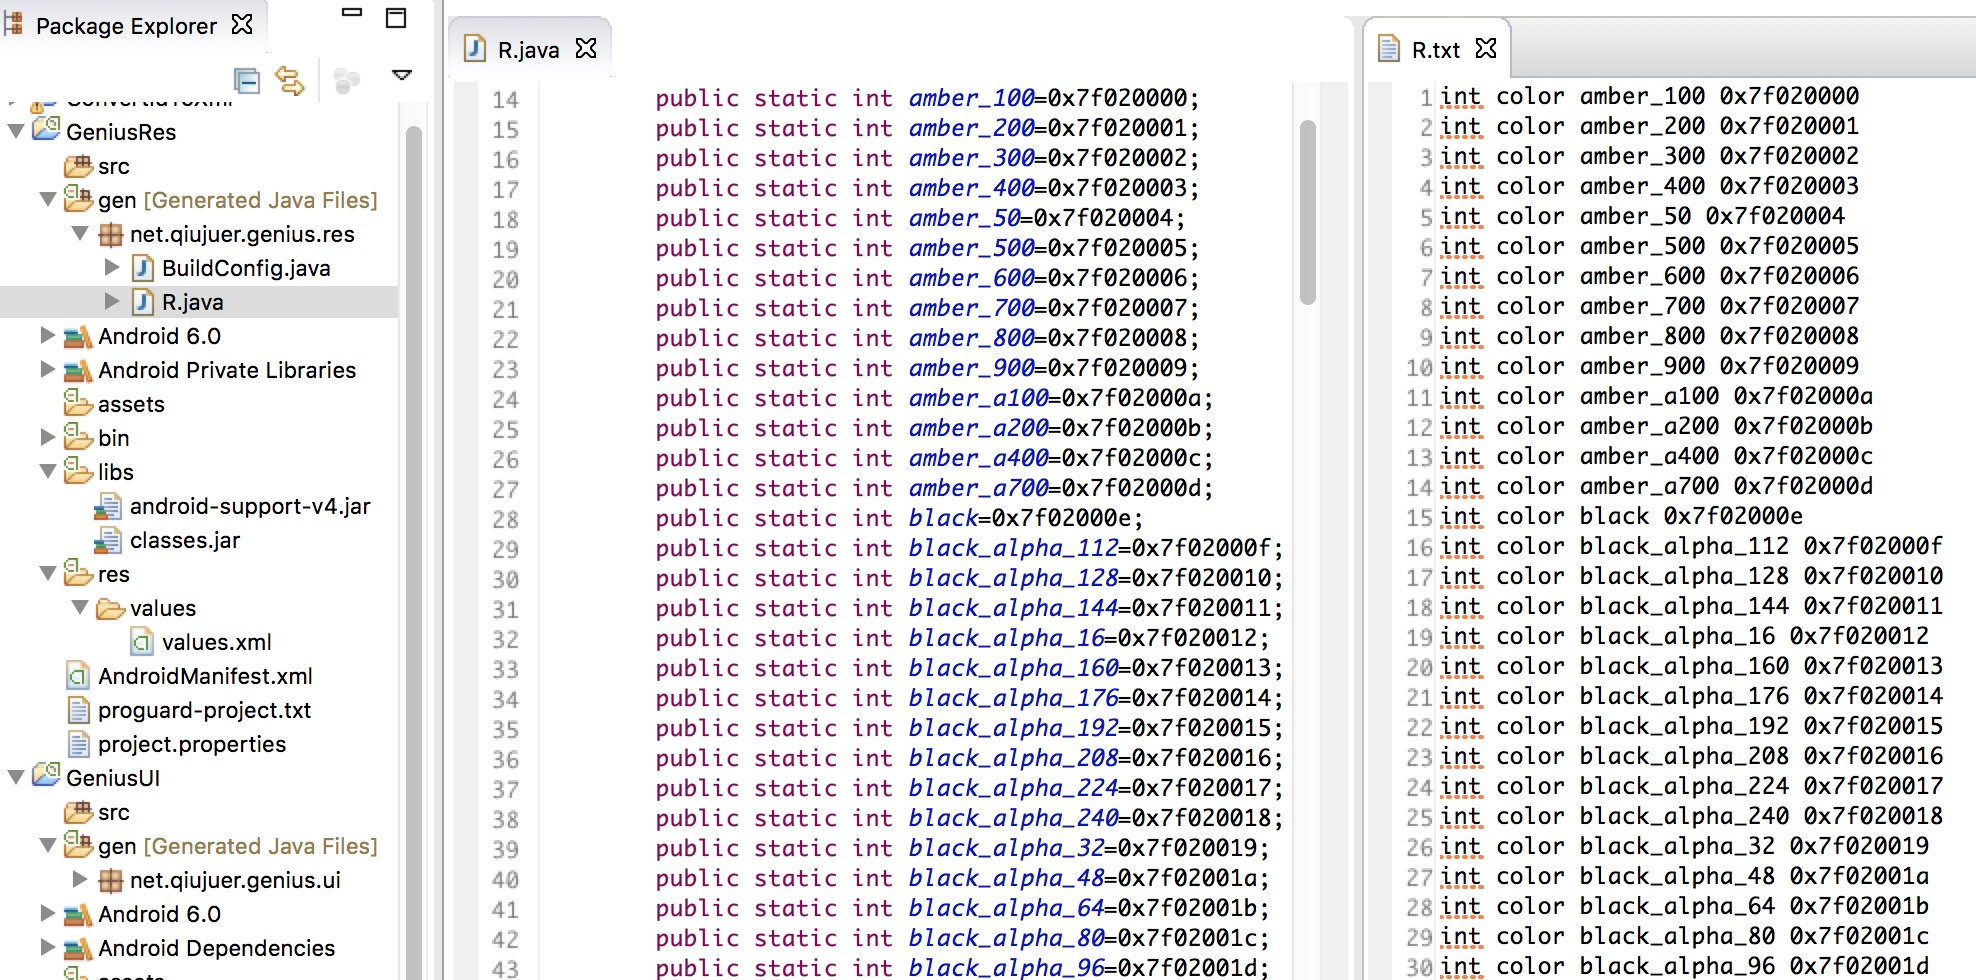
Open both the R file in the Res package (left) and the R file in the UI package (right):
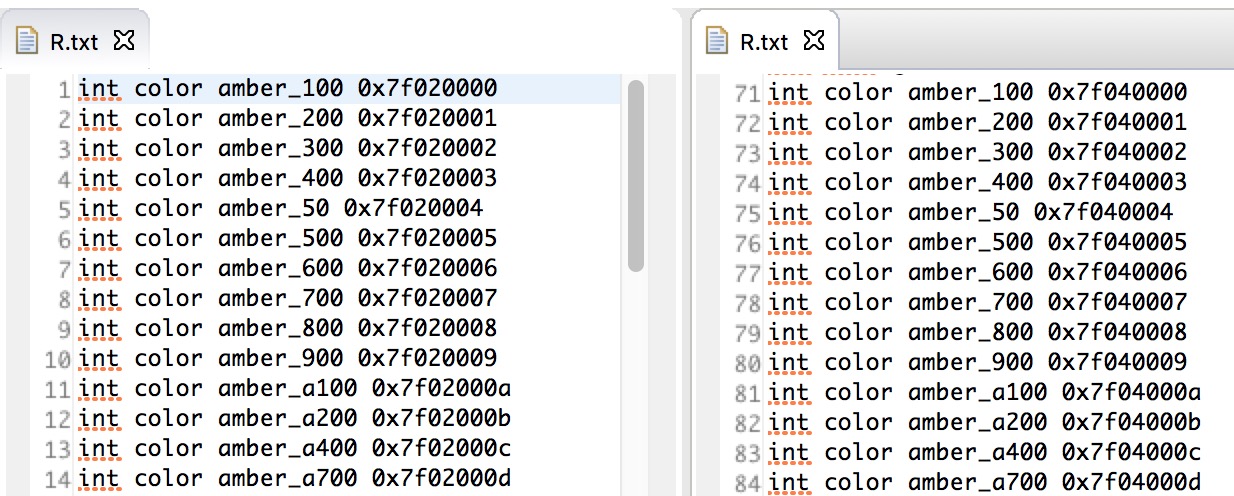
You can see that the UI package also contains INT values for colors, but the values are different from those in the original Res package.
Copy File
We copy all the existing files into the project as shown in the picture:
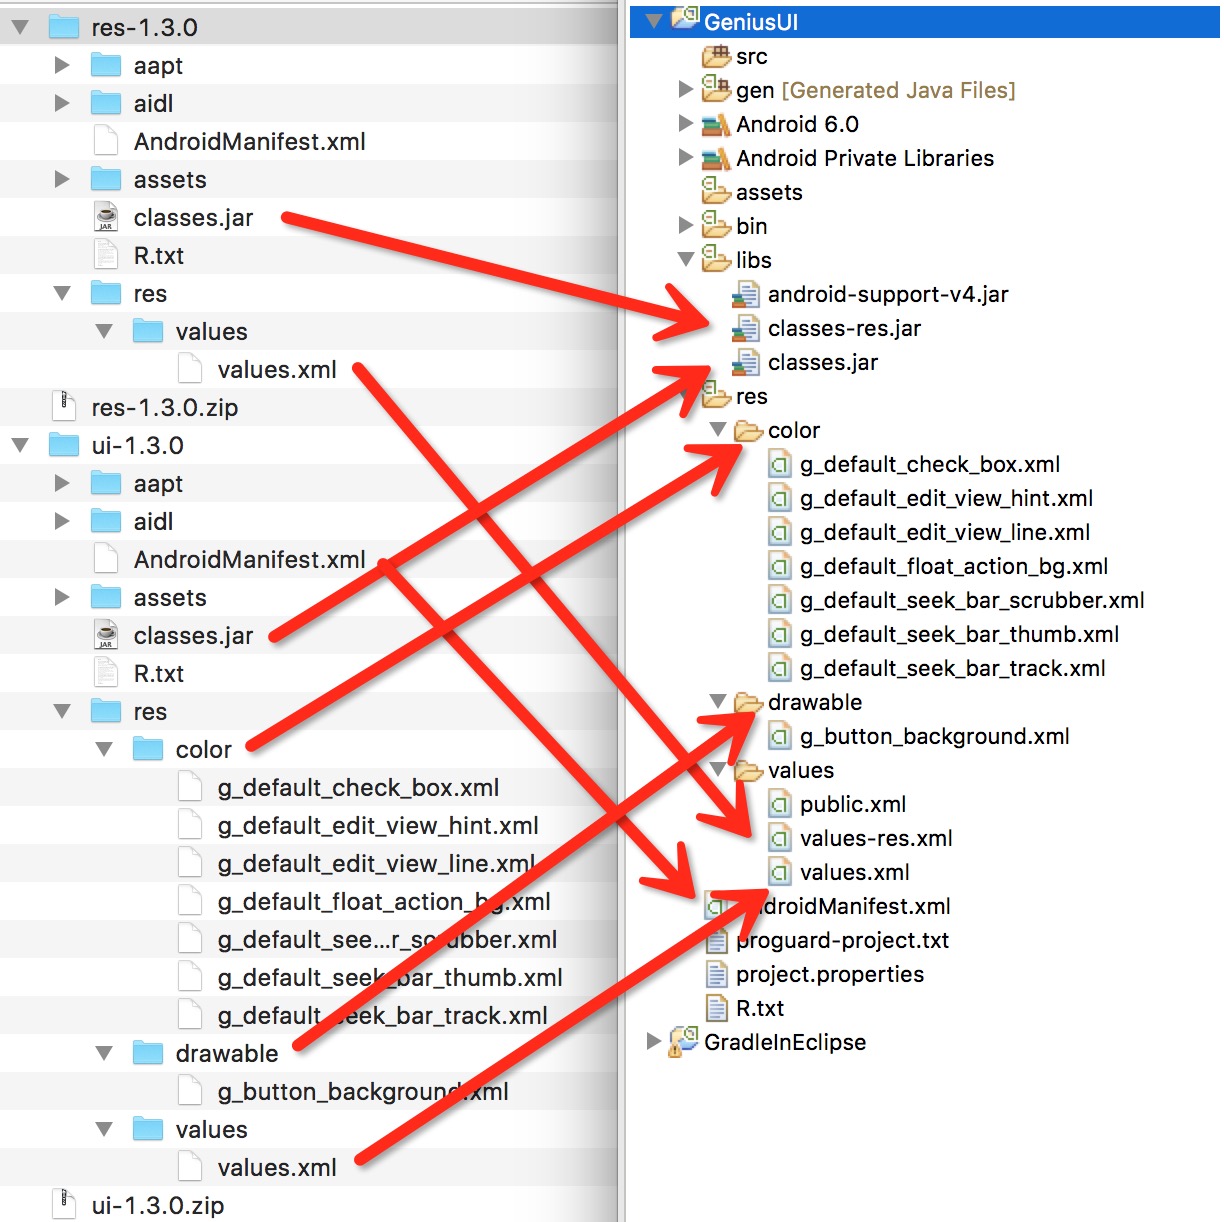
A project is compiled at this time. Generally speaking, as long as all copies of the files are correct, no error should be reported, and an R file should be generated at this time. However, the R file at this time is not exactly the same value as the original library (there may be some parts of the same, which also results in some resources being used normally).
Contrast
At this point, we compare the R file generated by the project with the R file in the library:
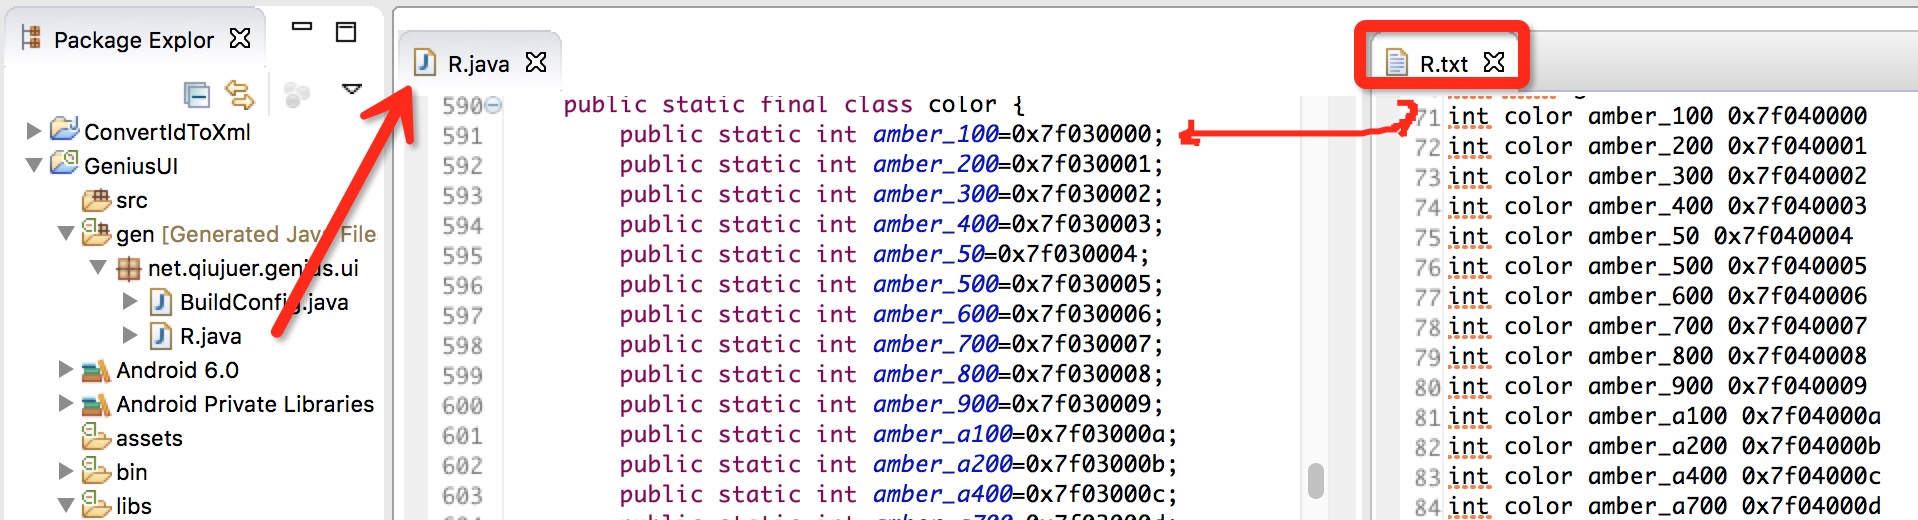
You may find that they are different, and of course you may be the same, for example:
What does this mean?This means that the resources in this project can be fully used, but under what circumstances will they be different?
We add a color to the values.xml file in the Res project:
<color name="a">#ffecb3</color>
What will this sentence bring?Problems that cause subsequent ID s to all fail:

This is also the problem that I said the resources can not correspond properly.
This same and different are random, maybe the original library just happened to be the same.
Curing of Public.xml
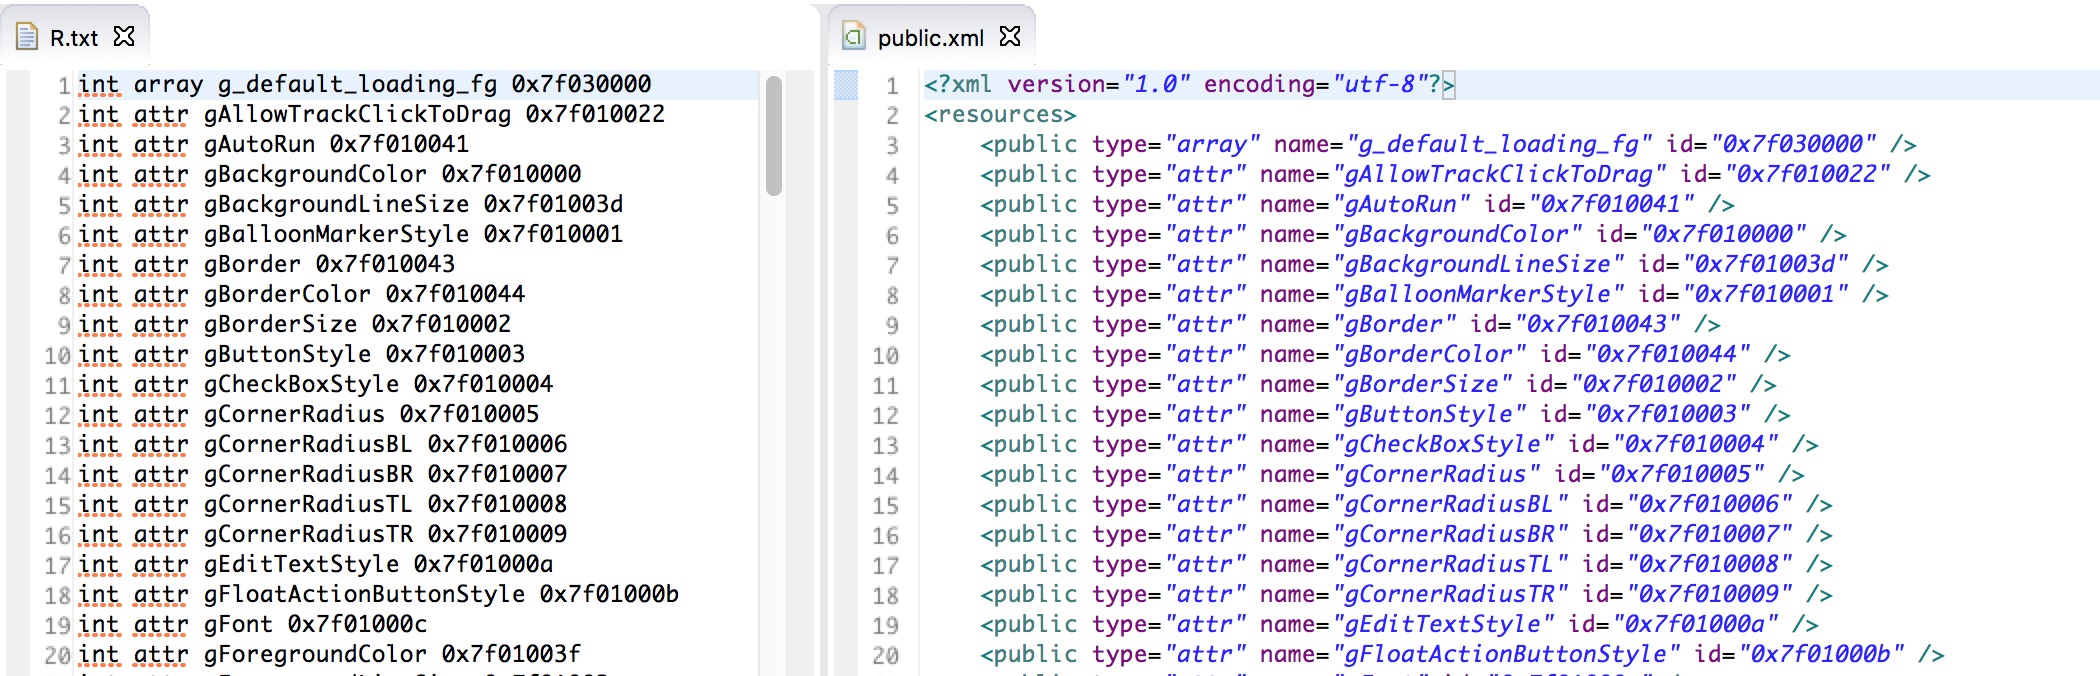
At this point, we create the public.xml file in the project's values folder and add:
<?xml version="1.0" encoding="utf-8"?> <resources> <public id="0x7f020000" name="amber_100" type="color" /> <public id="0x7f020001" name="amber_200" type="color" /> <public id="0x7f020002" name="amber_300" type="color" /> <public id="0x7f020003" name="amber_400" type="color" /> </resources>
Compile the project, and then we'll look at the R file again:

Here we can see that the part we have written is OK and there has been a problem since the fifth, so we need to solidify all the corresponding INT values of R into Public.
Okay, now I know the magic of Public files, but it's not so good to solidify an entire file; I crashed when I opened the R file of the UI library.

I wipe, more than 500 sweats to~
Pop dad, no!!
And take a look at the color-number-style-TM and styleable What's this>ghost?If you've written about custom controls, you should know this: custom properties.
But how does this cure?More than 500 lines. The dishes will be cold when ready.
Coding
We're programmers, and we're all lazy, so we use programs to solve this.
Let's write a little program here that converts from R.txt to public.xml.
format
First, let's look at the format that corresponds to the conversion to XML in the R.txt file.
- Color, number, array, ID, String, drawable can be converted directly
int color black 0x7f04000e int dimen font_10 0x7f050000 int array loading 0x7f030000 int id all 0x7f080009 int string g_font_file 0x7f060000 int drawable background 0x7f020000
<public type="color" name="black" id="0x7f04000e" />
<public type="dimen" name="font_10" id="0x7f050000" />
<public type="array" name="loading" id="0x7f030000" />
<public type="id" name="all" id="0x7f080009" />
<public type="string" name="g_font_file" id="0x7f060000" />
<public type="drawable" name="background" id="0x7f020000" />
- style needs to replace''with'.
int style Genius_Widget_BalloonMarker 0x7f070000
<public type="style" name="Genius.Widget.BalloonMarker" id="0x7f070000" />
- attr attribute needs to discard the styleable part
int attr gAllowTrackClickToDrag 0x7f010022 ... int[] styleable AbsSeekBar { 0x7f01000c, 0x7f010019, 0x7f01001a, 0x7f01001b, 0x7f01001c, 0x7f01001d, 0x7f01001e, 0x7f01001f, 0x7f010020, 0x7f010021, 0x7f010022, 0x7f010023, 0x7f010024, 0x7f010025, 0x7f010026, 0x7f010027, 0x7f010028, 0x7f010029, 0x7f01002a, 0x7f01002b, 0x7f01002c }
int styleable AbsSeekBar_gAllowTrackClickToDrag 10
To get the INT value represented by gAllowTrackClickToDrag, convert it directly from the first sentence.
Second, when reading styleable AbsSeekBar, store the array behind it, and then read int styleable AbsSeekBar_gAllowTrackClickToDrag 10, follow the subscript 10 to get the value 0x7f010022.
<public type="attr" name="gAllowTrackClickToDrag" id="0x7f010022" />
Code
Entity Class
static class PublicLine implements Comparable<PublicLine> { public String type; public String name; public String id; public PublicLine() {
        } public PublicLine(String type, String name, String id) { this.type = type.trim(); this.name = name.trim(); this.id = id.trim();
        } public String getKey() { return type + "_" + name;
        } @Override public String toString() { return "<public type=\"" + type + "\" name=\"" + name + "\" id=\"" + id + "\" />";
        } @Override public int compareTo(PublicLine o) { int i = this.type.compareTo(o.type); if (i == 0) return this.name.compareTo(o.name); else return i;
        }
    }
- Implementing compareTo is used for subsequent sorting to avoid cluttering the output.
- The getKey() method is to prepare the primary key values stored in the Map and avoid duplication.
- "toString()" This is prepared for the output log.
Overall process
public static void main(String[] args) throws IOException {
        File in = new File("R.txt");
        File out = new File("public.xml"); if (!in.exists()) { throw new NullPointerException("R.txt is not null.");
        } try { out.createNewFile();
        } catch (IOException e) {
            e.printStackTrace(); return;
        }

        System.out.println(in.getAbsolutePath());
        System.out.println(out.getAbsolutePath());

        InputStreamReader read = new InputStreamReader(new FileInputStream(in));
        BufferedReader bufferedReader = new BufferedReader(read);

        OutputStreamWriter writer = new OutputStreamWriter(new FileOutputStream(out));
        BufferedWriter bufferedWriter = new BufferedWriter(writer);

        Map<String, PublicLine> xml = new HashMap<>();
        buildXml(bufferedReader, xml);

        List<PublicLine> lines = new ArrayList<>();
        lines.addAll(xml.values());

        Collections.sort(lines);

        saveFile(lines, bufferedWriter);

        close(bufferedReader);
        close(bufferedWriter);

        System.out.println("End.");
    }
-
The whole process is very simple, using the current directory directly to generate two files, R.txt as the input source and public.xml as the output file, which regenerates a new file each time it runs.
-
Then output directory information for two files at a time to the console.
-
Buffer is then initialized, where it is subpacked in two layers and the final result is: BufferedReader and BufferedWriter, which are meant to read one line and output one line at a time.
-
A Map variable is then declared to store the collection read and converted to entities.Maps are used to avoid duplicate content.
-
Later we declared a List variable and stored the values of the Map in the List, mainly to sort the entire set; the Map itself is out of order, and if you sort the Map directly, it's fairly complex, so here we populate the List and sort again.
-
Then output to a Public file and close the stream.
Read Collection
public static void buildXml(BufferedReader reader, Map<String, PublicLine> xml) { while (true) { String line; try {
                line = reader.readLine(); if (line == null || line.trim().length() == 0) return;
            } catch (IOException e) {
                e.printStackTrace(); continue;
            } if (line.contains("styleable")) { // skip styleable array continue;
            } else { // convert other xml String[] split = line.split(" "); if (split.length == 0) continue; String type = split[1]; String name = split[2]; String id = split[3]; if (type.contains("style"))
                    name = name.replace("_", ".");
                saveToMap(xml, new PublicLine(type, name, id));
            }
        }
    }
- Loop reads each line and exits when a line is empty
- Here we filter attr transformations, so any line with a "styleable" flag can be discarded directly.
- Normally, we read a line separated by spaces; then we read the values of type, name, and id, respectively.
- If the current type is style, then our name needs to replace''with'.'.
- Store the currently recognized information in the Map.
If attr is identified here by reading the information in the styleable array and then searching the index for the corresponding INT value, the code should look like this:
public static void buildXml(BufferedReader reader, Map<String, PublicLine> xml) { while (true) { String line; try {
                line = reader.readLine(); if (line == null || line.trim().length() == 0) return;
            } catch (IOException e) {
                e.printStackTrace(); continue;
            } String[] split = line.split(" "); if (split.length == 0) continue; if (line.contains("int[]")) { // convert attr xml String name = split[2].trim();
                line = line.substring(line.indexOf("{") + 1, line.lastIndexOf("}"));
                System.out.println(line); String[] ids = line.split(","); if (ids.length > 0) {
                    readStyleableXml(reader, xml, ids, name);
                }
            } else { // convert other xml String type = split[1]; String name = split[2]; String id = split[3]; if (type.contains("style"))
                    name = name.replace("_", ".");
                saveToMap(xml, new PublicLine(type, name, id));
            }
        }
    }

    @SuppressWarnings("unused")
    public static void readStyleableXml(BufferedReader reader, Map<String, PublicLine> xml, String[] ids, String name) { for (String id : ids) { String line; try {
                line = reader.readLine(); if (line == null) continue;
            } catch (IOException e) {
                e.printStackTrace(); continue;
            } String[] split = line.split(" "); String lName = split[2].substring(split[2].indexOf(name) + name.length() + 1); String lId = ids[Integer.parseInt(split[3].trim())];
            saveToMap(xml, new PublicLine("attr", lName, lId));
        }
    }
Here we need an additional method, in which we loop through the length of the current control's array to read the subsequent rows corresponding to the length of the array, then parse and store them.
storage
public static void saveToMap(Map<String, PublicLine> xml, PublicLine line) { try {
            xml.putIfAbsent(line.getKey(), line);
            System.out.println(">>>: " + line.toString());
        } catch (Exception e) {
            e.printStackTrace();
        }
    }
The storage method is relatively simple. We use Map's "putIfAbsent" method, which has a role in determining whether the current KEY exists or not.
storage
public static void saveFile(List<PublicLine> lines, BufferedWriter writer) throws IOException {
        // write head
        writer.append("<?xml version=\"1.0\" encoding=\"utf-8\"?>"); writer.append("\n"); writer.append("<resources>"); writer.append("\n"); for (PublicLine line : lines) {
            try {
                writer.append(" "); writer.append(line.toString()); writer.append("\n"); writer.flush(); } catch (IOException e) {
                e.printStackTrace(); }
        }

        // write footer
        writer.append("</resources>"); writer.flush(); }
Stored procedures are divided into storage header, collection data, and bottom to complete.
Close Stream
public static void close(Closeable closeable) { try {
            closeable.close();
        } catch (IOException e) {
            e.printStackTrace();
        }
    }
Closing streams is a much simpler process, simply going out on its own.
Effect
Now we put the R file in the root directory, run the code once, and the console will output:
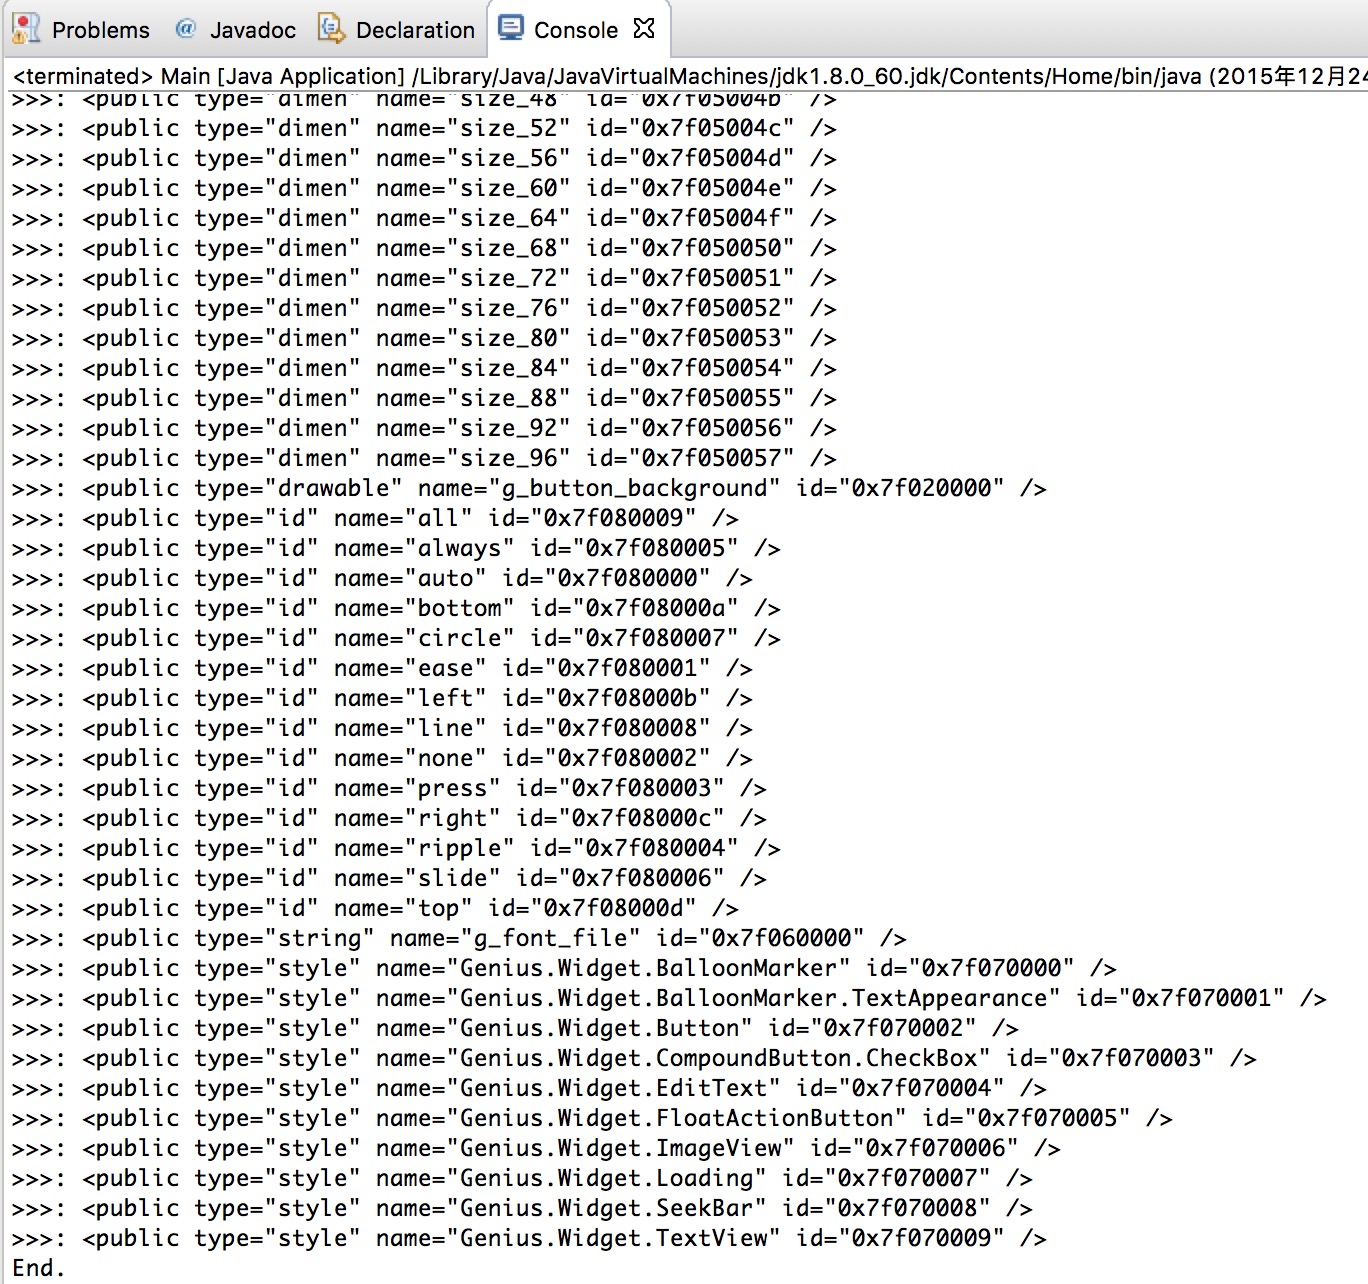
At this point, a public file has been generated to look at the R file:
You can see that it works quite well, copying the public file into the library and putting it into use directly.
preview
To test for success, I follow the open source library Genius-Android In sample The project code completes an interface layout in Eclipse.
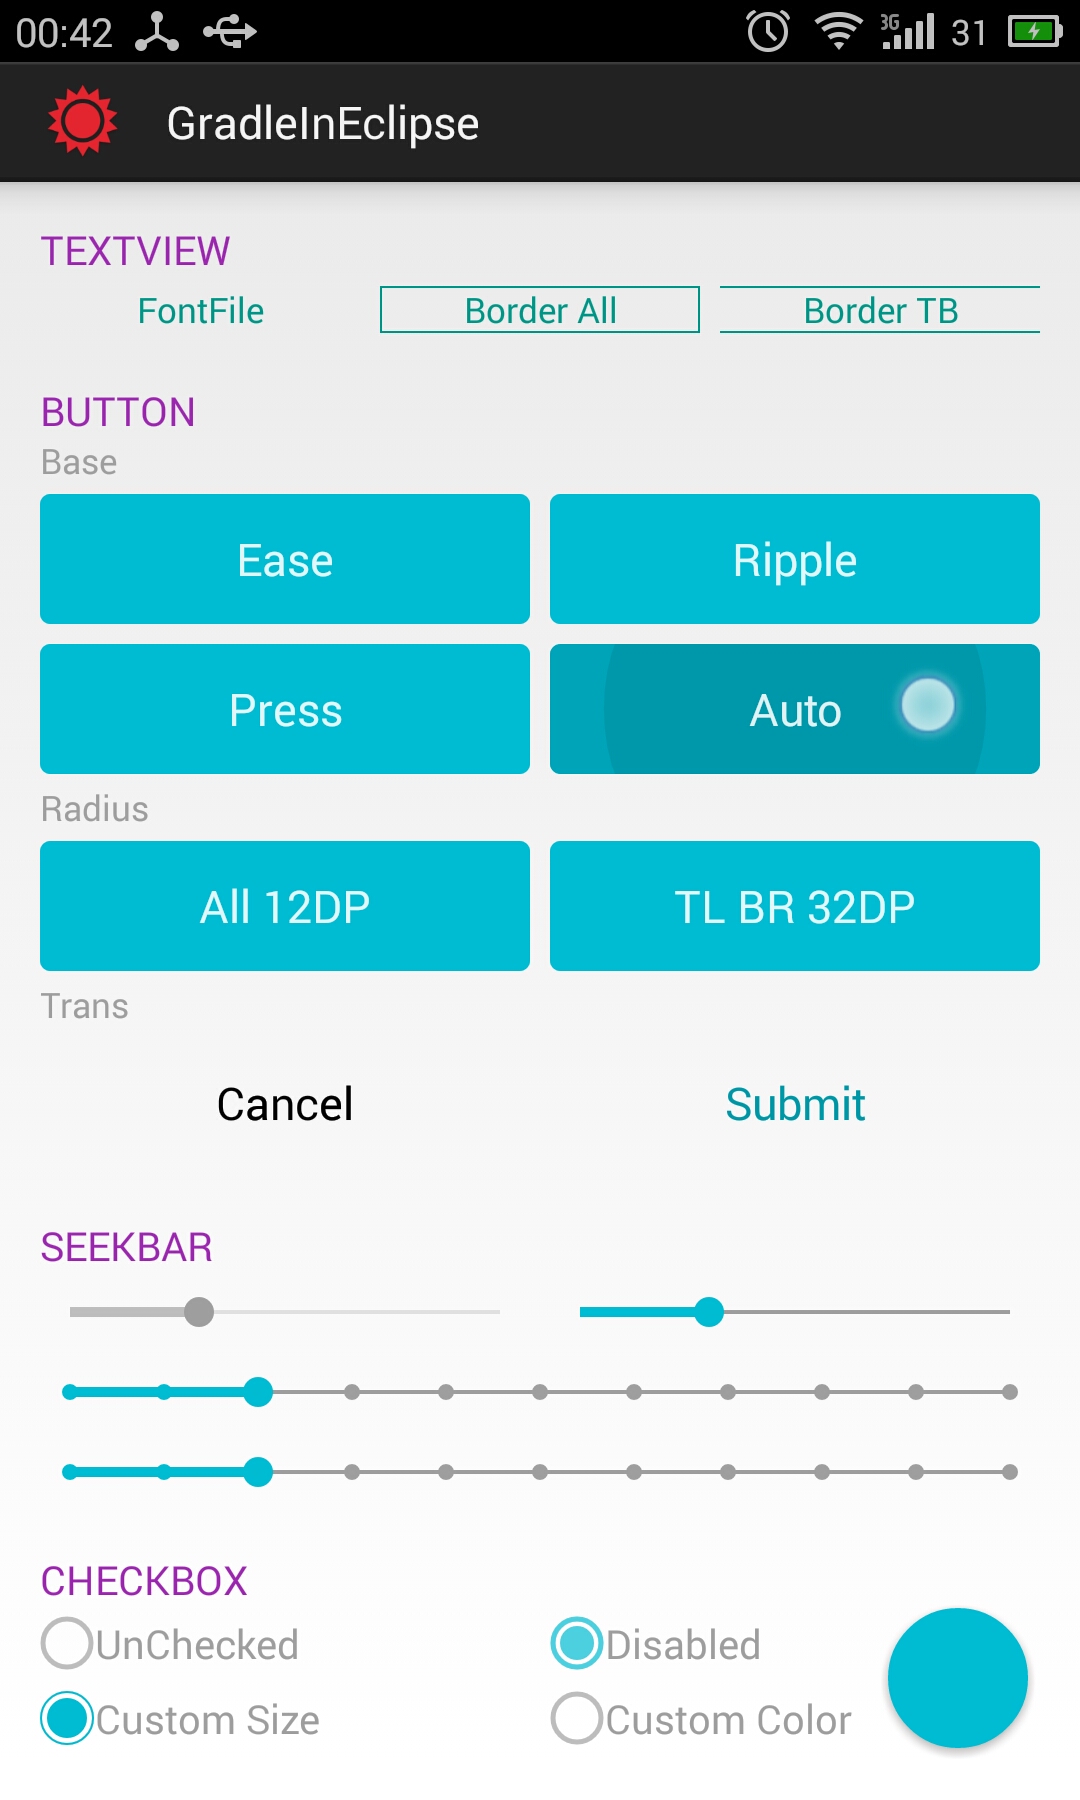
All controls and resources work.
Last
Here I've generated a copy of the code jar File, you can download it, put the R.txt file in the same directory, and run it jar Files can both get public files.
At the same time, I uploaded all the source files and code to GtiHub's BeFoot In the project; all future examples will also be updated in the project.
If there is something wrong or you are not clear enough, please give more advice.
========================================================
Author: qiujuer
Blog: blog.csdn.net/qiujuer
Website: www.qiujuer.net
Open Source Library: github.com/qiujuer/Genius-Android
Open Source Library: github.com/qiujuer/Blink
For reprinting, please indicate the source: http://blog.csdn.net/qiujuer/article/details/50084345
- Open source for learning, open source for learning; Beginner's mentality, reluctant with you!
========================================================
Reprinted at: https://my.oschina.net/qiujuer/blog/550739