What is Gradle?
Gradle is an advanced build system as well as an advanced build toolkit allowing to create custom build logic through plugins
Gradle is an advanced build system and an advanced build tool that allows you to create custom build logic through plug-ins.
Why use gradle?
Gradle is an excellent build system and build tool that allows you to create custom build logic through plug-ins. Based on the following characteristics of Gradle, it is selected:
1. Domain Specific Language(DSL language) is used to describe and control the construction logic.
2. The build file is Groovy-based and allows you to control DSL elements by mixing declarative DSL elements and using code to control custom build logic.
3. Support Maven or Ivy's dependency management.
4. Very flexible. Allow the best implementations, but not the mandatory ones.
5. Plug-ins can provide their own DSL and API for building files.
6. Good API tools for IDE integration.
If you don't know Gradle's children's shoes, you can read these two articles:
1,Gradle went from introduction to understanding
2,Gradle Complete Guide (Android)
- Gradle global configuration:
Usually we have this section in build.gradle for each module:
android {
    compileSdkVersion 25
    buildToolsVersion '25.0.0'
    defaultConfig {
        minSdkVersion 15
        targetSdkVersion 25
        versionCode 1
        versionName "1.0"
    }
}
If we have multiple modules in our Project, if we upgrade targetSdk, buildTool and so on, then every module needs to change its value. It is not only troublesome, but also possible to cause problems because the versions of modules are not uniform. The solution is to configure Gradle global variables for each module to use and build in the root directory of your Project. Radle defines ext global variables:
ext {
    compileSdkVersion = 25
    buildToolsVersion = '25.0.0'
    minSdkVersion = 15
    targetSdkVersion = 25
    versionCode = 1
    versionName = "1.0"
}
Then the following is referenced in build.gradle in each module:
android {
    compileSdkVersion rootProject.ext.compileSdkVersion
    buildToolsVersion rootProject.ext.buildToolsVersion
    defaultConfig {
        minSdkVersion rootProject.ext.minSdkVersion
        targetSdkVersion rootProject.ext.targetSdkVersion
        versionCode rootProject.ext.versionCode
        versionName rootProject.ext.versionName
    }
}
This allows the global configuration to be achieved each time the build.gradle configuration of the Project is modified.
- Close Log in release version
We want to display Log log information when debugging code, but when we publish it to the application market, we don't want our application to display Log information, because it will slow down the running speed of the application and even expose key information, so what should we do? You can configure buildTypes to automatically close Logs in release versions:
 buildTypes {
        release {
            minifyEnabled false
            buildConfigField "boolean", "IS_SHOW_LOG", NOT_SHOW_LOG
            proguardFiles getDefaultProguardFile('proguard-android.txt'), 'proguard-rules.pro'
        }
        debug {
            minifyEnabled false
            buildConfigField "boolean", "IS_SHOW_LOG", SHOW_LOG
        }
    }
The build ConfigField parameter of the configuration will automatically generate the corresponding version of BuildConfig.java file under the folder of. app build generate source build Config after compilation. This file can be used directly in the code. NOT_SHOW_LOG and SHOW_LOG in the configuration information above are determined in the grade of the Project. The value of meaning:
org.gradle.jvmargs=-Xmx1536m
SHOW_LOG true
NOT_SHOW_LOG false
Let's first explain the use of buildConfigField, which uses an example:
buildConfigField "boolean", "IS_SHOW_LOG", NOT_SHOW_LOG
The meaning of parameters of buildConfigField:
| buildConfigField | Remarks |
|---|---|
| String type | The type of field to create, such as boolean above |
| String name | The field name to create, such as IS_SHOW_LOG above |
| String value | Create a value for this field, such as NOT_SHOW_LOG(false) above |
After configuring the above information, write a MyLog.java class in the project as follows:
public class MyLog {
    public static int v(String tag, String msg) {
        if (BuildConfig.IS_SHOW_LOG) {
            return Log.v(tag, msg);
        } else {
            return -1;
        }
    }
---------Other methods----------
}
Complete class address: MyLog.java
The above encapsulates the Log class and determines whether to print the Log according to the value of BuildConfig.IS_SHOW_LOG. The IS_SHOW_LOG we configure in release of buildTypes is false, and the IS_SHOW_LOG we configure in debug is true, so that when we debug, the log log will be displayed, while when we type release package. Log is automatically blocked.
- Build Variant Management, Multi-channel Packaging
BuildTypes: Defines compilation types that can be configured differently for each type (usually differentiating between obfuscated code, debuggable, and resource compression). The defaults are debug and release types, in addition to which compiler types (such as preview) can be added manually.
Product Flavors: If you want to compile multiple versions for the same BuildType (e.g., allied multi-channel packaging, differentiating different channels according to the values in different meta-data), then you need Product Flavors.
So the number of APK s that can be compiled at last = BuildTypes x Product Flavors, that is:
Build Variant = BuildTypes x ProductFlavors
Examples of Alliance Multi-Channel Packaging:
1. Define meta-data in Android Manifest. XML first:
 <meta-data
    android:name="UMENG_CHANNEL"
    //Placeholder, assigned in build.gradle
    android:value="${UMENG_CHANNEL_VALUE}" />
2. Configure buildTypes
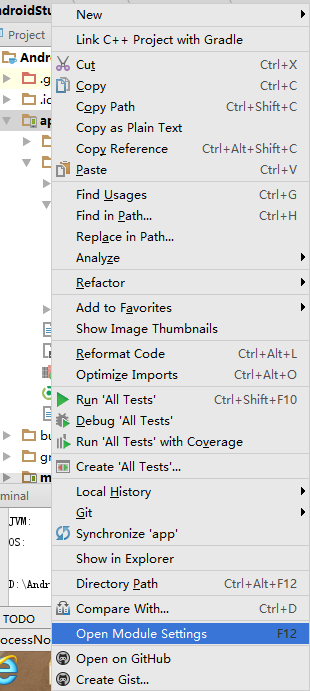
It can be written by hand or automatically generated by Gradle. Step: Right-click on the app - > Open Module Settings - > click on the Build Types button to configure different buildType s, and add a preview as follows:
 buildTypes {
        release {
            minifyEnabled false
            buildConfigField "boolean", "IS_SHOW_LOG", NOT_SHOW_LOG
            proguardFiles getDefaultProguardFile('proguard-android.txt'), 'proguard-rules.pro'
        }
        debug {
            minifyEnabled false
            buildConfigField "boolean", "IS_SHOW_LOG", SHOW_LOG
        }
        preview {
            minifyEnabled false
            buildConfigField "boolean", "IS_SHOW_LOG", SHOW_LOG
        }
    }
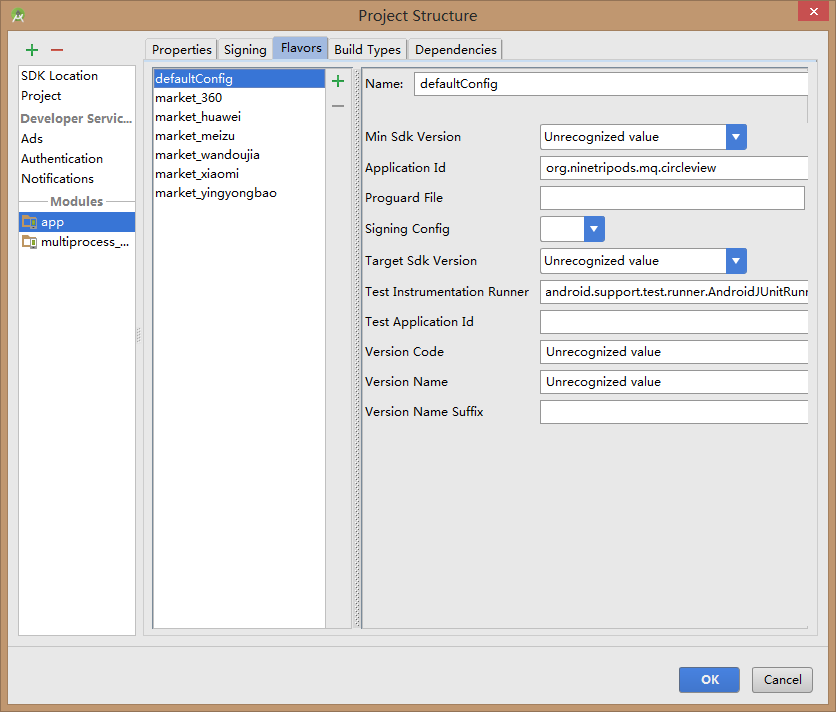
3. Configure product Flavors, which can be handwritten or automatically generated by Gradle. Step: Right-click on the app - > Open Module Settings - > click on the Flavors button to configure different Flavors, as shown in the figure:


Finally, UMENG_CHANNEL_VALUE is assigned in the generated product Flavors:
  //Assignment of UMENG_CHANNEL_VALUE in Android Manifest.xml
  productFlavors {
        market_meizu {
            manifestPlaceholders = [UMENG_CHANNEL_VALUE: "meizu"]
        }
        market_xiaomi {
            manifestPlaceholders = [UMENG_CHANNEL_VALUE: "meizu"]
        }
        market_huawei {
            manifestPlaceholders = [UMENG_CHANNEL_VALUE: "huawei"]
        }
        market_wandoujia {
            manifestPlaceholders = [UMENG_CHANNEL_VALUE: "wandoujia"]
        }
        market_yingyongbao {
            manifestPlaceholders = [UMENG_CHANNEL_VALUE: "yingyongbao"]
        }
        market_360 {
            manifestPlaceholders = [UMENG_CHANNEL_VALUE: "360"]
        }
    }
4. Modify the generated APK name
//Get the timestamp def getDate() {  def date = new Date() def formattedDate = date.format('yyyyMMddHHmm') return formattedDate }
  //Modify the APK generation name to traverse all build variant s through the android. application variants index
    applicationVariants.all { variant ->
        variant.outputs.each { output ->

            def timeNow = getDate()
            def newName
            if (variant.buildType.name.equals('debug')) {
                newName = "android-" + timeNow + "_v${variant.versionName}-debug.apk"
            } else {
                newName = "android_${variant.flavorName}_" + timeNow + "_v${variant.versionName}.apk"
            }
            output.outputFile = new File(output.outputFile.parent, newName)
        }
    }
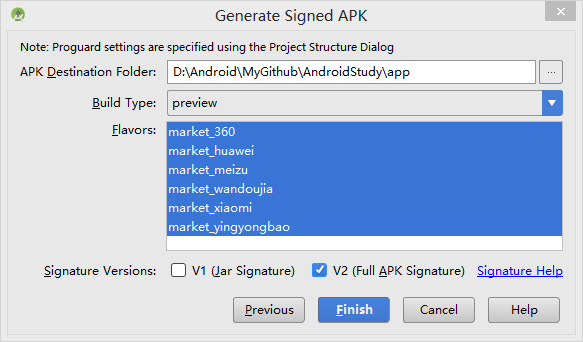
If you want to generate preview version now, select preview in build types, select the channel package we want to hit, and click finish:

Finally, the channel package is generated as follows. The name is named as we want.

build.gradle configuration address: build.gradle
Reference resources:
1,Gradle went from introduction to understanding
2,Gradle Complete Guide (Android)
3,Android Packing
4,Gradle Android Plug-in User Guide Translation