1. Examples and application scenarios of common floating frame display styles
Now many applications are using the suspension box, such as wechat video. After clicking the Home button, the wechat video window stays on the desktop, and the shortcut keys (Home, lock screen...) on the Xiaomi mobile phone screen. Today, we will implement the Android suspension box and explore the common errors of the suspension box;
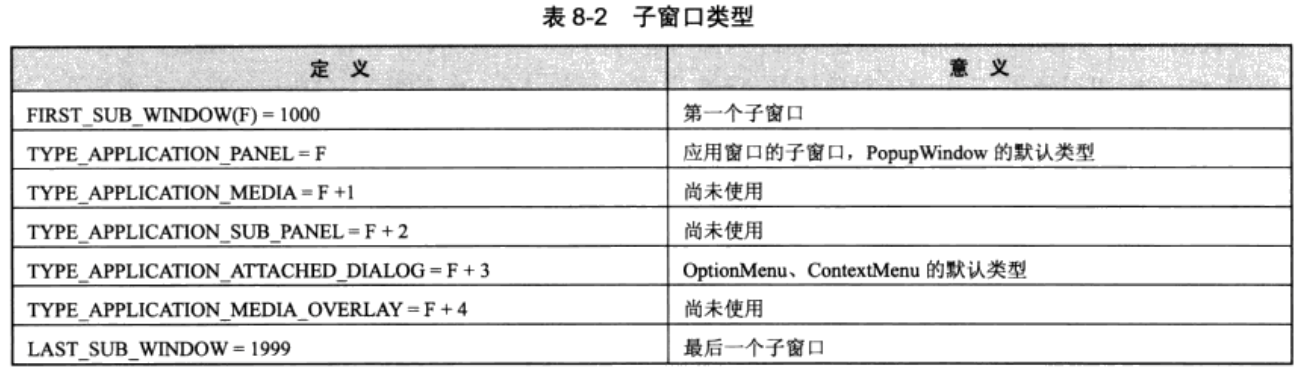
2. Common window types
2.1 common window types
There are three types of windows: application Window, sub Window and system Window; The application class Window corresponds to an Activity. The child Window cannot exist alone and needs to be attached to a specific parent Window. For example, some common Dialog is a child Window; The system Window needs to declare permission (android.permission.SYSTEM_ALERT_WINDOW) to create a Window. For example, Toast and system status bar are both system windows;
Windows are hierarchical. Each Window has a corresponding z-ordered. Windows with large levels will cover windows with small levels, which is completely consistent with the concept of z-index in HTML. Among the three kinds of windows, the application Window level ranges from 1 to 99, the sub Window level ranges from 1000 to 1999, and the system Window level ranges from 2000 to 2999. We can use a table to intuitively express:
Window level
Application Window 1~99;
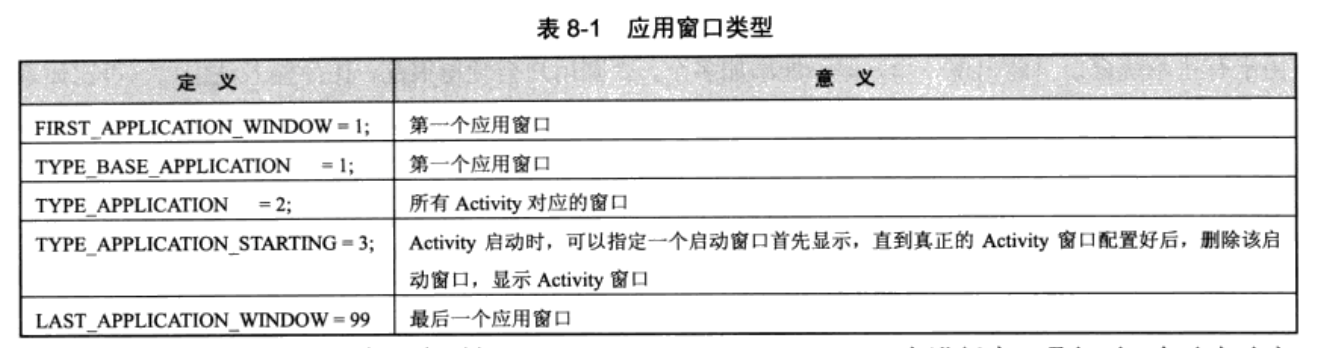
Sub Window 1000~1999;
System Window 2000~2999;
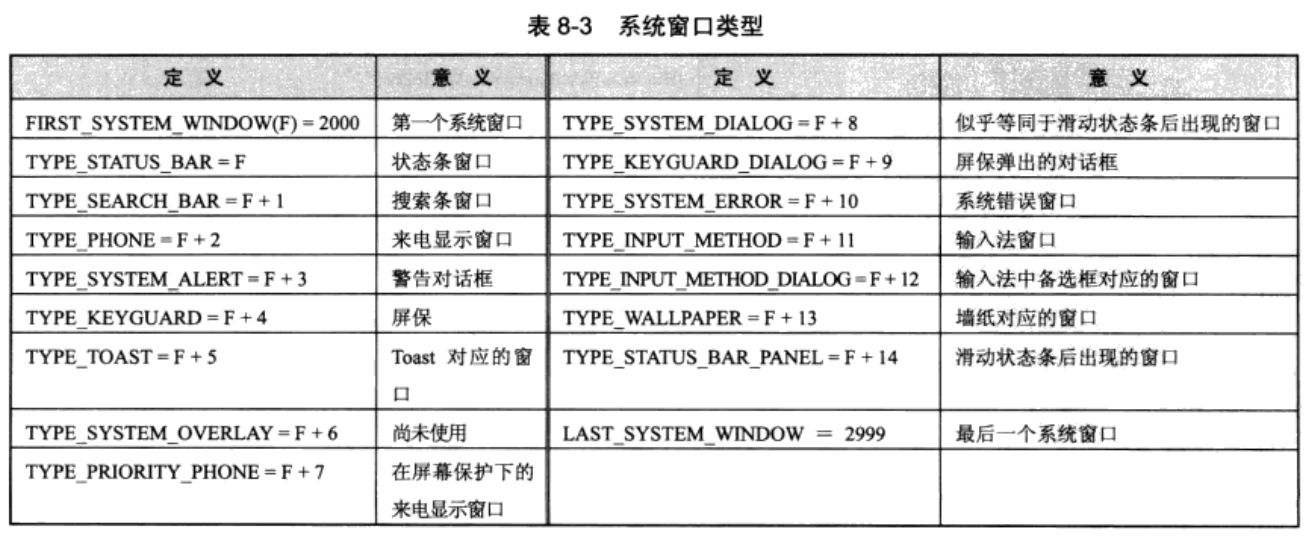
These levels correspond to the type parameter of WindowManager.LayoutParams. If you want windows to be at the top level of all windows, you can use a larger level. Obviously, the system Window has the largest level. When we use the system level, we need to declare permissions.
Android: system is required for system level windows_ alert_ Window can only be displayed. Unlike the above two windows, it will not disappear with the disappearance of activity. However, if the app is still displayed after it enters the background, many ROM s need the user's permission to manually open the floating window;
2.2WindowManagerService
WindowManagerService is a window management service located in the Framework layer. Its responsibility is to manage all windows in the system. What is the essence of window? In fact, it is a display area. In Android, it is a painted canvas: Surface. When a Surface is displayed on the screen, it is the window that users see. The process of WindowManagerService adding a window is actually the process of WindowManagerService assigning a piece of Surface to it. The pieces of Surface are orderly arranged on the screen under the management of WindowManagerService, and Android can present a colorful interface. Therefore, according to the operation type of Surface, the Android display system can be divided into three levels, as shown in the following figure:
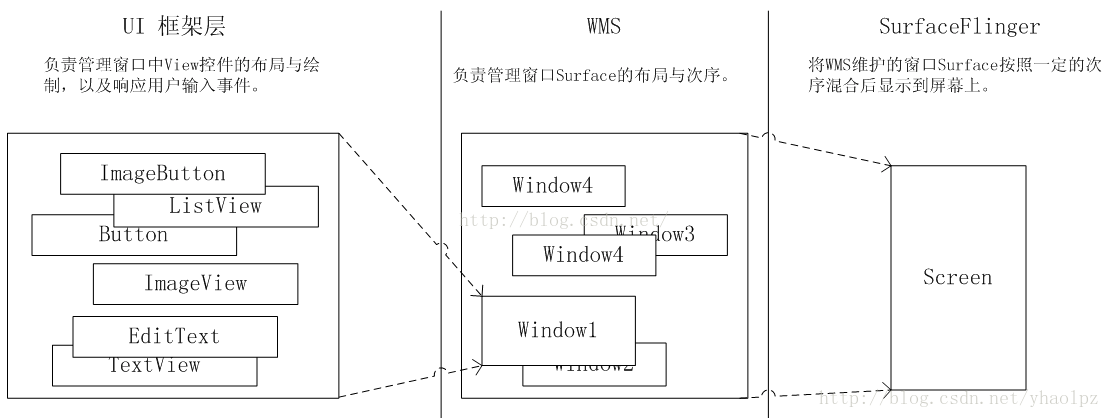
In the general development process, we operate the UI framework layer. The operation of Window can be completed through WindowManager, and WindowManagerService runs in a separate process as a system level service. Therefore, the interaction between WindowManager and WindowManagerService is an IPC process.
3. Implementation principle
3.1 suspension frame insertion interface
Before implementing the floating box, we need to know what interface can put a control into the screen;
Android interface drawing is realized through WindowManager services; Then, since we want to implement a floating box on the interface other than our own application, we need to complete it through WindowManager;
(frameworks/base/core/java/android/view/WindowMananger.java)
@SystemService(Context.WINDOW_SERVICE)
public interface WindowManager extends ViewManager {
}
WindowManager implements the ViewManager interface, which can be accessed through windows_ Service system service; The ViewManager interface has the addView method, through which we can add the floating box control to the screen;
public interface ViewManager
{
    public void addView(View view, ViewGroup.LayoutParams params);
    public void updateViewLayout(View view, ViewGroup.LayoutParams params);
    public void removeView(View view);
}
3.2 permission setting and request
The hover box needs to display controls on other applications. Obviously, this requires some permissions;
When API level > = 23, you need to declare the permission system in the androidmanifest.xml file_ ALERT_ Windows can draw controls on other applications;
<uses-permission android:name="android.permission.SYSTEM_ALERT_WINDOW" />
In addition to this permission, we also need to set the floating box permission for this application in system settings; This permission needs to start settings.action in the application_ MANAGE_ OVERLAY_ Permission to allow users to manually set permissions;
startActivityForResult(new Intent(Settings.ACTION_MANAGE_OVERLAY_PERMISSION, Uri.parse("package:" + getPackageName())), REQUEST_CODE);3.3 layoutparams settings
The addView method of WindowManager has two parameters, one is the control object to be added, and the other is the WindowManager.LayoutParam object;
What needs to be emphasized here is the type variable in LayoutParam. This variable is used to specify the window type. When setting this variable, you need to pay attention to a pit, that is, you need to adapt different versions of Android systems.
if (Build.VERSION.SDK_INT >= Build.VERSION_CODES.O) {
	layoutParams.type = WindowManager.LayoutParams.TYPE_APPLICATION_OVERLAY;
} else {
    layoutParams.type = WindowManager.LayoutParams.TYPE_PHONE;
}
Before Android 8.0, the floating window setting could be TYPE_PHONE, which is a non application window used to provide user interaction;
Android 8.0 has made changes to the system and API behavior, including the use of system_ ALERT_ Applications with windows permission can no longer use the following window types to display reminder windows above other applications and windows:
- TYPE_PHONE
- TYPE_PRIORITY_PHONE
- TYPE_SYSTEM_ALERT
- TYPE_SYSTEM_OVERLAY
- TYPE_SYSTEM_ERROR
 /**
         * Window type: phone.  These are non-application windows providing
         * user interaction with the phone (in particular incoming calls).
         * These windows are normally placed above all applications, but behind
         * the status bar.
         * In multiuser systems shows on all users' windows.
         * @deprecated for non-system apps. Use {@link #TYPE_APPLICATION_OVERLAY} instead.
         */
        @Deprecated
        public static final int TYPE_PHONE              = FIRST_SYSTEM_WINDOW+2;
...
If you need to display the reminder window above other applications and windows, you must change it to type_ APPLICATION_ New type of overlay;
If you still use type in Android version 8.0 or above_ The following exception message will appear in the phone type suspension window:
android.view.WindowManager$BadTokenException: Unable to add window
android.view.ViewRootImpl$W@f8ec928 -- permission denied for window type 2002
4. Concrete realization
Let's explain the specific implementation of the suspended window:
In order to separate the suspended window from the Activity so that the suspended window can still run normally when the application is in the background, Service is used to start the suspended window and serve as the logic support behind it;
Before starting the service, you need to judge whether the suspension window is allowed to be opened;
MainActivity.java
private static final int OVERLAYS_REQUEST_CODE = 1000;
    public void startFloatingService(){
        if(FloatService.isStarted)
            return;
        if(Build.VERSION.SDK_INT >= Build.VERSION_CODES.M &&
            !Settings.canDrawOverlays(this)){
            toast("No permission at present, please authorize");
            startActivityForResult(new Intent(Settings.ACTION_MANAGE_OVERLAY_PERMISSION, Uri.parse("package:" + getPackageName())), 0);
        }else{
            startService();
        }
    }

    @Override
    protected void onActivityResult(int requestCode, int resultCode, Intent data) {
        super.onActivityResult(requestCode, resultCode,data);
        if (requestCode == OVERLAYS_REQUEST_CODE && Build.VERSION.SDK_INT >= Build.VERSION_CODES.M){
            if (!Settings.canDrawOverlays(this)) {
                toast("privilege grant failed");
            } else {
                toast("Authorization succeeded");
                startService();
            }
        }
    }

    public void startService(){
        startService(new Intent(BehaviorActivity.this, FloatService.class));
    }

    public void toast(String toastMessage){
        Toast.makeText(this, toastMessage, Toast.LENGTH_SHORT).show();
    }
The floating window control can be any subtype of View. Here, take the simplest Button as an example;
Suspended window service class
FloatService
public class FloatService extends Service {
    public static boolean isStarted = false;
    @Nullable
    @Override
    public IBinder onBind(Intent intent) {
        return null;
    }

    @Override
    public void onCreate() {
        super.onCreate();
        FloatService.isStarted = true;
    }

    @Override
    public int onStartCommand(Intent intent, int flags, int startId) {
        showFloatingWindow();
        return super.onStartCommand(intent, flags, startId);
    }

    private void showFloatingWindow() {
        Button button = new Button(getApplicationContext());
        button.setText("I'm the floating window button");
        FloatWindowManager.getInstance().showFloatWindow(button);
    }

    @Override
    public void onDestroy() {
        super.onDestroy();
        FloatWindowManager.getInstance().hideFloatWindow();
    }
}
Suspended window management class
public class FloatWindowManager {
private static FloatWindowManager floatWindowManager = null;
private Context app;
private WindowManager windowManager;
private WindowManager.LayoutParams wMParams;
private View floatView;
private FloatWindowManager(){
this.app = ChildApplication.getApp();
//Get WindowManager
windowManager = (WindowManager) app.getSystemService(Context.WINDOW_SERVICE);
//Get the parameters related to layoutparams (global variable)
wMParams = new WindowManager.LayoutParams();
}
public static FloatWindowManager getInstance(){
if(floatWindowManager == null) {
synchronized (FloatWindowManager.class){
if(floatWindowManager == null){
floatWindowManager = new FloatWindowManager();
}
}
}
return floatWindowManager;
}
public void showFloatWindow(View view){
/**
* Set LayoutParam. The following are the relevant properties of WindowManager.LayoutParams
* Specific users can refer to the SDK documentation
*/
//Set Window type
if (Build.VERSION.SDK_INT >= Build.VERSION_CODES.O) {
wMParams.type = WindowManager.LayoutParams.TYPE_APPLICATION_OVERLAY;
} else {
wMParams.type = WindowManager.LayoutParams.TYPE_PHONE;
}
// wMParams.type = WindowManager.LayoutParams.TYPE_APPLICATION_OVERLAY;//WindowManager.LayoutParams.TYPE_PHONE;
//Format the picture so that the background is transparent
wMParams.format = PixelFormat.RGBA_8888;
//Set Window flag
wMParams.flags = WindowManager.LayoutParams.FLAG_NOT_TOUCH_MODAL
| WindowManager.LayoutParams.FLAG_NOT_FOCUSABLE;
/*
* The following flags attribute has the same effect as "lock".
* The suspended window cannot be touched, does not accept any events, and does not affect the subsequent event response.
wmParams.flags=LayoutParams.FLAG_NOT_TOUCH_MODAL
| LayoutParams.FLAG_NOT_FOCUSABLE
| LayoutParams.FLAG_NOT_TOUCHABLE;
*/
//Adjust the floating window to the upper left corner to adjust the coordinates
wMParams.gravity = Gravity.LEFT | Gravity.TOP;
//Set the initial values of x and y with the upper left corner of the screen as the origin
wMParams.x = 100;
wMParams.y = 100;
//Set floating window length and width data
wMParams.height = 200;
wMParams.width = 200;
//Display myFloatView image in WindowManager
windowManager.addView(view,wMParams);
floatView = view;
}
public void hideFloatWindow(){
windowManager.removeView(floatView);
}
public WindowManager.LayoutParams getWMParams(){
return wMParams;
}
public WindowManager getWM(){
return windowManager;
}
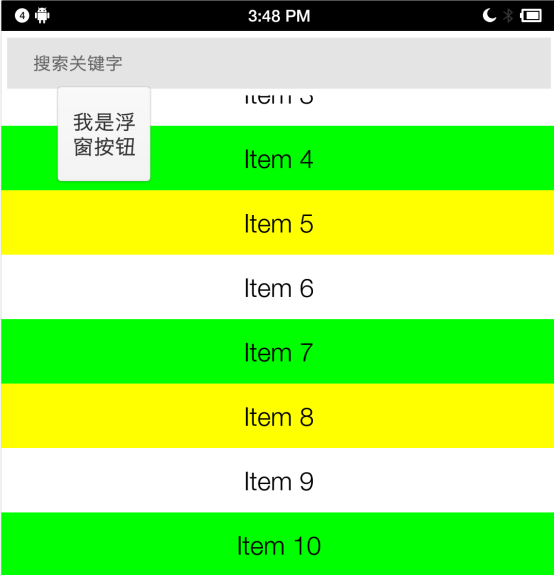
}A simple suspended window is completed. Let's see the following results:
5. Add small functions
5.1 drag function
The first function you want to add is to drag the floating window; Because the display position of the suspended window may block the information you want to see behind, it would be better if you could drag the suspended window away;
In Android, add a touch event for the child View added to WindowManager. The code is as follows:
Set touch event listening as follows:
FloatButtonService.java
    private void showFloatingWindow() {
        Button button = new Button(getApplicationContext());
        button.setOnTouchListener(new SystemDragViewListener(FloatWindowManager.getInstance().getWMParams(),
                FloatWindowManager.getInstance().getWM()));
        button.setText("I'm the floating window button");
        FloatWindowManager.getInstance().showFloatWindow(button);
    }
Button add touch event is defined as follows:
public class SystemDragViewListener implements View.OnTouchListener {

    private int x;
    private int y;

    public SystemDragViewListener(WindowManager.LayoutParams wMParams, WindowManager wM){
        this.wMParams = wMParams;
        this.wM = wM;
    }

    private WindowManager.LayoutParams wMParams;
    private WindowManager wM;

    @Override
    public boolean onTouch(View v, MotionEvent event) {
        switch (event.getAction()){
            case MotionEvent.ACTION_DOWN:
                x = (int)event.getRawX();
                y = (int)event.getRawY();
                break;
            case MotionEvent.ACTION_MOVE:
                int moveX = (int)event.getRawX() - x;
                int moveY = (int)event.getRawY() - y;
                //Calculate the position of the View on the screen
                wMParams.x = wMParams.x + moveX;
                wMParams.y = wMParams.y + moveY;
                //Update the location of the View on the screen
                wM.updateViewLayout(v, wMParams);

                x = (int)event.getRawX();
                y = (int)event.getRawY();

                break;
        }
        return false;
    }
}
It should be noted here that the method of updating the suspended window control layout at the code comment is WindowManager.updateViewLayout(). Only when this method is called can the position of the suspended window be changed. See the effect:
5.2 automatic picture playback
Let's make some small changes to the suspended window to demonstrate a slightly complex interface;
In the floating window interface here, we do not simply use a Button control, but a LinearLayout with an ImageView. The layout file is as follows:
<?xml version="1.0" encoding="utf-8"?>
<LinearLayout
    xmlns:android="http://schemas.android.com/apk/res/android"
    android:layout_width="match_parent"
    android:layout_height="match_parent"
    android:orientation="vertical" >

    <ImageView
        android:id="@+id/image_display_imageview"
        android:layout_width="wrap_content"
        android:layout_height="wrap_content" />

</LinearLayout>
Make some changes where you created the suspended window layout
FloatImageViewService.java
private void showFloatingWindow() {
        View floatView = LayoutInflater.from(this).inflate(R.layout.float_imageview, null);
        imageView = floatView.findViewById(R.id.image_display_imageview);
        imageView.setOnTouchListener(new SystemDragViewListener(FloatWindowManager.getInstance().getWMParams(),
                FloatWindowManager.getInstance().getWM()));
        FloatWindowManager.getInstance().showFloatWindow(floatView);
        changeImageHandler = new Handler(getMainLooper(), changeCallback);
    }
We also want to switch pictures every two seconds, so we can make a mechanism to switch pictures regularly;
FloatImageViewService.java
@Override
public void onCreate() {
super.onCreate();
changeImageHandler = new Handler(getMainLooper(), changeCallback);
}
private ImageView imageView;
private Handler changeImageHandler;
private int[] images = {R.drawable.b,R.drawable.a,R.drawable.c};
private int imageIndex = 0;
private Handler.Callback changeCallback = new Handler.Callback() {
@Override
public boolean handleMessage(@NonNull Message msg) {
if(msg.what == 0){
imageIndex++;
if(imageIndex>=3){
imageIndex=0;
}
imageView.setImageResource(images[imageIndex]);
changeImageHandler.sendEmptyMessageDelayed(0,2000);
}
return false;
}
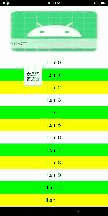
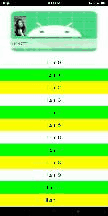
};Let's take a look at the effect of automatic picture playing by the floating window as follows:
5.3 video window
Let's take a look at the common functions of the suspension box, the video small window; For example, when you exit the interface during wechat video, the video will be displayed in the form of a small window; Here, we first play a network video with MediaPlayer and SurfaceView to simulate the effect; The implementation is basically the same as that of the above picture player, except that the control and corresponding playback logic are changed;
The layout file is similar to the picture player above, except that the ImageView is replaced by SurfaceView;
Create a suspended window control;
FloatPlayerService.java
 private void showFloatingWindow() {
        ActivitiesVideoPlayerView activitiesVideoPlayerView = new ActivitiesVideoPlayerView(getApplicationContext());
        FloatWindowManager.getInstance().showFloatWindow(activitiesVideoPlayerView);
    }
Customize a player class as follows: ActivitiesVideoPlayerView
zsz_activities_player.xml
<?xml version="1.0" encoding="utf-8"?>
<LinearLayout xmlns:android="http://schemas.android.com/apk/res/android"
    android:orientation="vertical" android:layout_width="match_parent"
    android:background="@color/black"
    android:layout_height="match_parent">
    <SurfaceView
        android:layout_width="match_parent"
        android:layout_height="match_parent"
        android:id="@+id/sv_zsz_player"/>
</LinearLayout>
The simple playback code is as follows:
/**
 * Active video player
 */
public class ActivitiesVideoPlayerView extends LinearLayout
        implements MediaPlayer.OnErrorListener, MediaPlayer.OnCompletionListener,
        MediaPlayer.OnPreparedListener, View.OnClickListener {

    private MediaPlayer mediaPlayer;
    private SurfaceHolder holder;
    //Current playback progress
    private int savedPosition;
    private String playUrl = "https://media.w3.org/2010/05/sintel/trailer.mp4";

    private SurfaceView mSvZszPlayer;
...

    public void initViews(){
        View view = LayoutInflater.from(getContext()).inflate(R.layout.zsz_activities_player, this);
        mSvZszPlayer = (SurfaceView) view.findViewById(R.id.sv_zsz_player);

        //Canvas transparency
        mSvZszPlayer.setZOrderOnTop(true);
        mSvZszPlayer.getHolder().setFormat(PixelFormat.TRANSLUCENT);
        mSvZszPlayer.setOnClickListener(this);
    }


    /**
     * Play preparation
     */
    public void playPrepare(){
        if(mediaPlayer == null){
            mediaPlayer = new MediaPlayer();
            mediaPlayer.setOnCompletionListener(this);
            mediaPlayer.setOnPreparedListener(this);
            mediaPlayer.setOnErrorListener(this);

            holder = mSvZszPlayer.getHolder();
            holder.setType(SurfaceHolder.SURFACE_TYPE_PUSH_BUFFERS);
            holder.addCallback(new SurfaceHolder.Callback() {
                @Override
                public void surfaceCreated( SurfaceHolder holder) {
                    if(savedPosition>0){
                        try {
                            mediaPlayer.reset();
                            mediaPlayer.setDataSource(playUrl);
                            mediaPlayer.setDisplay(holder);
                            mediaPlayer.prepare();
                        } catch (IOException e) {
                            e.printStackTrace();
                        }
                    }
                }

                @Override
                public void surfaceChanged(SurfaceHolder holder, int format, int width, int height) {

                }

                @Override
                public void surfaceDestroyed(SurfaceHolder holder) {
                    if(mediaPlayer != null){
                        savedPosition = mediaPlayer.getCurrentPosition();
                        mediaPlayer.stop();
                    }
                }
            });
        }else{
            stop();
        }
    }

    /**
     * Interface for external call
     */
    public void stop(){
        if (mediaPlayer != null && mediaPlayer.isPlaying()) {
            mediaPlayer.stop();
        }
        mediaPlayer.reset();
    }

    @Override
    public void onCompletion(MediaPlayer mp) {
    }

    @Override
    public boolean onError(MediaPlayer mp, int what, int extra) {
        return false;
    }

    @Override
    public void onPrepared(MediaPlayer mp) {
        mediaPlayer.start();
        mediaPlayer.seekTo(savedPosition);
    }

    @Override
    public void onClick(View v) {
       if(v.getId() == R.id.sv_zsz_player){
           playPrepare();
           try {
               mediaPlayer.setDataSource(this.playUrl);
               mediaPlayer.setDisplay(holder);
               mediaPlayer.prepareAsync();
           } catch (IOException e) {
               e.printStackTrace();
           }
       }
    }
}
6. Summary
The implementation method of suspension window is briefly summarized as follows:
1. Declaration and application authority;
2. Construct the suspension box control;
3. Add the hover box control to WindowManager;
4. Update the WindowManager layout if necessary;
The easy to fall pit to pay attention to is Version adaptation of LayoutParams.type;
reference resources:
android window level - brief book
Implementation of freely movable floating window in Android - Captain duck - blog Garden