Update 2020.06.23
1 Background
Develop an app to interact with the background database, based on MySQL+native JDBC+Tomcat, without using DBUtils or JDBC framework, pure underlying JDBC implementation.
In the future, we will gradually change to the Spring framework, optimize MySQL, further deploy Tomcat and so on. Now the project is just starting, there are still a lot of things we don't understand, we need to slowly...
These days, I have stepped on a lot of pits, exaggerating points are really stepping on the author unconscious, I hope to help others less stepping on pits...
2 Development Environment
- Local Win
- Server CentOS 7
- Android Studio 3.5.1
- IntelliJ IDEA 2019.02
- MySQL 8.0.17
- Tomcat 9.0.26
3 Prepare the environment
Tell me about the installation of MySQL and Tomcat.
3.1 Install MySQL
This is the newer version of MySQL.
The server system is CentOS.
Other system installations can be found here:
CentOS is installed using the yum command:
3.1.1 Download and install mysql
sudo yum localinstall https://repo.mysql.com//mysql80-community-release-el7-1.noarch.rpm
sudo yum install mysql-community-server
3.1.2 Start the service and view the initialization password
sudo service mysqld start
sudo grep 'temporary password' /var/log/mysqld.log
3.1.3 Change Password
First log in using root:
mysql -u root -p
Enter the password you saw in the previous step, and then use alter to change the password:
alter mysql.user 'root'@'localhost' identified by 'password';
Note that the new version of MySQL cannot use passwords that are too weak.
If the following prompt appears:
That means the password is too weak. Use a stronger password.
3.1.4 Allow external access
use mysql;
update user set host='%' where user='root';
This can be modified to suit your needs. Host='%'means that all ip logins are allowed or specific IPS can be set. If host='%' is used, a new user is recommended to configure the appropriate permissions.
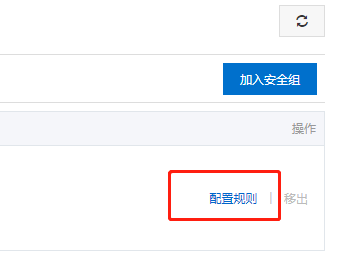
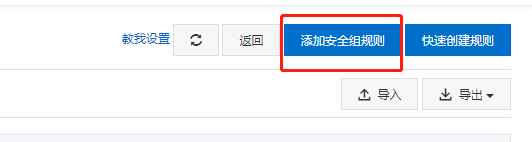
3.1.5 Configure firewall (optional)
In general, you need to open a response port in the firewall configuration of the corresponding cloud vendor, as shown in the following figure: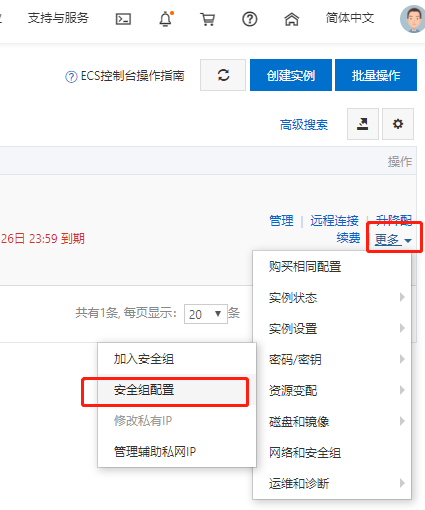
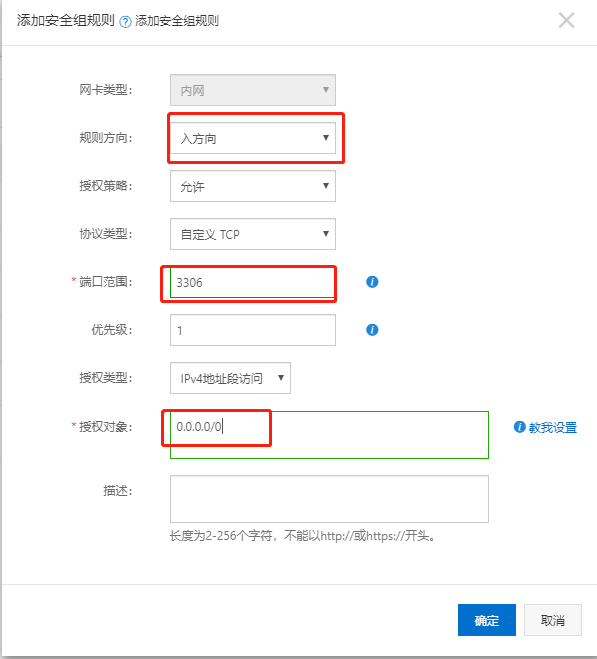
Where the authorized object can be changed according to its needs, 0.0.0/0 means that all IPS are allowed.
3.2 Install Tomcat
3.2.1 Download and upload to server
Go first Official Web Download, upload files to the server after downloading: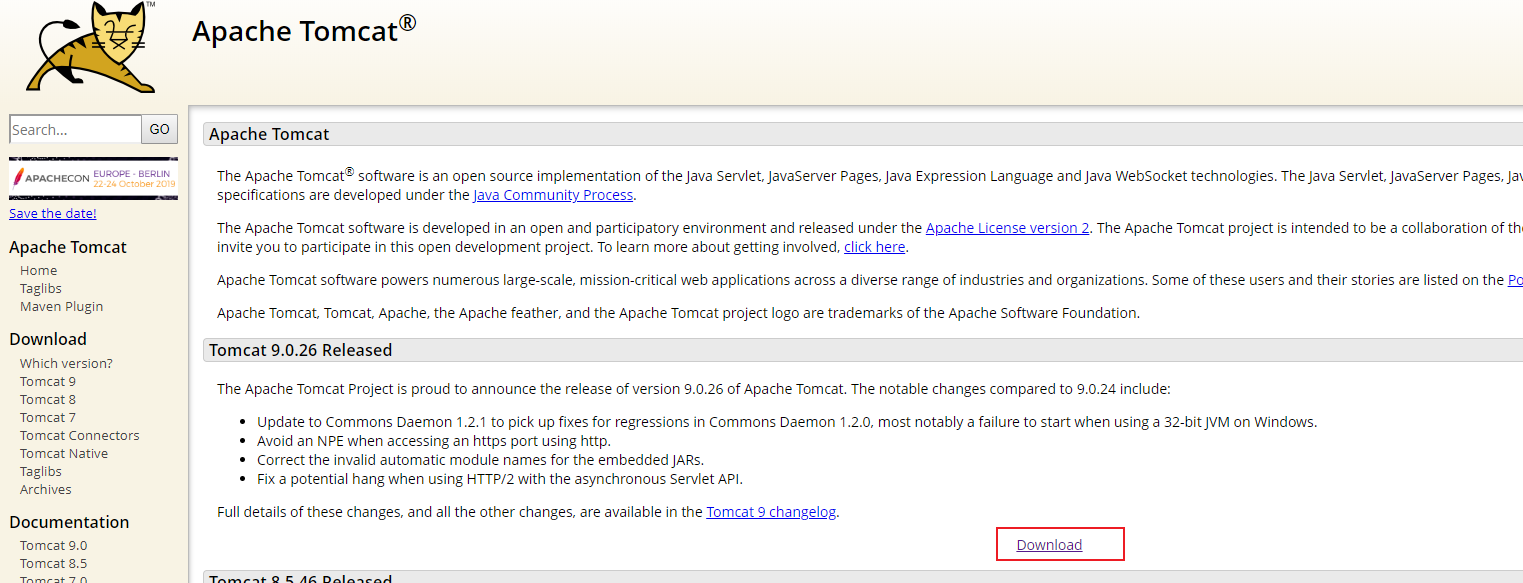
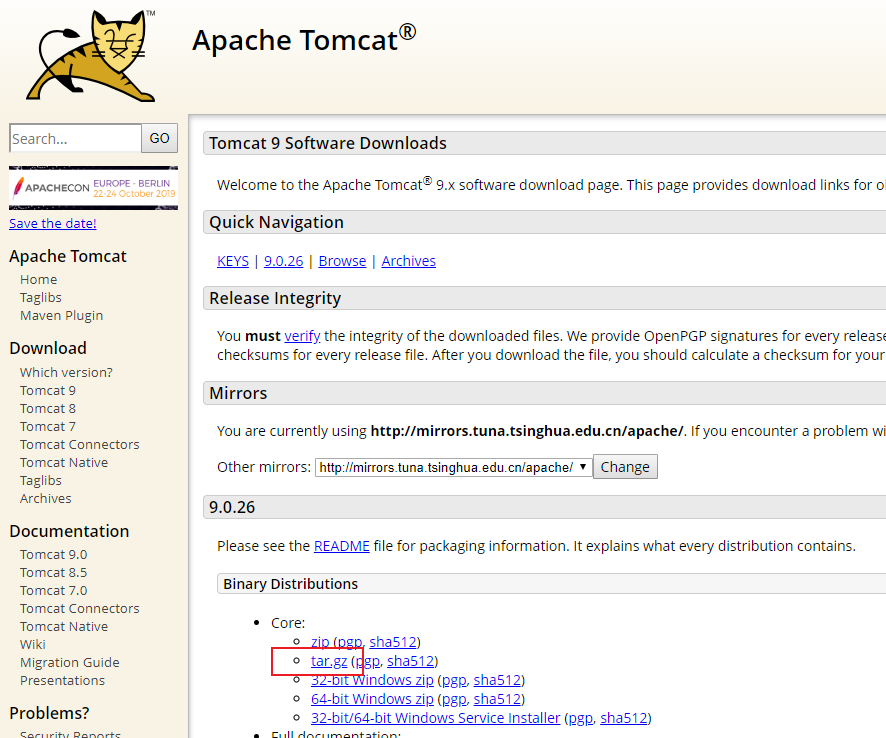
The author uses the scp command, Use inexperienced stamps to see here
scp apache-tomcat-xxxx.tar.gz username@xx.xx.xx.xx:/
Change to your user name and ip.
3.2.2 Decompression
ssh connects to the server, then moves to/usr/local and uncompresses:
mkdir /usr/local/tomcat
mv apache-tomcat-xxxx.tar.gz /usr/local/tomcat
tar -xzvf apache-tomcat-xxx.tar.gz
3.2.3 Modify the default port (optional)
Modify conf/Server.xmlFiles, generally only need to be modified
<Connector port="8080" protocol="HTTP/1.1" connectionTimeout="20000" redirectPort="8443" />
Port 8080 in, modify this port.
Change it if you want.
I'm so lazy that I won't change it.
3.2.4 Startup
Run under the bin directoryStartup.sh:
cd bin
./startup.sh
3.2.5 Test
Browser input:
Server IP:Port
If present: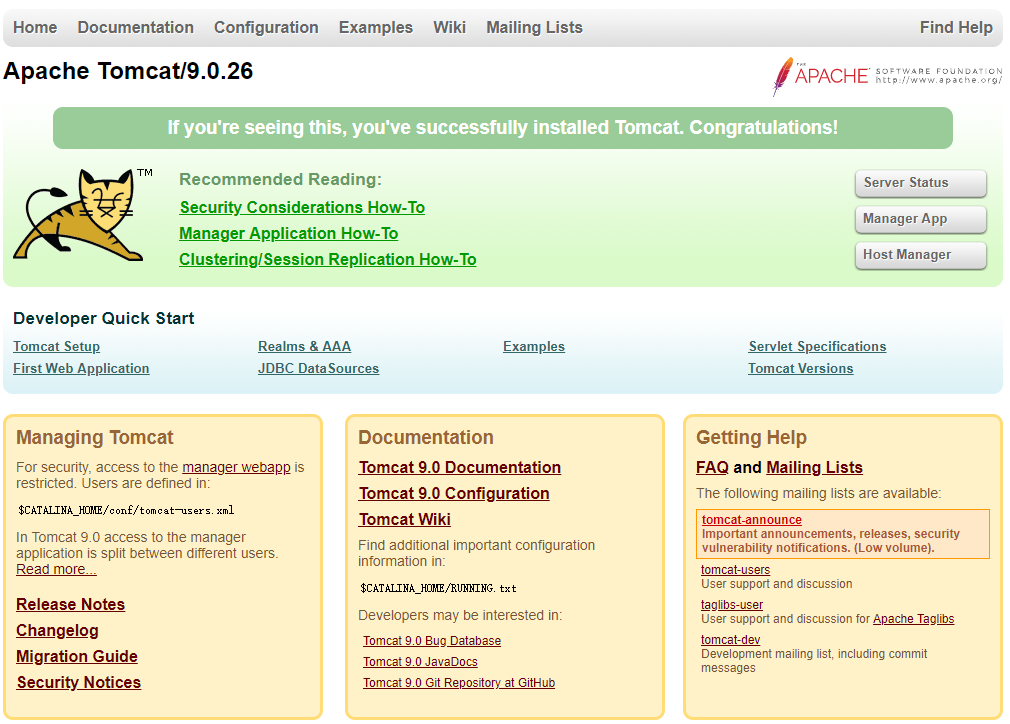
Success.
3.2.6 Start-up (optional)
Recommended configuration boot-up, modification/etc/Rc.localFile, add:
sh /usr/local/tomcat/bin/startup.sh
This is modified according to your Tomcat installation path, specifying theStartup.shYes.
4 Building library and table
Create a user table, which simplifies the operation (well, I like to be lazy) without creating a new user without authorization.
This is an example of logging in locally with root, create and authorize users as appropriate.
4.1 CreationUser.sql
CREATE DATABASE userinfo;
USE userinfo;
CREATE TABLE user
(
    id          INT     NOT NULL    PRIMARY KEY   AUTO_INCREMENT,
    name        CHAR(30)    NULL,
    password    CHAR(30)    NULL
);
4.2 Import to Database
mysql -u root -p < user.sql

5 rear part
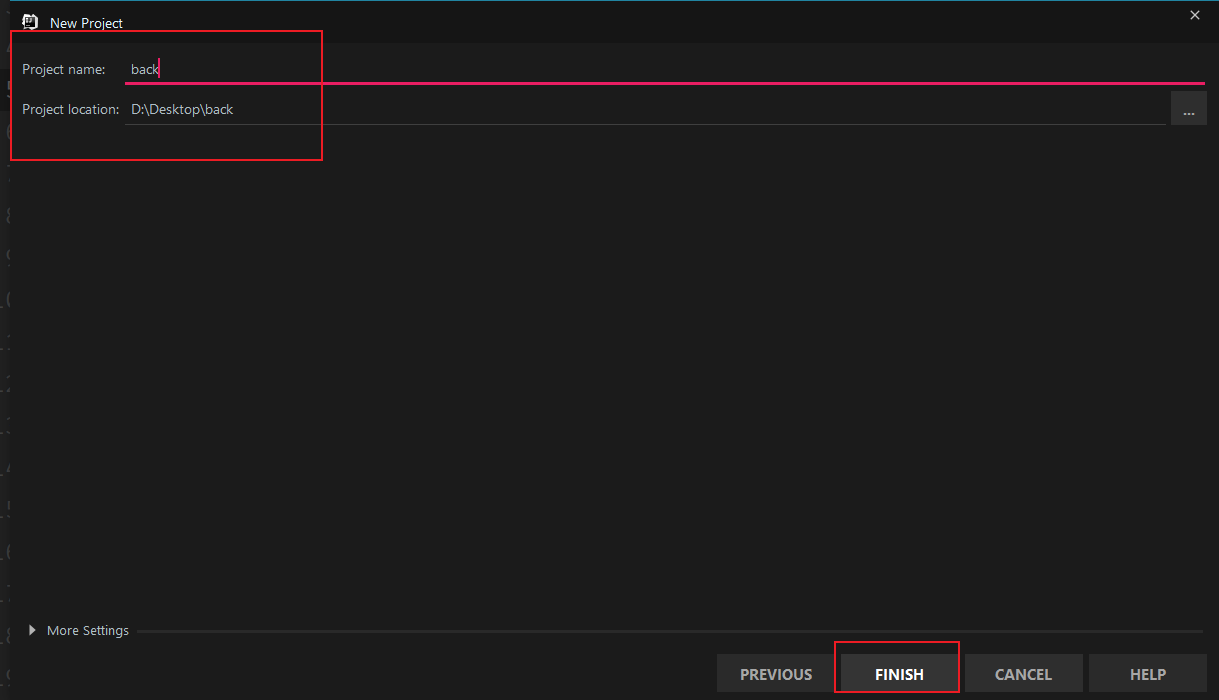
5.1 Create Project
Select Web Application: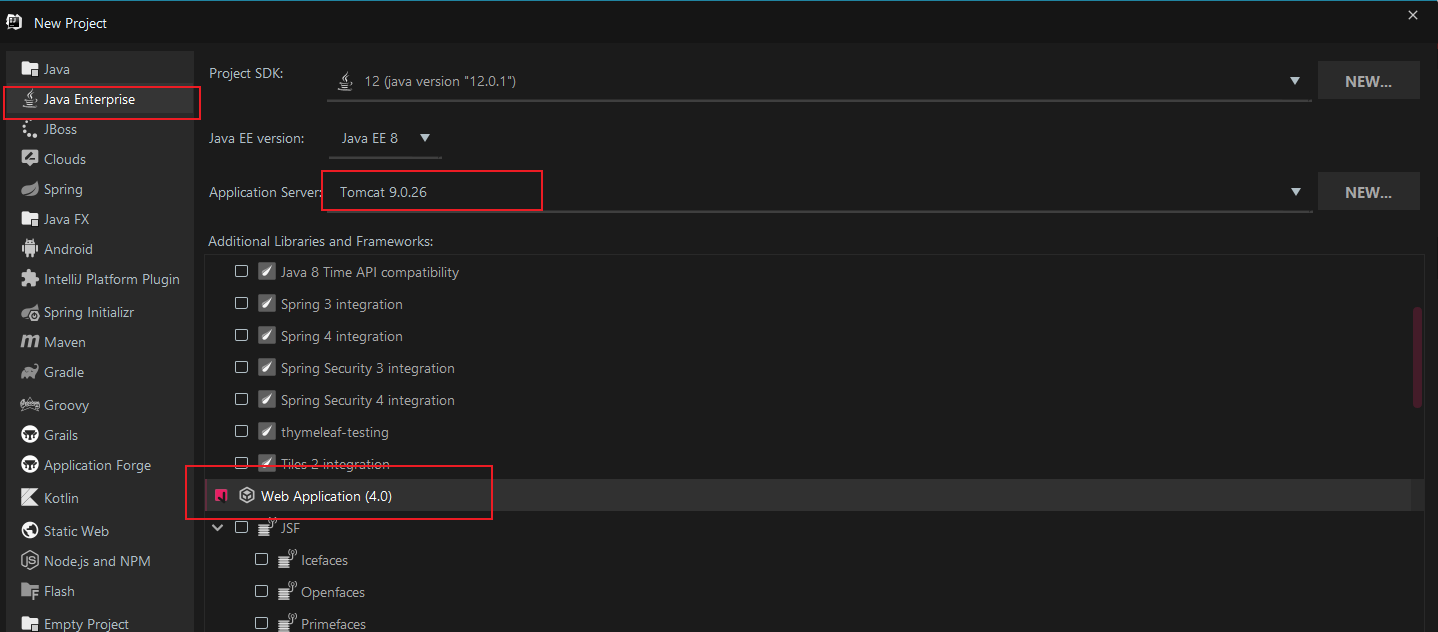
5.2 Add Dependent Library
Create a directory called lib: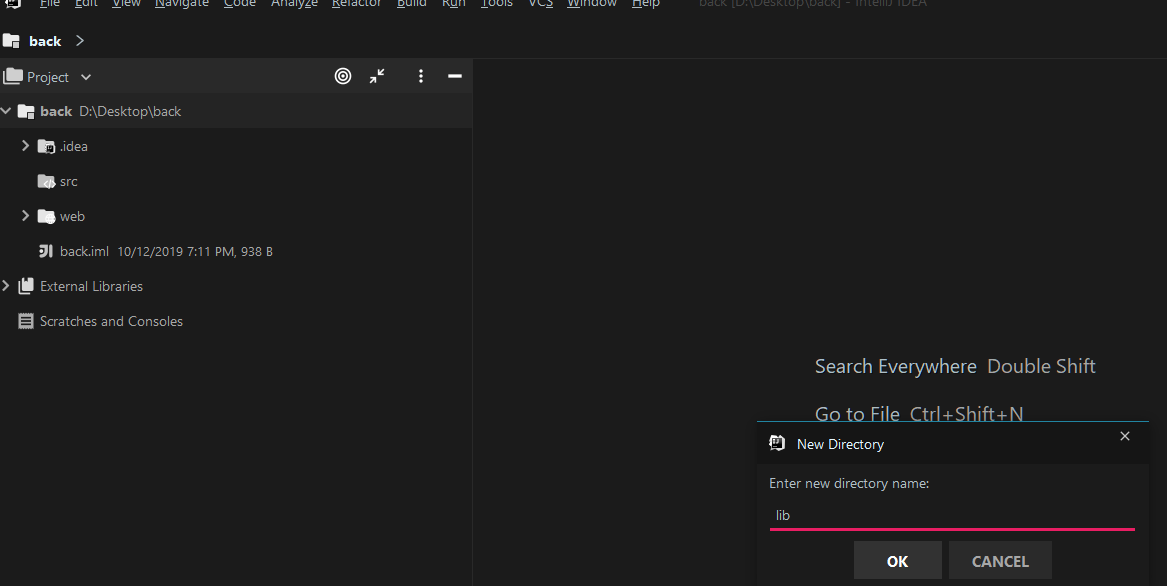
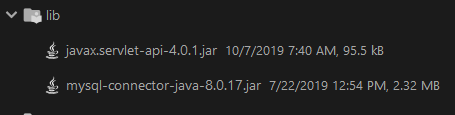
Add two jar packages (the jar packages provide download links at the end):
- mysql-connector-java-8.0.17.jar
- javax.servlet-api-4.0.1.jar
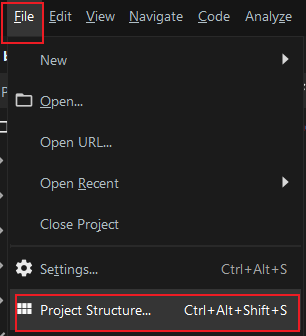
Open Project Structure: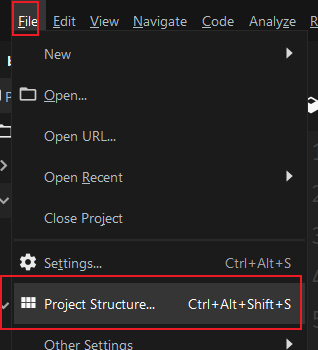
Modules --> + --> JARs or directories: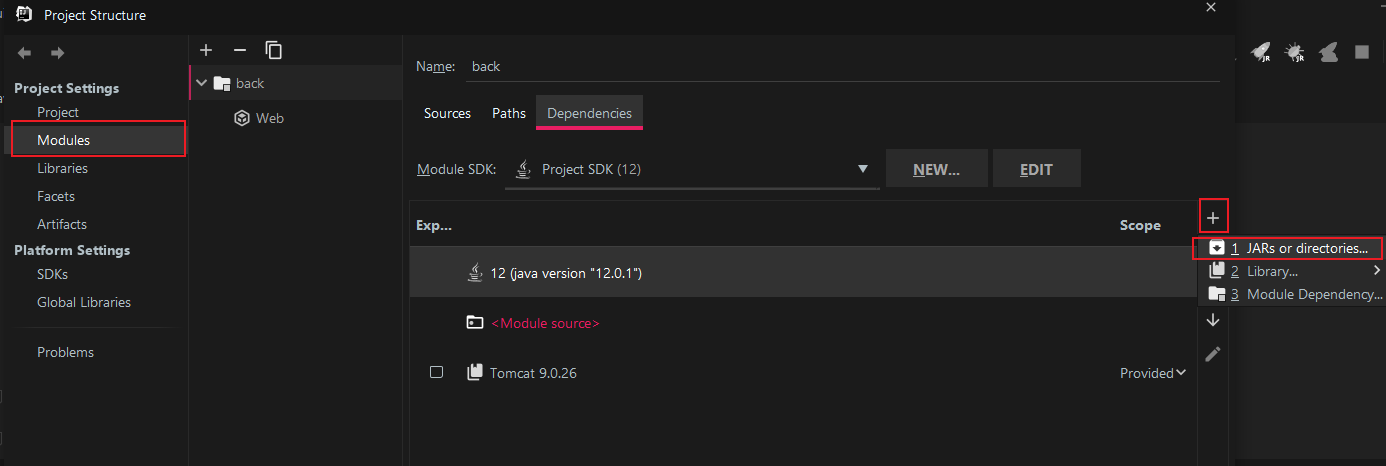
Select the two jar packages under the newly created lib: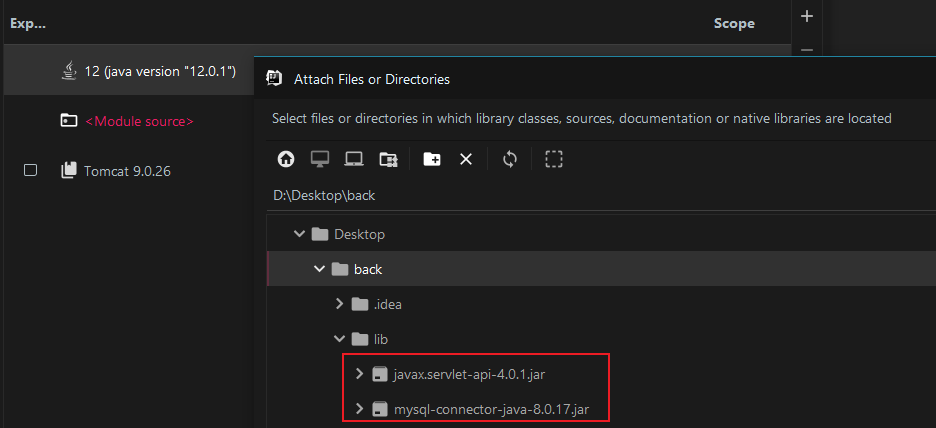
Check, apply: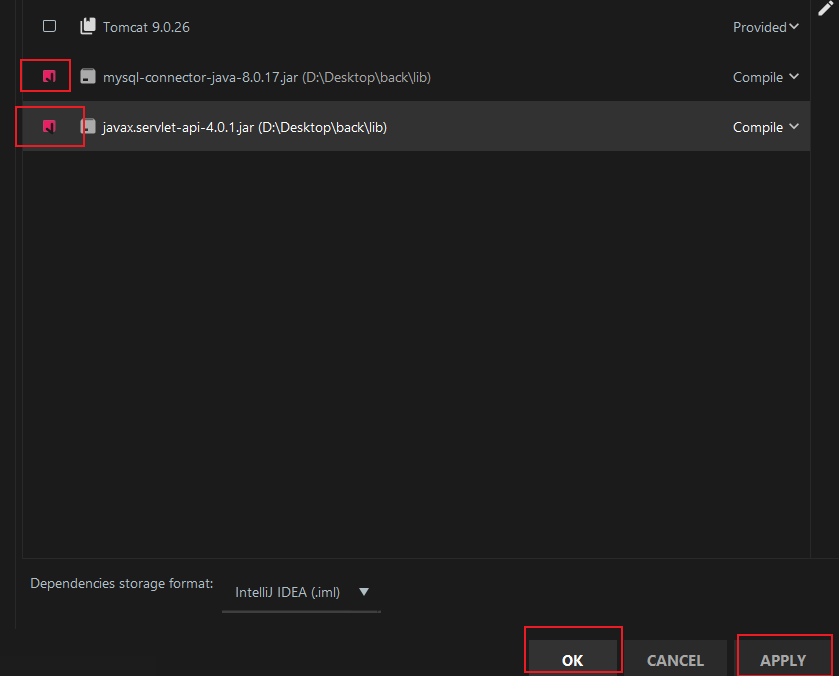
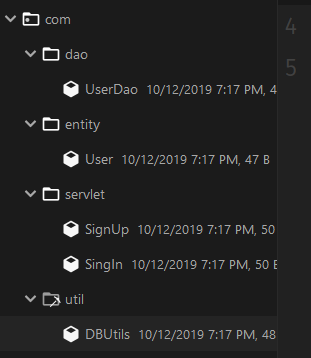
5.3 Creating packages and classes
Total 4 packages
- com.servlet: Used to process requests from the front end, includingSignUp.java,SignIn.java
- com.util: The main function is database connection, includingDBUtils.java
- com.entity: Entity class, containingUser.java
- com.dao: Classes that operate on user classes, includingUserDao.java
5.4 DBUtils
Connect to the database class, pure underlying jdbc implementation, note the driver version.
public class DBUtils {

    private static Connection connection = null;
    public static Connection getConnection()
    {
        try {
            Class.forName("com.mysql.cj.jdbc.Driver");
            String url = "jdbc:mysql://127.0.0.1:3306/Database name ";
            String usename = "Account number";
            String password = "Password";
            connection = DriverManager.getConnection(url,usename,password);
        }
        catch (Exception e)
        {
            e.printStackTrace();
            return null;
        }
        return connection;
    }

    public static void closeConnection()
    {
        if(connection != null)
        {
            try {
                connection.close();
            }
            catch (SQLException e)
            {
                e.printStackTrace();
            }
        }
    }
}
The main function is to get the connection and close the connection.
String url = "jdbc:mysql://127.0.0.1:3306/Database name ";
String usename = "Account number";
String password = "Password";
These lines are modified according to your user name, password, server ip, and library name.
Note that the registration-driven statements used above MySQL 8.0 are:
Class.forName("com.mysql.cj.jdbc.Driver");The old version was:
Class.forName("com.mysql.jdbc.Driver");5.5 User
The User class is simpler by comparing three fields to getter,setter:
public class User {
    private int id;
    private String name;
    private String password;
    //Three getter s and three setter s
    //...
}
5.6 UserDao
public class UserDao {
    public boolean query(User user)
    {
        Connection connection = DBUtils.getConnection();
        String sql = "select * from user where name = ? and password = ?";
        try {
            PreparedStatement preparedStatement = connection.prepareStatement(sql);
            preparedStatement.setString(1,user.getName());
            preparedStatement.setString(2,user.getPassword());
            ResultSet resultSet = preparedStatement.executeQuery();
            return resultSet.next();
        }
        catch (SQLException e)
        {
            e.printStackTrace();
            return false;
        }
        finally {
            DBUtils.closeConnection();
        }
    }

    public boolean add(User user)
    {
        Connection connection = DBUtils.getConnection();
        String sql = "insert into user(name,password) values(?,?)";
        try {
            PreparedStatement preparedStatement = connection.prepareStatement(sql);
            preparedStatement.setString(1,user.getName());
            preparedStatement.setString(2,user.getPassword());
            preparedStatement.executeUpdate();
            return preparedStatement.getUpdateCount() != 0;
        }
        catch (SQLException e)
        {
            e.printStackTrace();
            return false;
        }
        finally {
            DBUtils.closeConnection();
        }
    }
}
This is mainly a query and add operation, which returns true if the user exists in the query operation, or false if it does not.
Use executeUpdate() and getUpdateCount() in add operations!= 0. Note that you cannot use them directly
return preparedStatement.execute();
To replace
preparedStatement.executeUpdate();
return preparedStatement.getUpdateCount() != 0;
At first glance, there seems to be nothing wrong. That night when the author tested, the problem was serious. The android side shows that registration failed, but the database side insert s in...........
Well, if you say too much, it's all tears, or if you don't use the function skillfully.
- Generally, select uses executeQuery(), which returns a ResultSet, representing the result set, saving the execution result of the select statement, and working with next()
- delete,insert,update uses executeUpdate(),executeUpdate() returns an integer indicating the number of rows affected, that is, delete,insert,update modified rows, for drop, the create operation returns 0
-
create,drop uses execute(), and the return value of execute() is as follows:
- Returns true if the first result is a ResultSet object
- Returns false if the first result is an update count or no result
So in this case
return preparedStatement.execute();
It must have returned false, so insert on this side of the database goes in, but the front-end shows that registration failed (this bug was found really long...)
5.7 SignIn and SignUp
The SingIn class of the servlet package handles logins and calls JDBC to see if the database has a corresponding user.
The SignUp class handles registration and adds User to the database.
HTTPS connection is currently used and HTTPS support will be considered later.
SignIn.java The following:
@WebServlet("/SignIn")
public class SingIn extends HttpServlet {
    @Override
    protected void doGet(HttpServletRequest httpServletRequest, HttpServletResponse httpServletResponse) throws IOException,ServletException
    {
        this.doPost(httpServletRequest,httpServletResponse);
    }

    @Override
    protected void doPost(HttpServletRequest httpServletRequest,HttpServletResponse httpServletResponse) throws IOException, ServletException
    {
        httpServletRequest.setCharacterEncoding("utf-8");
        httpServletResponse.setCharacterEncoding("utf-8");
        httpServletResponse.setContentType("text/plain;charset=utf-8");//Set the corresponding type to html, encoding utf-8

        String name = httpServletRequest.getParameter("name");
        String password = httpServletRequest.getParameter("password");

        UserDao userDao = new UserDao();
        User user = new User();
        user.setName(name);
        user.setPassword(password);

        if(!userDao.query(user))//If the query fails
        {
            httpServletResponse.sendError(204,"query failed.");//Set 204 Error Code and Error Information
        }
    }
}
@WebServlet("/SignIn")The first is the @WebServlet annotation, which means that this is a servlet named SignIn that can be used to map the servlet to the url. If you do not add this annotation here, you will need to add it in the WEB-INF directoryWeb.xmlAdd a < servlet-mapping>, also known as a servlet mapping.
Next, set the response type and encoding:
httpServletResponse.setContentType("text/plain;charset=utf-8");//Set the corresponding type to html, encoding utf-8HttpServletRequest.getParameterThe (String name) method means that the corresponding parameter is obtained from the name:
String name = httpServletRequest.getParameter("name");
String password = httpServletRequest.getParameter("password");
Here are SignUp.java:
@WebServlet("/SignUp")
public class SignUp extends HttpServlet {
    @Override
    protected void doGet(HttpServletRequest httpServletRequest,HttpServletResponse httpServletResponse) throws IOException,ServletException
    {
        this.doPost(httpServletRequest,httpServletResponse);
    }

    @Override
    protected void doPost(HttpServletRequest httpServletRequest,HttpServletResponse httpServletResponse) throws IOException,ServletException
    {
        httpServletRequest.setCharacterEncoding("utf-8");
        httpServletResponse.setCharacterEncoding("utf-8");//Set encoding to prevent Chinese scrambling
        httpServletResponse.setContentType("text/plain;charset=utf-8");//Set the corresponding type to html, encoding utf-8

        String name = httpServletRequest.getParameter("name");//Get parameters from name
        String password = httpServletRequest.getParameter("password");//Get parameters from password

        UserDao userDao = new UserDao();
        User user = new User();
        user.setName(name);
        user.setPassword(password);

        if(!userDao.add(user)) //If add fails
        {
            httpServletResponse.sendError(204,"add failed.");//Set 204 Error Code and Error Information
        }
    }
}
5.8 Add servlet s toWeb.xml
<?xml version="1.0" encoding="UTF-8"?>
<web-app xmlns="http://xmlns.jcp.org/xml/ns/javaee"
         xmlns:xsi="http://www.w3.org/2001/XMLSchema-instance"
         xsi:schemaLocation="http://xmlns.jcp.org/xml/ns/javaee http://xmlns.jcp.org/xml/ns/javaee/web-app_4_0.xsd"
         version="4.0">
    <servlet>
        <servlet-name>SignIn</servlet-name>
        <servlet-class>com.servlet.SingIn</servlet-class>
    </servlet>

    <servlet>
        <servlet-name>SignUp</servlet-name>
        <servlet-class>com.servlet.SignUp</servlet-class>
    </servlet>
</web-app>
To add the Servlet you just createdWeb.xml, add child elements < servlet-name> and < servlet-class>:
- < servlet-name> is the name of the Servlet, preferably the same as the class name
- < servlet-class> is the location of the Servlet class
If the @WebServlet("/xxxx") annotation is not added to the Servlet class, you will need toWeb.xmlAdd:
<servlet-mapping>
    <servlet-name>SignIn</servlet-name>
    <url-pattern>/SignIn</url-pattern>
</servlet-mapping>
Where < servlet-name> and < servlet> the child elements in < servlet-name> have the same value, < url-pattern> is the path to access.
5.9Hello.htmlTest File
Add one last called Hello.html HTML test file.
<!DOCTYPE html>
    <head>
        <meta charset="utf-8">
        <title>Welcome</title>
    </head>
    <body>
        Hello web.
    </body>
</html>
6 Package and Publish
The IDEA used by the author, See here for Eclipse packaging.
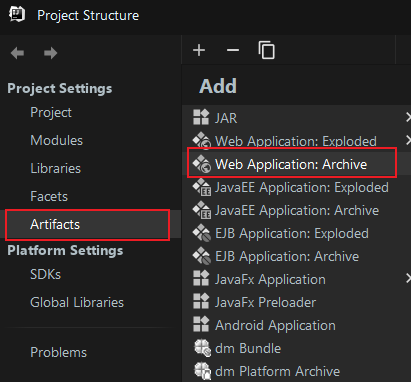
6.1 Project Structure->Artifacts->Web Application:Archive
6.2 Create directories and add modules
Modify the name and create the WEB-INF directory and subdirectory classes: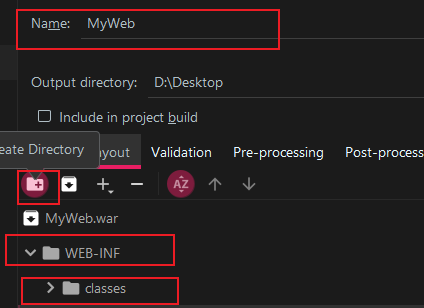
Select classes, add Module Output, and select your own web project: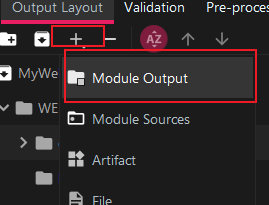
6.3 Add Dependent Libraries and Other Files
Add a JAR package, select the lib directory and add the JAR package file:
(The lib folder is blocked. Don't care about the details....)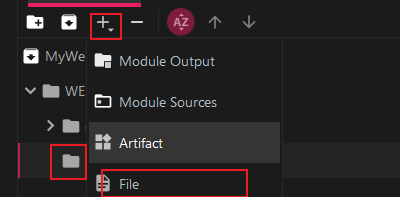
Then addHello.htmlandWeb.xml,Web.xmlIn the WEB-INF directory,Hello.htmlOutside WEB-INF: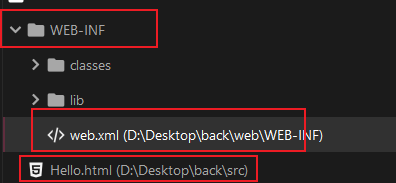
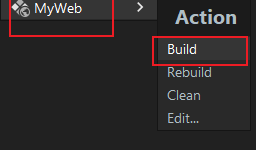
6.4 Packaging
Build->Build Artifacts: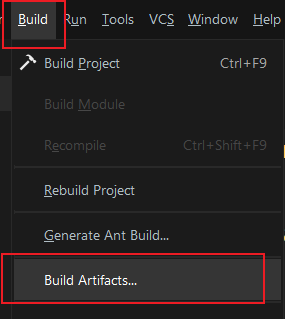
6.5 Upload Test
The packaged.war file is uploaded to the server's Tomcat webapps directory:
scp ***.war username@xxx.xxx.xxx.xxx:/usr/local/tomcat/webapps
Note changing to your own webapps directory.
After Tomcat starts, type in the browser
Server IP: Port/Project/Hello.html
The author tested it locally for convenience: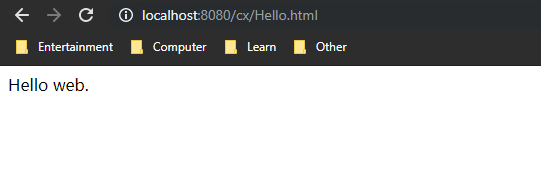
7 Android side
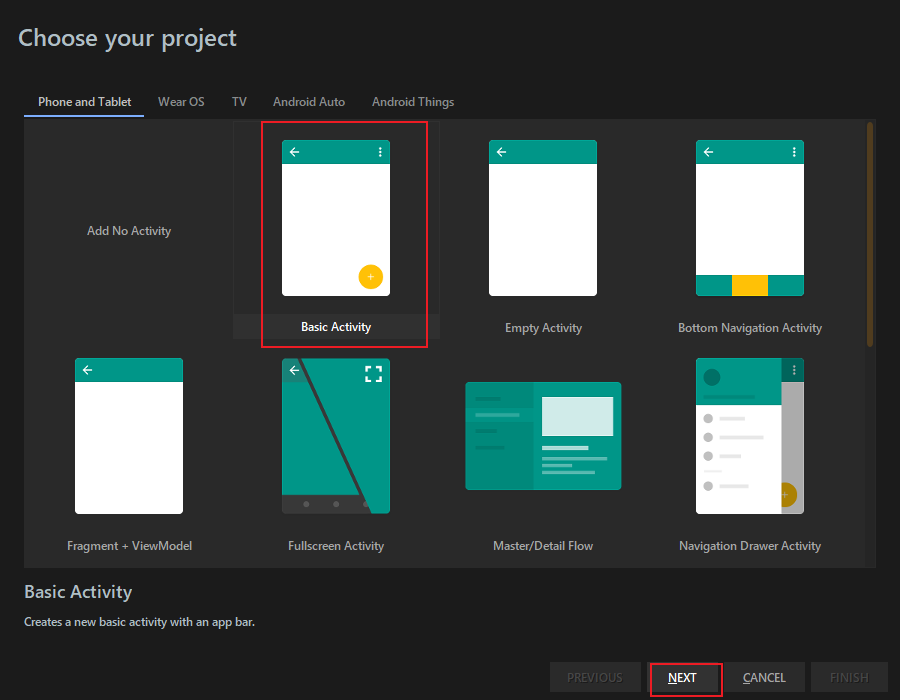
7.1 New Project

7.2 MainActivity.java
public class MainActivity extends AppCompatActivity {

    @Override
    protected void onCreate(Bundle savedInstanceState) {
        super.onCreate(savedInstanceState);
        setContentView(R.layout.activity_main);

        Button signin = (Button) findViewById(R.id.signin);
        signin.setOnClickListener(new View.OnClickListener() {
            @Override
            public void onClick(View view) {
                String name = ((EditText) findViewById(R.id.etname)).getText().toString();
                String password = ((EditText) findViewById(R.id.etpassword)).getText().toString();
                if (UserService.signIn(name, password))
                    runOnUiThread(new Runnable() {
                        @Override
                        public void run() {
                            Toast.makeText(MainActivity.this, "Login Successful", Toast.LENGTH_SHORT).show();
                        }
                    });
                else {
                    runOnUiThread(new Runnable() {
                        @Override
                        public void run() {
                            Toast.makeText(MainActivity.this, "Logon Failure", Toast.LENGTH_SHORT).show();
                        }
                    });
                }
            }
        });

        Button signup = (Button) findViewById(R.id.signup);
        signup.setOnClickListener(new View.OnClickListener() {
            @Override
            public void onClick(View view) {
                String name = ((EditText) findViewById(R.id.etname)).getText().toString();
                String password = ((EditText) findViewById(R.id.etpassword)).getText().toString();
                if (UserService.signUp(name, password))
                    runOnUiThread(new Runnable() {
                        @Override
                        public void run() {
                            Toast.makeText(MainActivity.this, "login was successful", Toast.LENGTH_SHORT).show();
                        }
                    });
                else {
                    runOnUiThread(new Runnable() {
                        @Override
                        public void run() {
                            Toast.makeText(MainActivity.this, "login has failed", Toast.LENGTH_SHORT).show();
                        }
                    });
                }
            }
        });
    }
}
Nothing to say, just bind events for two Button s and set two Toast prompts.
7.3 UserService.java
public class UserService {
    public static boolean signIn(String name, String password) {
        MyThread myThread = new MyThread("http://Local intranet IP:8080/cx/SignIn",name,password);
        try
        {
            myThread.start();
            myThread.join();
        }
        catch (InterruptedException e)
        {
            e.printStackTrace();
        }

        return myThread.getResult();
    }

    public static boolean signUp(String name, String password) {
        MyThread myThread = new MyThread("http://Local intranet IP:8080/cx/SignUp ", name, password";
        try
        {
            myThread.start();
            myThread.join();
        }
        catch (InterruptedException e)
        {
            e.printStackTrace();
        }
        return myThread.getResult();
    }
}

class MyThread extends Thread
{
    private String path;
    private String name;
    private String password;
    private boolean result = false;

    public MyThread(String path,String name,String password)
    {
        this.path = path;
        this.name = name;
        this.password = password;
    }
    @Override
    public void run()
    {
        try {
            URL url = new URL(path);
            HttpURLConnection httpURLConnection = (HttpURLConnection) url.openConnection();
            httpURLConnection.setConnectTimeout(8000);//Set connection timeout
            httpURLConnection.setReadTimeout(8000);//Set Read Timeout
            httpURLConnection.setRequestMethod("POST");//Set the request method, post

            String data = "name=" + URLEncoder.encode(name, "utf-8") + "&password=" + URLEncoder.encode(password, "utf-8");//Set up data
            httpURLConnection.setRequestProperty("Content-Type", "application/x-www-form-urlencoded");//Set Response Type
            httpURLConnection.setRequestProperty("Content-Length", data.length() + "");//Set Content Length
            httpURLConnection.setDoOutput(true);//Allow Output
            OutputStream outputStream = httpURLConnection.getOutputStream();
            outputStream.write(data.getBytes("utf-8"));//Write data
            result = (httpURLConnection.getResponseCode() == 200);
        } catch (Exception e) {
            e.printStackTrace();
        }
    }

    public boolean getResult()
    {
        return result;
    }
}
MyThread myThread = new MyThread("http://Intranet IP:8080/cx/SignUp ", name, password";
MyThread myThread = new MyThread("http://Intranet IP:8080/cx/SignIn",name,password);These two lines are replaced with their own ip, which can be viewed with ipconfig or ifconfig for intranet ips, and with the change of the default port.
The path is:
Port/web project name/Servlet name
The web project name is set when you re-type the war package, and the Servlet name is set inWeb.xmlThe < servlet> child element < servlet-name> settings are consistent with the @WebServlet() comment in the source code.
Another thing to note is the threading problem, which requires a new thread to connect to http.
7.4 activity_main.xml
The front-end page section is simple, just two button s to validate functionality.
<?xml version="1.0" encoding="utf-8"?>
<LinearLayout
    xmlns:app="http://schemas.android.com/apk/res-auto"
    xmlns:android="http://schemas.android.com/apk/res/android"
    android:layout_height="match_parent"
    android:layout_width="match_parent"
    android:orientation="vertical"
    >

    <LinearLayout
        android:layout_width="wrap_content"
        android:layout_height="wrap_content"
        android:orientation="horizontal">
        <TextView
            android:layout_width="wrap_content"
            android:layout_height="wrap_content"
            android:text="User name"
            />
        <EditText
            android:layout_width="300dp"
            android:layout_height="60dp"
            android:id="@+id/etname"
            />
    </LinearLayout>
    <LinearLayout
        android:layout_width="wrap_content"
        android:layout_height="wrap_content"
        android:orientation="horizontal">
        <TextView
            android:layout_width="wrap_content"
            android:layout_height="wrap_content"
            android:text="Password"
            />
        <EditText
            android:layout_width="300dp"
            android:layout_height="60dp"
            android:id="@+id/etpassword"
            />
    </LinearLayout>

    <LinearLayout
        android:layout_width="wrap_content"
        android:layout_height="wrap_content"
        android:orientation="horizontal">
        <Button
            android:layout_width="120dp"
            android:layout_height="60dp"
            android:text="register"
            android:id="@+id/signup"
            />
        <Button
            android:layout_width="120dp"
            android:layout_height="60dp"
            android:text="Sign in"
            android:id="@+id/signin"
            />
    </LinearLayout>
</LinearLayout>
8 Tests
8.1 Registration Test
Enter username and password at will
View the database: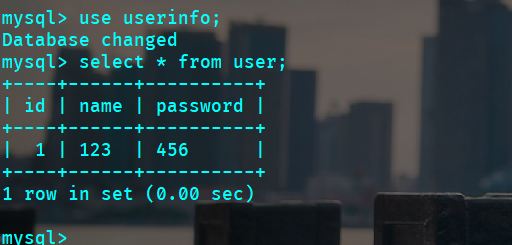
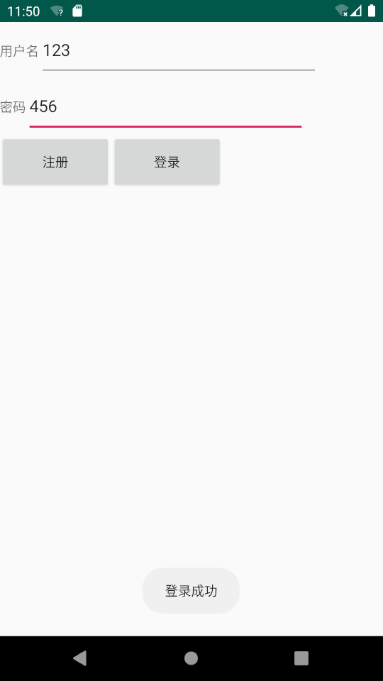
8.2 Logon Test
9 Notes
9.1 Database User Name and Password
The user name and password of the database must be set correctly or an exception will be thrown as shown below:
This error may also occur when loading a driver error, so make sure the lib directory is correct and the JAR package version is correct when typing into a WAR package.
Also, since this is the underlying implementation of JDBC, note that handwritten SQL statements cannot be wrong.
Never be like the author:
9.2 Network Permission Issues
Need to AndroidManifest.xml Add network permissions:
<uses-permission android:name="android.permission.INTERNET" />
<uses-permission android:name="android.permission.ACCESS_WIFI_STATE" />
<uses-permission android:name="android.permission.ACCESS_NETWORK_STATE" />
9.3 Firewall issues
Server will generally have corresponding web interface configuration, of course, you can also manually configure iptables.
Modify/etc/sysconfig/iptables
vim /etc/sysconfig/iptables
Add to
-A INPUT -m state --state NEW -m tcp -p tcp --dport 8080 -j ACCEPT
-A RH-Firewall-1-INPUT -m state --state NEW -m tcp -p tcp --dport 8080 -j ACCEPT
Restart iptables:
service iptables restart
9.4 HTTP considerations
Since starting with Android P, google defaults to require an encrypted connection, which uses HTTPS, the use of HTTP connections is prohibited.
The following exceptions occur when using HTTP connections:
W/System.err: java.io.IOException: Cleartext HTTP traffic to **** not permitted
java.net.UnknownServiceException: CLEARTEXT communication ** not permitted by network security policy
Two suggestions:
- Use HTTPS
- Modify Default AndroidManifest.xml Make it allow HTTP connections
Create a new folder xml under res and create a folder called network_Security_Config.xmlFile, the contents of which are as follows
<?xml version="1.0" encoding="utf-8"?>
<network-security-config>
    <base-config cleartextTrafficPermitted="true" />
</network-security-config>
And then AndroidMainfest.xml Join in:
<application
 android:networkSecurityConfig="@xml/network_security_config"
/>
that will do
Another way is to AndroidManifest.xml Add a sentence directly
<application
android:usesCleartextTraffic="true"
/>
9.5 Thread Problem
Starting with Android 4.0, networking can no longer be operated by the main thread, in case the network is bad, it will get stuck, so the operation related to networking needs to open a new thread, and can not be operated by the main thread.
9.6 AVD Issues
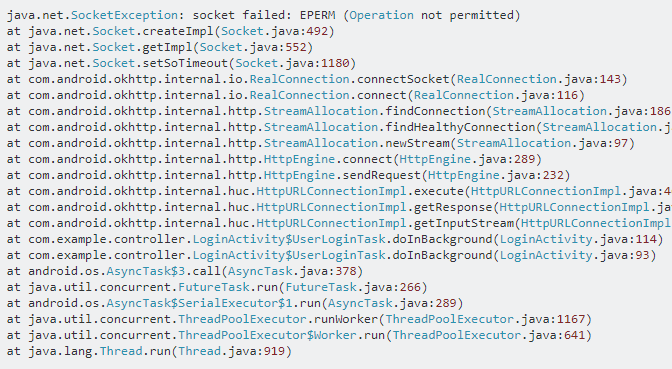
This bug has been found by the author for a long time, HTTP connection is OK, server is OK, database is OK, front-end code is OK, then StackOverflow, found that it is AVD problem...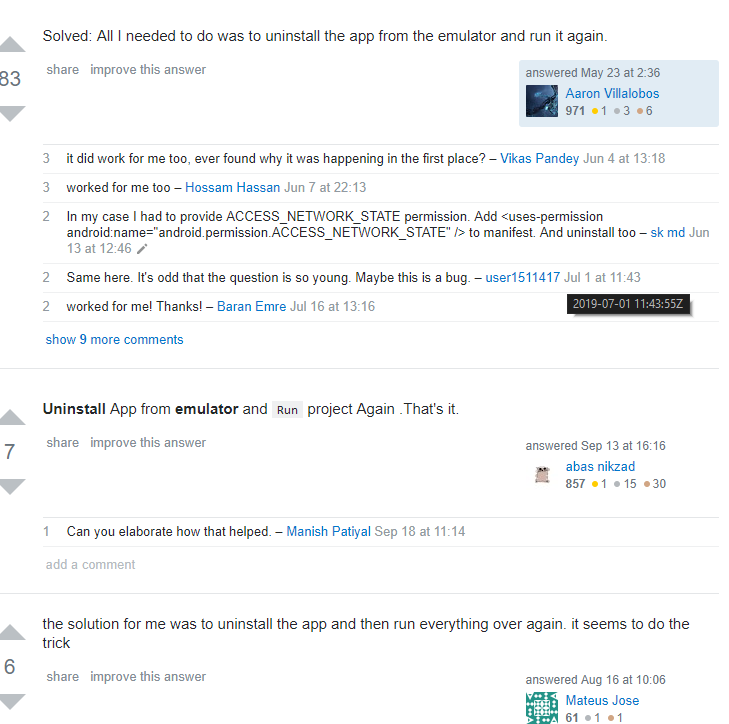
Simply put, unloading APP and restarting AVD succeeded.....
10 Source and JAR Package
10.1 JAR Package
- MySQL 8.0.17 Driver (Note that this corresponds to your own version of mysql)
- java-servlet-api-4.0.1
Other versions are available Here Search for downloads.
10.2 Source
11 Last
Author Xiao Bai, what is wrong, please correct, comment on the author will reply well.
12 Reference Sites
1.Android interacts with the Mysql database through the Web server
2.Android High Version Networking Failed
3.IDEA Deployment Web Project
4.ExcuteQuery, executeUpdate and execute of PreparedStatement
5.preparedstatement execute() operation succeeded!But return false
6.HttpServletResponse(1)
7.HttpServletResponse(2)
8.HttpServletRequest
9.HttpUrlConnection
10.java.net.socketexception
If you find the article interesting, you are welcome to comment on it.
At the same time, you are welcome to pay attention to the public number of WeChat: Fanling Road.