For reprinting, please indicate the source: http://blog.csdn.net/guolin_blog/article/details/43376527
Reuse layout files
The Android system already provides a lot of useful controls, which makes it easy to write layout. But sometimes we may need to reuse a written layout over and over again. If you always use copy-and-paste for layout reuse, it's obviously a silly way to do it. Android, of course, has taken full account of the importance of layout reuse, so it provides two very useful tags. Let's learn them one by one.
Labels allow for the introduction of another layout in one layout. So for example, all interfaces of our program have a common part. The best way to do this is to extract the common part into a separate layout file and then refer to the common layout in the layout file of each interface.
For example, we should all know that almost all software currently has a header layout, which can include the title of the interface, the return button, and other operating functions. For such a header layout, some software is implemented using ActionBar, but because ActionBar is not very flexible, many software will choose to write their own implementation. If we want to implement it ourselves, since the header layout is used in all interfaces, it is obviously impossible for us to write the header layout code once in each interface, so it is very appropriate to use labels in this case. In order to show you, I will write a very simple header layout. In the res/layout folder, I will create a new titlebar.xml as the header layout. The code is as follows:
<?xml version="1.0" encoding="utf-8"?>
<RelativeLayout xmlns:android="http://schemas.android.com/apk/res/android"
android:layout_width="match_parent"
android:layout_height="match_parent" >
<Button
android:id="@+id/back"
android:layout_width="wrap_content"
android:layout_height="wrap_content"
android:layout_alignParentLeft="true"
android:layout_centerVertical="true"
android:text="Back" />
<TextView
android:id="@+id/title"
android:layout_width="wrap_content"
android:layout_height="wrap_content"
android:layout_centerInParent="true"
android:text="Title"
android:textSize="20sp" />
<Button
android:id="@+id/done"
android:layout_width="wrap_content"
android:layout_height="wrap_content"
android:layout_alignParentRight="true"
android:layout_centerVertical="true"
android:text="Done" />
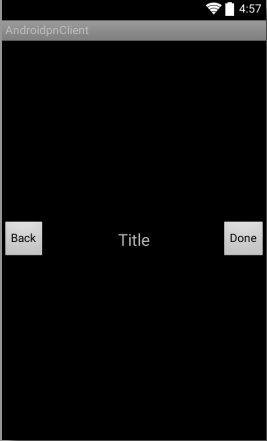
</RelativeLayout>As you can see, the layout in titlebar.xml is very simple. The outer layer is a Relative Layout. There are only two Buttons and one TextView in it. The left Button is used to implement the return function, the right Button is used to implement the completion function, and the middle TextView is used to display the title of the current interface. We can preview what titlebar looks like, as shown in the following figure:
OK, so titlebar as a separate layout has been written now, and the next work is very simple. No matter any interface needs to add the function of titlebar, you just need to introduce titlebar.xml in the layout file. So let's say we have an activity_main.xml file in our program. Now, if you want to introduce titlebar, you just need to write as follows:
<?xml version="1.0" encoding="utf-8"?>
<LinearLayout xmlns:android="http://schemas.android.com/apk/res/android"
    android:layout_width="match_parent"
    android:layout_height="match_parent"
    android:orientation="vertical" >

    <include layout="@layout/titlebar" />

    ......

</LinearLayout>
It's very simple. One line of include statement will do it. A layout attribute can be specified in the label, and we can just fill in the layout name that needs to be introduced in the layout attribute. And with this introduction, if the interface of titlebar changes in the future, we only need to modify the file titlebar.xml, instead of modifying all the interfaces one by one.
Wait! Now, if you run the program, you will find a big problem. Although titlebar was successfully introduced, the original interface in activity_main.xml is all gone! The reason for this problem is that the outermost layout of titlebar is a Relative Layout with match parent width and height, which fills up the whole layout, so that our original layout can not be seen. Now that the reason for the problem is clear, I'm sure you'll immediately think about how to modify it. Just change the layout_height attribute of Relative Layout to wrap_content. Yes, of course, this modification is fine, but this modification will affect all interfaces that reference titlebar, and if you only want the activity_main.xml interface to be affected, you can use override attributes.
In tags, we can override all layout attributes, that is, the layout attributes specified in include will override the layout attributes specified in titlebar. So here we want to set the height of titlebar to wrap_content, so we can write as follows:
    <?xml version="1.0" encoding="utf-8"?>
    <LinearLayout xmlns:android="http://schemas.android.com/apk/res/android"
        android:layout_width="match_parent"
        android:layout_height="match_parent"
        android:orientation="vertical" >

        <include
            android:layout_width="match_parent"
            android:layout_height="wrap_content"
            layout="@layout/titlebar" />

        ......

    </LinearLayout>
Now it's time to rerun the program and everything should be fine, as shown in the following figure:
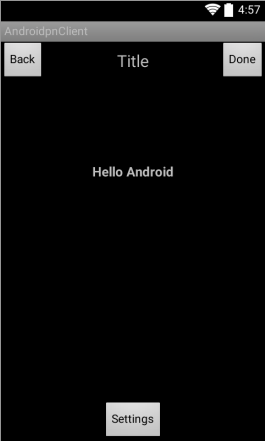
In addition to layout_height, we can override any layout attributes in titlebar, such as layout_gravity, layout_margin, etc., while non-layout attributes cannot be overridden in tags. Also note that if we want to override layout attributes in tags, we must override layout_width and layout_height attributes, otherwise the override effect will not work.
Tags are used as an auxiliary extension of tags. Its main purpose is to prevent redundant nesting of layout when referring to layout files. As we all know, it takes time for Android to parse and display a layout. The more nested the layout, the more time-consuming the parsing is and the worse the performance is. So we should make the nested layers smaller and better when we write layout files.
In the above, we mainly introduce its advantages when we explain the use of tags, but it also has a disadvantage that it may lead to redundant layout nesting. Let's give you some examples. For example, we need to write a public layout to determine the cancel button, so that any interface that needs to determine and cancel functions does not need to be written separately. New ok_cancel_layout.xml is created. The code is as follows:
<?xml version="1.0" encoding="utf-8"?>
<LinearLayout xmlns:android="http://schemas.android.com/apk/res/android"
android:layout_width="match_parent"
android:layout_height="wrap_content"
android:orientation="vertical" >
<Button
android:id="@+id/ok"
android:layout_width="match_parent"
android:layout_height="wrap_content"
android:layout_marginLeft="20dp"
android:layout_marginRight="20dp"
android:text="OK" />
<Button
android:id="@+id/cancel"
android:layout_width="match_parent"
android:layout_height="wrap_content"
android:layout_marginLeft="20dp"
android:layout_marginRight="20dp"
android:layout_marginTop="10dp"
android:text="Cancel" />
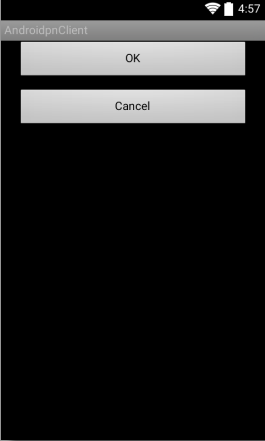
</LinearLayout> As you can see, the interface is also very simple. The outer layer is a vertical Linear Layout. Linear Layout contains two buttons, one for determining function and one for canceling function. Now we can preview the interface, as shown in the following figure:
Okay, then we have a profile.xml interface that needs to be edited, so here we can introduce ok_cancel_layout into profile.xml interface, as follows:
<?xml version="1.0" encoding="utf-8"?>
<LinearLayout xmlns:android="http://schemas.android.com/apk/res/android"
android:layout_width="match_parent"
android:layout_height="match_parent"
android:orientation="vertical" >
<EditText
android:id="@+id/edit"
android:layout_width="match_parent"
android:layout_height="wrap_content"
android:layout_marginBottom="10dp"
android:layout_marginLeft="20dp"
android:layout_marginRight="20dp"
android:layout_marginTop="10dp"
android:hint="Edit something here" />
<include layout="@layout/ok_cancel_layout"/>
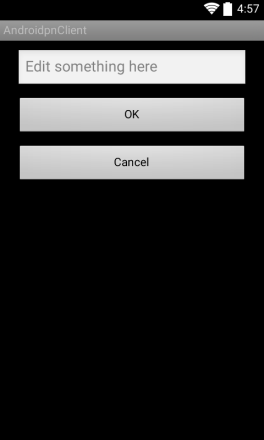
</LinearLayout> In profile.xml, there is an EditText control for editing content. Then the tag is used to introduce the ok_cancel_layout layout. Now run the program again. The interface effect is as follows:
It looks very good, doesn't it? But without your awareness, there are already redundant nested layouts in profile.xml. Feeling like I haven't written a few lines of code yet, how come there's already redundant nesting of layouts? Believe it or not, we can check it with the View Hierarchy tool, as shown in the following figure:
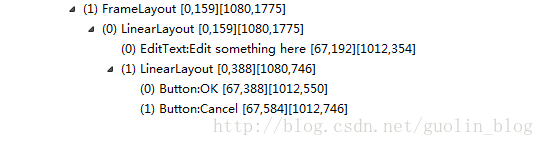
As you can see, the outermost layer is first and foremost a FrameLayout, which is beyond reproach. Then FrameLayout contains a LinearLayout, which is the outermost layout we defined in profile.xml. The next part is the problem. There are two elements in the outer Linear Layout, one is EditText, the other is Linear Layout, and then the two buttons are included in the inner Linear Layout.
As you can see, this internal Linear Layout is a redundant layout nesting. In fact, it does not need such a layer, so that the two buttons are directly included in the external Linear Layout. This redundant nesting of layouts is actually due to the introduction of layouts, because we also define a LinearLayout in ok_cancel_layout.xml. So how to optimize this problem? Of course, it's done with tags, modifying the code in ok_cancel_layout.xml, as follows:
    <?xml version="1.0" encoding="utf-8"?>
    <merge xmlns:android="http://schemas.android.com/apk/res/android">

        <Button
            android:id="@+id/ok"
            android:layout_width="match_parent"
            android:layout_height="wrap_content"
            android:layout_marginLeft="20dp"
            android:layout_marginRight="20dp"
            android:text="OK" />

        <Button
            android:id="@+id/cancel"
            android:layout_width="match_parent"
            android:layout_height="wrap_content"
            android:layout_marginLeft="20dp"
            android:layout_marginRight="20dp"
            android:layout_marginTop="10dp"
            android:text="Cancel" />

    </merge>
As you can see, here we delete the outermost Linear Layout layout of ok_cancel_layout and replace it with a label, which means that when you go anywhere to include the layout, the contents of the label will be filled directly into the include location, and no additional layout structure will be added. Okay, that's how it works. Now run the program again, and you'll see that the interface hasn't changed. Then we'll look at the current View structure through the View Hierarchy tool, as shown in the following figure: 
OK, as you can see, now that EditText and both buttons are directly included under LinearLayout, there is no redundant layout nesting in our profile.xml.