1, Experimental purpose
Write an APP using LBS, which can display your current address (longitude and latitude, national, provincial and municipal streets) and display the movement of your position in real time.
2, Experimental content
Develop a LBS APP with the following functions:
1. Development of LBS APP based on Baidu
2. Show your current address
3. Show the movement of your position in real time
3, Experimental requirements
(1) Each student independently designs software functions and completes software development and testing.
(2) Each student completes the experiment report independently (according to the template) and submits it to the online classroom.
4, Screenshot of data code and operation results
preparation in advance
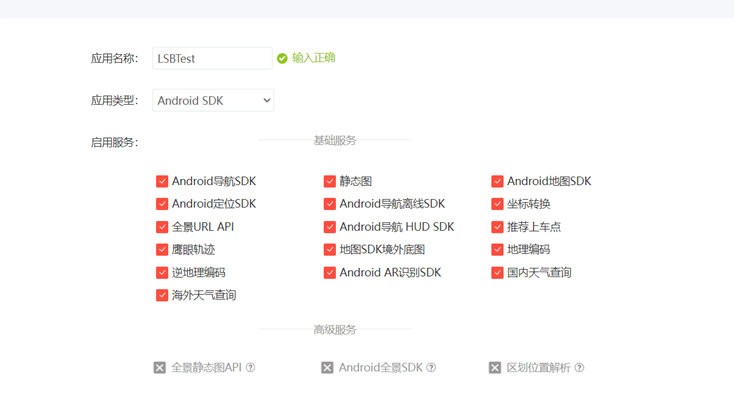
Application API
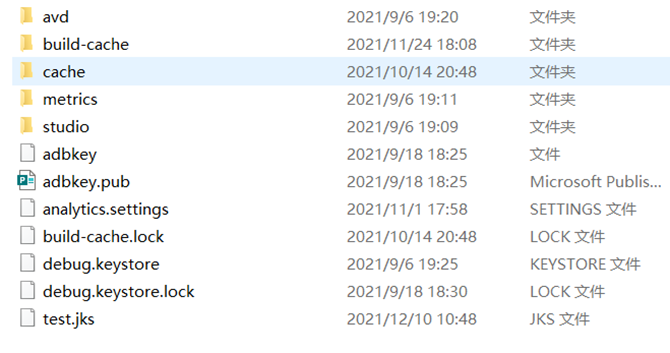
Generate jks file and obtain key
Main code
The code of the display part is the mainactivity part:
package com.example.lbstest;
import android.content.Intent;
import android.os.Bundle;
import androidx.appcompat.app.AppCompatActivity;
public class MainActivity extends AppCompatActivity {
    @Override
    protected void onCreate(Bundle savedInstanceState) {
        super.onCreate(savedInstanceState);
        Intent intent = new Intent(MainActivity.this,PositionAcitivity.class);
        startActivity(intent);
    }
}
Module code for positioning:
package com.example.lbstest;
import androidx.appcompat.app.AppCompatActivity;
import androidx.core.app.ActivityCompat;
import androidx.core.content.ContextCompat;
import android.Manifest;
import android.content.pm.PackageManager;
import android.os.Bundle;
import android.widget.TextView;
import android.widget.Toast;
import com.baidu.location.BDLocation;
import com.baidu.location.BDLocationListener;
import com.baidu.location.LocationClient;
import com.baidu.location.LocationClientOption;
import com.baidu.mapapi.SDKInitializer;
import com.baidu.mapapi.map.BaiduMap;
import com.baidu.mapapi.map.MapStatusUpdate;
import com.baidu.mapapi.map.MapStatusUpdateFactory;
import com.baidu.mapapi.map.MapView;
import com.baidu.mapapi.map.MyLocationData;
import com.baidu.mapapi.model.LatLng;
import java.util.ArrayList;
import java.util.List;
public class PositionAcitivity extends AppCompatActivity {
    public LocationClient locationClient;
    private TextView position;
    private MapView mapView;
    private BaiduMap baiduMap;//Baidu map controller
    private boolean isFirstLocation = true;
    @Override
    protected void onCreate(Bundle savedInstanceState) {
        super.onCreate(savedInstanceState);
        SDKInitializer.initialize(getApplicationContext());//A very important piece of code
        setContentView(R.layout.activity_position_acitivity);
        //Baidu map client
        locationClient = new LocationClient(getApplicationContext());
        locationClient.registerLocationListener(new MyLocationListener());
        position = findViewById(R.id.textView_position);
        mapView = findViewById(R.id.baiduMap);
        mapView.onCreate(getApplicationContext(),savedInstanceState);
        //Get the controller of Baidu map
        baiduMap = mapView.getMap();
        baiduMap.setMyLocationEnabled(true);//The current position can be displayed
        //Permission verification
        List<String> permissionList = new ArrayList<>();
        if (ContextCompat.checkSelfPermission(this, Manifest.permission.ACCESS_FINE_LOCATION) != PackageManager.PERMISSION_GRANTED) {
            permissionList.add(Manifest.permission.ACCESS_FINE_LOCATION);
        }
        if (ContextCompat.checkSelfPermission(this, Manifest.permission.READ_PHONE_STATE) != PackageManager.PERMISSION_GRANTED) {
            permissionList.add(Manifest.permission.READ_PHONE_STATE);
        }
        if (ContextCompat.checkSelfPermission(this, Manifest.permission.WRITE_EXTERNAL_STORAGE) != PackageManager.PERMISSION_GRANTED) {
            permissionList.add(Manifest.permission.WRITE_EXTERNAL_STORAGE);
        }
        if (!permissionList.isEmpty()) {
            String [] permissions = permissionList.toArray(new String[permissionList.size()]);
            ActivityCompat.requestPermissions(this, permissions, 1);
        } else {
            requestLocation();
        }
    }
    private void requestLocation() {
        initLocation();
        locationClient.start();
    }
    //This is to update the location when moving
    private void initLocation() {
        LocationClientOption option = new LocationClientOption();
        option.setScanSpan(5000);
        option.setIsNeedAddress(true);//Specific address
        locationClient.setLocOption(option);
    }
    //onResume
    @Override
    protected void onResume() {
        super.onResume();
        mapView.onResume();
    }
    //pause
    @Override
    protected void onPause() {
        super.onPause();
        mapView.onPause();
    }
    //close
    @Override
    protected void onDestroy() {
        super.onDestroy();
        locationClient.stop();
        mapView.onDestroy();
        baiduMap.setMyLocationEnabled(false);
    }
    //monitor
    public class MyLocationListener implements BDLocationListener {
        @Override
        public void onReceiveLocation(BDLocation location) {
            //Locate myself
            if(location.getLocType() == BDLocation.TypeGpsLocation ||
                    location.getLocType() == BDLocation.TypeNetWorkLocation){
                navigateTo(location);
            }
            if (location.getCity() == null)
                return;
            //Display address of text View
            StringBuilder currentPosition = new StringBuilder();
            currentPosition.append("Latitude:").append(location.getLatitude()).append(" ");
            currentPosition.append("Longitude:").append(location.getLongitude()).append("\n");
            currentPosition.append("country:").append(location.getCountry()).append(" ");
            currentPosition.append("Province:").append(location.getProvince()).append("\n");
            currentPosition.append("City:").append(location.getCity()).append(" ");
            currentPosition.append("Zone:").append(location.getDistrict()).append(" ");
            currentPosition.append("street:").append(location.getStreet()).append(" ");
            currentPosition.append("Positioning mode:");
            if (location.getLocType() == BDLocation.TypeGpsLocation) {
                currentPosition.append("GPS");
            } else if (location.getLocType() == BDLocation.TypeNetWorkLocation) {
                currentPosition.append("network");
            }
            position.setText(currentPosition);
        }
    }
    //Achieve positioning effect
    private void navigateTo(BDLocation location) {
        if(isFirstLocation){
            Toast.makeText(this, "current location: " + location.getAddrStr(), Toast.LENGTH_SHORT).show();
            LatLng ll= new LatLng(location.getLatitude(),location.getLongitude());
            MapStatusUpdate update = MapStatusUpdateFactory.newLatLng(ll);
            baiduMap.animateMapStatus(update);
            update = MapStatusUpdateFactory.zoomTo(16f);//Map zoom in
            baiduMap.animateMapStatus(update);
            isFirstLocation = false;
        }
        //Achieve cursor display my position
        MyLocationData.Builder builder = new MyLocationData.Builder();
        builder.latitude(location.getLatitude());
        builder.longitude(location.getLongitude());
        MyLocationData data = builder.build();
        baiduMap.setMyLocationData(data);
    }
}
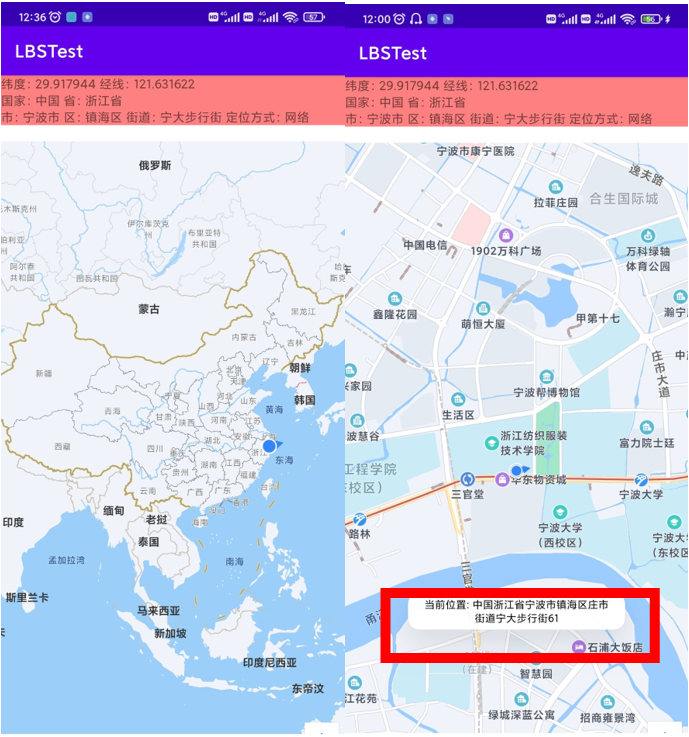
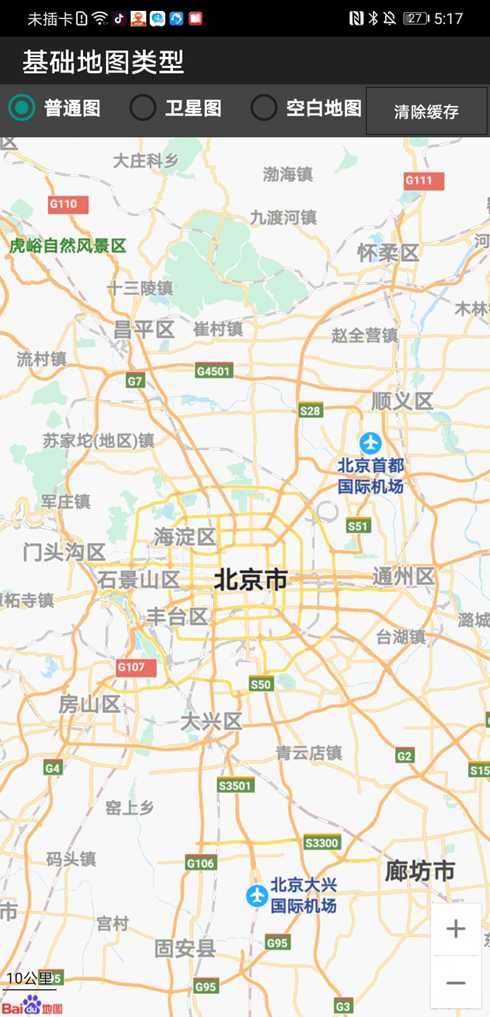
The screenshot of the operation is as follows
5, Error summary
As shown in the figure, the NULL Baidu positioning API only gives a few seconds to record information and cannot update the positioning at any time. Therefore, when NULL is detected, it can be returned directly

public class MyLocationListener implements BDLocationListener {
        @Override
        public void onReceiveLocation(BDLocation location) {
            //Locate myself
            if(location.getLocType() == BDLocation.TypeGpsLocation ||
                    location.getLocType() == BDLocation.TypeNetWorkLocation){
                navigateTo(location);
            }
            if (location.getCity() == null)
                return;
            //Display address of text View
            StringBuilder currentPosition = new StringBuilder();
            currentPosition.append("Latitude:").append(location.getLatitude()).append(" ");
            currentPosition.append("Longitude:").append(location.getLongitude()).append("\n");
            currentPosition.append("country:").append(location.getCountry()).append(" ");
            if (location.getLocType() == BDLocation.TypeGpsLocation) {
                currentPosition.append("GPS");
            } else if (location.getLocType() == BDLocation.TypeNetWorkLocation) {
                currentPosition.append("network");
            }
            position.setText(currentPosition);
        }
    }
6, Personal experience
Hello BaiduMap
Baidu maps SDK provides developers with a convenient interface to use Baidu maps. Baidu maps can be used in applications through the following steps:
1. Step 1: configure androidmanifest XML file
1. Add the following code to configure the development key (AK):
<application>
    <meta-data
        android:name="com.baidu.lbsapi.API_KEY"
        android:value="developer key" />
</application>
If you have not applied for a development key, click here to apply
2. Add the following permission statement externally:
<!-- Access the network and request map related business data, including map data, route planning, POI Search, etc -->
<uses-permission android:name="android.permission.INTERNET" />
<!-- Obtain the network state, and perform data request network conversion according to the network state switching -->
<uses-permission android:name="android.permission.ACCESS_NETWORK_STATE" />

<!-- Read external storage. If developers use so Dynamic loading function and so If the file is placed in an external storage area, you need to apply for the permission, otherwise you don't need it -->
<uses-permission android:name="android.permission.READ_EXTERNAL_STORAGE" />
<!-- Write external storage. If the developer uses an offline map and the data is written in the external storage area, you need to apply for this permission -->
<uses-permission android:name="android.permission.WRITE_EXTERNAL_STORAGE" />
Note: from Android 6 The use of some permissions from 0 requires developers to apply dynamically in the code.
2 step 2: add a map container in the layout file
MapView is a subclass of View, which is used to place maps in Android View. MapView is used in the same way as other views provided by Android.
<com.baidu.mapapi.map.MapView
    android:id="@+id/bmapView"
    android:layout_width="match_parent"
    android:layout_height="match_parent"
    android:clickable="true" />
3 step 3 map initialization
Note: "SDKInitializer.initialize(getApplicationContext())" needs to be called before each functional component of the SDK is used. Therefore, it is recommended to initialize the Context referenced by the SDK as a global variable when the application is created.
Create a custom Application and complete SDK initialization in its onCreate method. The example code is as follows:
public class DemoApplication extends Application {
    @Override
    public void onCreate() {
        super.onCreate();
        //Before using SDK components, initialize the context information and pass in ApplicationContext
        SDKInitializer.initialize(this);
        //Since 4.3.0, all interfaces of Baidu map SDK support Baidu coordinates and National Survey Bureau coordinates. Use this method to set the coordinate type you use
        //It includes BD09LL and GCJ02 coordinates. The default is BD09LL coordinates.
        SDKInitializer.setCoordType(CoordType.BD09LL);
    }
}
At androidmanifest Declare the Application in the XML file
4 create a map Activity and manage the MapView life cycle
Note: when using maps in a project, it is very important to pay special attention to reasonably managing the map life cycle.
The following example code briefly describes the management of the map lifecycle:
public class MainActivity extends Activity {
    private MapView mMapView = null;
    @Override
    protected void onCreate(Bundle savedInstanceState) {
        super.onCreate(savedInstanceState);
        setContentView(R.layout.activity_main);
        //Get map control reference
        mMapView = (MapView) findViewById(R.id.bmapView);
    }
    @Override
    protected void onResume() {
       super.onResume();
       //Execute mmapview when the activity executes onResume Onresume() to realize map life cycle management
       mMapView.onResume();
    }
    @Override
    protected void onPause() {
      super.onPause();
      //Execute mmapview. When the activity executes onPause Onpause() to realize map life cycle management
      mMapView.onPause();
    }
    @Override
    protected void onDestroy() {
      super.onDestroy();
      //Execute mmapview when the activity performs onDestroy Ondestroy() to realize map life cycle management
      mMapView.onDestroy();
    }
}
Complete the above work to display the map in your application:
Display map by adding View
Baidu maps SDK supports displaying maps by directly adding MapView to Java code without adding MapView control to layout file. Examples are as follows:
1 create MapView object
MapView mapView = new MapView(this);
2 add MapView object
setContentView(mapView);
In addition, the method of adding MapView to Java code supports the construction of MapView objects containing specific map state types and control display states according to requirements through BaiduMapOptions objects. Examples are as follows:
1. Define BaiduMapOptions object
BaiduMapOptions options = new BaiduMapOptions();
2 set the required status
//Set map mode to satellite map
options.mapType(BaiduMap.MAP_TYPE_SATELLITE);
3 create MapView object
MapView mapView = new MapView(this, options);
4 add MapView object
setContentView(mapView);
You can set the zoom level of the map through the following code:
MapStatus.Builder builder = new MapStatus.Builder();
builder.zoom(18.0f);
mBaiduMap.setMapStatus(MapStatusUpdateFactory.newMapStatus(builder.build()));
Common map container
At the bottom of the map SDK, two OpenGL ES components, GLSurfaceView and TextureView, are used to build maps. The following is a brief introduction. GLSurfaceView includes three containers: MapView, MapFragment and SupportMapFragment. MapFragment and SupportMapFragment are used to place maps in Android Fragment. It is suitable for development scenarios that need to use fragment, which is convenient for you to realize flexible layout. MapFragment and SupportMapFragment are Android app. Fragment and Android support. v4. App, a subclass of fragment. MapFragment needs to be in Android 3 Used in versions above 0.
TextureView
It includes three containers: TextureMapView, TextureMapFragment and TextureSupportMapFragment. Usage scenario: when you overlay MapView with other glsurfaceviews (such as cameras), or load a map in ScrollView, it is recommended to use TextureMapView and SupportTextureMapFragment to display the map, which can effectively solve the problems of penetration and black screen scrolling during GLSurfaceView overlay. If you use TextureMapView, please make sure that Android 4.4 or above systems are in androidmanifest Configure hardware acceleration options in XML.
SupportMapFragment
The sample code here briefly describes the use of SupportMapFragment.
@Override
protected void onCreate(@Nullable Bundle savedInstanceState) {
    super.onCreate(savedInstanceState);
    setContentView(R.layout.activity_fragment);
    manager = getSupportFragmentManager();
    //Get SupportMapFragment instance
    mSupportMapFragment = SupportMapFragment.newInstance(mapOptions);
    //Add fragment to Activity
    manager.beginTransaction().add(R.id.map_container, mapFragment).commit();
}
Alternatively, you can use the replace method to replace an existing fragment.
manager.beginTransaction().replace(R.id.map_container, mapFragment).commit();
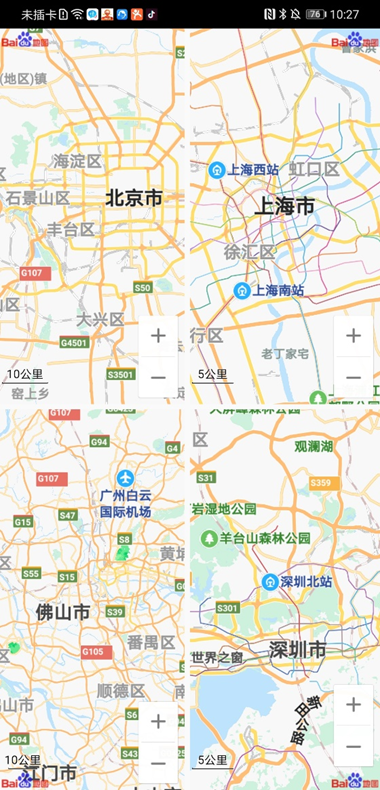
Multi instance display map
Developers can create multiple map objects in one page, and operate these objects separately without mutual interference. Example code: adding multiple supportmapfragments to a layout file
<fragment
    android:id="@+id/map1"
    android:layout_width="match_parent"
    android:layout_height="0dp"
    android:layout_margin="5dp"
    android:layout_weight="1"
    class="com.baidu.mapapi.map.SupportMapFragment" />
<fragment
    android:id="@+id/map2"
    android:layout_width="match_parent"
    android:layout_height="0dp"
    android:layout_margin="5dp"
    android:layout_weight="1"
    class="com.baidu.mapapi.map.SupportMapFragment" />
stay Activity Manage map containers in
@Override
protected void onCreate(Bundle savedInstanceState) {
    super.onCreate(savedInstanceState);
    setContentView(R.layout.activity_multi_map_demo);

    LatLng GEO_BEIJING = new LatLng(39.945, 116.404);
    LatLng GEO_SHANGHAI = new LatLng(31.227, 121.481);

    //Beijing is the center of the map, and the logo is in the upper left corner
    MapStatusUpdate status1 = MapStatusUpdateFactory.newLatLng(GEO_BEIJING);
    SupportMapFragment map1 = (SupportMapFragment) (getSupportFragmentManager()
            .findFragmentById(R.id.map1));
    map1.getBaiduMap().setMapStatus(status1);
    map1.getMapView().setLogoPosition(LogoPosition.logoPostionleftTop);

    //Shanghai is the map center
    MapStatusUpdate status2 = MapStatusUpdateFactory.newLatLng(GEO_SHANGHAI);
    SupportMapFragment map2 = (SupportMapFragment) (getSupportFragmentManager()
            .findFragmentById(R.id.map2));
    map2.getBaiduMap().setMapStatus(status2);
}
The effect is shown in the figure: