Material style
01 slide menu
1 DrawerLayout
drawerLayout is a layout container There are two child controls inside, the first is the main screen control, and the second is the sliding menu The second control must specify layout_gravity
activity_main.xml
<?xml version="1.0" encoding="utf-8"?>
<androidx.drawerlayout.widget.DrawerLayout xmlns:android="http://schemas.android.com/apk/res/android"
    xmlns:app="http://schemas.android.com/apk/res-auto"
    xmlns:tools="http://schemas.android.com/tools"
    android:id="@+id/drawer_layout"
    android:layout_width="match_parent"
    android:layout_height="match_parent"
    tools:context=".MainActivity">
 <!-- First control-->
    <FrameLayout
        android:layout_width="match_parent"
        android:layout_height="match_parent">
        <androidx.appcompat.widget.Toolbar
            android:id="@+id/toolbar"
            android:layout_width="match_parent"
            android:layout_height="?attr/actionBarSize"
            android:background="?attr/colorPrimary"
            android:theme="@style/ThemeOverlay.AppCompat.Dark.ActionBar"
            android:popupTheme="@style/ThemeOverlay.AppCompat.Light"
            />
    </FrameLayout>
    <!--Second control,Menu slide direction,layout_gravity-->
    <TextView
        android:layout_width="match_parent"
        android:layout_height="match_parent"
        android:layout_gravity="start"
        android:text="this is menu"
        android:textSize="30sp"
        android:background="#FFF"/>

</androidx.drawerlayout.widget.DrawerLayout>
when sliding, it may conflict with the mobile phone gesture. In this case, you can turn off the gesture and use navigation Or start the navigation button of the actionbar
mainactivity.java
public class MainActivity extends AppCompatActivity {

    private DrawerLayout mDrawerLayout ;

    @Override
    protected void onCreate(Bundle savedInstanceState) {
        super.onCreate(savedInstanceState);
        setContentView(R.layout.activity_main);

        //Set toolbar to actionbar. Note that Android X appcompat. widget. Toolbar package; Otherwise, the parameters of the setSupportActionBar method will be incorrect
        Toolbar toolbar = (Toolbar)findViewById(R.id.toolbar);
        setSupportActionBar(toolbar);

        mDrawerLayout = (DrawerLayout) findViewById(R.id.drawer_layout);
        ActionBar actionBar = getSupportActionBar();
        if (actionBar !=null){
            //Show navigation buttons
            actionBar.setDisplayHomeAsUpEnabled(true);
            //Set the navigation icon, using the vector icon in studio
            actionBar.setHomeAsUpIndicator(R.drawable.ic_menu);
        }
    }

    //Process navigation buttons
    @Override
    public boolean onOptionsItemSelected(@NonNull MenuItem item) {
        switch (item.getItemId()){
            case android.R.id.home:
                mDrawerLayout.openDrawer(GravityCompat.START); //start is consistent with that in xml
                break;
        }
        return true;
    }
}
2 NavigationView
Import dependency
implementation 'com.google.android.material:material:1.1.0'
implementation 'de.hdodenhof:circleimageview:3.0.1'
Prepare menu and headerLayout in NavigationView

Menu file nav_menu.xml
create a new menu directory under the res directory, new - > menu resource file
<?xml version="1.0" encoding="utf-8"?>
<menu xmlns:android="http://schemas.android.com/apk/res/android">
    <!-- single Menu items can only be selected by radio   -->
    <group android:checkableBehavior="single">
        <item
            android:id="@+id/navCall"
            android:icon="@drawable/ic_call"
            android:title="Call" />
        <item
            android:id="@+id/navFriends"
            android:icon="@drawable/ic_friend"
            android:title="Friends" />
        <item
            android:id="@+id/navLocation"
            android:icon="@drawable/ic_location"
            android:title="Location" />

    </group>
</menu>
New nav_header.xml
<?xml version="1.0" encoding="utf-8"?>
<RelativeLayout xmlns:android="http://schemas.android.com/apk/res/android"
    android:layout_width="match_parent"
    android:layout_height="180dp"
    android:padding="10dp"
    android:background="?attr/colorPrimary"
    >
    <de.hdodenhof.circleimageview.CircleImageView
        android:id="@+id/icon_image"
        android:layout_width="70dp"
        android:layout_height="70dp"
        android:src="@drawable/ic_image"
        android:layout_centerInParent="true"/>
    <TextView
        android:id="@+id/username"
        android:layout_width="wrap_content"
        android:layout_height="wrap_content"
        android:text="Tony"
        android:textColor="#FFF"
        android:layout_above="@+id/mail"
        android:textSize="14sp"/>
    <TextView
        android:id="@+id/mail"
        android:layout_width="wrap_content"
        android:layout_height="wrap_content"

        android:layout_alignParentBottom="true"
        android:text="123456@qq.com"
        android:textColor="#FFF"
        android:textSize="14sp"/>
</RelativeLayout>
In activity_ Add in main
    <com.google.android.material.navigation.NavigationView
        android:id="@+id/nav_view"
        android:layout_width="match_parent"
        android:layout_height="match_parent"
        android:layout_gravity="start"
        app:menu="@menu/nav_menu"
        app:headerLayout="@layout/nav_header"/>
Add code in MainActivity
//2 menu
NavigationView navView = (NavigationView) findViewById(R.id.nav_view);
//Set default selected item
navView.setCheckedItem(R.id.navCall);
//Set the listener when item is selected
navView.setNavigationItemSelectedListener(new NavigationView.OnNavigationItemSelectedListener() {
    @Override
    public boolean onNavigationItemSelected(@NonNull MenuItem item) {
        mDrawerLayout.closeDrawers();
        return true;
    }
});
02 hover button and interactive prompt
1 suspension button
add button
<!-- elevation Is height,The higher the height,The lighter the shadow,The wider the projection range-->
<com.google.android.material.floatingactionbutton.FloatingActionButton
    android:id="@+id/fabtn"
    android:layout_width="wrap_content"
    android:layout_height="wrap_content"
    android:layout_gravity="bottom|end"
    android:layout_margin="16dp"
    android:src= "@drawable/ic_done"
    android:elevation="3dp"
    />
Click events can be set
//3 suspension button click event
FloatingActionButton fabtn = (FloatingActionButton) findViewById(R.id.fabtn);
fabtn.setOnClickListener(new View.OnClickListener() {
    @Override
    public void onClick(View v) {
        Toast.makeText(MainActivity.this,"Fabtn clicked",Toast.LENGTH_SHORT).show();
    }
});
2 Snackbar
It is an extension of Toast (not a substitute. Both have their own applicable scenarios) to realize the revocation action
Snackbar.make(v,"Data deleted",Snackbar.LENGTH_SHORT)
        .setAction("Undo",new View.OnClickListener(){ //
            @Override
            //Click Cancel
            public void onClick(View v) {
                Toast.makeText(MainActivity.this,"Data restored",Toast.LENGTH_SHORT).show();
            }
        })
        .show();

3 coordinatorlayout (enhanced framelayout)
the button will be blocked after the above undo action appears. In order to cancel this phenomenon, the enhanced frameLayout is applicable. This layout can listen to various events of all child controls and automatically make reasonable responses

<androidx.coordinatorlayout.widget.CoordinatorLayout
    android:layout_width="match_parent"
    android:layout_height="match_parent">
    </androidx.coordinatorlayout.widget.CoordinatorLayout>
03 card layout
1 layout CardView
recyclerView and glide libraries are used
Import dependency
implementation 'androidx.recyclerview:recyclerview:1.0.0'
implementation 'com.github.bumptech.glide:glide:4.9.0'
Use recyclerView to display pictures in enhanced frameout (non sliding menu)
The item in the recyclerView uses a card layout (a bit like a floating button)
recyclerView component added (in activity_main)
        <androidx.recyclerview.widget.RecyclerView
            android:id="@+id/recycler_view"
            android:layout_width="match_parent"
            android:layout_height="match_parent"/>
recyclerView item file fruit_item
<?xml version="1.0" encoding="utf-8"?>
<androidx.cardview.widget.CardView xmlns:android="http://schemas.android.com/apk/res/android"
    android:layout_width="match_parent"
    android:layout_height="wrap_content"
    xmlns:app="http://schemas.android.com/apk/res-auto"
    android:layout_margin="5dp"
    app:cardCornerRadius="4dp">

    <LinearLayout
        android:orientation="vertical"
        android:layout_width="match_parent"
        android:layout_height="wrap_content">
        <!--picture-->
        <ImageView
            android:id="@+id/fruit_image"
            android:layout_width="match_parent"
            android:layout_height="100dp"
            android:scaleType="centerCrop"/>
         <!--written words-->
        <TextView
            android:id="@+id/fruit_name"
            android:layout_width="wrap_content"
            android:layout_height="wrap_content"
            android:layout_gravity="center_horizontal"
            android:layout_margin="5dp"
            android:textSize="16sp"/>
    </LinearLayout>

</androidx.cardview.widget.CardView>
recyclerView custom adapter
public class FruitAdapter extends RecyclerView.Adapter<FruitAdapter.MyViewHolder> {

    //item data
    private List<Fruit> data;
    private Context context;

    public FruitAdapter(List<Fruit> data, Context context) {
        this.data = data;
        this.context = context;
    }

    @NonNull
    @Override
    public MyViewHolder onCreateViewHolder(@NonNull ViewGroup parent, int viewType) {
        //1. Get item layout style
        View view = View.inflate(context, R.layout.fruit_item,null);
        //3. Return to textView in item layout
        return new MyViewHolder(view);
    }

    @Override
    public void onBindViewHolder(@NonNull MyViewHolder holder, int position) {
        //4. Bind data for item
        Fruit fruit = data.get(position);
        holder.fruitName.setText(fruit.getName());
        //Bind an image to the imageView component according to the ImageID (which can be an image address) in the fruit object
        Glide.with(context).load(fruit.getImageId()).into(holder.fruitImage);
    }

    @Override
    public int getItemCount() {
        return data == null ? 0 : data.size();
    }

    public class MyViewHolder extends RecyclerView.ViewHolder{
        //2. Get the textView in the layout item style
        private CardView cardView;
        private ImageView fruitImage;
        TextView fruitName;
        public MyViewHolder(@NonNull View itemView) {
            super(itemView);
            //2.
            cardView = (CardView) itemView;
            fruitImage = (ImageView) cardView.findViewById(R.id.fruit_image);
            fruitName = (TextView) cardView.findViewById(R.id.fruit_name);
        }
    }
}
Data entity
public class Fruit {
    private String name;
    private int imageId;
	//get\ set \constructor
}
Render recyclerView in mainactivity
//4_ 1 card layout, fruit data
private Fruit[] fruits = {new Fruit("Apple",R.drawable.fruit_1),new Fruit("Banana",R.drawable.fruit_2)};
private List<Fruit> fruitList = new ArrayList<>();
private FruitAdapter adapter;
//4_ 2 card layout rendering recyclerView
initFruits();
RecyclerView recyclerView = (RecyclerView) findViewById(R.id.recycler_view);
GridLayoutManager layoutManager = new GridLayoutManager(this,2);
recyclerView.setLayoutManager(layoutManager);
adapter = new FruitAdapter(fruitList,this);
recyclerView.setAdapter(adapter);

//4_ 3 assign a value to the fruit array
private void initFruits() {
    fruitList.clear();
    for (int i = 0; i < 50; i++) {
        Random random = new Random();
        int index = random.nextInt(fruits.length);
        fruitList.add(fruits[index]);
    }
}
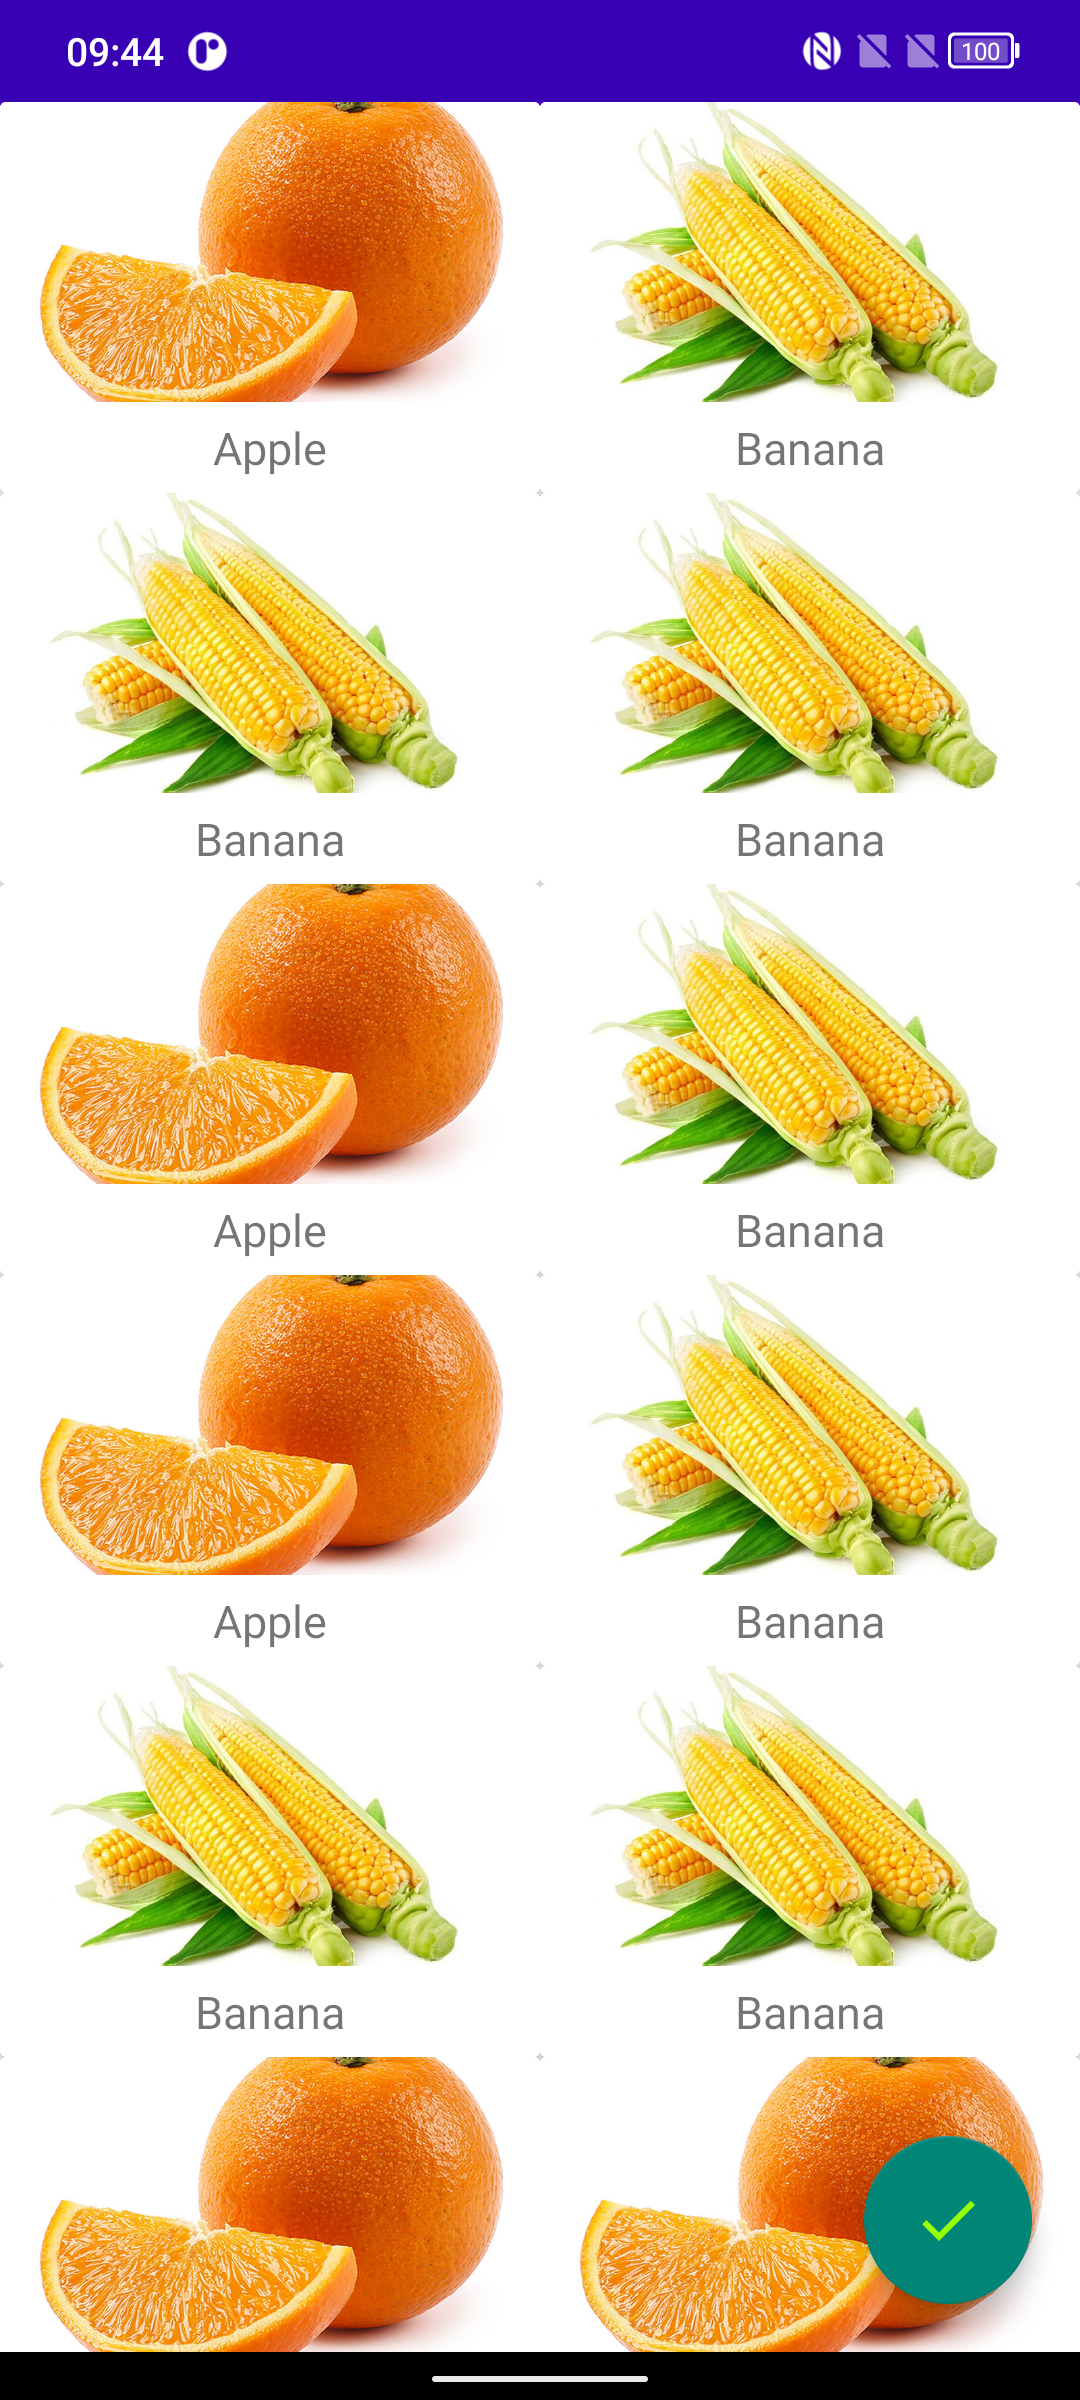
result:

2 appbarlayout (linear layout in vertical direction)
as can be seen from the above figure, the toolbar is blocked in the coordinator layout
CoordinatorLayout is an enhanced version of FrameLayout. Without explicit positioning, all controls in FrameLayout will be placed in the upper left corner of the layout by default, resulting in occlusion.
solution:
Place the toolbar in appbarlayout
<com.google.android.material.appbar.AppBarLayout
    android:layout_width="match_parent"
    android:layout_height="wrap_content">
    <androidx.appcompat.widget.Toolbar
        android:id="@+id/toolbar"
        android:layout_width="match_parent"
        android:layout_height="?attr/actionBarSize"
        android:background="?attr/colorPrimary"
        android:theme="@style/ThemeOverlay.AppCompat.Dark.ActionBar"
        android:popupTheme="@style/ThemeOverlay.AppCompat.Light"
        app:layout_scrollFlags="scroll|enterAlways|snap"
        />
</com.google.android.material.appbar.AppBarLayout>
Add behavior for toolbar and recyclerView
<!--toolbar-->
<!--
scroll Mean when RecyclerView When scrolling up,Toolbar Will scroll up and hide together;
enterAlways Mean when RecyclerView When scrolling down,Toolbar It scrolls down and redisplays;
snap Mean when Toolbar Not completely hidden or displayed,Scrolls according to the current distance,Automatically select whether to hide or show.-->
app:layout_scrollFlags="scroll|enterAlways|snap"
<!--recyclerView-->
app:layout_behavior="@string/appbar_scrolling_view_behavior"
04 drop down refresh (SwipeRefreshLayout)
add dependency
implementation "androidx.swiperefreshlayout:swiperefreshlayout:1.0.0"
recyclerView supports drop-down refresh and puts recyclerView into the SwipeRefreshLayout layout
<androidx.swiperefreshlayout.widget.SwipeRefreshLayout
    android:id="@+id/swipe_refresh"
    android:layout_width="match_parent"
    android:layout_height="match_parent"
    app:layout_behavior="@string/appbar_scrolling_view_behavior"
    >
    <!--        Card layout-->
    <androidx.recyclerview.widget.RecyclerView
        android:id="@+id/recycler_view"
        android:layout_width="match_parent"
        android:layout_height="match_parent"
        />
</androidx.swiperefreshlayout.widget.SwipeRefreshLayout>
//5_ 1 pull down refresh
swipeRefresh = (SwipeRefreshLayout) findViewById(R.id.swipe_refresh);
//Drop down refresh progress bar color
swipeRefresh.setColorSchemeResources(R.color.design_default_color_primary);
//5_ 2 pull down trigger event
swipeRefresh.setOnRefreshListener(new SwipeRefreshLayout.OnRefreshListener() {
    @Override
    public void onRefresh() {
        refreshFruits();
    }
});
//5_ 3 pull down refresh fruit
private void refreshFruits() {
    new Thread(new Runnable() {
        @Override
        public void run() {
            try {
                Thread.sleep(2000);
            } catch (InterruptedException e) {
                e.printStackTrace();
            }
            runOnUiThread(new Runnable() {
                @Override
                public void run() {
                    initFruits();
                    adapter.notifyDataSetChanged();
                    swipeRefresh.setRefreshing(false);
                }
            });
        }
    }).start();
}
05 collapsing toolbar layout
CollapsingToolbarLayout depends on appbarlayout, and appbarlayout depends on CoordinatorLayout
Next, the foldable title block will be used on the fruit details page
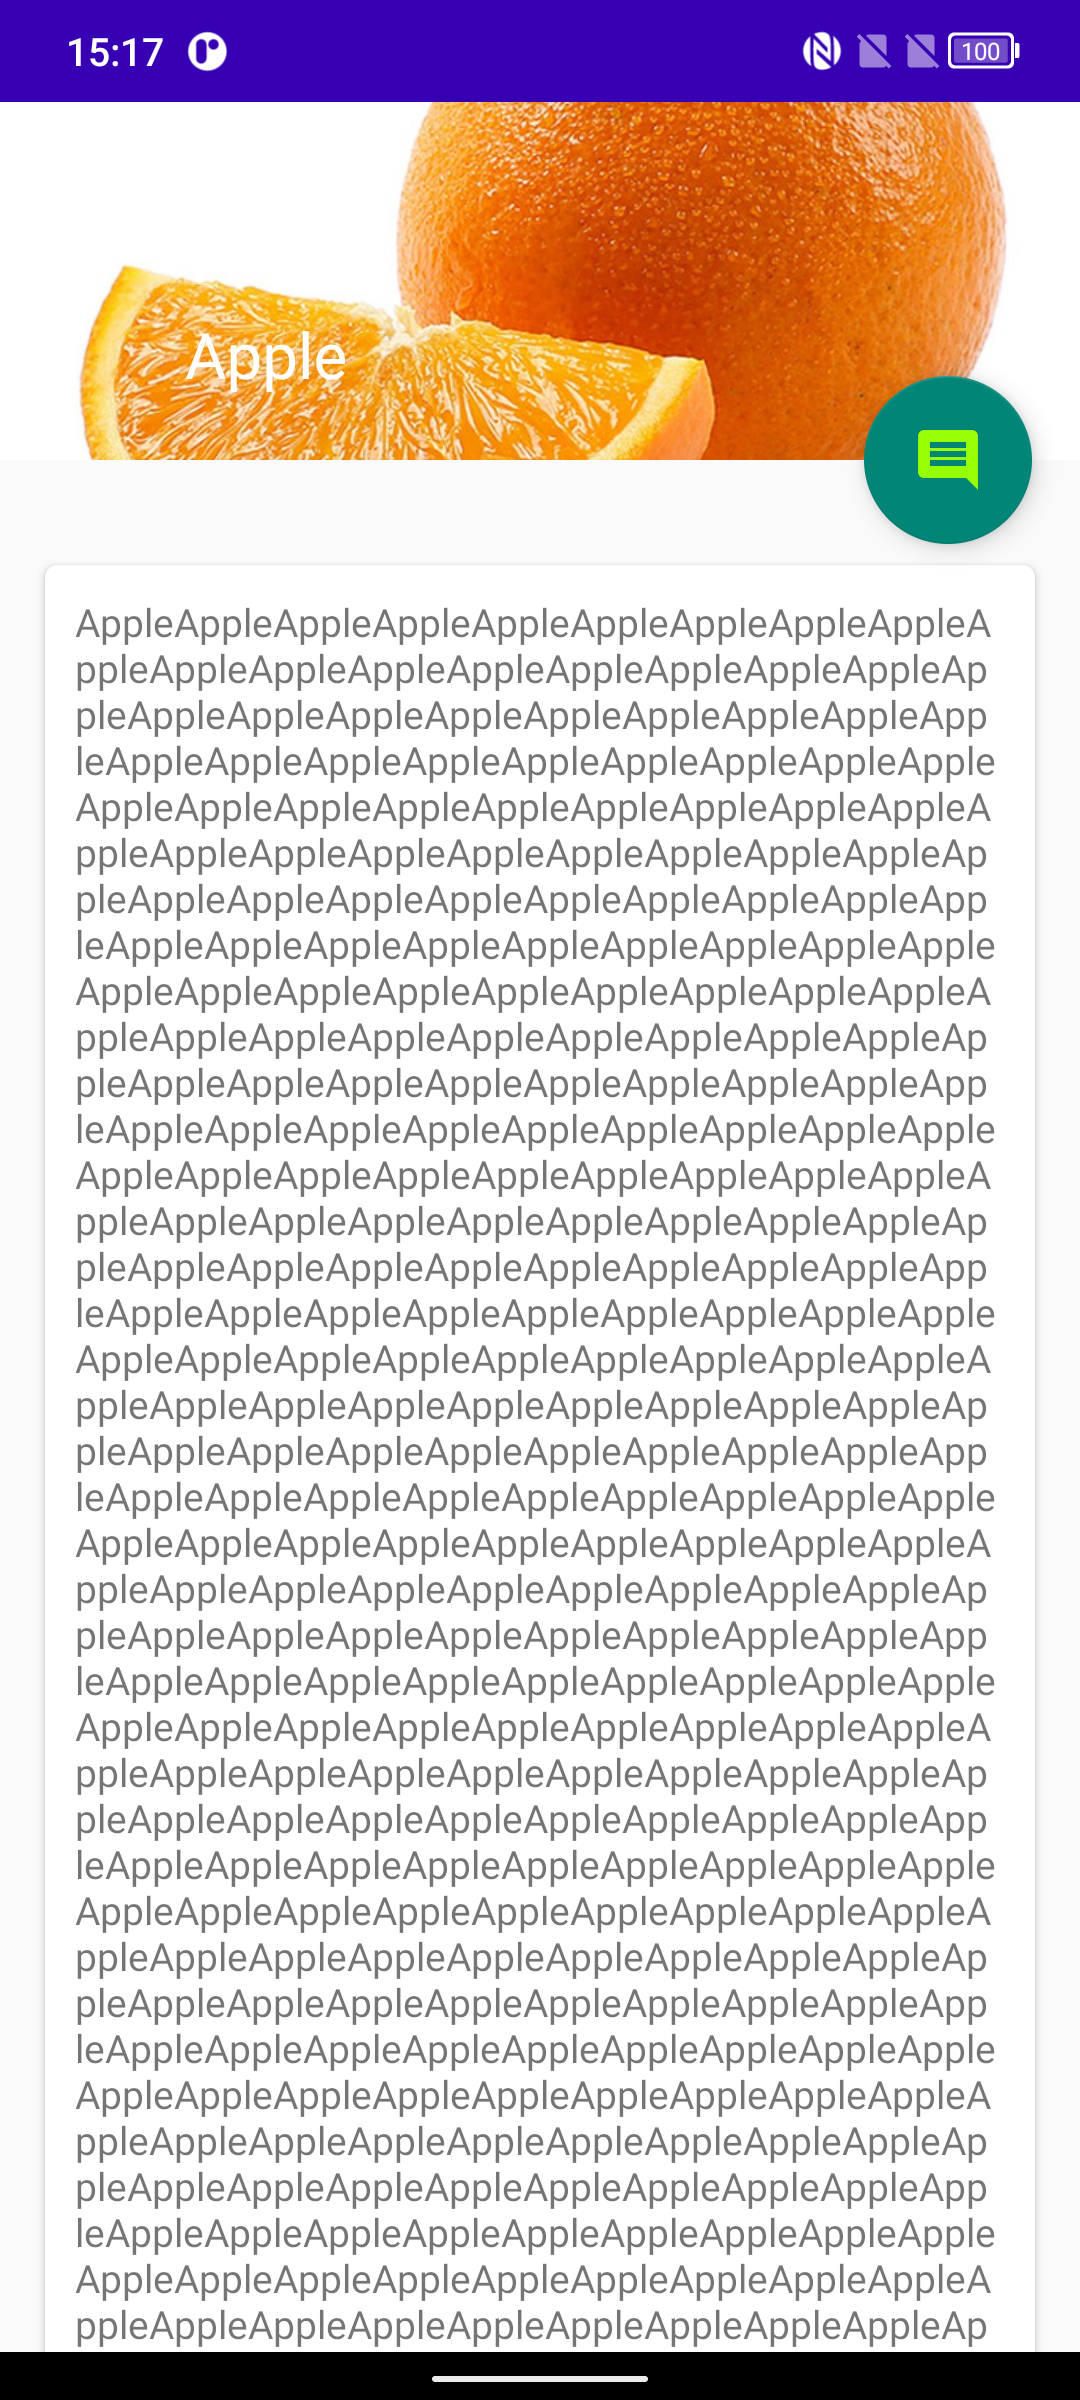
effect:

The structure of the details page is as follows
<?xml version="1.0" encoding="utf-8"?>
<androidx.coordinatorlayout.widget.CoordinatorLayout xmlns:android="http://schemas.android.com/apk/res/android"
    xmlns:app="http://schemas.android.com/apk/res-auto"
    xmlns:tools="http://schemas.android.com/tools"
    android:layout_width="match_parent"
    android:layout_height="match_parent"
    tools:context=".FruitActivity">
    <com.google.android.material.appbar.AppBarLayout
        android:id="@+id/appBar"
        android:layout_width="match_parent"
        android:layout_height="250dp">
        <!--  Collapsible title block      -->
        <com.google.android.material.appbar.CollapsingToolbarLayout
            android:id="@+id/collapsing_toolbar"
            android:layout_width="match_parent"
            android:layout_height="match_parent"
            android:theme="@style/ThemeOverlay.AppCompat.Dark.ActionBar"
            app:contentScrim="?attr/colorPrimary"
            app:layout_scrollFlags="scroll|exitUntilCollapsed">
            <!--theme Specify theme,contentScrim Specifies the background color that tends to or after the collapsed state
                        app:layout_scrollFlags attribute
                        among,scroll express CollapsingToolbarLayout It will scroll with the details of the fruit content,
                        exitUntilCollapsed Mean when CollapsingToolbarLayout With scrolling, it remains on the interface after folding,Don't move out of the screen again.-->
            <!-- collapseMode
            Used to specify where the current control is located CollapsingToolbarLayout Folding mode during folding,
            among Toolbar Designated as pin,Indicates that the position remains unchanged during folding,
            ImageView Designated as parallax,Indicates that a certain dislocation offset will occur during the folding process,
            The visual effect of this mode will be very good.           -->
            <ImageView
                android:id="@+id/fruit_image_view"
                android:layout_width="match_parent"
                android:layout_height="match_parent"
                android:scaleType="centerCrop"
                app:layout_collapseMode="parallax"/>
            <androidx.appcompat.widget.Toolbar
                android:id="@+id/toolbar"
                android:layout_width="match_parent"
                android:layout_height="?attr/actionBarSize"
                app:layout_collapseMode="pin"/>
        </com.google.android.material.appbar.CollapsingToolbarLayout>
    </com.google.android.material.appbar.AppBarLayout>
    <androidx.core.widget.NestedScrollView
        android:layout_width="match_parent"
        android:layout_height="match_parent"
        app:layout_behavior="@string/appbar_scrolling_view_behavior">
        <LinearLayout
            android:layout_width="match_parent"
            android:layout_height="wrap_content">
            <androidx.cardview.widget.CardView
                android:layout_width="match_parent"
                android:layout_height="wrap_content"
                android:layout_marginBottom="15dp"
                android:layout_marginLeft="15dp"
                android:layout_marginRight="15dp"
                android:layout_marginTop="35dp"
                app:cardCornerRadius="4dp">
                <TextView
                    android:id="@+id/fruit_content_text"
                    android:layout_width="wrap_content"
                    android:layout_height="wrap_content"
                    android:layout_margin="10dp"/>
            </androidx.cardview.widget.CardView>
        </LinearLayout>
    </androidx.core.widget.NestedScrollView>
    <!--  Suspension button anchor settings anchor  -->
    <com.google.android.material.floatingactionbutton.FloatingActionButton
        android:layout_width="wrap_content"
        android:layout_height="wrap_content"
        android:layout_margin="16dp"
        android:src="@drawable/ic_comment"
        app:layout_anchor="@id/appBar"
        app:layout_anchorGravity="bottom|end"/>

</androidx.coordinatorlayout.widget.CoordinatorLayout>
CoordinatorLayout
appbarlayout (collapsible title block)
collapsing toolbar layout (collapsible title bar)
ImageView (put pictures)
toolbar (general title bar)
nestedscrollview (used to describe fruit)
floatactionbutton
Fruit details page activity java
//Note the package imported by toolbar
public class FruitActivity extends AppCompatActivity {

    public static final String FRUIT_NAME = "fruit_name";
    public static final String FRUIT_IMAGE_ID = "fruit_image_id";
    @Override
    protected void onCreate(Bundle savedInstanceState) {
        super.onCreate(savedInstanceState);
        setContentView(R.layout.activity_fruit);

        //1 get the information of jump page
        Intent intent = getIntent();
        String fruitName = intent.getStringExtra(FRUIT_NAME);
        int fruitImageId = intent.getIntExtra(FRUIT_IMAGE_ID,0);

        //Collapsible title block
        CollapsingToolbarLayout collapsingToolbar = (CollapsingToolbarLayout) findViewById(R.id.collapsing_toolbar);
        //toolbar and pictures
        Toolbar toolbar = (Toolbar) findViewById(R.id.toolbar);
        ImageView fruitImageView = (ImageView) findViewById(R.id.fruit_image_view);
        //Content details
        TextView fruitContentText = (TextView) findViewById(R.id.fruit_content_text);

        //Set toolbar to actionbar
        setSupportActionBar(toolbar);
        ActionBar actionBar = getSupportActionBar();
        if (actionBar!=null){
            actionBar.setDisplayHomeAsUpEnabled(true);  //Set navigation mark
        }
        //Set the title for the collapsible title block
        collapsingToolbar.setTitle(fruitName);
        //Set picture
        Glide.with(this).load(fruitImageId).into(fruitImageView);
        String fruitContent = generateFruitContent(fruitName);
        fruitContentText.setText(fruitContent);
    }

    //Automatically generate content details
    private String generateFruitContent(String fruitName) {
        StringBuilder fruitContent = new StringBuilder();
        for (int i = 0; i < 500; i++) {
            fruitContent.append(fruitName);
        }
        return fruitContent.toString();
    }

    //
    @Override
    public boolean onOptionsItemSelected(@NonNull MenuItem item) {
        //Handling navigation bar HomeAsUp events
        switch (item.getItemId()){
            case android.R.id.home:
                finish();
                return true;
        }
        return super.onOptionsItemSelected(item);
    }
}
Set adapter click event
//In the ViewHolder constructor, specify ronghe
//Click event
itemView.setOnClickListener(new View.OnClickListener() {
    @Override
    public void onClick(View v) {
        int positon =  getAdapterPosition();
        Fruit fruit = data.get(positon);
        Intent intent = new Intent(context, FruitActivity.class);
        intent.putExtra(FruitActivity.FRUIT_NAME,fruit.getName());
        intent.putExtra(FruitActivity.FRUIT_IMAGE_ID,fruit.getImageId());
        context.startActivity(intent);
    }
});
    //Set click event
    //----------------------------------------------------------------------------
    private OnRecyclerItemClickListener mOnItemClickListener;

    //2_ 1 generate listener
    public void setmOnItemClickListener(OnRecyclerItemClickListener mOnItemClickListener) {
        this.mOnItemClickListener = mOnItemClickListener;
    }
    //Interface
    public interface OnRecyclerItemClickListener{
        void onRecyclerItemClick(int position);
    }
1. Perfection – integration of system status bar control and background drawing
System status bar - the line where the power is
Add properties for the control to be merged and its parent layout
android:fitsSystemWindows="true"
In res - > values - > themes XML add
<resources xmlns:tools="http://schemas.android.com/tools">
    <!-- Base application theme. -->
    <style name="Theme.MyApplication" parent="Theme.MaterialComponents.DayNight.NoActionBar.Bridge">
        <!-- Primary brand color. -->
        <item name="colorPrimary">@color/purple_500</item>
        <item name="colorPrimaryVariant">@color/purple_700</item>
        <item name="colorOnPrimary">@color/white</item>
        <!-- Secondary brand color. -->
        <item name="colorSecondary">@color/teal_200</item>
        <item name="colorSecondaryVariant">@color/teal_700</item>
        <item name="colorOnSecondary">@color/black</item>
        <!-- Status bar color. -->
        <item name="android:statusBarColor" tools:targetApi="l">?attr/colorPrimaryVariant</item>
        <!-- Customize your theme here. -->
    </style>
	<!--Inherit the above style-->
    <style name="FruitActivityTheme" parent="Theme.MyApplication">
        <item name="android:statusBarColor">@android:color/transparent</item>
    </style>
</resources>
At manifest Add the following topics to the fruitActivity in XML
android:theme="@style/FruitActivityTheme"
effect:
The system bar and picture are integrated
