I. Articles Description
Recently, I have been too busy to update my articles for a long time. I have received a lot of news from my friends to urge me to update them. I am really ashamed to update them when I am free today.
The first article introduced Android mobile live broadcasting in general, and then two articles introduced video and audio acquisition respectively. This article began to introduce the knowledge of encoding and decoding. Android provides many classes related to video and audio processing, and skilled use of these classes can actually achieve very powerful functions.
Video and audio coding and decoding are generally divided into two kinds, one is hard-coded implementation, the other is soft-coded implementation. These two methods have their own advantages and disadvantages, hard-coded performance is good, but compatibility needs to be handled accordingly; soft-coded compatibility is good, and some parameters can be set, but soft-coded performance is generally poor, the introduction of relevant codec libraries will often increase the overall volume of app, but also need to write the corresponding jni interface.
This article mainly describes the use of Android native provided by various classes to achieve audio and video processing, I believe you will feel the full article after the use of these classes together powerful.
Live broadcasting project has been opened, open source address: SopCastComponent
Github address: https://github.com/SuperJim123
II. Several Categories
Many times we tend to ignore a lot of things, such as Android system has provided us with strong support for video and audio, we often do not know, not dedicated to research. This article first introduces several classes related to audio and video. Through the combination of these classes, it can actually transform many functions related to audio and video processing. The following is a brief introduction of these classes.
MediaMetadata Retriever:: Used to get relevant information about video, such as video width, length, rotation angle, bit rate and so on.
Media Extractor:: Video and Audio Separator, which separates some formats of video from video and audio tracks.
MediaCodec: The corresponding video and audio codec class.
MediaMuxer: Video and audio synthesizer, which synthesizes video and audio into corresponding formats.
MediaFormat: Video and audio format information.
MediaCodec.BufferInfo: A class that stores information about ByteBuffer.
MediaCrypto: Class of video and audio encryption and decryption processing.
MediaCodecInfo: Class of information related to video and audio coding and decoding.
MediaFormat and MediaCodec.BufferInfo are bridges linking the above classes. The above classes of video and audio processing link up through these two bridges, thus changing the corresponding functions. If you carefully analyze them, you will feel the subtlety of Google's design.
MediaMetadata Retriever
MediaMetadata Retriever is used to obtain the relevant information of video and audio. The use of MediaMetadata Retriever is very simple. MediaMetadata Retriever is created by passing in the corresponding file path, and then the relevant parameters of video can be obtained.
MediaMetadataRetriever metadataRetriever = new MediaMetadataRetriever();
metadataRetriever.setDataSource(file.getAbsolutePath());
String widthString = metadataRetriever.extractMetadata(MediaMetadataRetriever.METADATA_KEY_VIDEO_WIDTH);
if(!TextUtils.isEmpty(widthString)) {
    width = Integer.valueOf(widthString);
}
String heightString = metadataRetriever.extractMetadata(MediaMetadataRetriever.METADATA_KEY_VIDEO_HEIGHT);
if(!TextUtils.isEmpty(heightString)) {
    height = Integer.valueOf(heightString);
}
String durationString = metadataRetriever.extractMetadata(MediaMetadataRetriever.METADATA_KEY_DURATION);
if(!TextUtils.isEmpty(durationString)) {
    duration = Long.valueOf(durationString);
}
String bitrateString = metadataRetriever.extractMetadata(MediaMetadataRetriever.METADATA_KEY_BITRATE);
if(!TextUtils.isEmpty(bitrateString)) {
    bitrate = Integer.valueOf(bitrateString);
}
String degreeStr = metadataRetriever.extractMetadata(MediaMetadataRetriever.METADATA_KEY_VIDEO_ROTATION);
if (!TextUtils.isEmpty(degreeStr)) {
    degree = Integer.valueOf(degreeStr);
}
metadataRetriever.release();
IV. MediaExtractor
MediaExtractor is used to separate video and audio. It can do a lot of things to separate video and audio tracks in files. For example, to write a player, the first step is to separate video and audio tracks, and then process them accordingly. The creation of MediaExtractor is as simple as MediaMetadata Retriever, which only needs to pass in the corresponding file path. The corresponding number of tracks can be obtained by getTrackCount(). Generally, video and audio tracks are available, sometimes only video, sometimes only audio. The serial number of the track starts at 0. The corresponding MediaFormat can be obtained by getTrackFormat(int index) method, and the track can be judged by MediaFormat as video or audio. The track of corresponding serial number is selected by selectTrack(int index) method.
public static MediaExtractor createExtractor(String path) throws IOException {
    MediaExtractor extractor;
    File inputFile = new File(path);   // must be an absolute path
    if (!inputFile.canRead()) {
        throw new FileNotFoundException("Unable to read " + inputFile);
    }
    extractor = new MediaExtractor();
    extractor.setDataSource(inputFile.toString());
    return extractor;
}

public static String getMimeTypeFor(MediaFormat format) {
    return format.getString(MediaFormat.KEY_MIME);
}

public static int getAndSelectVideoTrackIndex(MediaExtractor extractor) {
    for (int index = 0; index < extractor.getTrackCount(); ++index) {
        if (isVideoFormat(extractor.getTrackFormat(index))) {
            extractor.selectTrack(index);
            return index;
        }
    }
    return -1;
}

public static int getAndSelectAudioTrackIndex(MediaExtractor extractor) {
    for (int index = 0; index < extractor.getTrackCount(); ++index) {
        if (isAudioFormat(extractor.getTrackFormat(index))) {
            extractor.selectTrack(index);
            return index;
        }
    }
    return -1;
}

public static boolean isVideoFormat(MediaFormat format) {
    return getMimeTypeFor(format).startsWith("video/");
}

public static boolean isAudioFormat(MediaFormat format) {
    return getMimeTypeFor(format).startsWith("audio/");
}
After choosing a track, the data of the corresponding orbit can be extracted by the corresponding method. The extractor.seekTo(startTime, SEEK_TO_PREVIOUS_SYNC) method can jump directly to the start of parsing. The extractor.readSampleData(byteBuffer, 0) method parses the data into byteBuffer. The extractor.advance() method moves the parsing position forward to prepare for the next parsing.
The following is the general usage of MediaExtractor.
MediaExtractor extractor = new MediaExtractor();
extractor.setDataSource(...);
int numTracks = extractor.getTrackCount();
for (int i = 0; i < numTracks; ++i) {
    MediaFormat format = extractor.getTrackFormat(i);
    String mime = format.getString(MediaFormat.KEY_MIME);
    if (weAreInterestedInThisTrack) {
        extractor.selectTrack(i);
    }
}
ByteBuffer inputBuffer = ByteBuffer.allocate(...)
while (extractor.readSampleData(inputBuffer, ...) >= 0) {
    int trackIndex = extractor.getSampleTrackIndex();
    long presentationTimeUs = extractor.getSampleTime();
    ...
    extractor.advance();
}

extractor.release();
extractor = null;
V. MediaCodec
MediaCodec is the most important class in Android video and audio. Its main function is to encode and decode video and audio. In terms of coding, the collected video and audio data can be coded and processed, so that the data can be compressed, so that the video and audio information can be stored with less data. In decoding, the corresponding format of video and audio data can be decoded to get the original data that can be rendered, so as to achieve video and audio playback.
In general, the AAC-LC format is used for audio and H264 format for video. Both formats are well supported in EdaCodec-supported versions (Api 16). In the process of live broadcasting, the video and audio data are collected first, then the original data is stuffed into the encoder for hard-coding, and then the corresponding coded AAC-LC and H264 data are obtained.
In Android systems, the format of MediaCodec support is limited. Hard-coded support needs to be checked before using MediaCodec, and if MediaCodec support is used again.
1. Inspection
Before using hard coder, we need to check the format supported by the coder. In Android, we can use the class MediaCodecInfo to get the system's support for video and audio hard coder.
The following code determines whether MediaCodec supports a MIME:
private static MediaCodecInfo selectCodec(String mimeType) {
     int numCodecs = MediaCodecList.getCodecCount();
     for (int i = 0; i < numCodecs; i++) {
         MediaCodecInfo codecInfo = MediaCodecList.getCodecInfoAt(i);
         if (!codecInfo.isEncoder()) {
             continue;
         }
         String[] types = codecInfo.getSupportedTypes();
         for (int j = 0; j < types.length; j++) {
             if (types[j].equalsIgnoreCase(mimeType)) {
                 return codecInfo;
             }
         }
     }
     return null;
 }
According to the previous description, there are different color formats in Android system, with various types of YUV color formats and RGB color formats. In the article about camera acquisition, we need to set the color format of the image captured by the camera, generally set it to ImageFormat.NV21, and then get the corresponding image data in the callback of the camera PreView.
In Android system, different coders in different mobile phones support different color formats, but in general, they do not directly support NV21 format. At this time, it is necessary to convert NV21 format into the color format supported by encoders. YUV image format and corresponding storage rules have been described in detail in the article of camera acquisition. YUV image format conversion can be used. LibYuv.
Here is the image format supported by MediaCodec. In general, Android Media Codec supports the following formats:
/**
     * Returns true if this is a color format that this test code understands (i.e. we know how
     * to read and generate frames in this format).
     */
    private static boolean isRecognizedFormat(int colorFormat) {
        switch (colorFormat) {
            // these are the formats we know how to handle for this test
            case MediaCodecInfo.CodecCapabilities.COLOR_FormatYUV420Planar:
            case MediaCodecInfo.CodecCapabilities.COLOR_FormatYUV420PackedPlanar:
            case MediaCodecInfo.CodecCapabilities.COLOR_FormatYUV420SemiPlanar:
            case MediaCodecInfo.CodecCapabilities.COLOR_FormatYUV420PackedSemiPlanar:
            case MediaCodecInfo.CodecCapabilities.COLOR_TI_FormatYUV420PackedSemiPlanar:
                return true;
            default:
                return false;
        }
    }
I have read an article before, which roughly counts the various color formats supported by Android mobile phone MediaCodec. The above five types are commonly used.
In addition, MediaCodec supports Surface input and output. When encoding, only drawing on Surface can be input to the encoder. When decoding, the decoded image can be directly output to Surface. It is quite convenient to use, and requires Api 18 or more.
2. Creation
When you need to use MediaCodec, you first need to create the corresponding MediaCodec according to the type of audio and video. Video uses H264 in live projects, while audio uses AAC-LC. Creating live audio coder in Android requires passing in the corresponding MIME, AAC-LC corresponds to audio/mp4a-latm, and H264 corresponds to video/avc. The following code shows the creation of two encoders, in which the input settings of the video encoder become Surface mode.
    //Audio
    public static MediaCodec getAudioMediaCodec() throws IOException {
        int size = AudioRecord.getMinBufferSize(44100, AudioFormat.CHANNEL_IN_MONO, AudioFormat.ENCODING_PCM_16BIT);
        MediaFormat format = MediaFormat.createAudioFormat("audio/mp4a-latm", 44100, 1);
        format.setInteger(MediaFormat.KEY_AAC_PROFILE, MediaCodecInfo.CodecProfileLevel.AACObjectLC);
        format.setInteger(MediaFormat.KEY_BIT_RATE, 64 * 1000);
        format.setInteger(MediaFormat.KEY_SAMPLE_RATE, 44100);
        format.setInteger(MediaFormat.KEY_MAX_INPUT_SIZE, size);
        format.setInteger(MediaFormat.KEY_CHANNEL_COUNT, 1);
        MediaCodec mediaCodec = MediaCodec.createEncoderByType("audio/mp4a-latm");
        mediaCodec.configure(format, null, null, MediaCodec.CONFIGURE_FLAG_ENCODE);
        return mediaCodec;
    }
    //Video
    public static MediaCodec getVideoMediaCodec() throws IOException {
        int videoWidth = getVideoSize(1280);
        int videoHeight = getVideoSize(720);
        MediaFormat format = MediaFormat.createVideoFormat("video/avc", videoWidth, videoHeight);
        format.setInteger(MediaFormat.KEY_COLOR_FORMAT, MediaCodecInfo.CodecCapabilities.COLOR_FormatSurface);
        format.setInteger(MediaFormat.KEY_BIT_RATE, 1300* 1000);
        format.setInteger(MediaFormat.KEY_FRAME_RATE, 15);
        format.setInteger(MediaFormat.KEY_I_FRAME_INTERVAL, 1);
        format.setInteger(MediaFormat.KEY_BITRATE_MODE,MediaCodecInfo.EncoderCapabilities.BITRATE_MODE_CBR);
        format.setInteger(MediaFormat.KEY_COMPLEXITY,MediaCodecInfo.EncoderCapabilities.BITRATE_MODE_CBR);
        MediaCodec mediaCodec = MediaCodec.createEncoderByType("video/avc");
        mediaCodec.configure(format, null, null, MediaCodec.CONFIGURE_FLAG_ENCODE);
        return mediaCodec;
    }

    // We avoid the device-specific limitations on width and height by using values that
    // are multiples of 16, which all tested devices seem to be able to handle.
    public static int getVideoSize(int size) {
        int multiple = (int) Math.ceil(size/16.0);
        return multiple*16;
    }
3. Use
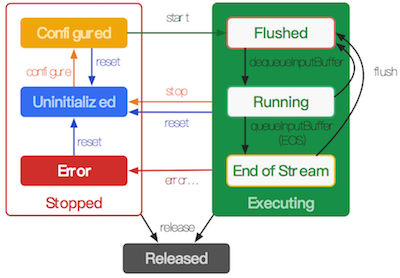
Once MediaCodec is created, it needs to be opened by the start() method. MediaCodec has an input buffer queue and an output buffer queue. It continuously passes data to the input buffer queue. After processing by MediaCodec, the output data of the response can be obtained. When encoding, it is necessary to transmit the original video and audio data collected to the input buffer, and then obtain the data of the output buffer. The output data is the data after encoding. When decoding, input the data needed to be decoded into the input buffer, and then get the data of the output buffer. The output data is the original video and audio data after decoding. When you need to clear the input and output buffers, you can call the flush() method of MediaCodec. When the encoding or decoding is finished, the end tag can be obtained from the output buffer by inputting the data with the end tag into the input buffer, thus completing the whole encoding and decoding process. The following picture is a good illustration of MediaCodec's state changes.
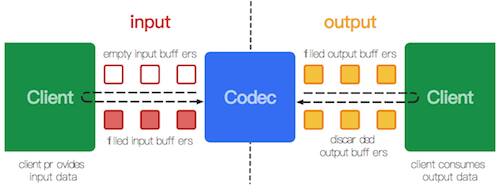
For MediaCodec, the output data is obtained by processing the input data. MediaCodec processes data through a series of input and output buffers. As shown in the figure below, the input client gets the empty input buffer through query, fills it with data, and then passes the input buffer to MediaCodec; the output client gets the full output buffer through query, then gets the data inside, and then notifies MediaCodec to release the output buffer.
MediaCodec can be used asynchronously in API 21 and beyond.
 MediaCodec codec = MediaCodec.createByCodecName(name);
 MediaFormat mOutputFormat; // member variable
 codec.setCallback(new MediaCodec.Callback() {
   @Override
   void onInputBufferAvailable(MediaCodec mc, int inputBufferId) {
     ByteBuffer inputBuffer = codec.getInputBuffer(inputBufferId);
     // fill inputBuffer with valid data
     ...
     codec.queueInputBuffer(inputBufferId, ...);
   }

   @Override
   void onOutputBufferAvailable(MediaCodec mc, int outputBufferId, ...) {
     ByteBuffer outputBuffer = codec.getOutputBuffer(outputBufferId);
     MediaFormat bufferFormat = codec.getOutputFormat(outputBufferId); // option A
     // bufferFormat is equivalent to mOutputFormat
     // outputBuffer is ready to be processed or rendered.
     ...
     codec.releaseOutputBuffer(outputBufferId, ...);
   }

   @Override
   void onOutputFormatChanged(MediaCodec mc, MediaFormat format) {
     // Subsequent data will conform to new format.
     // Can ignore if using getOutputFormat(outputBufferId)
     mOutputFormat = format; // option B
   }

   @Override
   void onError(...) {
     ...
   }
 });
 codec.configure(format, ...);
 mOutputFormat = codec.getOutputFormat(); // option B
 codec.start();
 // wait for processing to complete
 codec.stop();
 codec.release();
Starting with API 21, you can use MediaCodec in the following synchronization way.
 MediaCodec codec = MediaCodec.createByCodecName(name);
 codec.configure(format, ...);
 MediaFormat outputFormat = codec.getOutputFormat(); // option B
 codec.start();
 for (;;) {
   int inputBufferId = codec.dequeueInputBuffer(timeoutUs);
   if (inputBufferId >= 0) {
     ByteBuffer inputBuffer = codec.getInputBuffer(...);
     // fill inputBuffer with valid data
     ...
     codec.queueInputBuffer(inputBufferId, ...);
   }
   int outputBufferId = codec.dequeueOutputBuffer(...);
   if (outputBufferId >= 0) {
     ByteBuffer outputBuffer = codec.getOutputBuffer(outputBufferId);
     MediaFormat bufferFormat = codec.getOutputFormat(outputBufferId); // option A
     // bufferFormat is identical to outputFormat
     // outputBuffer is ready to be processed or rendered.
     ...
     codec.releaseOutputBuffer(outputBufferId, ...);
   } else if (outputBufferId == MediaCodec.INFO_OUTPUT_FORMAT_CHANGED) {
     // Subsequent data will conform to new format.
     // Can ignore if using getOutputFormat(outputBufferId)
     outputFormat = codec.getOutputFormat(); // option B
   }
 }
 codec.stop();
 codec.release();
Before API version 21, the way to get buffers is different. It is not possible to get the corresponding buffers directly. It is necessary to get the corresponding buffers from the list of buffers according to the index number. The specific code is as follows:
 MediaCodec codec = MediaCodec.createByCodecName(name);
 codec.configure(format, ...);
 codec.start();
 ByteBuffer[] inputBuffers = codec.getInputBuffers();
 ByteBuffer[] outputBuffers = codec.getOutputBuffers();
 for (;;) {
   int inputBufferId = codec.dequeueInputBuffer(...);
   if (inputBufferId >= 0) {
     // fill inputBuffers[inputBufferId] with valid data
     ...
     codec.queueInputBuffer(inputBufferId, ...);
   }
   int outputBufferId = codec.dequeueOutputBuffer(...);
   if (outputBufferId >= 0) {
     // outputBuffers[outputBufferId] is ready to be processed or rendered.
     ...
     codec.releaseOutputBuffer(outputBufferId, ...);
   } else if (outputBufferId == MediaCodec.INFO_OUTPUT_BUFFERS_CHANGED) {
     outputBuffers = codec.getOutputBuffers();
   } else if (outputBufferId == MediaCodec.INFO_OUTPUT_FORMAT_CHANGED) {
     // Subsequent data will conform to new format.
     MediaFormat format = codec.getOutputFormat();
   }
 }
 codec.stop();
 codec.release();
When the data input ends, MediaCodec is notified of the end of the encoding by setting the input tag of queueInputBuffer to BUFFER_FLAG_END_OF_STREAM. When MediaCodec is used as an encoder, the dequeueOutput Buffer method can get the relevant information of the current encoded output buffer data, which is stored in the buffer Info. The real length of the data can be obtained through the buffer Info information, and the current data is the key frame or non-key frame and so on.
When using Output Surface as the output of decoding, you can set whether or not to render the video to Surface according to the following circumstances.
releaseOutputBuffer(bufferId, false)  //Do not render data in buffer
releaseOutputBuffer(bufferId, true)  //Rendering data in buffer
releaseOutputBuffer(bufferId, timestamp)  //Rendering data in buffer at a specific time
When using Input Surface as the input of the encoder, dequeueInput Buffer is not allowed. When the input ends, signal EndOfInputStream () is used to stop the encoder.
VI. MediaMuxer
MediaExtractor (Video and Audio Separator) was described earlier, and now MediaMuxer (Video and Audio Synthesizer). MediaMuxer is a video and audio synthesizer provided by Android. At present, it only supports video and audio synthesizer in mp4 and webm formats. In general, video and audio media have video and audio tracks, and sometimes alphabetical tracks. MediaMuxer combines these tracks and stores them in a file.
One of the most common scenarios for MediaMuxer in Android is recording mp4 files. Generally speaking, when stored as MP4 files, the video track is usually the h264 video after encoding, and the audio track is the aac Audio after encoding. We have already described how to hard-code the collected video and audio. Then if we use MediaMuxer to synthesize the hard-coded video and audio, we can synthesize them into mp4 files.
Here is the general use of MediaMuxer.
MediaMuxer muxer = new MediaMuxer("temp.mp4", OutputFormat.MUXER_OUTPUT_MPEG_4);
// More often, the MediaFormat will be retrieved from MediaCodec.getOutputFormat()
// or MediaExtractor.getTrackFormat().
MediaFormat audioFormat = new MediaFormat(...);
MediaFormat videoFormat = new MediaFormat(...);
int audioTrackIndex = muxer.addTrack(audioFormat);
int videoTrackIndex = muxer.addTrack(videoFormat);
ByteBuffer inputBuffer = ByteBuffer.allocate(bufferSize);
boolean finished = false;
BufferInfo bufferInfo = new BufferInfo();

muxer.start();
while(!finished) {
// getInputBuffer() will fill the inputBuffer with one frame of encoded
// sample from either MediaCodec or MediaExtractor, set isAudioSample to
// true when the sample is audio data, set up all the fields of bufferInfo,
// and return true if there are no more samples.
    finished = getInputBuffer(inputBuffer, isAudioSample, bufferInfo);
    if (!finished) {
        int currentTrackIndex = isAudioSample ? audioTrackIndex : videoTrackIndex;
        muxer.writeSampleData(currentTrackIndex, inputBuffer, bufferInfo);
    }
};
muxer.stop();
muxer.release();
In fact, the comments above illustrate the use scenario of MediaMuxer very well. Initialization of video and audio tracks needs to be imported into MediaFormat, which can be obtained by MediaCodec.getOutputFormat() or by MediaExtractor.getTrackFormat(). There are two application scenarios, one is acquisition, the other is transcoding.
VII. Combination
The combination of MediaExtractor and MediaCodec can realize video playback function. The combination of MediaCodec and MediaMuxer can realize video recording function. The combination of MediaExtractor, MediaCodec and MediaMuxer can realize video transcoding function. The following describes the implementation of these functions.
1. Video and Audio Recording
The video acquisition and audio acquisition are described before. The collected video and audio are coded by MediaCodec, and then the coded data are transmitted to MediaMuxer for synthesis, which completes the function of video and audio recording.
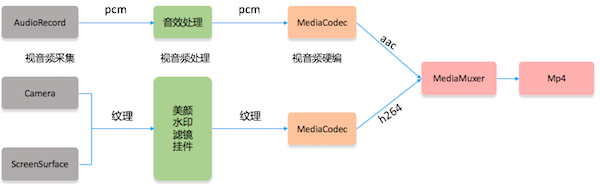
MediaCodec is created according to the relevant parameters of video and audio acquisition. When the output BufferId of MediaCodec is INFO_OUTPUT_FORMAT_CHANGED, the corresponding MediaFormat can be obtained through codec.getOutputFormat(), and then the MediaFormat can be used to add corresponding audio and video tracks for MediaMuxer. Through codec.dequeueOutputBuffer(... ) The bufferInfo information and corresponding data of the encoded data can be obtained, and then the data and bufferInfo are transmitted to Muxer through muxer. writeSampleData (current Track Index, inputBuffer, bufferInfo), which synthesizes the whole video and audio data into mp4.
2. Video and Audio Playing
It's also possible to implement a player using Android's Media API, which is what ExoPlayer, Google's famous open source project, does.
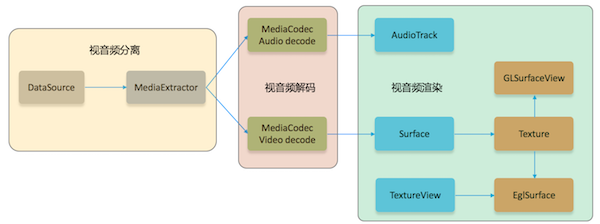
The diagram above briefly describes the structure of a simple local player. Video and audio files are separated by MediaExtractor, and corresponding audio and video tracks are obtained. After that, the data is obtained from the corresponding track by MediaExtractor and passed to the input buffer of MediaCodec. After decoding by MediaCodec, the corresponding original data can be obtained. After audio decoding, PCM data can be obtained, which can be transmitted to AudioTrack for playback. Video decoding can be rendered to the corresponding Surface, which can be created by Surface Texture, and Surface Texture can be created by texture, thus the decoded video data can be transferred to the texture.
MediaExtractor parses video and audio files to get the pts of the corresponding data, then pts can be transmitted to MediaCodec, and then the corresponding pts can be obtained in the output of MediaCodec, and then the video and audio rendering can be controlled according to the pts of video and audio, so as to achieve the synchronization of video and audio.
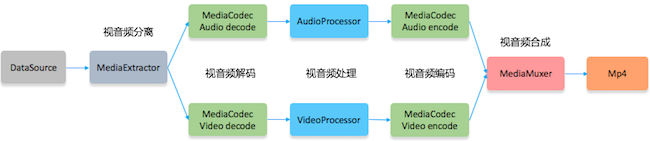
3. Video-Audio Transcoding
Video-audio transcoding, in fact, is to parse the corresponding files through MediaExtractor, and then get the corresponding video track and audio track, and then transmit the data in the track to MediaCodec for decoding, and then process the decoded data accordingly (such as audio muting, video clipping, video filter), and then transmit the processed data to MediaCodec for coding. Finally, the video track and audio track are synthesized by MediaMuxer, and the whole transcoding process is completed.
VIII. Prospects
This paper describes how to use the Media API to record, play and transcode, and how to combine video and audio codec with texture. However, due to space reasons, it does not describe how to process video through OpenGL, which will be further described in the next article.
This paper describes a lot of the principles and processes of how to achieve, but does not provide the corresponding implementation source code, in fact, the preparation of these programs is not complicated, and then will write the corresponding open source code, which will be updated to this article after writing.
IX. Relevant Links
Android Mobile Live Broadcasting (1) Overview
Android Mobile Live Broadcasting (II) Camera
Android Mobile Live Broadcast (3) Sound Acquisition
Android Mobile Live Broadcast (IV) Android Media API
10. Concluding remarks
Finally, I've finished writing. If you think the article is good, you might as well order a favorite one to read it.