
Author: Bighead
Link: https://juejin.im/post/5a4c90c15188257c4d1b8d0c
This article is authorized by the author.
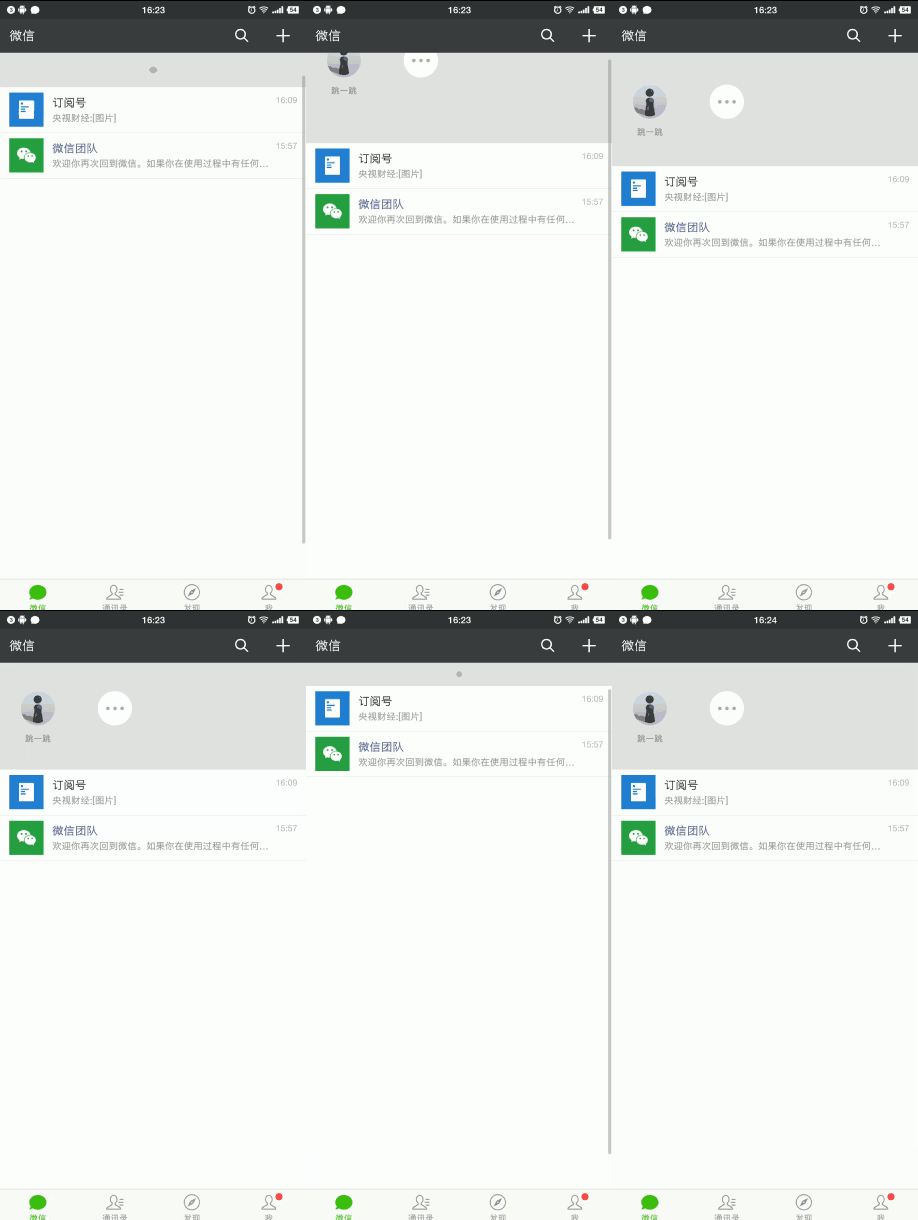
Last week, Wechat upgraded to version 6.6.1, adding the Wechat game. The circle of friends is playing and dancing. And now Wechat has put the recently used widgets on the top of the home page, which can be accessed quickly with a gentle drop-down. You can see the effect, if you haven't upgraded your friends can grasp it.

As an Android programmer, I can't write small programs, but I have to keep up with the craze. So just copy the drop-down control. The seventh cosmic convention, first of all, the effect map:

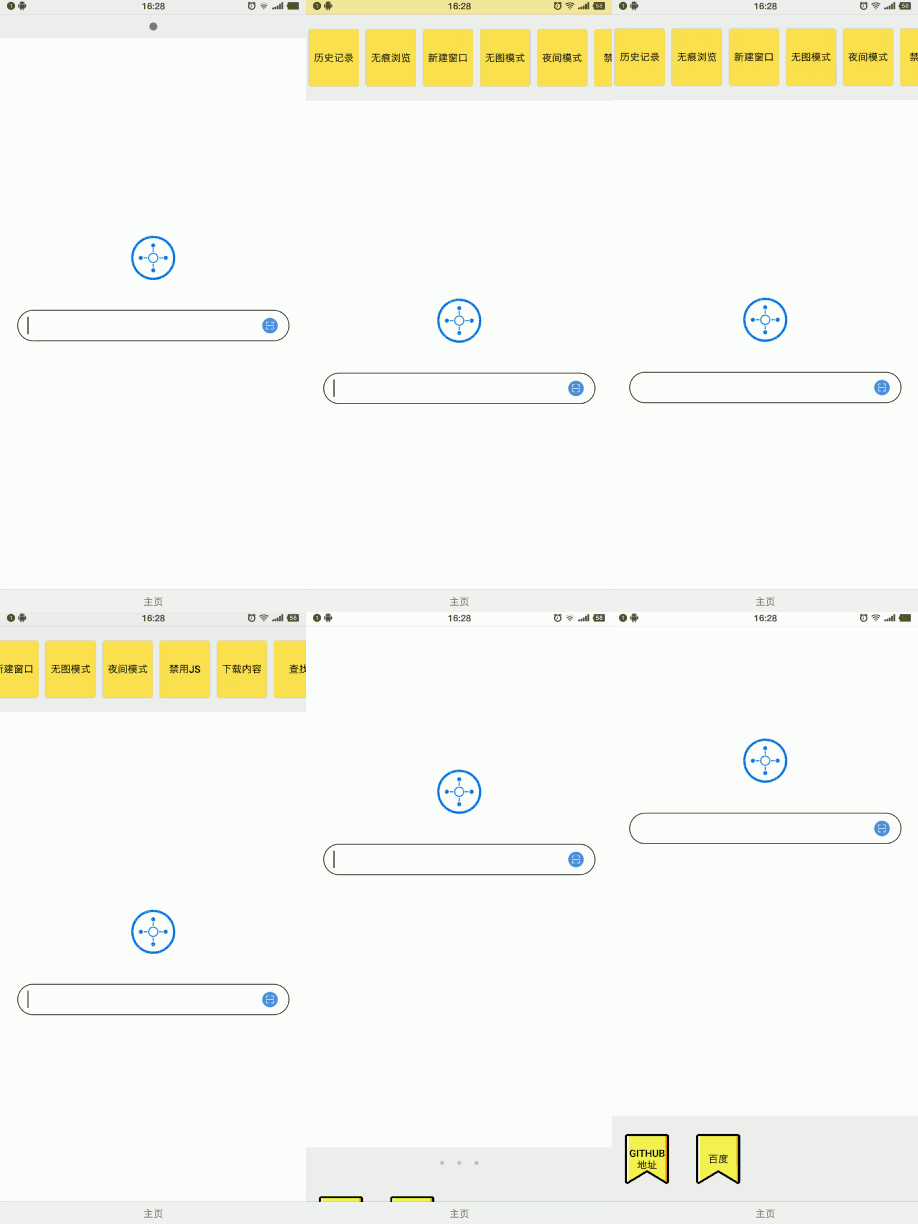
The main interface of the picture above is demo written in my last article, A Full Gesture Operating Browser. After writing this control, I found that it can be used as a drop-down menu bar, so I used it directly. Okay, no more nonsense, let's start with the implementation process.
Process analysis
The whole pull-down process is divided into four stages:
-
Stage 1: A circle appears and the radius increases with the pull-down distance. Always in the middle
-
Stage 2: There are two circles on both sides of the circle with smaller radius. The distance increases with the pull-down distance, and the radius of the middle circle decreases. Always in the middle
-
Phase 3: A list of contents appears from the top, and the position moves down quickly with the finger pulling down. At the same time, the position of the three dots moves down and disappears gradually.
-
Stage 4: With only a list of content left, the finger can continue to slide down, but the damping becomes larger. The content list is always in the middle.
There are two cases of upward sliding:
-
If the content list is expanded when the sliding starts, the sliding up (the dots do not appear)
-
On the contrary, it is the inverse process of pull-down (the dots will appear).
Concrete realization
Students familiar with the drop-down refresh control can see that the above sliding process and drop-down refresh are very similar, so in order to avoid repeating the wheel (lazy), I will change the drop-down refresh control, so the main implementation is still in the head piece.
Initial layout location
There are many ways to put your head outside the screen. I used the method of setting negative padding. The outer layout inherits Linear Layout with vertical orientation. Then set padding for it:
headerHeight = (null != mHeaderLayout) ? mHeaderLayout.getMeasuredHeight() : 0;
int pLeft = getPaddingLeft();
int pTop = -headerHeight;
int pRight = getPaddingRight();
int pBottom = -footerHeight;
setPadding(pLeft, pTop, pRight, pBottom);
The value of padding Top is equal to the height of the negative Header Layout, so that the head layout is placed just outside the screen.
Handling Touch Events
The main content of this section is to rewrite boolean onInterceptTouchEvent (Motion Event Event) and boolean onTouchEvent (Motion Event ev) to intercept and process sliding events.
@Override
    public final boolean onInterceptTouchEvent(MotionEvent event) {
        final int action = event.getAction();
        //No interception
        if (action == MotionEvent.ACTION_CANCEL || action == MotionEvent.ACTION_UP) {
            mIsHandledTouchEvent = false;
            return false;
        }
        //If the touch is not restarted and it has been determined that interception is needed, the entire set of touch events will be intercepted.
        if (action != MotionEvent.ACTION_DOWN && mIsHandledTouchEvent) {
            return true;
        }

        switch (action) {
            case MotionEvent.ACTION_DOWN:
                mLastMotionY = event.getY();
                mIsHandledTouchEvent = false;
                break;

            case MotionEvent.ACTION_MOVE:
                final float deltaY = event.getY() - mLastMotionY;
                final float absDiff = Math.abs(deltaY);
                // The displacement difference is greater than mTouchSlop (TouchSlop is the smallest distance that the system can recognize as sliding)
                //This is to prevent refresh caused by fast dragging
                if ((absDiff > mTouchSlop)) {
                    mLastMotionY = event.getY();
                    // The first one shows that the Header has been displayed or pulled down
                    if (isPullRefreshEnabled() && isReadyForPullDown()) {
                        // 1, Math. ABS (getScrollY ()> 0: Indicates that the absolute value of the current sliding offset is greater than 0, indicating that the current HeaderView has slipped out or is complete.
                        // Invisible, there is a case where RefreshableView has slid to the top and up while refreshing, so what we expect is the result.
                        // Still sliding up until HeaderView is completely invisible
                        // 2, deltaY > 0.5f: indicates that the drop-down value is greater than 0.5f
                        mIsHandledTouchEvent = (Math.abs(getScrollYValue()) > 0 || deltaY > 0.5f);
                    }
                }
                break;
            default:
               break;
        }
        return mIsHandledTouchEvent;//true: intercept, false does not intercept
    }
If intercepted, we deal with sliding, where offsetRadio is the sliding damping value.
@Override
    public final boolean onTouchEvent(MotionEvent ev) {
        boolean handled = false;
        switch (ev.getAction()) {
            case MotionEvent.ACTION_DOWN:
                mLastMotionY = ev.getY();
                mIsHandledTouchEvent = false;
                break;

            case MotionEvent.ACTION_MOVE:
                final float deltaY = ev.getY() - mLastMotionY;
                mLastMotionY = ev.getY();
                if (isPullRefreshEnabled() && isReadyForPullDown()) {
                    pullHeaderLayout(deltaY / offsetRadio);
                    handled = true;
                } else {
                    mIsHandledTouchEvent = false;
                }
                break;

            case MotionEvent.ACTION_CANCEL:
            case MotionEvent.ACTION_UP:
                if (mIsHandledTouchEvent) {
                    mIsHandledTouchEvent = false;
                    // When the first one comes out
                    if (isReadyForPullDown()) {
                        // Call refresh
                        if (mPullRefreshEnabled && (mPullDownState == State.RELEASE_TO_REFRESH)) {
                            startRefreshing();
                            handled = true;
                        }
                        resetHeaderLayout();
                    }
                }
                break;

            default:
                break;
        }
        return handled;
    }
Ultimately, we will scroll the layout as a whole by pullHeaderLayout() calling scrollBy(x, y) of View:
protected void pullHeaderLayout(float delta) {
        // Slide upward and do not slide when the current scrollY is 0
        int oldScrollY = getScrollYValue();
        if (delta < 0 && (oldScrollY - delta) >= 0) {
            setScrollTo(0, 0);
            if (null != mHeaderLayout && 0 != mHeaderHeight) {
                mHeaderLayout.setState(State.RESET);
                mHeaderLayout.onPull(0);
            }
            return;
        }
        //Sliding layout
        setScrollBy(0, -(int) delta);//Call scrollBy(x, y) of View
        int scrollY = Math.abs(getScrollYValue());
        if (null != mHeaderLayout && 0 != mHeaderHeight) {
            if (scrollY >= headerListHeight) {
                mHeaderLayout.setState(State.arrivedListHeight);
                setOffsetRadio(2.0f);//Damping increases when the content list is fully expanded
            } else {
                setOffsetRadio(1.0f);
            }
            mHeaderLayout.onPull(scrollY);//The sliding distance is transmitted to the head in real time to achieve the animation we need.
        }
    }
A problem encountered
After I wrote this above, I ran through it and found that onInterceptTouchEvent only executed ACTION_DOWN, and subsequent ACTION_MOVE and ACTION_UP events would not execute, so it would be impossible to intercept and slide. Baidu originally had such a rule:
The onInterceptTouchEvent returns false to indicate that the down event is handled by the sub-View; if the onTouchEvent of a sub-View returns true, subsequent events such as move and up will be passed to the onInterceptTouchEvent method of the ViewGroup first, and then passed on layer by layer, and handled by the sub-View; if the onTouchEvent of the sub-View returns false, the down event will be handed to the ViewGroup. If the onTouchEvent of ViewGroup returns true, subsequent events will no longer pass through the onInterceptTouchEvent method of the ViewGroup and will be handled directly by the onTouchEvent method.
Because the current sub-View (middle content section) is Relative Layout, its onTouchEvent returns false by default (ListView and other slidable controls won't have this problem). The solution is to set android:clickable="true".
Implementation of Head
As I said above, there are four stages of sliding, as long as the sliding distance is passed to the custom header, the status is judged according to the distance, and the TranslationY, TranslationY and Alpha of the content list can be changed in real time. Although the content of implementation is more, but are relatively simple, detailed code is not pasted, you can see the source code of interest. As for the dot animation, it is also a custom View. The outer layer only needs to pass in the percentage of the animation according to the sliding distance conversion, and draw the required graphics in it. It is judged that when the percentage reaches 0.5, draw three circles:
public class ExpendPoint extends View {

    float percent;
    float maxRadius = 15;
    float maxDist = 60;
    Paint mPaint;

    public ExpendPoint(Context context, @Nullable AttributeSet attrs) {
        super(context, attrs);
         mPaint = new Paint();
        mPaint.setAntiAlias(true);
        mPaint.setColor(Color.GRAY);
    }

    public void setPercent(float percent) {
        this.percent = percent;
        invalidate();
    }

    @Override
    protected void onDraw(Canvas canvas) {
        super.onDraw(canvas);
        float centerX = getWidth() / 2;
        float centerY = getHeight() / 2;
        if (percent <= 0.5f) {Draw only one circle.
            mPaint.setAlpha(255);
            float radius = percent * 2 * maxRadius;
            canvas.drawCircle(centerX, centerY, radius, mPaint);
        } else {//Draw three circles
            float afterPercent = (percent - 0.5f) / 0.5f;
            float radius = maxRadius - maxRadius / 2 * afterPercent;
            canvas.drawCircle(centerX, centerY, radius, mPaint);
            canvas.drawCircle(centerX - afterPercent * maxDist, centerY, maxRadius / 2, mPaint);
            canvas.drawCircle(centerX + afterPercent * maxDist, centerY, maxRadius / 2, mPaint);
        }
    }
}
Expansion: Pull-up Bar
With the above foundation, the implementation of the upload bar is very simple, the logic is basically the same, but the direction has changed. Let's look at the end result:

Finally, the github address of this project is posted:
https://github.com/renjianan/SimpleBrowser
Dry goods in the past
1
Android Arc ViewPager and Arc HeaderView (Upgraded)
2
Five Google interview questions, how many can you answer correctly?
3