preface
there are some problems in the construction of some conventional MVVM frameworks, so the development of some small functions also needs to be explained. Pay attention to practice, and this paper will practice it. A function may not be able to write an article.
Before writing, let's take a look at the finished rendering, as shown in the figure below:
text
you can see the function of Notepad from the title. This function is still of practical value. Although every mobile phone comes with this function, it is still developed, because this function can investigate some basic skills of developers, and can be investigated from the code and business requirements. Many graduation projects are to build a notepad, In addition, the weather App and garbage classification App I wrote before also have similar settings. Learning is good, but you should have your own thinking and think about some details when writing a function.
Let's first define the functional requirements: create notes, delete notes, modify notes and display notes.
These function points are tentatively determined, so our application should have a table to operate notes. The main function is to add, delete, modify and query. Let's realize these functions. I suggest you don't look directly at the source code. Sometimes the process and idea are more important than the result.
1, Notepad page
Since you want to write a notepad, you must first create a page. My code is still written in the MVVM framework. Create a NotebookActivity under the activity package, and the corresponding layout is activity_notebook.xml, let's modify the layout code first:
<?xml version="1.0" encoding="utf-8"?>
<layout xmlns:android="http://schemas.android.com/apk/res/android"
    xmlns:app="http://schemas.android.com/apk/res-auto"
    xmlns:tools="http://schemas.android.com/tools">

    <data>
        <variable
            name="hasNotebook"
            type="Boolean" />

        <import type="android.view.View" />
    </data>

    <RelativeLayout
        android:layout_width="match_parent"
        android:layout_height="match_parent"
        android:fitsSystemWindows="true"
        android:orientation="vertical"
        tools:context=".ui.activity.NotebookActivity">

        <androidx.appcompat.widget.Toolbar
            android:id="@+id/toolbar"
            android:layout_width="match_parent"
            android:layout_height="?attr/actionBarSize"
            android:background="@color/white"
            app:navigationIcon="@drawable/icon_back_black">

            <TextView
                android:layout_width="wrap_content"
                android:layout_height="wrap_content"
                android:layout_gravity="center"
                android:text="Notepad"
                android:textColor="@color/black"
                android:textSize="18sp"
                android:textStyle="bold" />
        </androidx.appcompat.widget.Toolbar>

        <RelativeLayout
            android:layout_width="match_parent"
            android:layout_height="match_parent"
            android:layout_below="@+id/toolbar"
            android:background="@color/gray_white"
            android:orientation="vertical">

            <!--Note List-->
            <androidx.recyclerview.widget.RecyclerView
                android:id="@+id/rv_notebook"
                android:layout_width="match_parent"
                android:layout_height="match_parent"
                android:overScrollMode="never"
                android:paddingStart="8dp"
                android:visibility="@{hasNotebook ? View.VISIBLE : View.GONE}"
                android:paddingEnd="8dp"
                android:paddingTop="8dp" />

            <!--No layout recorded-->
            <LinearLayout
                android:id="@+id/lay_no_record"
                android:layout_width="match_parent"
                android:layout_height="match_parent"
                android:gravity="center"
                android:visibility="@{hasNotebook ? View.GONE : View.VISIBLE}"
                android:orientation="vertical">

                <ImageView
                    android:layout_width="96dp"
                    android:layout_height="96dp"
                    android:src="@mipmap/icon_no_record" />

                <TextView
                    android:layout_width="wrap_content"
                    android:layout_height="wrap_content"
                    android:layout_marginTop="4dp"
                    android:text="No record"
                    android:textColor="@color/dark_gray"
                    android:textSize="16sp" />
            </LinearLayout>
        </RelativeLayout>

        <com.google.android.material.floatingactionbutton.FloatingActionButton
            android:id="@+id/fab_add_notebook"
            android:layout_width="wrap_content"
            android:layout_height="wrap_content"
            android:layout_alignParentEnd="true"
            android:layout_alignParentBottom="true"
            android:layout_margin="20dp"
            android:onClick="toEdit"
            android:src="@mipmap/icon_add"
            app:backgroundTint="@color/white"
            tools:ignore="UsingOnClickInXml" />

    </RelativeLayout>
</layout>
The icons used here are taken from my source code. If I post them, they will not be png, and then enter androidmanifest Modify the page style in XML and add a theme to NotebookActivity, as shown in the following figure:

Modify the code again. Next, modify the code in NotebookActivity, as shown in the following figure:
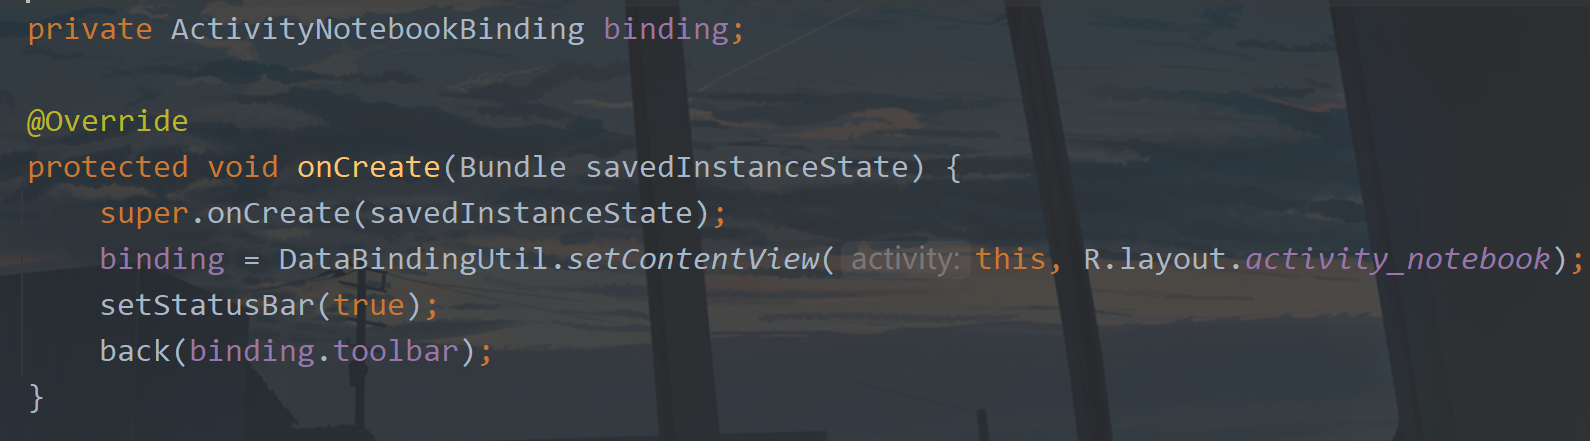
Here we inherit BaseActivity, use ViewBinding and status bar settings, and return listening. Run the following:
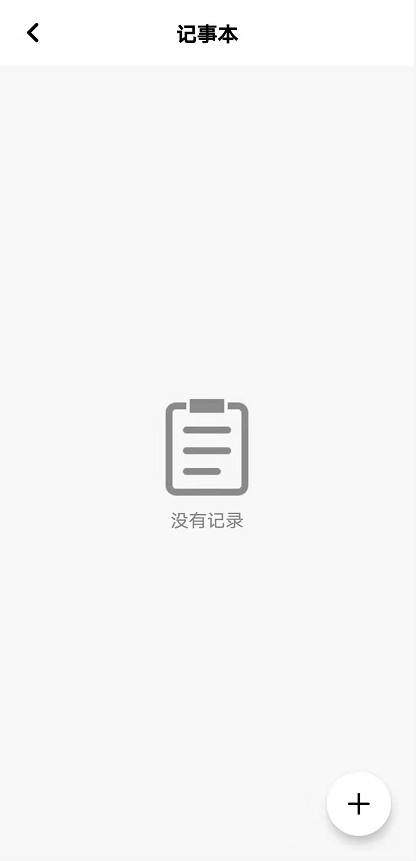
There is no data here. Ignore it first. See a button in the lower right corner. Click this button to edit the diary and add notes. Let's write this function, that is, add.
2, Edit page
the edit page can be used to add notes, view notes, modify notes and delete notes. A page needs to be well designed to have these functions. First, complete the simple interface design. Here, you also need to add an activity. Add an EditActivity under the activity package. The corresponding layout is activity_edit.xml, because there are two input boxes in the editing page, I need to change the default input box cursor style. Add a new custom under drawable_ cursor. XML, the code is as follows:
<?xml version="1.0" encoding="utf-8"?>
<shape xmlns:android="http://schemas.android.com/apk/res/android">
    <size android:width="1dp" />
    <solid android:color="@color/purple_700" />
</shape>
Then we modify the activity_ edit. Code in XML:
<?xml version="1.0" encoding="utf-8"?>
<layout xmlns:android="http://schemas.android.com/apk/res/android"
    xmlns:app="http://schemas.android.com/apk/res-auto"
    xmlns:tools="http://schemas.android.com/tools">

    <data>

    </data>

    <RelativeLayout
        android:layout_width="match_parent"
        android:layout_height="match_parent"
        android:fitsSystemWindows="true"
        tools:context=".ui.activity.EditActivity">

        <androidx.appcompat.widget.Toolbar
            android:id="@+id/toolbar"
            android:layout_width="match_parent"
            android:layout_height="?attr/actionBarSize"
            android:background="@color/white"
            app:navigationIcon="@mipmap/ic_edit_return">

            <ImageView
                android:id="@+id/iv_ok"
                android:layout_width="36dp"
                android:layout_height="36dp"
                android:layout_gravity="end"
                android:layout_marginEnd="16dp"
                android:foreground="?attr/selectableItemBackground"
                android:padding="4dp"
                android:src="@mipmap/ic_black_ok"
                android:visibility="gone" />
        </androidx.appcompat.widget.Toolbar>

        <LinearLayout
            android:layout_width="match_parent"
            android:layout_height="match_parent"
            android:layout_below="@+id/toolbar"
            android:orientation="vertical"
            android:paddingStart="12dp"
            android:paddingEnd="16dp">

            <androidx.appcompat.widget.AppCompatEditText
                android:id="@+id/et_title"
                android:layout_width="match_parent"
                android:layout_height="wrap_content"
                android:background="@null"
                android:hint="title"
                android:textColor="@color/black"
                android:textColorHint="@color/black"
                android:textCursorDrawable="@drawable/custom_cursor"
                android:textSize="36sp" />

            <androidx.appcompat.widget.AppCompatEditText
                android:id="@+id/et_content"
                android:layout_width="match_parent"
                android:layout_height="match_parent"
                android:layout_below="@+id/et_title"
                android:background="@null"
                android:cursorVisible="true"
                android:gravity="top"
                android:paddingTop="4dp"
                android:textCursorDrawable="@drawable/custom_cursor" />
        </LinearLayout>
    </RelativeLayout>
</layout>
The icons used in this layout are still found in my source code, so I won't post them.
You also need to change an Android manifest The theme of NotebookActivity in XML is shown in the following figure:

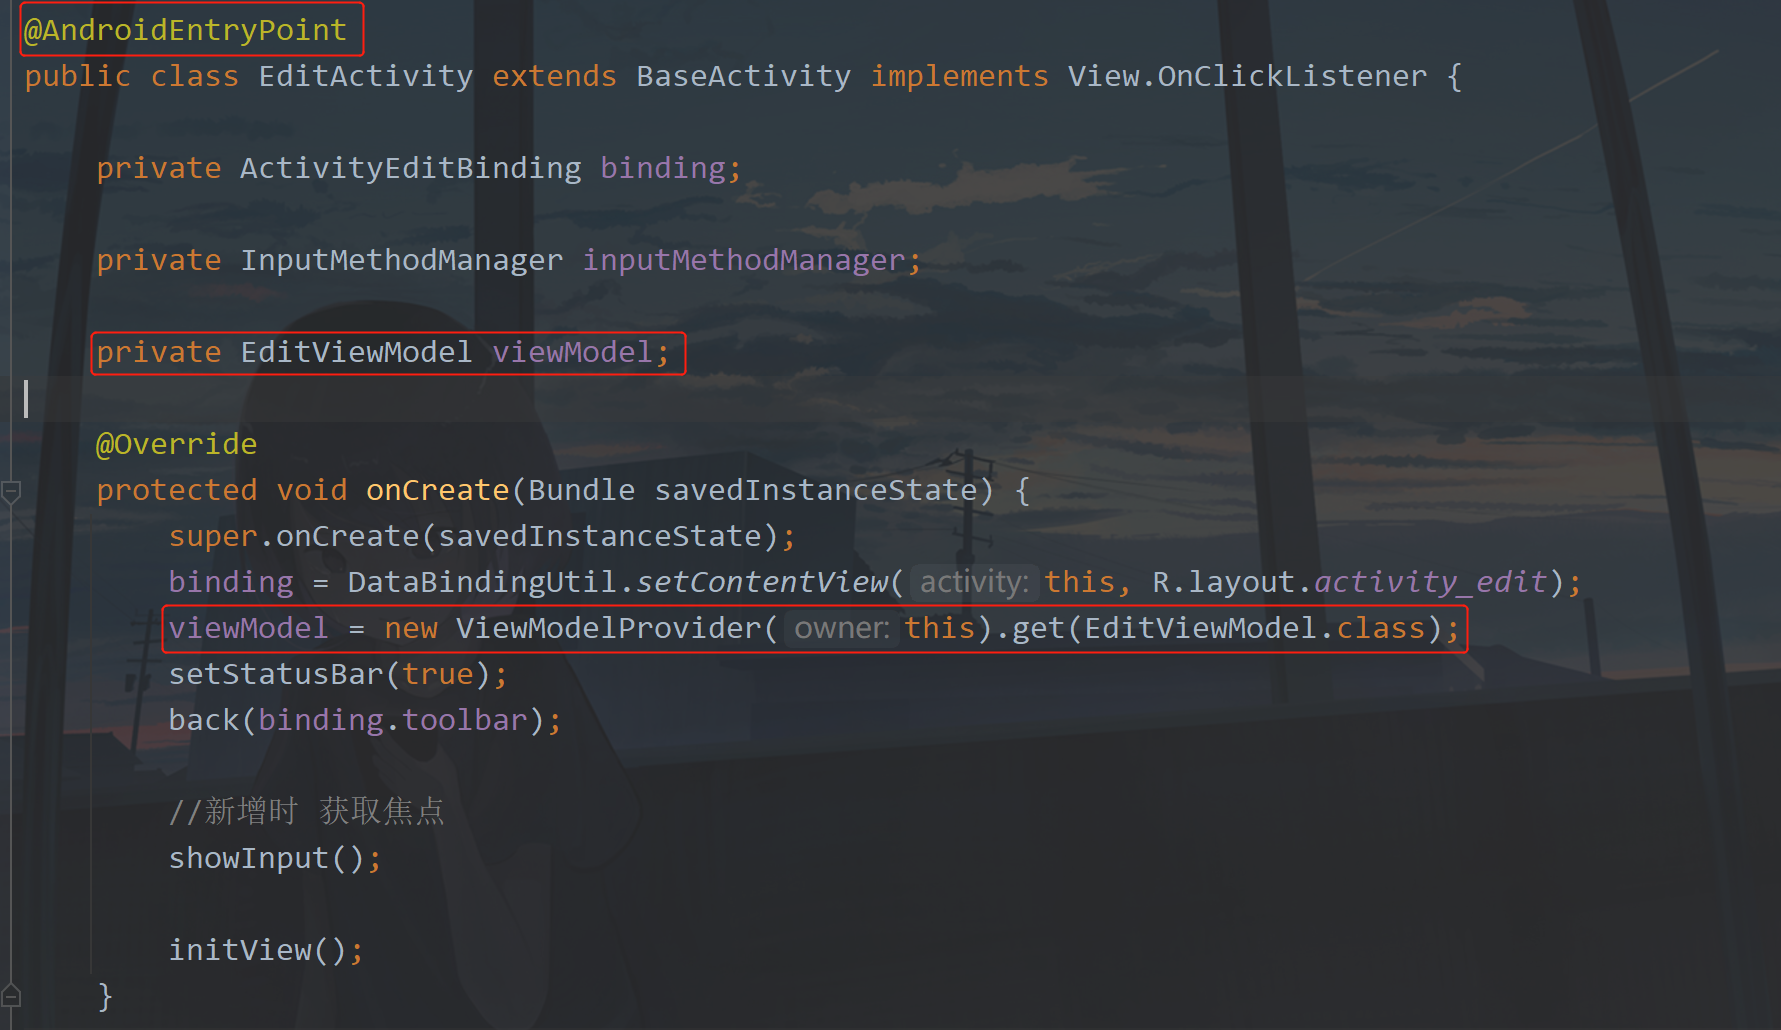
Then we modify the code in EditActivity:
public class EditActivity extends BaseActivity implements View.OnClickListener {

    private ActivityEditBinding binding;

    private InputMethodManager inputMethodManager;

    @Override
    protected void onCreate(Bundle savedInstanceState) {
        super.onCreate(savedInstanceState);
        binding = DataBindingUtil.setContentView(this, R.layout.activity_edit);
        setStatusBar(true);
        back(binding.toolbar);

        //Get focus when adding
        showInput();

        initView();
    }

    private void initView() {
        //Monitor input
        listenInput(binding.etTitle);
        listenInput(binding.etContent);
        binding.ivOk.setOnClickListener(this);
    }

    /**
     * Monitor input
     * @param editText Input box
     */
    private void listenInput(final AppCompatEditText editText) {
        editText.addTextChangedListener(new TextWatcher() {
            @Override
            public void beforeTextChanged(CharSequence s, int start, int count, int after) {

            }

            @Override
            public void onTextChanged(CharSequence s, int start, int before, int count) {

            }

            @Override
            public void afterTextChanged(Editable s) {
                if (s.length() > 0) {
                    binding.ivOk.setVisibility(View.VISIBLE);
                } else {
                    if (binding.etTitle.getText().length() == 0 && binding.etContent.getText().length() == 0  ){
                        binding.ivOk.setVisibility(View.GONE);
                    }
                }
            }
        });
    }

    /**
     * Display keyboard
     */
    public void showInput() {
        binding.etContent.requestFocus();
        inputMethodManager = (InputMethodManager) getSystemService(INPUT_METHOD_SERVICE);
        inputMethodManager.toggleSoftInput(InputMethodManager.SHOW_FORCED, 0);
    }

    /**
     * Hide keyboard
     */
    public void dismiss() {
        if (inputMethodManager != null) {
            inputMethodManager.hideSoftInputFromWindow(binding.etContent.getWindowToken(), 0);
        }
    }

    @Override
    protected void onPause() {
        super.onPause();
        dismiss();
    }

    @Override
    public void onBackPressed() {
        super.onBackPressed();
        dismiss();
    }

    @Override
    public void onClick(View v) {
        switch (v.getId()) {
            case R.id.iv_ok://Submit
                showMsg("Submit");
                break;
        }
    }
}
At present, the logic of this page is like this. There are two input boxes, one is the title, the other is the content. When there is input in the input box, a submit button is displayed, and when there is no input or the input box is empty, the submit button is hidden. The other is to display the cursor of the content input box as soon as you enter the current page, and pop up the soft keyboard at the same time.
This page also needs an entry, that is, click the button in the lower right corner of the Notepad page to jump over and click the activity_notebook.xml to modify the onClick event of the floating button.
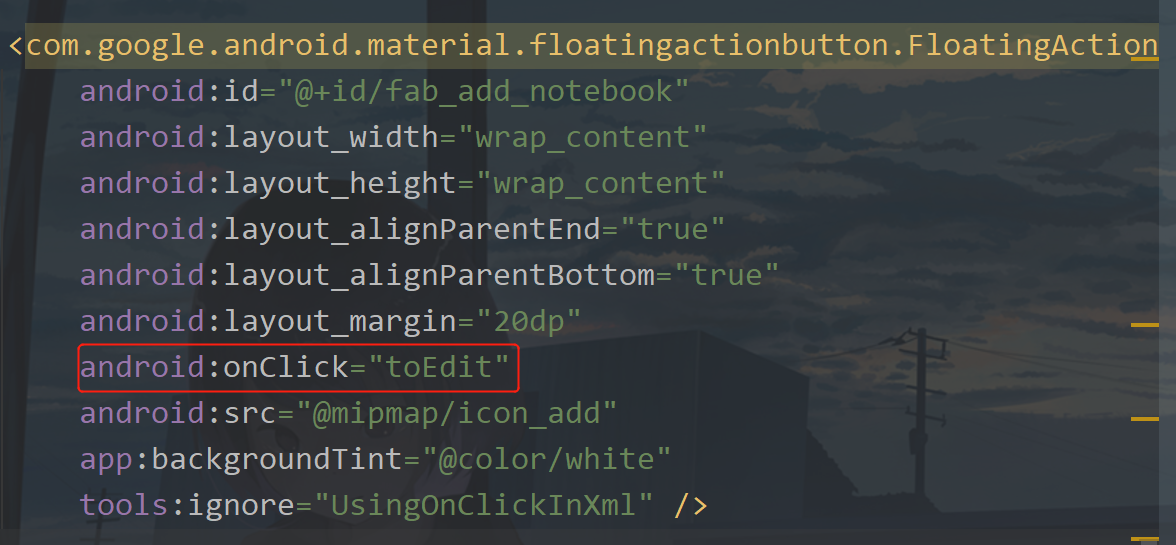
Here is a toEdit, and then add a toEdit method in NotebookActivity
	/**
     * To edit
     */
    public void toEdit(View view) {
        jumpActivity(EditActivity.class);
    }
Of course, our NotebookActivity also needs an entry. In my MVVM, I will add an entry in the sideslip menu. First, add a path icon and an icon under drawable_ notebook. XML, the code is as follows:
<?xml version="1.0" encoding="UTF-8" standalone="no"?>
<vector xmlns:android="http://schemas.android.com/apk/res/android"
    android:width="24dp"
    android:height="24dp"
    android:autoMirrored="true"
    android:tint="#000000"
    android:viewportWidth="24.0"
    android:viewportHeight="24.0">

    <path
        android:fillColor="@android:color/white"
        android:pathData="M14.17,3H5C3.9,3 3,3.9 3,5v14c0,1.1 0.9,2 2,2h14c1.1,0 2,-0.9 2,-2V9.83c0,-0.53 -0.21,-1.04 -0.59,-1.41l-4.83,-4.83C15.21,3.21 14.7,3 14.17,3L14.17,3zM8,15h8c0.55,0 1,0.45 1,1v0c0,0.55 -0.45,1 -1,1H8c-0.55,0 -1,-0.45 -1,-1v0C7,15.45 7.45,15 8,15zM8,11h8c0.55,0 1,0.45 1,1v0c0,0.55 -0.45,1 -1,1H8c-0.55,0 -1,-0.45 -1,-1v0C7,11.45 7.45,11 8,11zM8,7h5c0.55,0 1,0.45 1,1v0c0,0.55 -0.45,1 -1,1H8C7.45,9 7,8.55 7,8v0C7,7.45 7.45,7 8,7z" />

</vector>
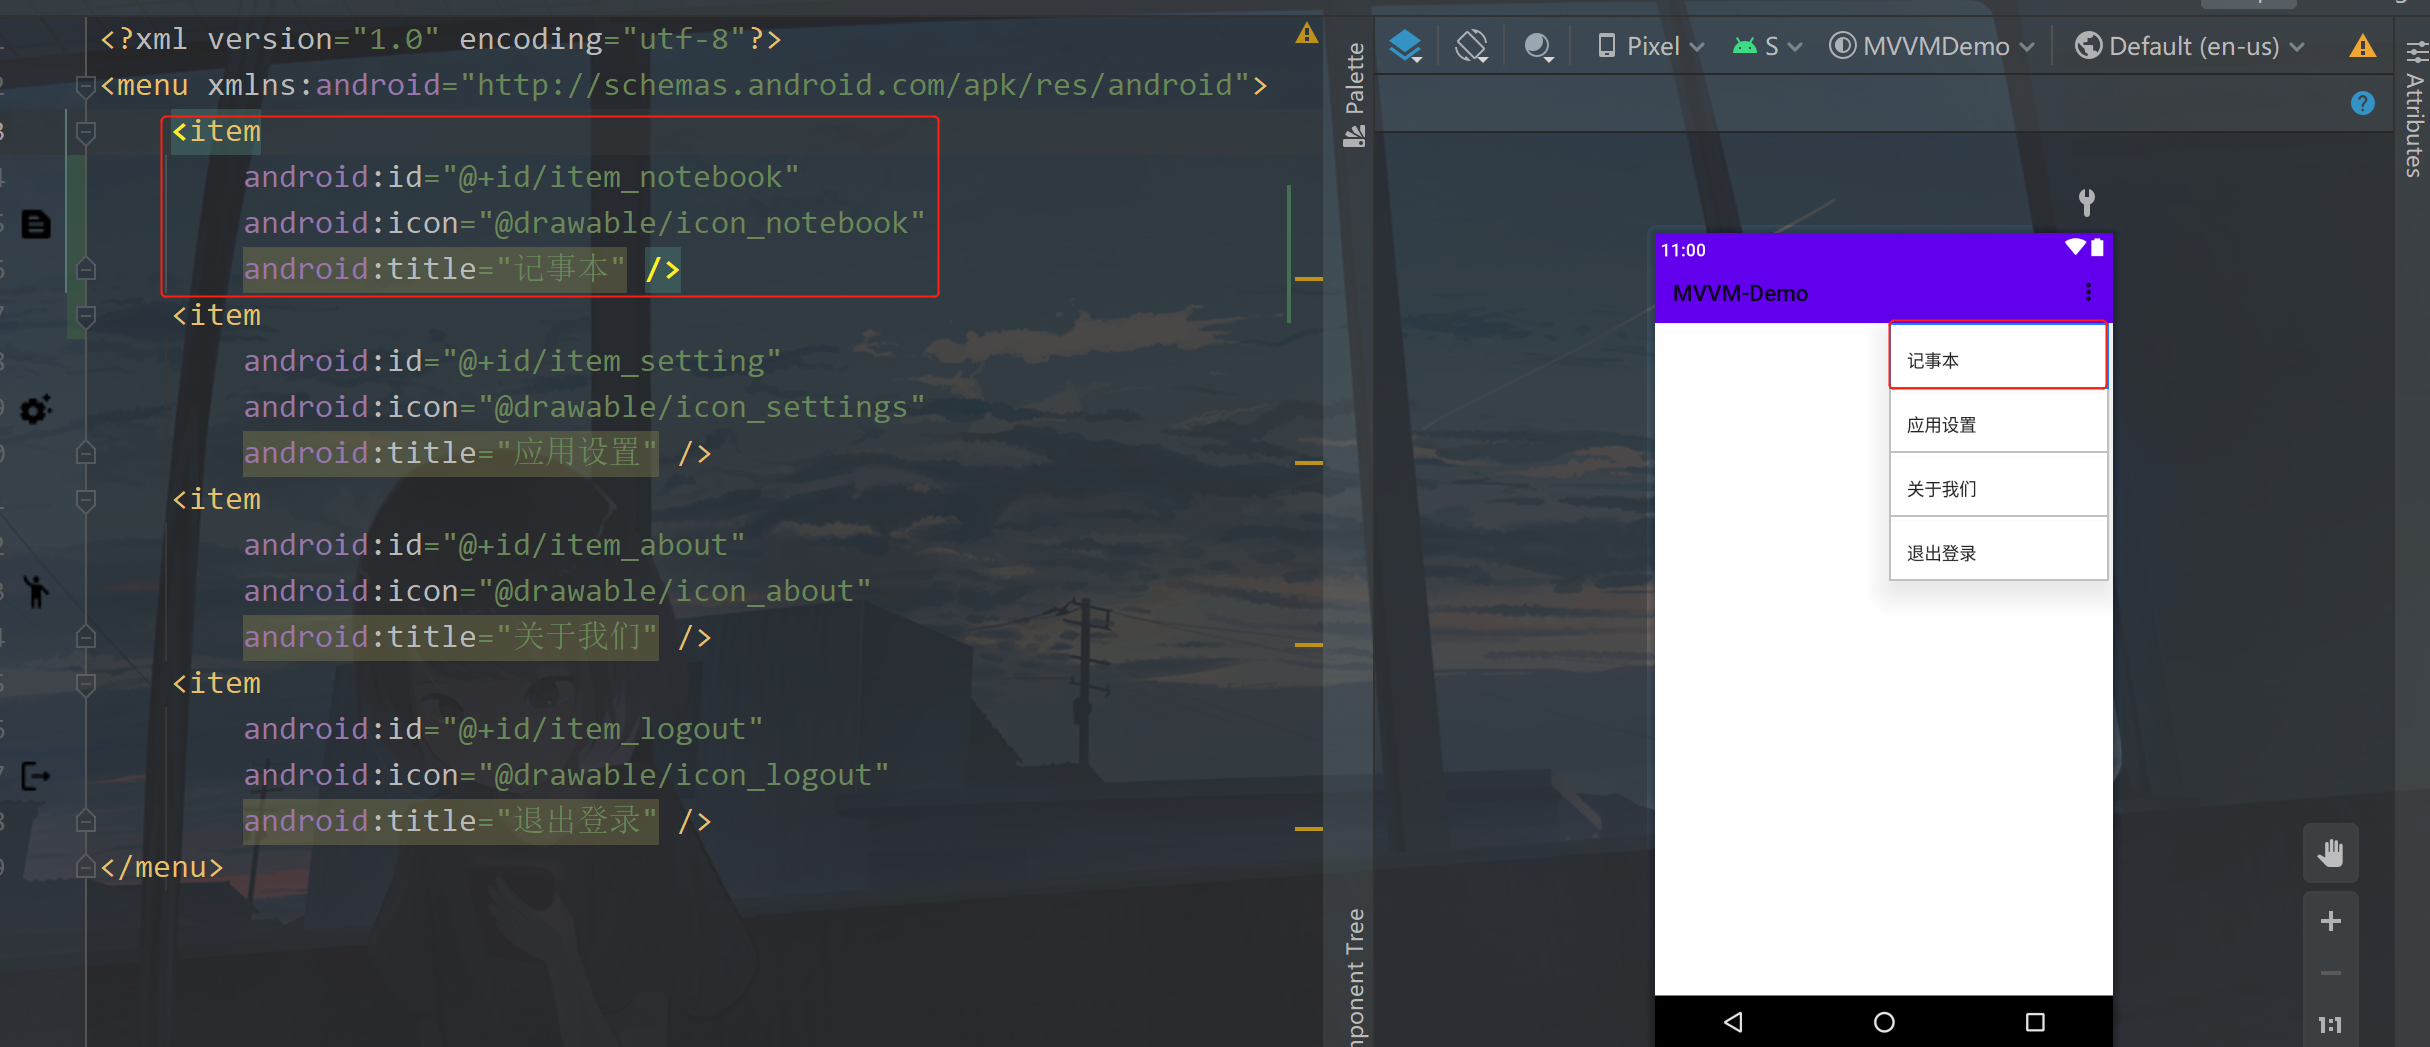
Then in nav_ menu. New code in XML:
	<item
        android:id="@+id/item_notebook"
        android:icon="@drawable/icon_notebook"
        android:title="Notepad" />
Add location as shown in the figure below:
Finally, modify the menu click code in HomeActivity, as shown in the following figure:
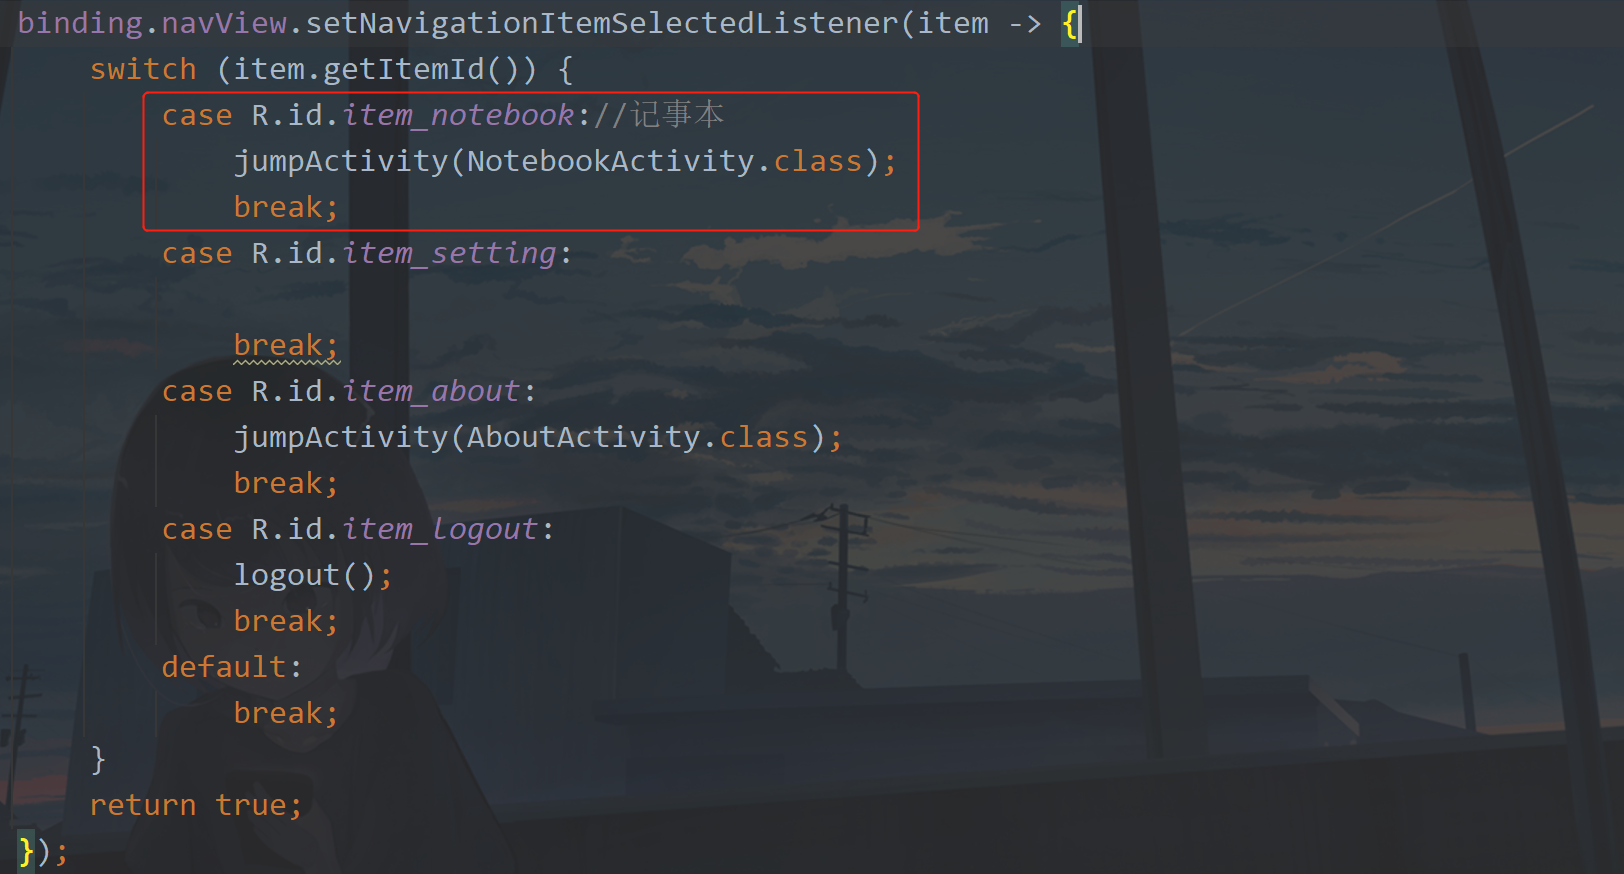
Let's run:

After the editing page is written, you need to write specific functions, which requires a note table in the database.
3, Add note sheet
① Bean
first, add a Notebook class under the bean package. The code is as follows:
@Entity(tableName = "notebook")
public class Notebook {

    @PrimaryKey(autoGenerate = true)
    private int uid;
    private String title;
    private String content;

    public int getUid() {
        return uid;
    }

    public void setUid(int uid) {
        this.uid = uid;
    }

    public String getTitle() {
        return title;
    }

    public void setTitle(String title) {
        this.title = title;
    }

    public String getContent() {
        return content;
    }

    public void setContent(String content) {
        this.content = content;
    }

    @Ignore
    public Notebook(String title, String content) {
        this.title = title;
        this.content = content;
    }

    public Notebook() {}
}
In the current table, I only set two main fields, title and content, and uid increases automatically.
② Dao
The following is the operation interface class of the data table. Create a new NotebookDao interface under the dao package. The code is as follows:
@Dao
public interface NotebookDao {

    @Query("SELECT * FROM notebook")
    Flowable<List<Notebook>> getAll();

    @Update
    Completable update(Notebook notebook);

    @Insert(onConflict = OnConflictStrategy.REPLACE)
    Completable insert(Notebook notebook);

    @Delete
    Completable delete(Notebook notebook);

}
Here is the addition, deletion, modification and check. I believe you are already familiar with it, if you read it all the way from the previous article.
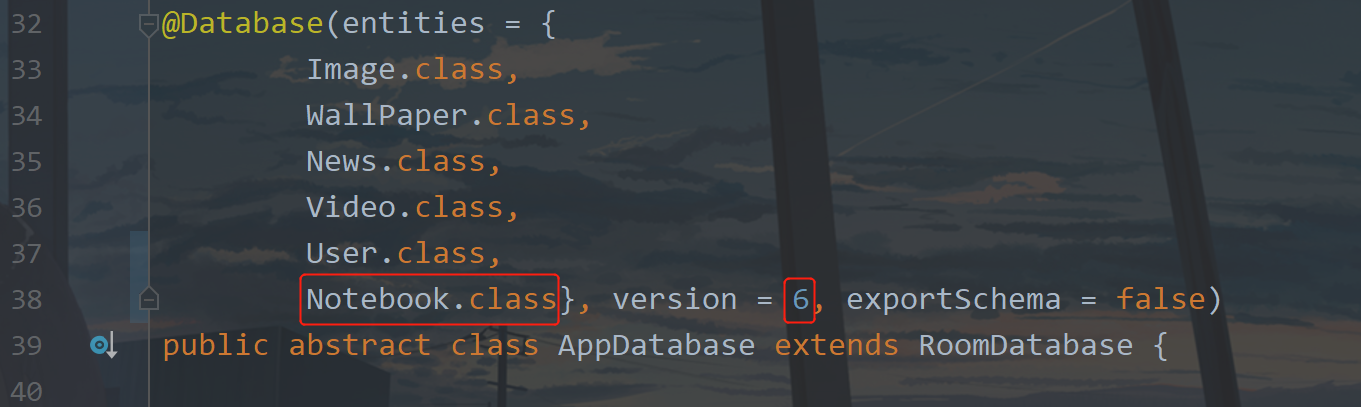
③ Database upgrade and migration
To open AppDatabase, first add tables and version upgrades, as shown in the following figure:
Next, add the implementation of Dao just now and finish it with one line of code, as shown in the figure below:
public abstract NotebookDao notebookDao();
The next step is database upgrade and migration. The code is as follows:
	/**
     * Upgrade the version and migrate to 6. Add a note table in the database
     */
    static final Migration MIGRATION_5_6 = new Migration(5, 6) {
        @Override
        public void migrate(@NonNull @NotNull SupportSQLiteDatabase database) {
            //Create note sheet
            database.execSQL("CREATE TABLE `notebook` " +
                    "(uid INTEGER NOT NULL, " +
                    "title TEXT, " +
                    "content TEXT, " +
                    "PRIMARY KEY(`uid`))");
        }
    };
Finally, add migration, as shown in the figure below:
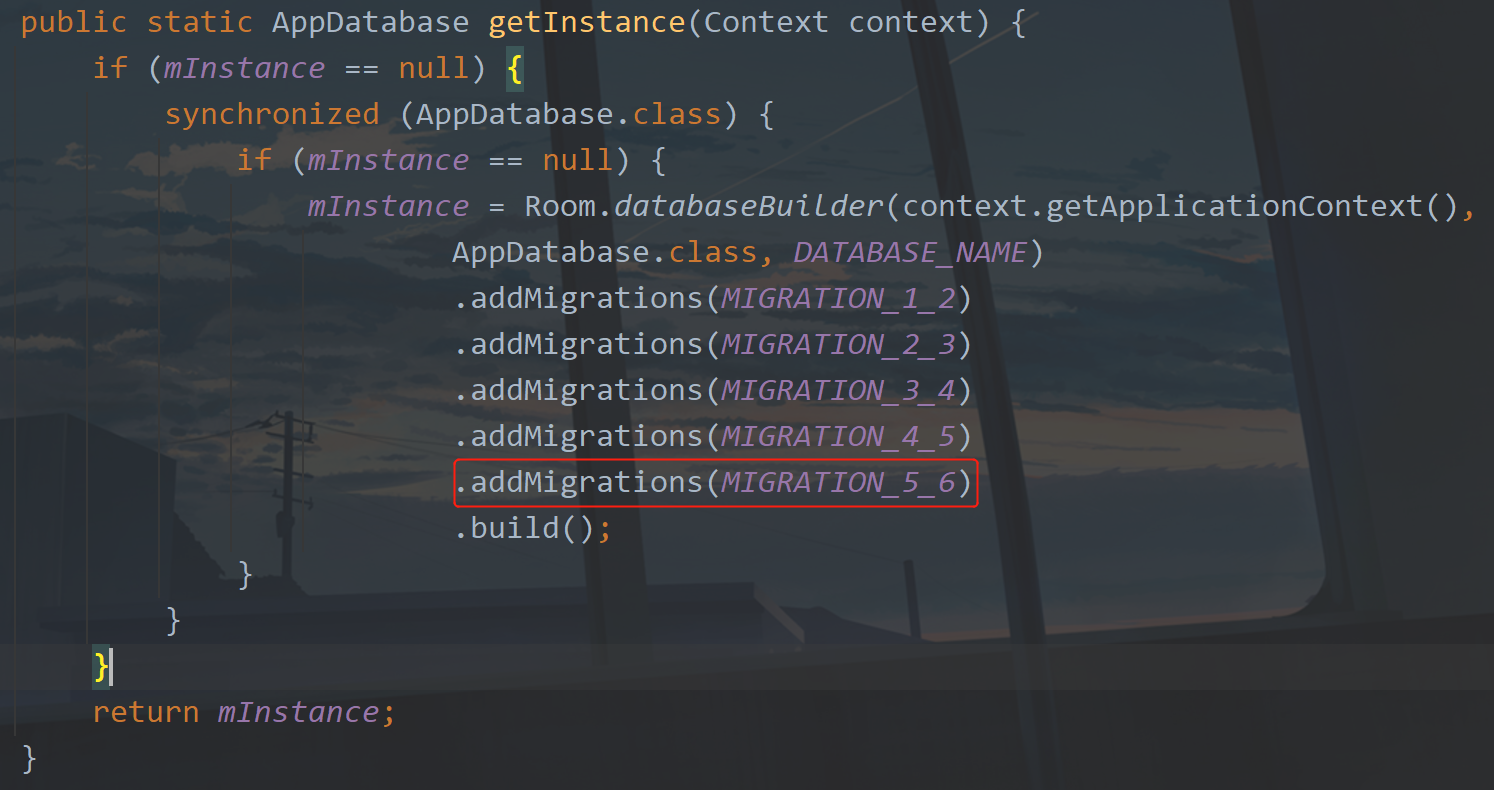
The database is done. Here is the repository.
④ New repository class
Create a new NotebookRepository class under the repository package. The code inside is as follows:
public class NotebookRepository {

    private static final String TAG = NotebookRepository.class.getSimpleName();

    @Inject
    NotebookRepository() {}

    private final MutableLiveData<Notebook> notebookLiveData = new MutableLiveData<>();

    private final MutableLiveData<List<Notebook>> notebooksMutableLiveData = new MutableLiveData<>();

    public final MutableLiveData<String> failed = new MutableLiveData<>();

	public final List<Notebook> emptyList = new ArrayList<>();


    /**
     * Add notes
     */
    public void saveNotebook(Notebook notebook) {
        //Save to database
        Completable insert = BaseApplication.getDb().notebookDao().insert(notebook);
        //RxJava handles Room data storage
        CustomDisposable.addDisposable(insert, () -> Log.d(TAG, "saveNotebook: Note data saved successfully"));
    }

    /**
     * Get all notes
     */
    public MutableLiveData<List<Notebook>> getNotebooks() {
        Flowable<List<Notebook>> listFlowable = BaseApplication.getDb().notebookDao().getAll();
        CustomDisposable.addDisposable(listFlowable, notebooks -> {
            if (notebooks.size() > 0) {
                notebooksMutableLiveData.postValue(notebooks);
            } else {
                notebooksMutableLiveData.postValue(emptyList);
                failed.postValue("No data");
            }
        });
        return notebooksMutableLiveData;
    }
}
There are now two methods stored here, one for query and one for addition. Then create a new ViewModel to operate the repository.
⑤ Add ViewModel
There are actually two viewmodels here, one corresponding to EditActivity and the other corresponding to NotebookActivity. First, create an EditViewModel class under the viewmodels package. The code is as follows:
public class EditViewModel extends BaseViewModel {

    private final NotebookRepository notebookRepository;

    @ViewModelInject
    EditViewModel(NotebookRepository notebookRepository){
        this.notebookRepository = notebookRepository;
    }

    /**
     * Add notes
     */
    public void addNotebook(Notebook notebook) {
    	failed = notebookRepository.failed;
        notebookRepository.saveNotebook(notebook);
    }

}
Then create the NotebookViewModel class under the viewmodels package as follows:
public class NotebookViewModel extends BaseViewModel {

    private final NotebookRepository notebookRepository;

    public LiveData<List<Notebook>> notebooks;

    @ViewModelInject
    NotebookViewModel(NotebookRepository notebookRepository){
        this.notebookRepository = notebookRepository;
    }

    public void getNotebooks() {
        failed = notebookRepository.failed;
        notebooks = notebookRepository.getNotebooks();
    }
}
⑥ Add notes
First, you need to bind EditViewModel with EditActivity, as shown in the following figure:
Then, when you click the button in the upper right corner, save the notes and modify the code in EditActivity, as shown in the following figure:

Here, after I save the data, I close the current page and return to the previous NotebookActivity. Then I need to search the table of the current database on this page and load it through the list.
4, Show Note List
since it is a list, you naturally need to have a layout of items, and create a new item under layout_ notebook. XML, the code inside is as follows:
<?xml version="1.0" encoding="utf-8"?>
<layout xmlns:android="http://schemas.android.com/apk/res/android">
<data>
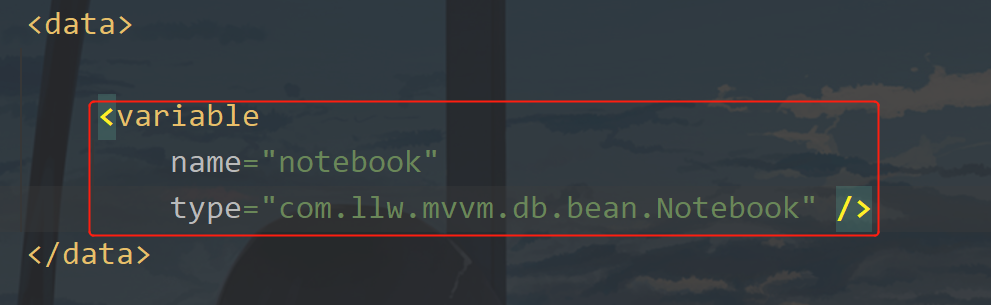
<variable
name="notebook"
type="com.llw.mvvm.db.bean.Notebook" />
<!--Click event-->
<variable
name="onClick"
type="com.llw.mvvm.ui.adapter.NotebookAdapter.ClickBinding" />
</data>
<RelativeLayout
android:id="@+id/detail"
android:foreground="?attr/selectableItemBackground"
android:layout_width="match_parent"
android:layout_height="wrap_content"
android:layout_marginBottom="8dp"
android:background="@drawable/shape_bg_white_radius_12"
android:onClick="@{() -> onClick.itemClick(notebook,detail)}"
android:padding="12dp">
<TextView
android:id="@+id/tv_title"
android:layout_width="wrap_content"
android:layout_height="wrap_content"
android:ellipsize="end"
android:singleLine="true"
android:text="@{notebook.title}"
android:textColor="@color/black"
android:textSize="16sp" />
<TextView
android:id="@+id/tv_content"
android:layout_width="wrap_content"
android:layout_height="wrap_content"
android:layout_below="@+id/tv_title"
android:layout_marginTop="4dp"
android:ellipsize="end"
android:maxLines="3"
android:text="@{notebook.content}"
android:textSize="14sp" />
</RelativeLayout>
</layout>
The layout is very simple, which is to display the title and content, assign values in the way of databinding, create an adapter, and create a NotebookAdapter class under the adapter package. The code is as follows:
public class NotebookAdapter extends BaseQuickAdapter<Notebook, BaseDataBindingHolder<ItemNotebookBinding>> {
public NotebookAdapter(@Nullable List<Notebook> data) {
super(R.layout.item_notebook, data);
}
@Override
protected void convert(@NotNull BaseDataBindingHolder<ItemNotebookBinding> bindingHolder, Notebook notebook) {
ItemNotebookBinding binding = bindingHolder.getDataBinding();
if (binding != null) {
binding.setNotebook(notebook);
binding.setOnClick(new NotebookAdapter.ClickBinding());
binding.executePendingBindings();
}
}
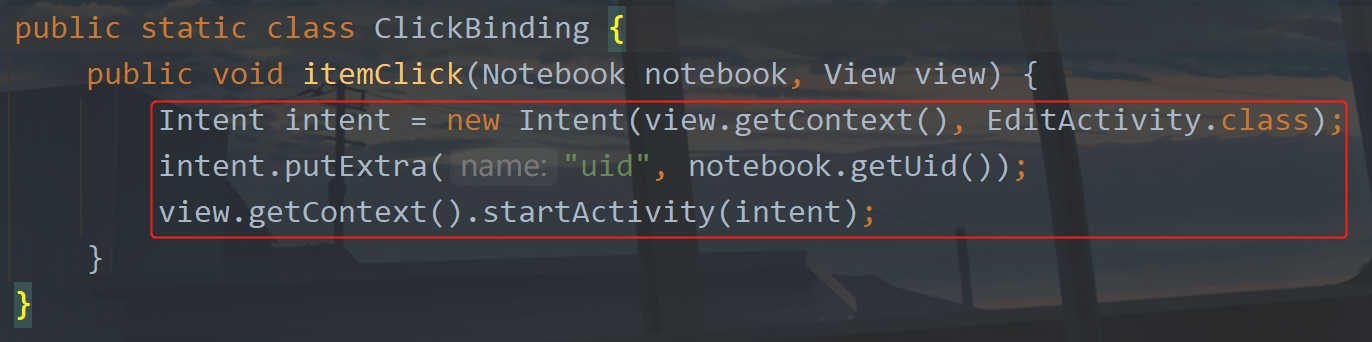
public static class ClickBinding {
public void itemClick(Notebook notebook, View view) {
}
}
}
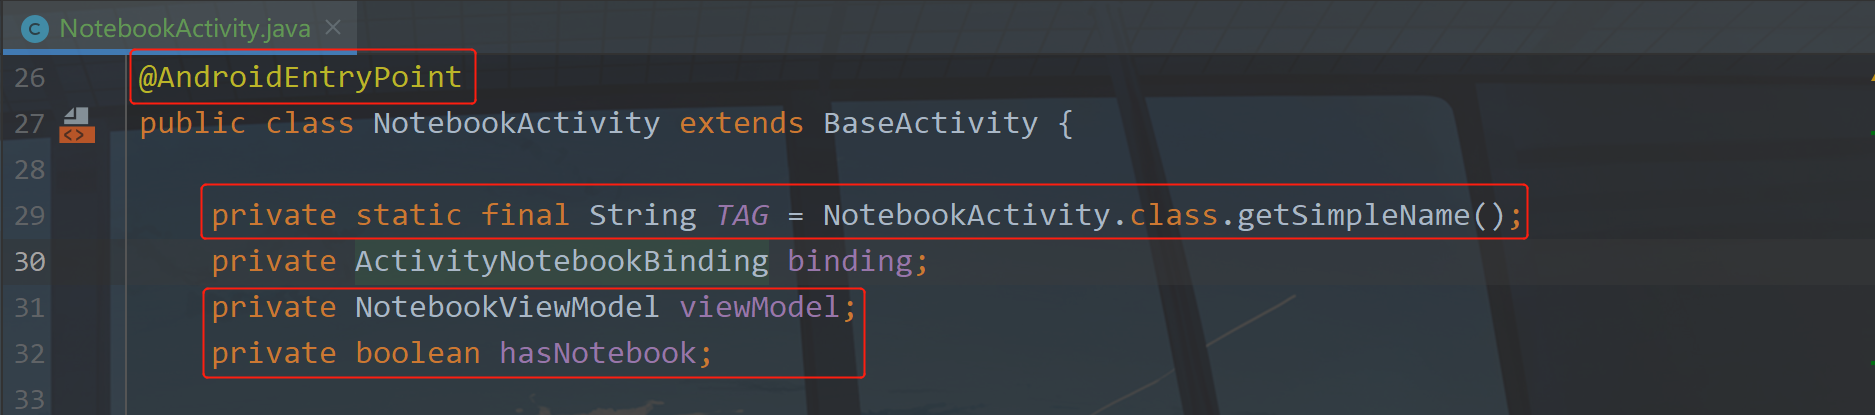
This code is also very simple, that is, binding data binding layout. The following is the list. It is also very simple. Go back to NotebookActivity, add three variables and add an annotation, as shown in the following figure:
Modify the code, as shown in the figure below:
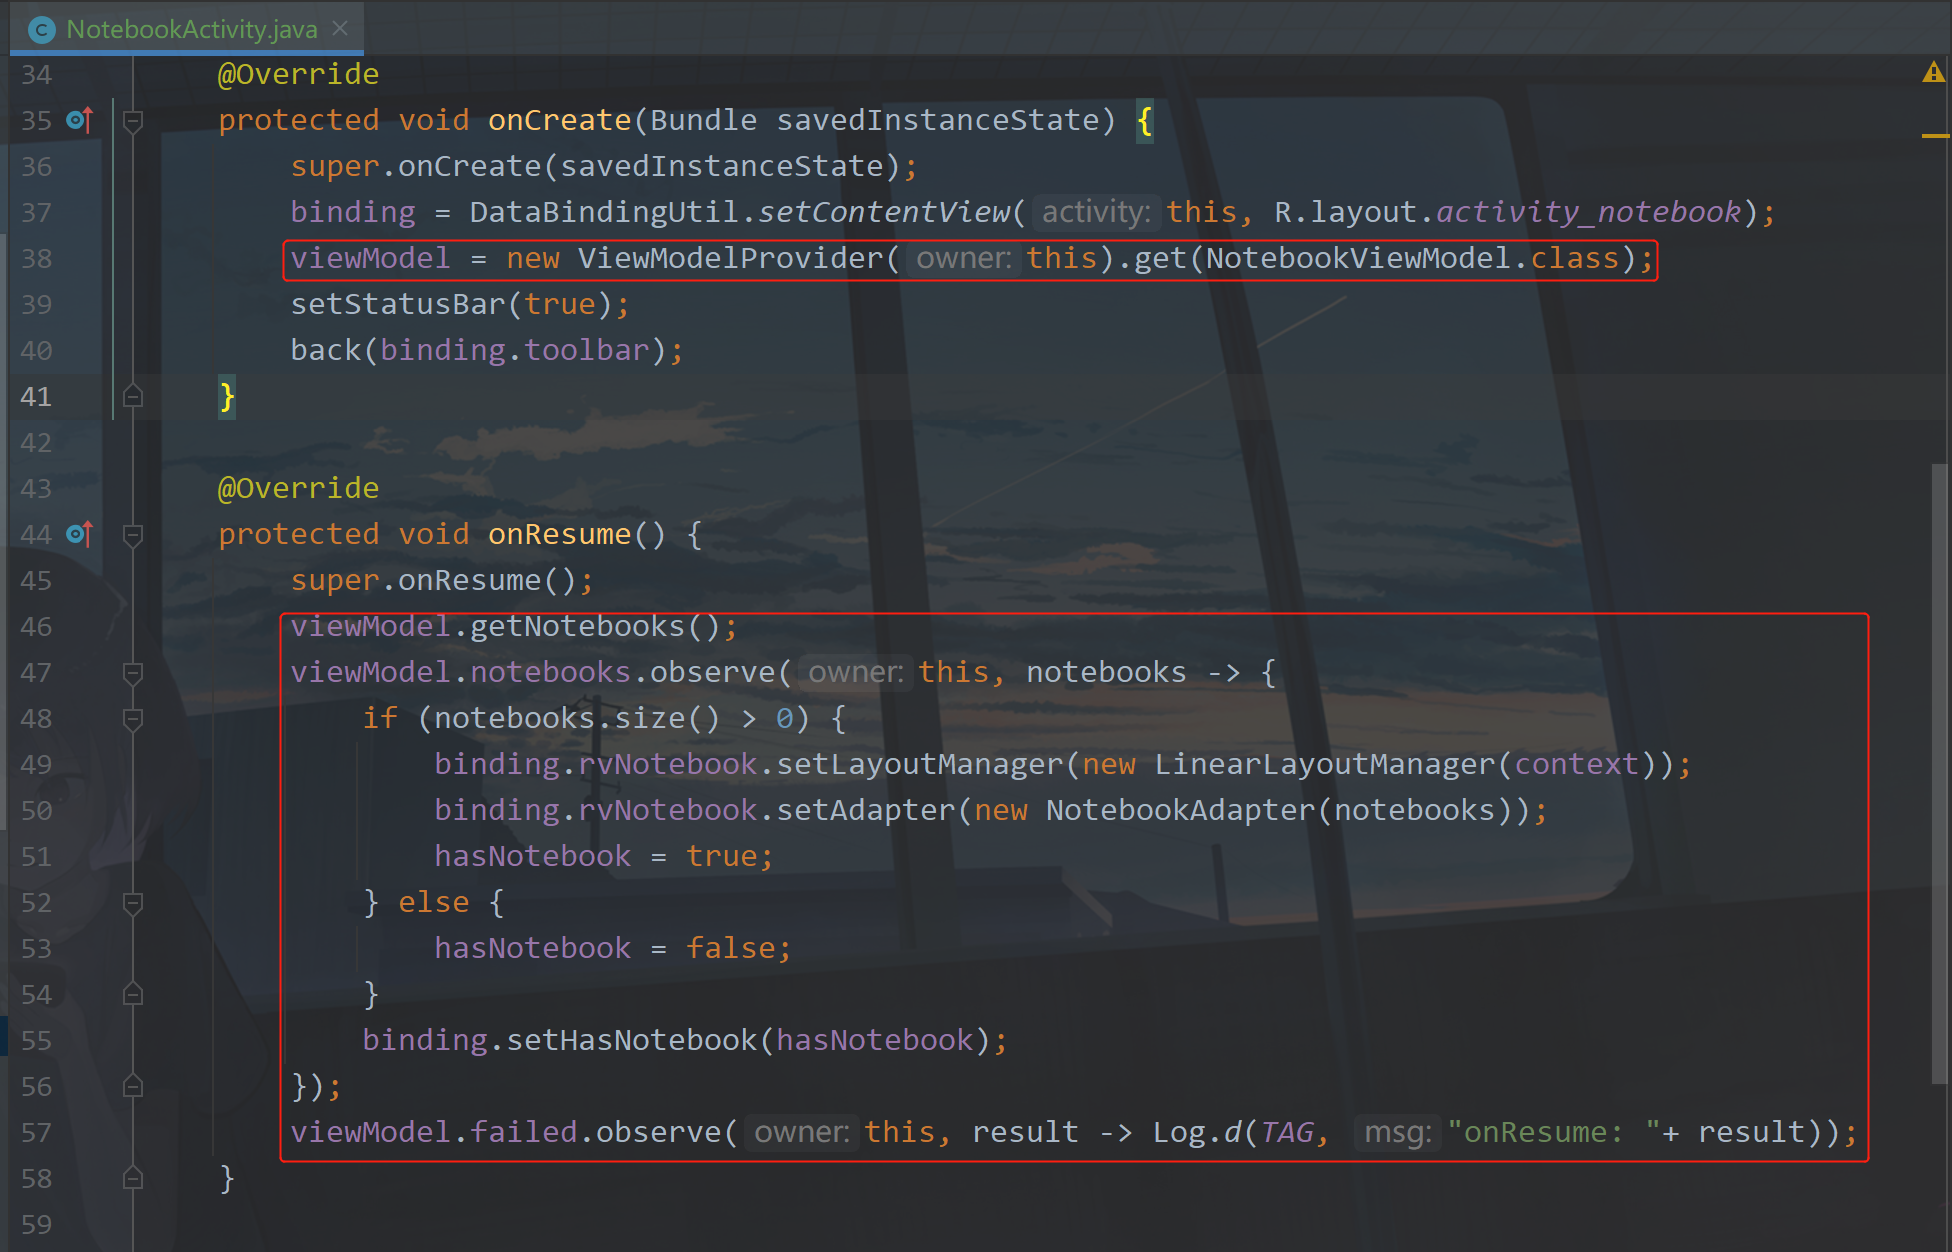
First, bind the ViewModel, and then query the data in the database in the onResume life cycle. After modifying the data on the editing page, it will be destroyed, and then the NotebookActivity will be displayed, which will trigger onResume and query the data again. Then monitor the data, load the list if there is data, and display the empty content layout if there is no data. Let's run it and see how it works.
It's still OK. The next thing to do is to modify the notes.
5, Modify notes
the premise of modifying notes is to query the notes to be modified, query through id, and then complete the modification. It's very simple to say. Of course, it's also very simple to implement. Let's implement it. The first is the click event of the list item. After clicking, the uid is passed to EditActivity to get the Notebook through uid.
Add the following code in NotebookAdapater:
Because there is no method to query notes through id in our NotebookDao, we add a new one in NotebookDao. The code is as follows:
	@Query("SELECT * FROM notebook WHERE uid=:uid")
    Flowable<Notebook> findById(int uid);
Then go to the NotebookRepository to implement the method. Here we need to implement two methods, one for id query and the other for modification. Add the following code in the NotebookRepository:
	/**
     * Get notes by id
     * @param uid id
     */
    public MutableLiveData<Notebook> getNotebookById(int uid) {
        Flowable<Notebook> flowable = BaseApplication.getDb().notebookDao().findById(uid);
        CustomDisposable.addDisposable(flowable, notebook -> {
           if (notebook != null) {
               notebookLiveData.postValue(notebook);
           } else {
               failed.postValue("No notes found");
           }
        });
        return notebookLiveData;
    }

    /**
     * Update notes
     *
     * @param notebook
     */
    public void updateNotebook(Notebook notebook) {
        Completable update = BaseApplication.getDb().notebookDao().update(notebook);
        CustomDisposable.addDisposable(update, () -> {
            Log.d(TAG, "updateNotebook: " + "Update successful");
            failed.postValue("200");
        });
    }
After the method of the repository is written, the following is called in EditViewModel. Enter EditViewModel and add the following code:
	public LiveData<Notebook> notebook;

	/**
     * Search notes by Id
     */
    public void queryById(int uid) {
        failed = notebookRepository.failed;
        notebook = notebookRepository.getNotebookById(uid);
    }

    /**
     * Update notes
     */
    public void updateNotebook(Notebook notebook) {
        failed = notebookRepository.failed;
        notebookRepository.updateNotebook(notebook);
    }
There's nothing to say about this code. I've seen many similar ones, and finally in EditActivity.
Enter EditActivity and add two variables:
	private int uid;
    private Notebook mNotebook;
First of all, we need to deal with the uid problem, because we click the new notes and notes to enter this page, so we need to deal with it according to the situation.

Here, I removed the showInput, according to the current business logic, it should not be invoked in onCreate. In the initView method, let's see how to modify it.
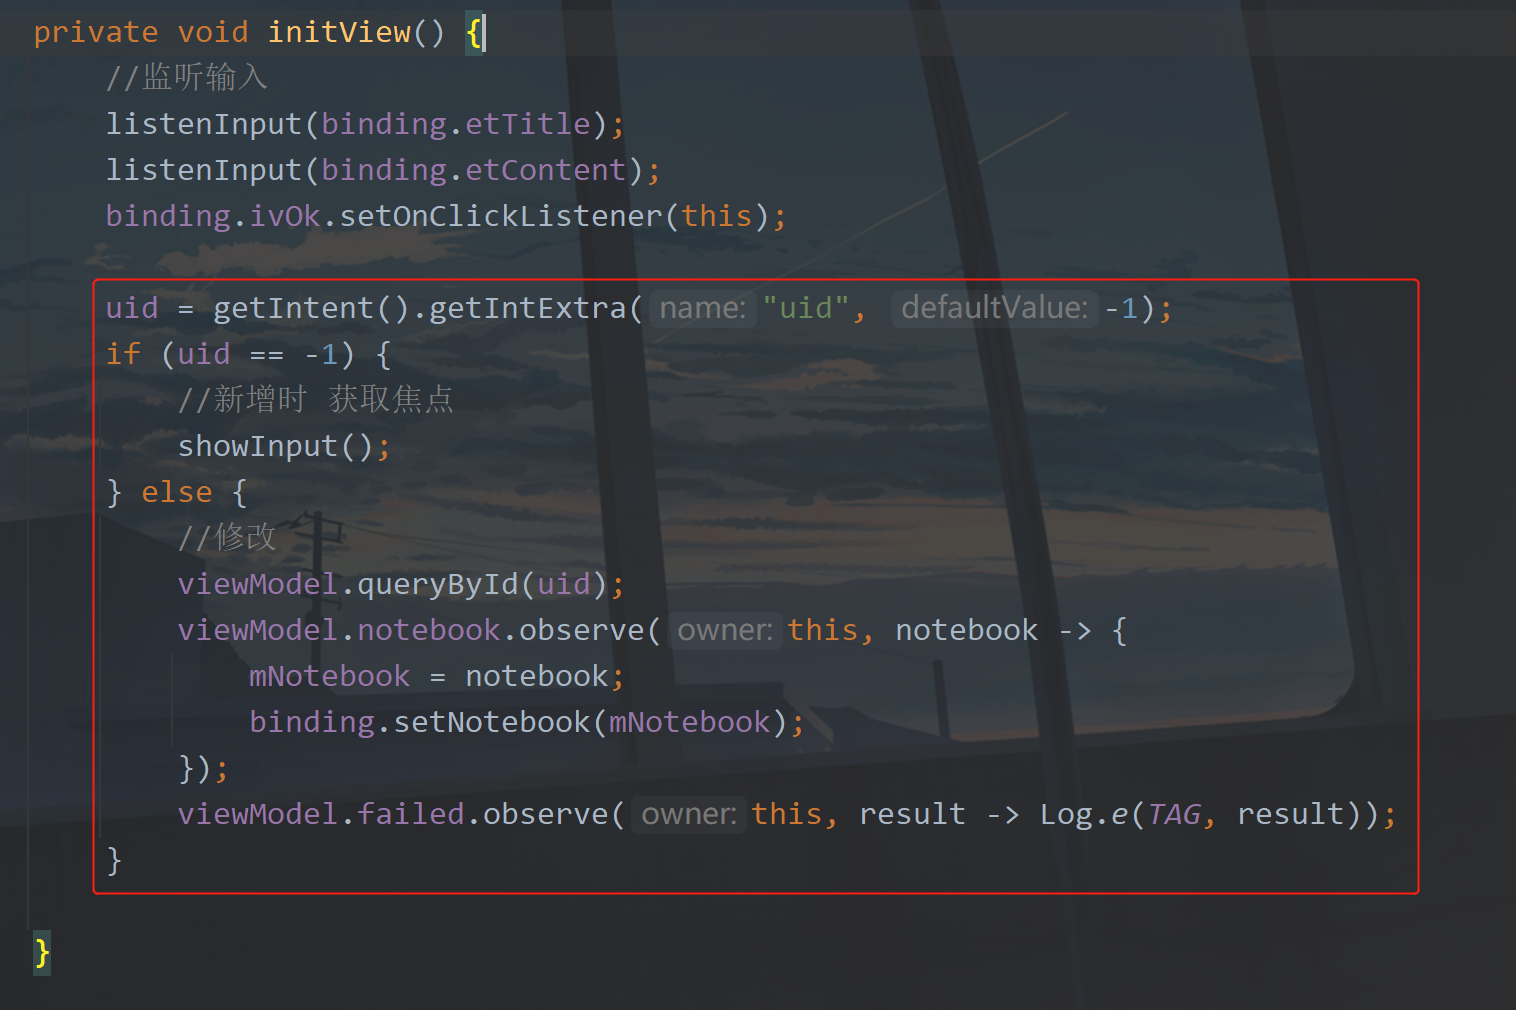
As shown in the figure, the uid is obtained here. If it is - 1, it means it is new, otherwise it is updated. If it is an update, query the id and observe the change of the returned data.
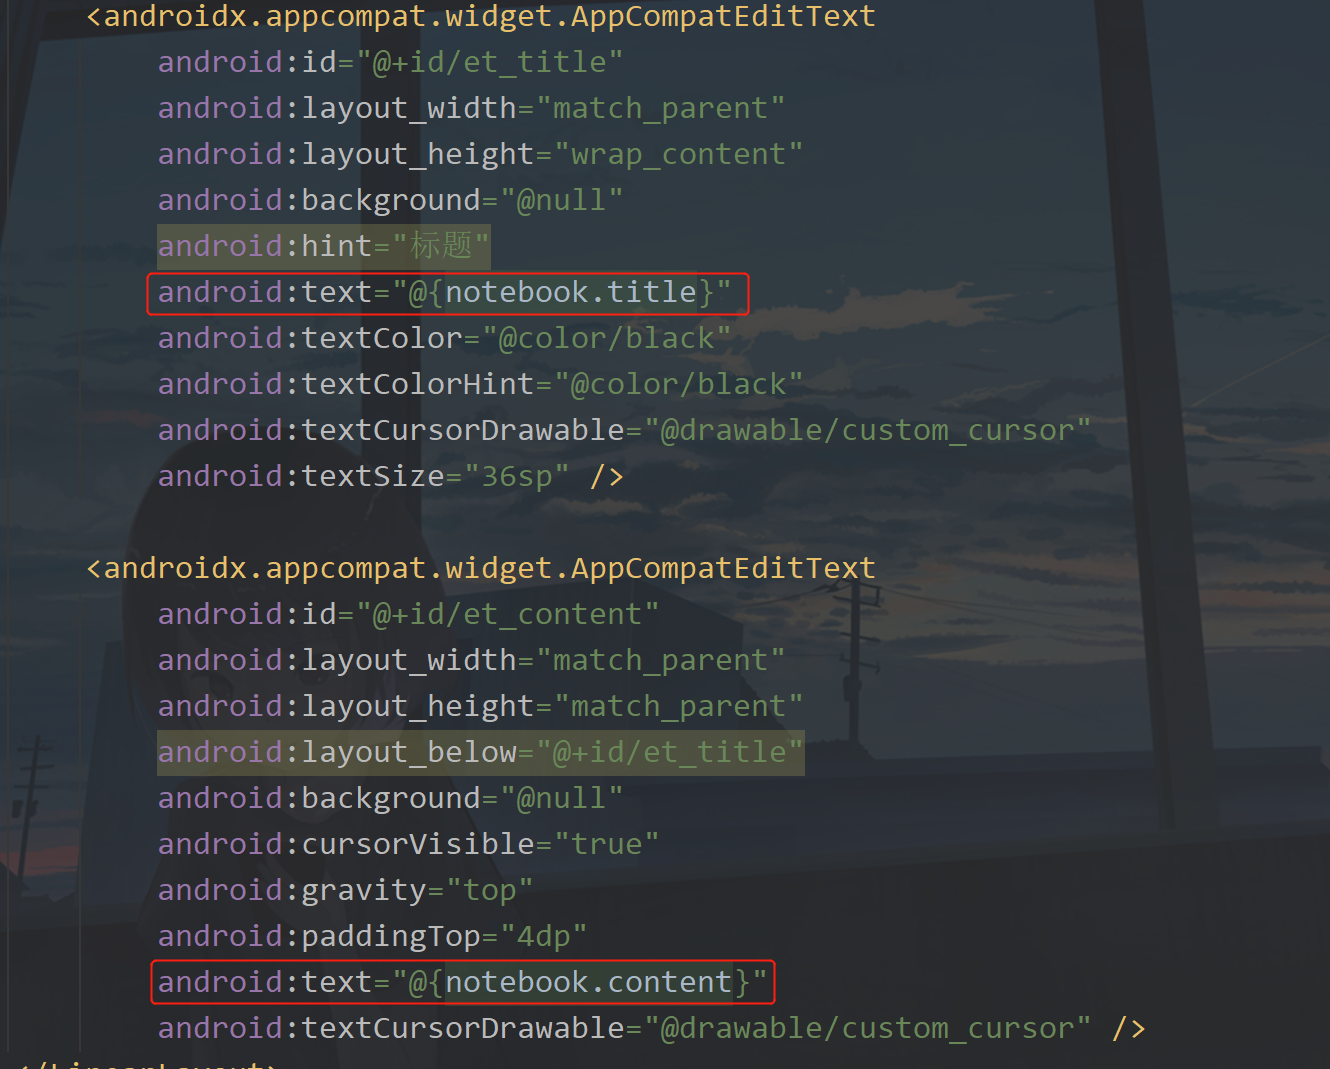
Binding here setNotebook(mNotebook); The control is directly assigned through one-way binding, so you need to modify the activity here_ edit. Code in XML:
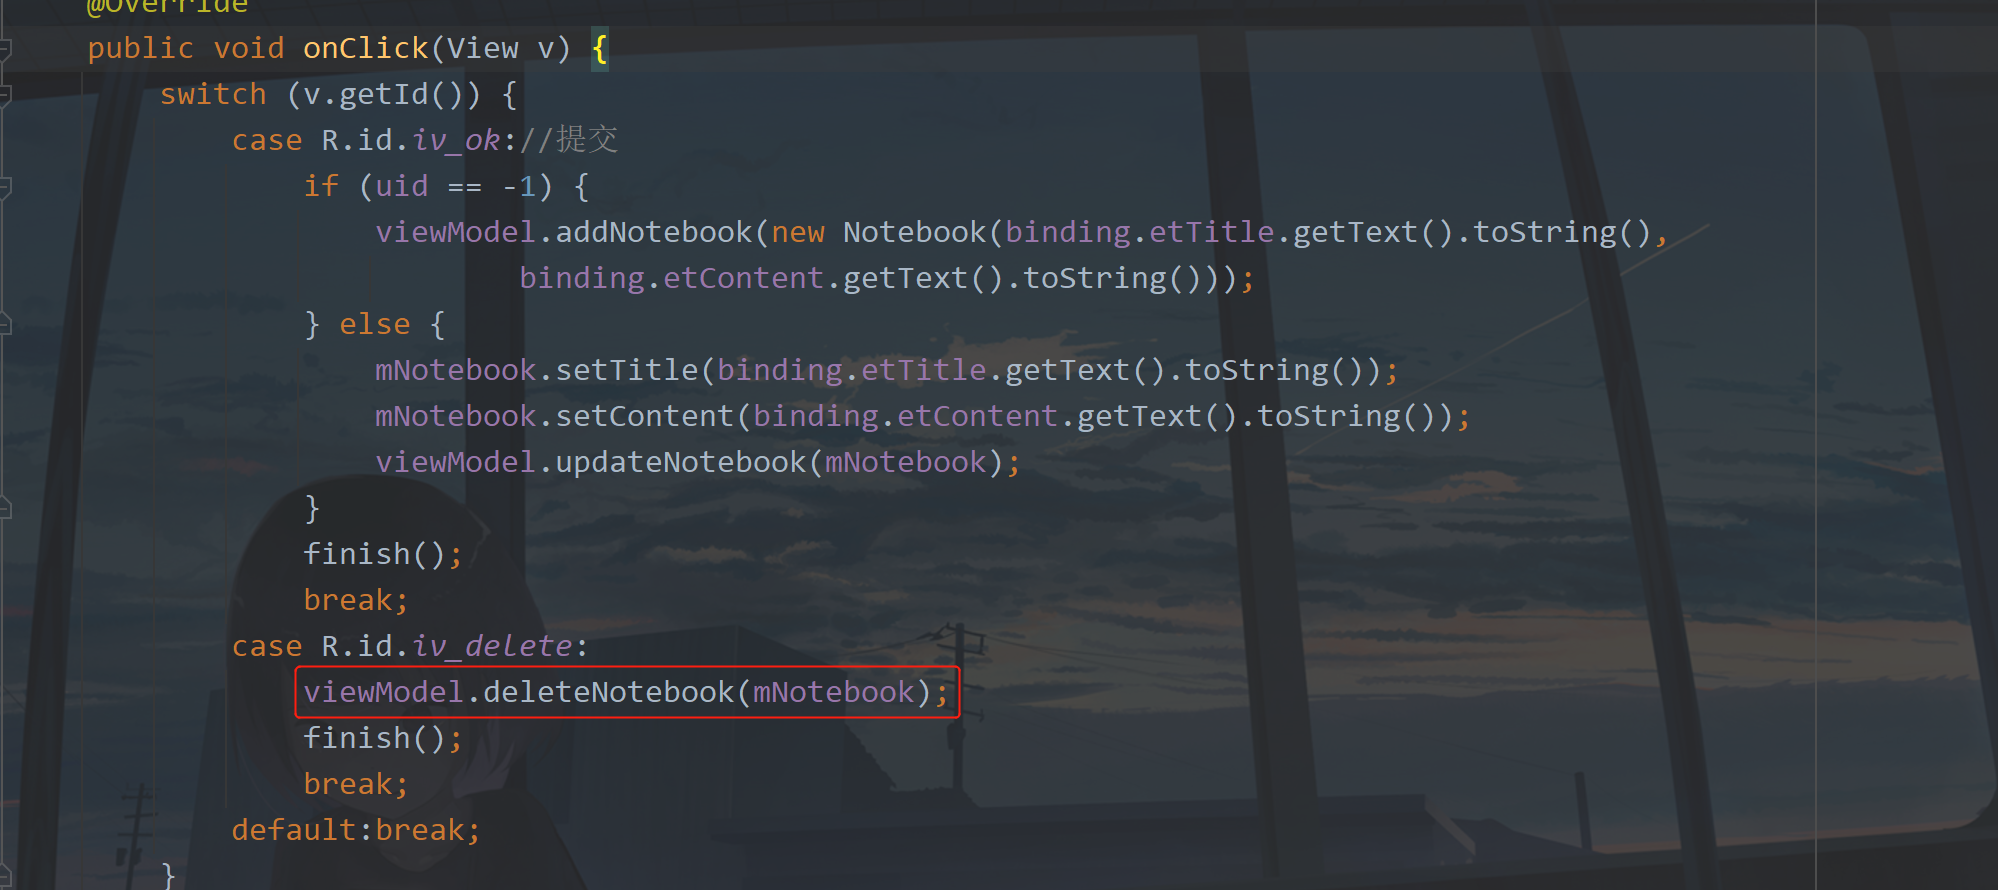
Finally, let's modify the business logic of the OK button, as shown in the following figure:
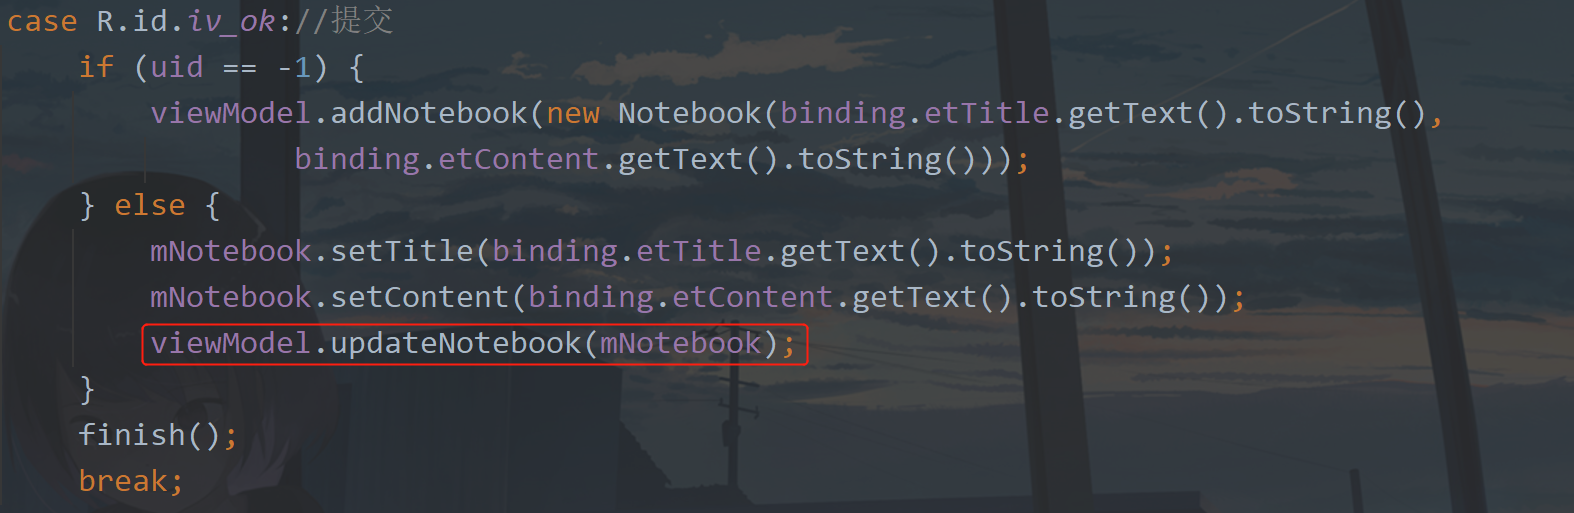
I won't say more about what this - 1 is used for. After modifying the data here, the current page will still be closed. Our code is finished. Let's run it.
The modification is completed, and the following is the deletion.
6, Delete notes
the deletion method has been written before, so there is no need to change it in Dao. Just add the deletion method in NotebookRepository. The code is as follows:
	/**
     * Delete notes
     */
    public void deleteNotebook(Notebook notebook) {
        Completable delete = BaseApplication.getDb().notebookDao().delete(notebook);
        CustomDisposable.addDisposable(delete, () -> {
            Log.d(TAG, "deleteNotebook: " + "Deleted successfully");
            failed.postValue("200");
        });
    }
Then it is called in EditViewModel, and the new code in EditViewModel is as follows:
	/**
     * Delete notes
     */
    public void deleteNotebook(Notebook notebook) {
        notebookRepository.deleteNotebook(notebook);
        failed = notebookRepository.failed;
    }
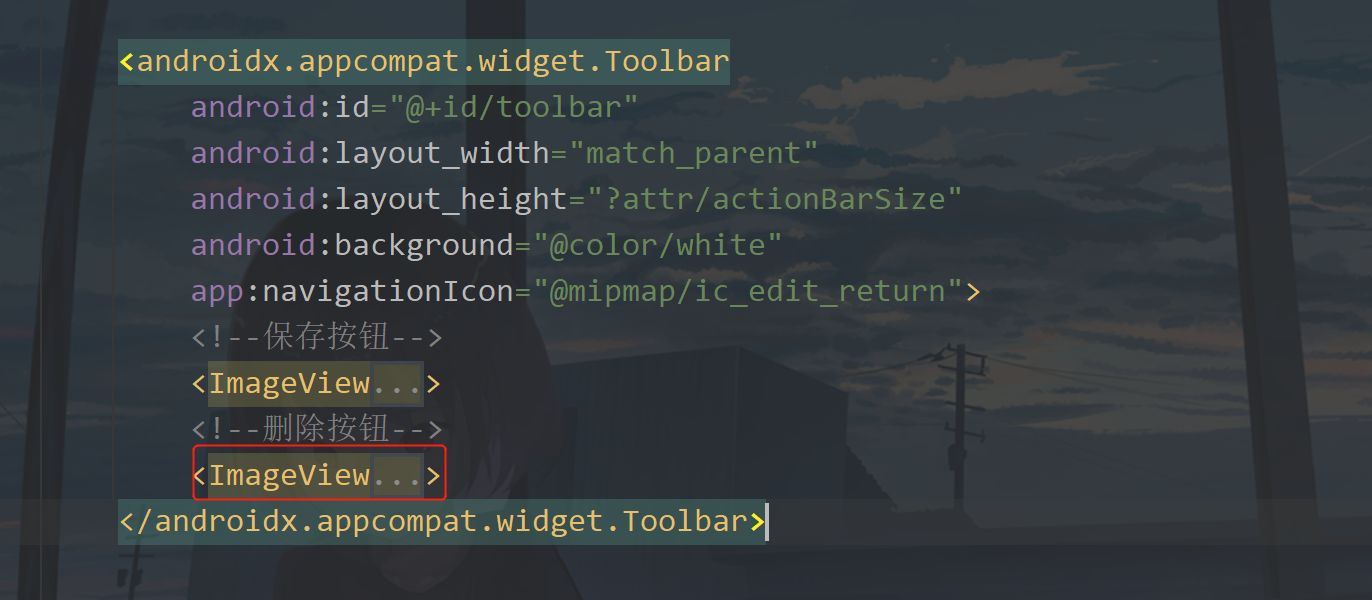
The following is to call the deleteNotebook method in EditViewModel in EditActivity, add a button in the title and modify the activity_edit.xml, the code is as follows:
			<!--Delete button-->
            <ImageView
                android:id="@+id/iv_delete"
                android:layout_width="36dp"
                android:layout_height="36dp"
                android:layout_gravity="end"
                android:layout_marginEnd="16dp"
                android:foreground="?attr/selectableItemBackground"
                android:padding="2dp"
                android:src="@mipmap/ic_delete"
                android:visibility="gone" />
Note where to add:
Then modify the code in EditActivity, which is mainly to listen to the registration button, and then call the delete method.
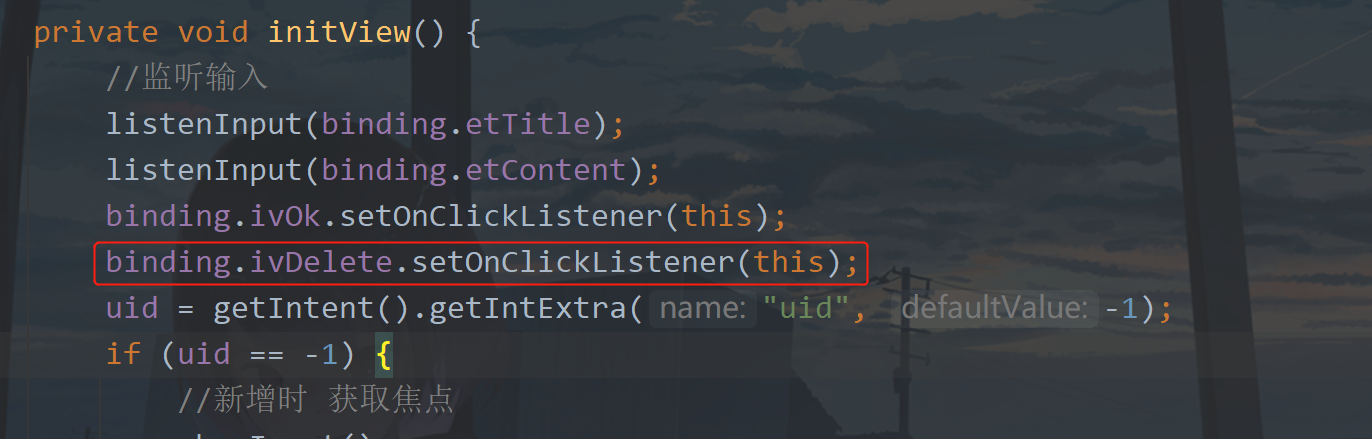
Delete notes
Run the following:
OK, that's all for this article. The next article may optimize the function of Notepad, mainly in terms of user experience. After nearly a month, it still takes a lot of time to write the article. I feel like I haven't seen you for a long time. Today is Friday. Have a nice weekend.
7, Source code
If it helps you, you can Fork or Star
GitHub: MVVM-Demo
CSDN: MVVMDemo_11.rar
8, Have fun