0. Preface
If we only study theory, do not practice, do not step on the pit, it is generally difficult to find real problems in practical projects, but also more difficult to deepen the understanding of technology. So continue the actual battle of JNI Android NDK Development: JNI Practical Chapter This article is mainly about the practice of some small NDK projects. Because demo is introduced on these projects online, there will be no detailed step-by-step instructions on how to operate. It only records some points or main steps that individuals need to pay attention to. Detailed introduction or code can be viewed by clicking on the links inside.
1. Encryption and Decryption of Files and Separation and Merge
1.1 INTRODUCTION
All files are stored in binary, whether text, pictures or video files are stored in binary on disk. So we can encrypt and decrypt files by binary operation. The following is a relatively simple ^ XOR operation to encrypt and decrypt files (a symmetric encryption algorithm)
Attachment: Encryption and decryption algorithm expansion: Encryption and Decryption Algorithms, Block Chain Technical Guidelines
Generally, when large files are transmitted, such as audio and video files, the files will be divided and then transmitted, thus improving efficiency. When needed, the split files can be merged.
The file encryption and decryption is designed to be secure, and NDK can be used to increase the difficulty of decompilation. In addition, the segmentation and merging of files are performance-intensive, and can be put into NDK processing to improve efficiency.
The following exercises are for reference: NDK Development Foundation II. File Encryption, Decryption, Segmentation and Merge - Brief Book
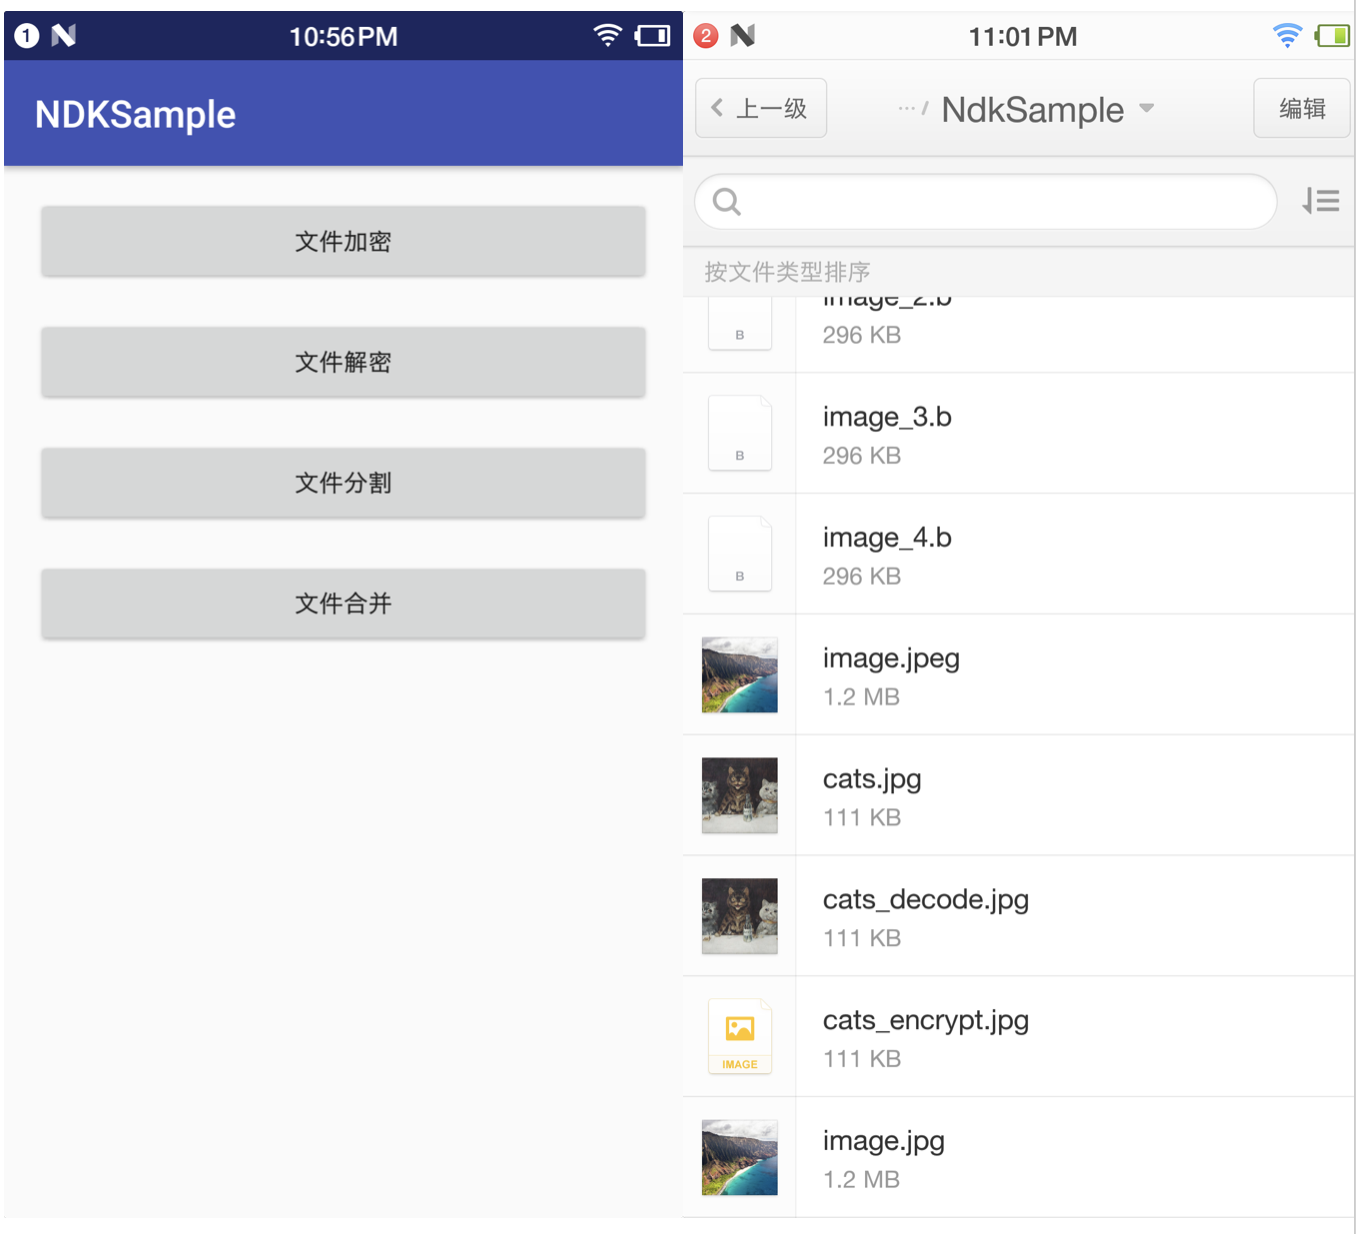
As shown in the image, two assets'images cats.jpg and image.jpg will be copied into the local sdcard/NdkSample directory for testing. The encrypted image cats_encypt.jpg cannot be viewed directly. The composite image is image.jpeg.
1.2 File Encryption and Decryption
Java code
public class FileUtils {
    private static final String FILE_PATH_PREFIX = Environment.getExternalStorageDirectory() + File.separator;
    private static final String FOLDER_NAME = "NdkSample" + File.separator;
    public static final String FILE_PATH = FILE_PATH_PREFIX + FOLDER_NAME;

    public static boolean fileEncrypt() {
        String normalFilePath = FILE_PATH + "cats.jpg";
        String encryptFilePath = FILE_PATH + "cats_encrypt.jpg";
        try {
            return fileEncrypt(normalFilePath, encryptFilePath);
        } catch (Exception e) {
            e.printStackTrace();
        }
        return false;
    }

    public static boolean fileDecode() {
        String encryptFilePath = FILE_PATH + "cats_encrypt.jpg";
        String decodeFilePath = FILE_PATH + "cats_decode.jpg";
        try {
            return fileDecode(encryptFilePath, decodeFilePath);
        } catch (Exception e) {
            e.printStackTrace();
        }
        return false;
    }

       private static native boolean fileEncrypt(String normalFilePath, String encryptFilePath);

    private static native boolean fileDecode(String encryptFilePath, String decodeFilePath);

}
JNI Encryption Code Implementation, Pay Attention to Adding File Read and Write Permissions
const char *PASSWORD = "pw";
long getFileSize(char* filePath);

extern "C"
JNIEXPORT jboolean JNICALL
Java_cn_cfanr_ndksample_utils_FileUtils_fileEncrypt(JNIEnv *env, jclass type, jstring normalFilePath_,
                                                    jstring encryptFilePath_) {
    const char *normalFilePath = env->GetStringUTFChars(normalFilePath_, 0);
    const char *encryptFilePath = env->GetStringUTFChars(encryptFilePath_, 0);

    int passwordLen = strlen(PASSWORD);

    LOGE("The path of the file to be encrypted = %s , The path of the encrypted file = %s", normalFilePath, encryptFilePath);

    //Read file pointer
    FILE *frp = fopen(normalFilePath, "rb");
    // Write file pointer
    FILE *fwp = fopen(encryptFilePath, "wb");

    if (frp == NULL) {
        LOGE("file does not exist");
        return JNI_FALSE;
    }
    if (fwp == NULL) {
        LOGE("No write permission");
        return JNI_FALSE;
    }

    // Encryption while reading and writing
    int buffer;
    int index = 0;
    while ((buffer = fgetc(frp)) != EOF) {
        // write
        fputc(buffer ^ *(PASSWORD + (index % passwordLen)), fwp);  //XOR Encryption
        index++;
    }
    // Close the file stream
    fclose(fwp);
    fclose(frp);

    LOGE("File Encryption Successful");

    env->ReleaseStringUTFChars(normalFilePath_, normalFilePath);
    env->ReleaseStringUTFChars(encryptFilePath_, encryptFilePath);

    return JNI_TRUE;
}
The decryption code is similar.
1.3 File Segmentation and Merge
Java Code Implementation
public static boolean fileSplit() {
        String splitFilePath = FILE_PATH + "image.jpg";
        String suffix = ".b";
        try {
            return fileSplit(splitFilePath, suffix, 4);
        } catch (Exception e) {
            e.printStackTrace();
        }
        return false;
    }

    /**
     * File merge
     *
     * @return
     */
    public static boolean fileMerge() {
        String splitFilePath = FILE_PATH + "image.jpg";
        String splitSuffix = ".b";
        String mergeSuffix = ".jpeg";
        try {
            return fileMerge(splitFilePath, splitSuffix, mergeSuffix, 4);
        } catch (Exception e) {
            e.printStackTrace();
        }
        return false;
    }

 /**
     * File segmentation
     *
     * @param splitFilePath Paths to split files
     * @param suffix        Extensions to split files
     * @param fileNum       Number of split files
     * @return
     */
    private static native boolean fileSplit(String splitFilePath, String suffix, int fileNum);

    /**
     * File merge
     *
     * @param splitFilePath Path of partitioning file
     * @param splitSuffix   Extensions to split files
     * @param mergeSuffix   Extensions to merge files
     * @param fileNum       Number of split files
     * @return
     */
    private static native boolean fileMerge(String splitFilePath, String splitSuffix, String mergeSuffix, int fileNum);
Note that splitting and merging files requires setting the number of splitting files after file extensions. When partitioning, there are two cases.
1) Divisible, direct average score;
2) FileSize% (n-1), the first n-1 average score, the remaining to the last;
When merging, it is important to note that merging must be done in the order of division.
The rest of the JNI implementation code is sketchy, you can go to GitHub to see the specific source code: NdkSample/native_file_handler.cpp
2. Android incremental updates
2.1 introduction
The so-called incremental update is that the server differentiates the old and new version of the apk, generates a differential package patch, and sends it to the client; the client merges the patch package and the local APK into a new apk, and then installs it. Obviously, this can reduce the amount of traffic consumed when updating the APK to some extent. At present, this technology is also used in many application markets. Incremental update technology mainly solves the problem of too large installation package files.
2.2 Advantages and disadvantages
Advantages: Save traffic, when downloading apk, only need to download differential packages, do not need to download complete packages;
Disadvantages:
- Both client and server need to add relevant support. Every time a new version is released, the server needs to generate the corresponding differential packages for all the old versions according to the new version, and maintain the packages of different channels. In addition, when the client requests, upload the current version number, and the server returns the corresponding differential packages and the md5 value of the new version APK as the check after merging the new apk; so the whole process will be a bit cumbersome.
- Synthesizing differential packages can be time-consuming (preferably processed by a separate thread) and memory-consuming. An apk damaged by an insufficient memory cell phone or local apk can not be incrementally updated. In addition, when the difference between apk packages is small (less than 2m), the generated differential packages still have several hundred k.
2.3 Generation and Merging of Differential Packets
Files need to be diff and patch processed with tools, usually through bsdiff Realization
For specific use, you can refer to Hongyang's article. Android Incremental Update Complete Resolution Is Incremental Not Hot Repair - Hongyang I'm not going to talk too much here.
Note that when you execute the make command, you may report the following errors. (The following environments are all on Mac)
bspatch.c:39:21: error: unknown type name 'u_char'; did you mean 'char'?
static off_t offtin(u_char *buf)
                    ^~~~~~
                    char
You can add #include <sys/types.h> header file to the bspatch.c file (not clearly explained by Hongyang). Reference: Compiling and Using bsdiff - Muping - Blog Garden
Mainly grasp several commands:
- Execute make command to make file generate bsdiff and bspatch executable files.
- Execute. / bsdiff old.apk new.apk update.patch to generate differential packets;
- Execute. / bspatch old.apk new2.apk update.patch to synthesize a new apk;
- Execute md5 xxx.apk to see the md5 value of apk.
2.4 Server-side operations
The server needs to return a file and a new version of apk md5 value to the client.
- Use the bsdiff executable file generated by 2.3 to generate the difference package update.patch between the new version of APK and the old version of apk; (You can write a script to process)
- Use the md5 command to view and save the md5 of the new apk, and then return it to the client.
2.5 Client Operations
The main implementation is how to make the so file of bspatch. Because the detailed steps on the Internet are relatively perfect, there is no verbosity here, just a brief description of the issues needing attention.
Because according to the default way of building NDK in Make of AS, C/C++ files are in the cpp directory and Hongyang files are in the jni directory. They are different in configuration. If they are used at the same time, they will only compile CMake's configuration, so we need to put bspatch.c in the cpp directory and download it at the same time. bzip Source code
Detailed steps can be referred to. Android Incremental Update and Make Builder Tool - Atlantis - CSDN Blog
PS: Here CMakeLists.txt is placed in the CPP directory. It is especially important to note that because the CMakeLists.txt directory has changed, the path of C/C++ source files must be modified, src/main/cpp must be removed, and the path of cmake files of build.gradle must also be modified, otherwise compilation will fail.
# Sets the minimum version of CMake required to build the native library.
cmake_minimum_required(VERSION 3.4.1)

#Support - std=gnu++11
set(CMAKE_VERBOSE_MAKEFILE on)
set(CMAKE_CXX_FLAGS "${CMAKE_CXX_FLAGS} -std=gnu++11 -Wall -DGLM_FORCE_SIZE_T_LENGTH")
set(CMAKE_CXX_FLAGS "${CMAKE_CXX_FLAGS} -DGLM_FORCE_RADIANS")

#Setting the path of the final output of the generated so dynamic library
set(CMAKE_LIBRARY_OUTPUT_DIRECTORY ${PROJECT_SOURCE_DIR}/../jniLibs/${ANDROID_ABI})

#Add the bzip2 directory to add a subpath for the build
set(bzip2_src_DIR ${CMAKE_SOURCE_DIR})
add_subdirectory(${bzip2_src_DIR}/bzip2)

add_library( native-lib
             SHARED
             # Provides a relative path to your source file(s). Note that CMakeLists.txt is in the CPP directory, where the path prefix src/main/cpp is not required.
             native_file_handler.cpp
             bspatch.c
             )

find_library(log-lib log )

target_link_libraries(native-lib ${log-lib} )
build.gradle file
      externalNativeBuild {
        cmake {
            path "src/main/cpp/CMakeLists.txt"
        }
    }
In addition, in the JNI code added to the modified bspatch.c file, the first parameter is the name of so library. Be careful to be consistent
//......
JNIEXPORT jint JNICALL Java_cn_cfanr_ndksample_utils_BsPatch_bspatch(JNIEnv *env, jclass jcls, jstring oldApk_,jstring newApk_, jstring patch_) {
    const char *oldApkPath = (*env)->GetStringUTFChars(env, oldApk_, 0);
    const char *newApkPath = (*env)->GetStringUTFChars(env, newApk_, 0);
    const char *patchPath = (*env)->GetStringUTFChars(env, patch_, 0);

    int argc = 4;
    char* argv[argc];
    argv[0] = "native-lib";  //Note that this is so library name
    argv[1] = oldApkPath;
    argv[2] = newApkPath;
    argv[3] = patchPath;

    jint ret = patchMethod(argc, argv);

    (*env)->ReleaseStringUTFChars(env, oldApk_, oldApkPath);
    (*env)->ReleaseStringUTFChars(env, newApk_, newApkPath);
    (*env)->ReleaseStringUTFChars(env, patch_, patchPath);
    return ret;
}
//......
Other code logic:
- 1) download the differential package update.patch from the server and save it locally, and request the md5 value of the new version of apk.
- 2) extracting local apk files;
- 3) using JNI method public static native int bspatch (String old Apk, String new Apk, String patch) to merge update.patch and local old APK into a new apk;
- 4) Check whether the md value of the generated new apk is the same as that returned by the server.
- 5) Install the new apk file after checking the consistency between the new apk and the server
However, demo does not write the logic of downloading differential packages from servers. Here, the differential packages are tested by placing them on mobile phones through the adb push patch path / sdcard/NdkSample command.
Specific code can be viewed in Github: NdkSample/PatchUpdateActivity.java
3. Android encapsulates libjpeg Library
3.1 Compile libjpeg.so Library
- 1. Clone libjpeg-trubo Android version locally and decompress it
git clone git://git.linaro.org/people/tomgall/libjpeg-turbo/libjpeg-turbo.git -b linaro-android- 2. After configuring the ndk-build environment (the specific steps are brief), start compiling libjpeg-trubo Library
Following the steps of most online tutorials is to execute the following commands
ndk-build APP_ABI=armeabi-v7a,armeabi But maybe because my local configuration version is ndk-14, it doesn't work to execute this command directly. Here are some mistakes I encountered.
1) If you execute the command without entering the libjpeg-turbo directory, you may report the following error, that is, you can't find Android.mk.
Android NDK: Your APP_BUILD_SCRIPT points to an unknown file: ./Android.mk
/Users/cfanr/Library/Android/sdk/ndk-bundle/build/core/add-application.mk:198: *** Android NDK: Aborting...    .  Stop.
2) If the catalogue of the application items can not be found, the following:
Android NDK: Could not find application project directory !
Android NDK: Please define the NDK_PROJECT_PATH variable to point to it.
/Users/cfanr/Library/Android/sdk/ndk-bundle/build/core/build-local.mk:151: *** Android NDK: Aborting    .  Stop.
NDK_PROJECT_PATH specifies the project directory of the code to be compiled. Here is the current directory. Also, APP_BUILD_SCRIPT is the path of the Android makefile. If you have an Application.mk file, you can add NDK_APP_APPLICATION_MK=./Application.mk. Refer to: Android development practices: Perform NDK compilation - Jhuster columns in any directory
3) If the NDK version is too high, the following errors may be reported.
Android.mk:11: Extraneous text after `ifeq' directive
Android NDK: WARNING: Unsupported source file extensions in Android.mk for module jpeg
Android NDK:   turbojpeg-mapfile
/Users/cfanr/Library/Android/sdk/ndk-bundle/build/core/build-binary.mk:687: Android NDK: Module jpeg depends on undefined modules: cutils
/Users/cfanr/Library/Android/sdk/ndk-bundle/build/core/build-binary.mk:700: *** Android NDK: Aborting (set APP_ALLOW_MISSING_DEPS=true to allow missing dependencies)    .  Stop.
So my final solution is to compile with the specified low-level version of NDK (ndk-r11c), rather than configuring NDK with my system. Correct commands, compiled using the specified NDK version
~/NDK/android-ndk-r11c/ndk-build NDK_PROJECT_PATH=. APP_BUILD_SCRIPT=./Android.mk APP_ABI=armeabi-v7a,armeabi
Check compiled successfully: After compiled successfully, libs and obj folders will be generated in libjpeg-turbo. There will be libjpeg.so libraries of ABI type and other generated files, which need to be copied to libjpeg.so libraries under libs files in the project.
3.2 native Method of Compressed Pictures Using libjpeg.so Library
Reference resources: Android uses libjpeg for image compression - BlueBerry's column - CSDN blog
1. Copy libjpeg.so and header files into the project
First, the libjpeg.so of different ABI is copied to the libs directory of the project, and then all the header files of the source code of libjpeg-turbo downloaded above are copied to the cpp/include directory.2. Configure CMakeLists file
When practicing, pay attention to the configuration of CMakeLists, otherwise the following mistakes may occur (bloggers just do not see the article clearly, do not configure it properly, after making mistakes, they keep searching and waste a lot of time).
1) If the CMakeLists.txt file is associated with Android's Bitmap-related library jnigraphics, the following error will be reported and Bitmap is not defined
Error:(39) undefined reference to 'AndroidBitmap_getInfo'
Error:(43) undefined reference to 'AndroidBitmap_lockPixels'
Error:(85) undefined reference to 'AndroidBitmap_unlockPixels'
Error:error: linker command failed with exit code 1 (use -v to see invocation)
2) If only the libjpeg.so library add_library(libjpeg SHARED IMPORTED) is added and the associated library target_link_libraries() is not set, an error similar to that of the following undefined attributes will be reported:
Error:(99) undefined reference to 'jpeg_std_error'
Error:(106) undefined reference to 'jpeg_CreateCompress'
Error:(114) undefined reference to 'jpeg_stdio_dest'
Error:(122) undefined reference to 'jpeg_set_defaults'
Error:(126) undefined reference to 'jpeg_set_quality'
It seems that it's easy to tread holes in understanding CMake build scripts. The next chapter will introduce the use of CMake build scripts in detail.
The full build script is as follows: (if the directory where libjpeg.so or header files are placed is different from mine, the following needs to be modified)
# Sets the minimum version of CMake required to build the native library.
cmake_minimum_required(VERSION 3.4.1)

#Setting the path of the final output of the generated so dynamic library
set(CMAKE_LIBRARY_OUTPUT_DIRECTORY ${PROJECT_SOURCE_DIR}/src/main/jniLibs/${ANDROID_ABI})

#Specify the header directory of libjpeg.so to refer to
set(LIBJPEG_INCLUDE_DIR src/main/cpp/include)
include_directories(${LIBJPEG_INCLUDE_DIR})

#Import libjpeg dynamic library SHARED; static library STATIC
add_library(libjpeg SHARED IMPORTED)
#For the so directory, the absolute path is set here for simplicity (note that add_library first, then set_target_properties)
set_target_properties(libjpeg PROPERTIES IMPORTED_LOCATION /Users/cfanr/AndroidStudioProjects/DemoProjects/NDKSample/compress/libs/${ANDROID_ABI}/libjpeg.so)

add_library(
             compress
             SHARED
             src/main/cpp/compress.c
             )

find_library(graphics jnigraphics)
find_library(log-lib log)

target_link_libraries(compress libjpeg ${log-lib} ${graphics})- 3. Writing Java Layer native Method
public class ImageCompress {
    static {
        System.loadLibrary("compress");
    }

    private ImageCompress(){
    }

    public static native boolean compressBitmap(Bitmap bitmap, String dstPath, int quality, boolean isOptimize);
}- 4. Implementing JNI logic
- 1) Bitmap decoding of Android into RGB data;
- 2) Allocate space for JPEG objects and initialize them;
- 3) Obtain file information, and then specify compressed data sources;
- 4) Setting parameters for compression, including image size and color space;
- 5) Start compression;
- 6) Release resources after compression;
Specific code view: navyifanr/NdkSample: compress.c
Design sketch: 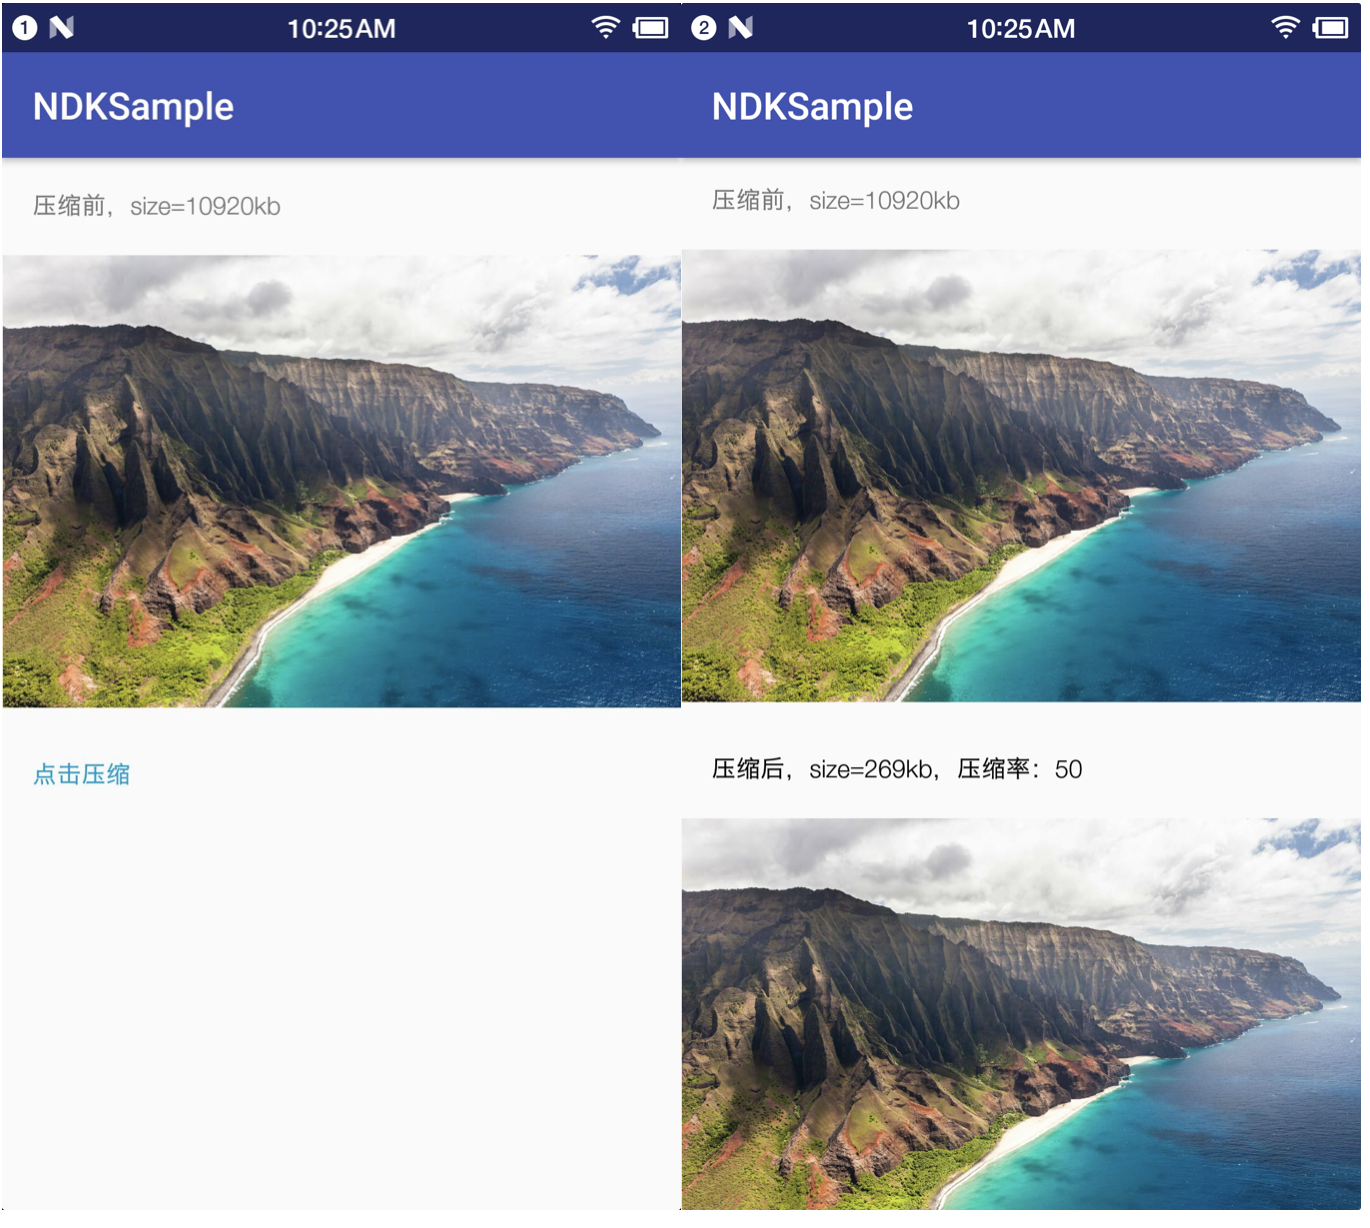
4. Brief description of the application scenario of NDK technology in Android
4.1 First of all, we need to understand the role and characteristics of NDk.
The function of NDK is that Google provides a cross-compiler tool chain, which can compile binary library files executed under arm platform on linux platform.
NDK features: (from: Android: What are JNI and NDK? - Carson_Ho's Blog - CSDN Blog) 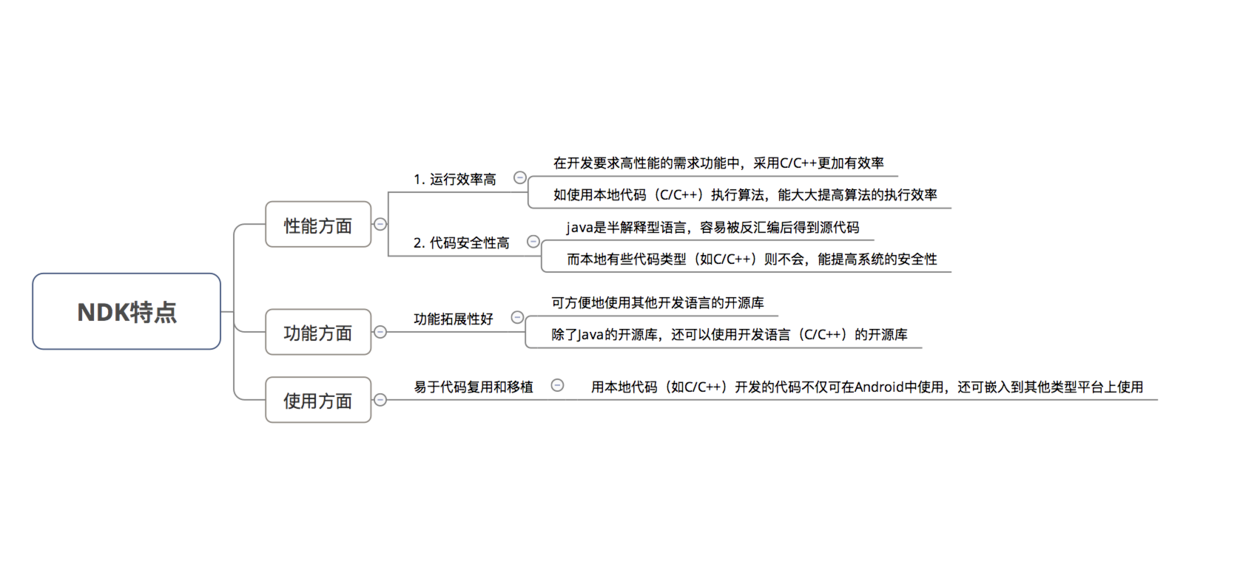
4.2 Application Scenario
- Optimize the performance of dense computing and resource-consuming modules, such as audio and video decoding, image manipulation, etc.
- Where security needs to be improved, compiling into so libraries is not easy to be decompiled, such as file encryption, core algorithm modules, etc.
- The need for cross-platform applications;
Some specific application scenarios of Android NDK:
- Cross-platform audio and video decoding library FFmpeg;
- Android incremental update technology;
- Android reinforcement and anti-reverse technology;
- Some thermal repair technologies;
- Face Recognition, OpenCV, etc.
- Android Platform Game Development, etc.
Attachment:
C/C++ code is compiled into library files before it can be executed. Library files are divided into dynamic library and static library. 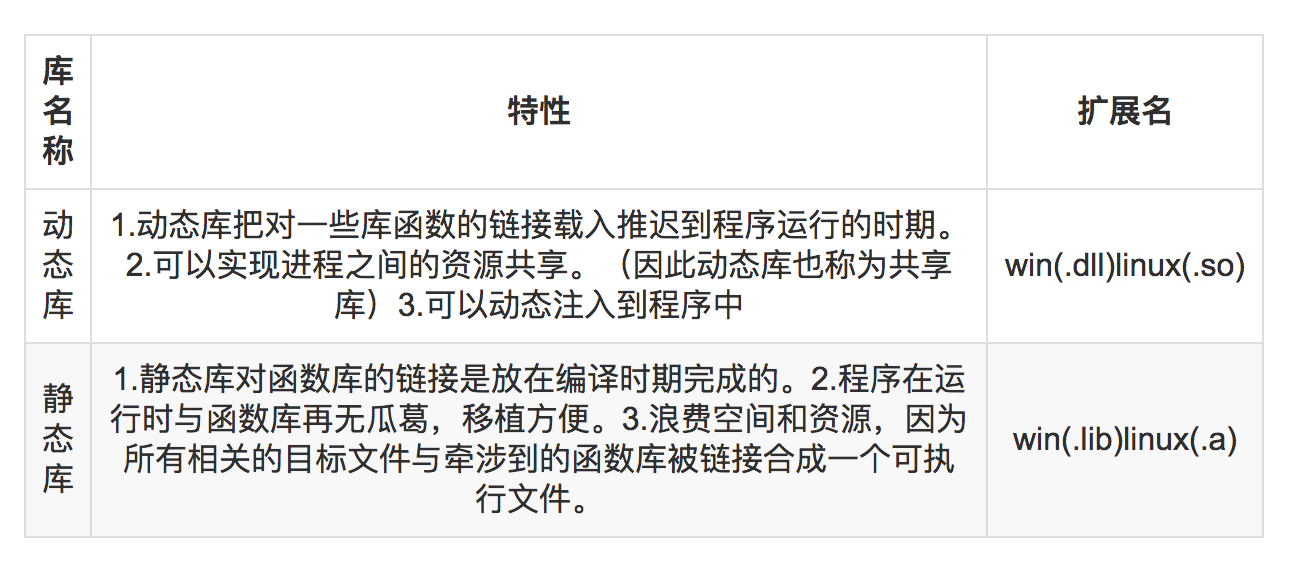
Sources of Library files: After compiling and linking C/C++ code, library files will be generated. Different types of C PU operating systems generate different library files.
- CPU classification: arm structure, embedded device processor; x86 structure, pc server processor; different CPU instruction sets are different;
- Cross-compiling: windows x86 compiled library files can run on arm platform code;
- Cross compiling tool chain: The NDK provided by Google is cross compiling tool chain, which can compile binary library files executed under ARM platform under linux environment.
Reference material:
- NDK Development Foundation II. File Encryption, Decryption, Segmentation and Merge - Brief Book
- Android Incremental Update Complete Resolution Is Incremental Not Hot Fix - Hongyang - CSDN Blog
- Android Incremental Update and Make Builder Tool - Atlantis - CSDN Blog
- JNI Development Example - Encapsulating libjpeg Library to Ensure Image Quality Compressed Pictures - Cat's Attic - CSDN Blog
- Android uses libjpeg for image compression - BlueBerry's column - CSDN blog
- Android: What are JNI and NDK? - Carson_Ho's Blog - CSDN Blog