Limitations of View (Fill-in) Animation
The view animation has been introduced in two previous articles. In fact, we can also find that the complementary animation only applies to simple animation effects and it only completes the display of animation effects, and it can not change the attributes of the view. For example, a button moves from (0,0) to (100,100). If the complementary animation is used, It will be found that the click button at the current position (100,100) can not respond to the click event, indicating that the position attribute of the button has not changed; furthermore, the combination effect of complementary animation also has some limitations, and can not achieve the sequential play of animation; therefore, in order to solve and optimize the related problems, Android launched the attribute action. Painting.
Animator animation
I. Concept
By changing the attributes of controls or views to achieve animation effect, the attribute values can be fully customized by developers.
CHARACTERISTICS
1. Animation will change the attributes of the view.
2. The form of animation can be completely customized, no longer restricted to translation, rotation, etc.
3. Variations of different attributes will not affect each other and can be used superimposed.
4. Compound animation can be achieved through Animator Set, and the sequence can be controlled.
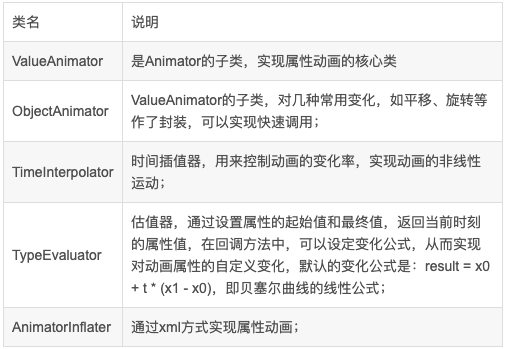
III. Relevant Core Categories
IV. CONTROL PROCESS
Value Animator is the core class of attribute animation, which achieves the effect of animation by setting the initial value, the end value and the change of the attribute value in the control process.
1. Set the initial and end values of the view:
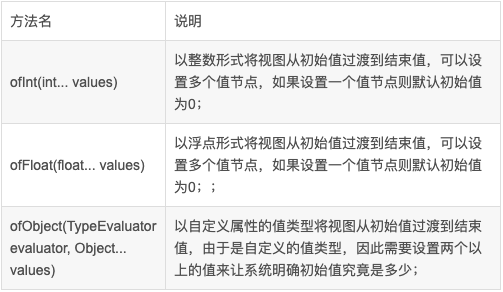
Both ofInt() and ofFloat() can only be used to modify the change of single attribute value. For example, translation change can only be used to modify single attribute of x or y. If you want to change at the same time, you need to set two Value Animators. If you use ofObject, you can customize an attribute containing x and y to achieve the same. Change x and y.
2. Attribute values in the control process:
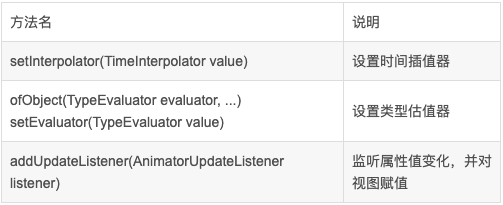
The control of view attributes is actually to control when the view is set and what attribute values are applied to the view.
Void set Interpolator (Time Interpolator value) is to control when to take a value by setting a time interpolator.
Type Evaluator in ofObject is to set the value of attributes at the current time point by setting the type estimator.
addUpdateListener monitors the change of attribute value, gets the corresponding attribute value through getAnimatedValue(), and assigns the view value.
Later, the code will be used to specify, especially Time Interpolator and Type Evaluator.
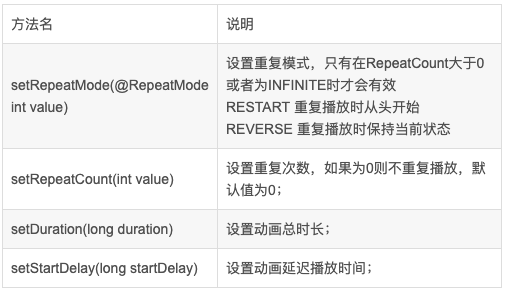
3. Some other methods:
5. Code Implementation
OfInt is similar to OfFloat in usage. Take OfFloat as an example. OfObject will be exemplified in the next section.
1. Through Java:
//Translation transformation
translationAnimator = ValueAnimator.ofFloat(0,200,0);
//Set up infinite loop playback
translationAnimator.setRepeatCount(ValueAnimator.INFINITE);
//Setting duplicate mode
translationAnimator.setRepeatMode(ValueAnimator.REVERSE);
//Set up time interpolator, accelerate first and decelerate later
translationAnimator.setInterpolator(new AccelerateDecelerateInterpolator());
//Setting the animation duration
translationAnimator.setDuration(2000);
translationAnimator.addUpdateListener(animation -> {
    float currentValue = (float) animation.getAnimatedValue();
    imgAnim.setTranslationX(currentValue);
});
2. Implement by xml:
Create a new animator directory under res and a new xml file value_anim:
<?xml version="1.0" encoding="utf-8"?>
<animator xmlns:android="http://schemas.android.com/apk/res/android"
    android:duration="2000"
    android:valueFrom="0"
    android:valueTo="200"
    android:valueType="floatType"
    android:interpolator="@android:anim/accelerate_decelerate_interpolator"
    android:repeatCount="-1"
    android:repeatMode="reverse"/>
Animator animator = AnimatorInflater.loadAnimator(getApplicationContext(),R.animator.value_anim); animator.start();
3. Effect screenshots:

TimeInterpolator and Type Evaluator
TimeInterpolator: Reflects and calculates the percentage of attribute values by setting the percentage of time elapsed;
Take Accelerate Decelerate Interpolator as an example:
His formula is:

So this is reflected by the function image:
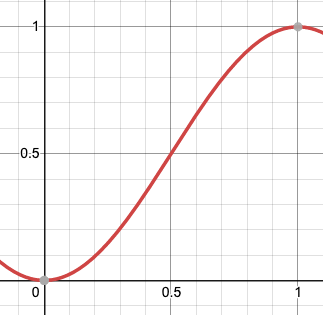
That is to say, the acceleration state should be maintained first, and the acceleration will begin to slow down as soon as it reaches 1:00. Android provides us with many template of time interpolator, such as linear interpolator, elastic interpolator, accelerated interpolator and so on. We can also customize the interpolator according to our needs.
Type Evaluator: According to the initial value (start Value), the final value (end Value) and the ratio between the initial value and the final value (fraction, completeness), through a custom formula conversion, get the change attribute value at each time. The default change formula of TypeEvaluator is the linear change formula of Bessel curve.
If the need is to achieve an animation similar to a parabola, we can achieve it through the formula of multi-order Bessel curve. We take the second-order Bessel curve as an example, the formula is:

Among them, B(t) is the change attribute value returned, P0 is the initial point, P1 is the final point, P2 is the control point (which can be temporarily understood as a fixed point, how to determine the specific knowledge points that can see the Bessel curve), and t is the proportional relationship between the initial value and the final value, or the degree of completion.
Let's look at the implementation in code:
1. Define a Point class to represent the coordinates of points:
public class Point {
    private float x;
    private float y;


    public Point(float x, float y) {
        this.x = x;
        this.y = y;
    }

    public float getX() {
        return x;
    }

    public void setX(float x) {
        this.x = x;
    }

    public float getY() {
        return y;
    }

    public void setY(float y) {
        this.y = y;
    }

}
2. Define TypeEvaulator:
Point controlP controlP = new Point(220, 40);//Define a control point
private class MyTypeEvaluator implements TypeEvaluator<Point> {
        @Override
        public Point evaluate(float fraction, Point startValue, Point endValue) {

            float x0 = startValue.getX();//Starting point abscissa
            float x1 = endValue.getX();//Endpoint abscissa
            float y0 = startValue.getY();//Starting point ordinates
            float y1 = endValue.getY();//Endpoint ordinates
            float x = (float) (Math.pow((1 - fraction), 2) * x0 + 2 * fraction * (1 - fraction) * controlP.getX() + Math.pow(fraction, 2) * x1);
            float y = (float) (Math.pow((1 - fraction), 2) * y0 + 2 * fraction * (1 - fraction) * controlP.getY() + Math.pow(fraction, 2) * y1);
            Log.v("typeEvaluatorAnim", "x:" + x + ",fraction:" + fraction);
            return new Point(x, y);
        }
    }
According to the formula, the corresponding parameters are substituted, and the values of x and y are the attributes of the current time.
3. Configuration animation:
//Set type estimators and specify starting and ending points
ValueAnimator typeEvaluatorAnim = ValueAnimator.ofObject(new MyTypeEvaluator(), new Point(0, 0),new Point(400, 400));
//Setting Time Interpolator
typeEvaluatorAnim.setInterpolator(new LinearInterpolator());
//Setting the animation duration
typeEvaluatorAnim.setDuration(2000);
typeEvaluatorAnim.addUpdateListener(animation -> {
    //Get the change value of attributes at the time
    Point point = (Point) animation.getAnimatedValue();
    imgAnim.setTranslationX(point.getX());
    imgAnim.setTranslationY(point.getY());
});
//Open animation
typeEvaluatorAnim.start();
4. Effect screenshots:

5. Summary
Both TimeInterpolator and TimeInterpolator can control the change of attributes in the process by modifying the change rate of time and setting the change of attributes value in unit time. In practical development, only one of them needs to be controlled.
Above is the preliminary summary of attribute animation, there will be time to continue to study, continue to supplement.