The so-called ORM framework, object relational mapping, is used to make a mapping between relational databases and objects. In this way, when we operate the database, we don't need to deal with complex SQL statements, but just operate it as usual.
======================================================================
The specific effects of the case are as follows:
This case is to use greenDAO to add, delete, modify and query commodities.
Click insert data to save all data in the database. Click query all data to query all data in the database and display it on the interface. At the same time, you can query according to conditions. When you click query snacks, only snacks will be queried and displayed on the desktop. Click a single commodity to jump to the commodity details page, On the product details page, you can modify the product description or delete the product.
The list display of goods is realized by RecyclerView.
=============================================================================
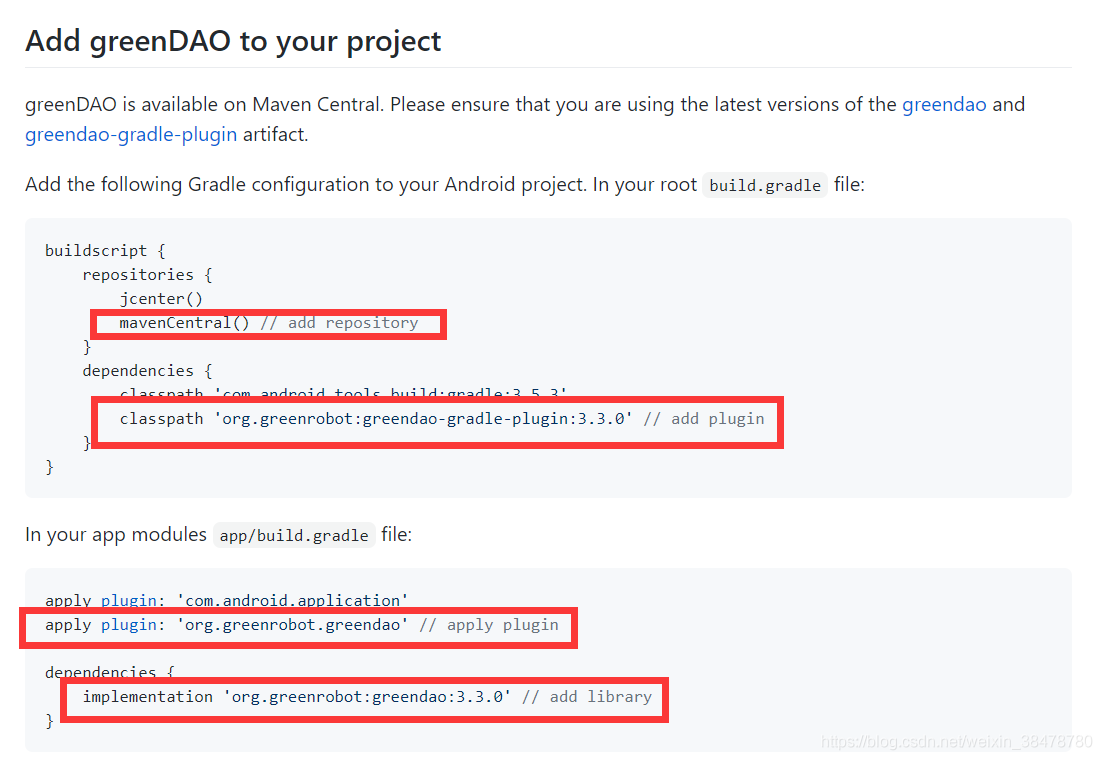
5.1. 1. Introducing greenDAO
The introduction of greenDAO is very simple. We just follow github documentation Just go up and do it, as shown below:
5.1. 2. Create entity class
@Entity

public class GoodsModel implements Parcelable {

    @Id(autoincrement = true)

    private Long id;

    @Index(unique = true)

    private Integer goodsId;

    private String name;

    private String icon;

    private String info;

    private String type;
Where @ Entity is the Entity annotation of greendao (used to identify the current Entity, which requires greendao to generate code).
@id is the primary key id and long type. You can set automatic growth through @ Id(autoincrement = true) (the basic type of automatic growth primary key cannot be long, but the packaging type can only be Long).
@Index(unique = true) is the only constraint added to the database.
5.1. 3. Automatically generate entity class code
After writing the above entity class code, the generation of entity class code can be handed over to the Android Studio compiler. First, click Build in the menu bar, then click Make Project, and wait for the compiler to compile, After compilation, the entity class code is as follows: (the Parcelable interface is implemented here to transfer entity classes between activities, and the method of implementing the interface can only be Alt + Enter)
@Entity

public class GoodsModel implements Parcelable {

    @Id(autoincrement = true)

    private Long id;

    @Index(unique = true)

    private Integer goodsId;

    private String name;

    private String icon;

    private String info;

    private String type;


    protected GoodsModel(Parcel in) {

        if (in.readByte() == 0) {

            id = null;

        } else {

            id = in.readLong();

        }

        if (in.readByte() == 0) {

            goodsId = null;

        } else {

            goodsId = in.readInt();

        }

        name = in.readString();

        icon = in.readString();

        info = in.readString();

        type = in.readString();

    }


    @Generated(hash = 1834473137)

    public GoodsModel(Long id, Integer goodsId, String name, String icon,

                      String info, String type) {

        this.id = id;

        this.goodsId = goodsId;

        this.name = name;

        this.icon = icon;

        this.info = info;

        this.type = type;

    }


    @Generated(hash = 971639536)

    public GoodsModel() {

    }


    public static final Creator<GoodsModel> CREATOR = new Creator<GoodsModel>() {

        @Override

        public GoodsModel createFromParcel(Parcel in) {

            return new GoodsModel(in);

        }


        @Override

        public GoodsModel[] newArray(int size) {

            return new GoodsModel[size];

        }

    };


    @Override

    public int describeContents() {

        return 0;

    }


    @Override

    public void writeToParcel(Parcel dest, int flags) {

        if (id == null) {

            dest.writeByte((byte) 0);

        } else {

            dest.writeByte((byte) 1);

            dest.writeLong(id);

        }

        if (goodsId == null) {

            dest.writeByte((byte) 0);

        } else {

            dest.writeByte((byte) 1);

            dest.writeInt(goodsId);

        }

        dest.writeString(name);

        dest.writeString(icon);

        dest.writeString(info);

        dest.writeString(type);

    }


    public Long getId() {

        return this.id;

    }


    public void setId(Long id) {

        this.id = id;

    }


    public Integer getGoodsId() {

        return this.goodsId;

    }


    public void setGoodsId(Integer goodsId) {

        this.goodsId = goodsId;

    }


    public String getName() {

        return this.name;

    }


    public void setName(String name) {

        this.name = name;

    }


    public String getIcon() {

        return this.icon;

    }


    public void setIcon(String icon) {

        this.icon = icon;

    }


    public String getInfo() {

        return this.info;

    }


    public void setInfo(String info) {

        this.info = info;

    }


    public String getType() {

        return this.type;

    }


    public void setType(String type) {

        this.type = type;

    }

}
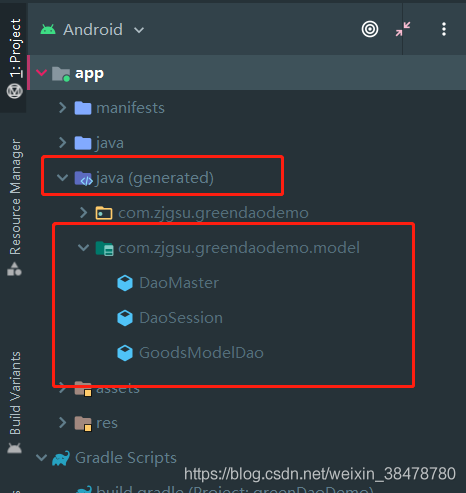
After clicking compile, the compiler will not only automatically generate entity class code for us, but also generate three files DaoMaster, DaoSession and XXXDao in the build directory. Using these three files, we can operate the database, as shown below:
5.1. 4. Initialize greenDAO
Here, I initialize in the Application (note that it should be referenced in the manifest file, otherwise the Application will not take effect), and provide a getDaoSession() method for external use. The specific code is as follows:
public class MyApplication extends Application {


    public static DaoSession mSession;


    @Override

    public void onCreate() {

        super.onCreate();


        initDb();

    }


    /**

     * Connect to the database and create a session

     */

    public void initDb() {

        // 1. Get the database to connect to

        DaoMaster.DevOpenHelper devOpenHelper = new DaoMaster.DevOpenHelper(this, "test.db");

        SQLiteDatabase db = devOpenHelper.getWritableDatabase();

        // 2. Create database connection

        DaoMaster daoMaster = new DaoMaster(db);

        // 3. Create database session

        mSession = daoMaster.newSession();

    }


    // For external use

    public DaoSession getDaoSession() {

        return mSession;

    }

}
5.2 specific use (addition, deletion, modification and query)
After the preparation work is completed, it is very simple to use. You only need to call the API of greenDAO. To operate the database, we first need to obtain the DAO instance. We create a GreenDaoManager class to manage the database operation. The specific code is as follows:
public class GreenDaoManager {


    private Context mContext;

    private GoodsModelDao mGoodsModelDao;


    public GreenDaoManager (Context context) {

        this.mContext = context;

        // Get DAO instance

        mGoodsModelDao = MyApplication.getDaoSession().getGoodsModelDao();

    }

}
5.2. 1. New data
// Add an entity

DAO.insert(T entity);

// Add multiple entities

DAO.insertInTx(T... entities);

...
//Insert data
public void insertGoods () {
String json = DataUtils.getJson("goods.json", mContext);

mGoodsModelDao.insertOrReplaceInTx(DataUtils.getGoodsModels(json));
}
### []( )5.2. 2. Query data


#### [] (1). Query all
DAO.loadAll();
// Query all data

public List<GoodsModel> queryGoods () {

    return mGoodsModelDao.loadAll();

}

```


#### [] (2). Query by PK


```

DAO.load(Long key);

```


#### [] (3) set query conditions with QueryBuilder and properties


```

// Query fruit data

public List<GoodsModel> queryFruits () {

    QueryBuilder<GoodsModel> result = mGoodsModelDao.queryBuilder();