1, Preface:
Since Jcenter has stopped serving, we usually publish the library to Maven Central;Maven Central, like Jcenter, is also a public warehouse. The library published on it can be used by yourself and others; Since Android Studio 4.2, Google has made Maven central a part of gradle
2, Process of Publishing Library (jar/aar) to Maven Central
1.Sonatype Jira related settings
We must first Sonatype Jira Register an account on;
Then in https://issues.sonatype.org/projects
Create an issue on
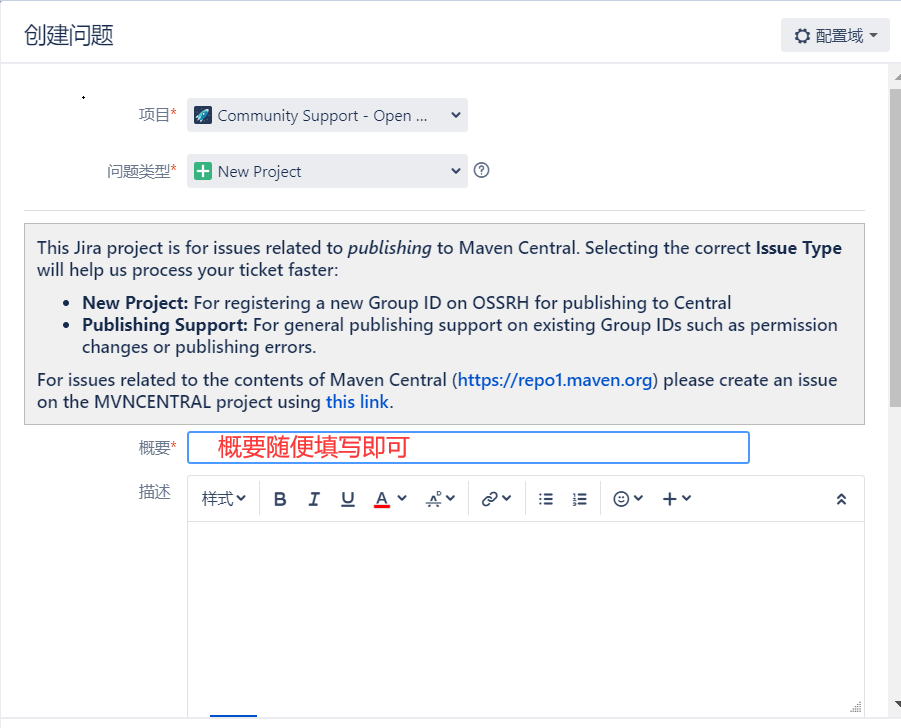
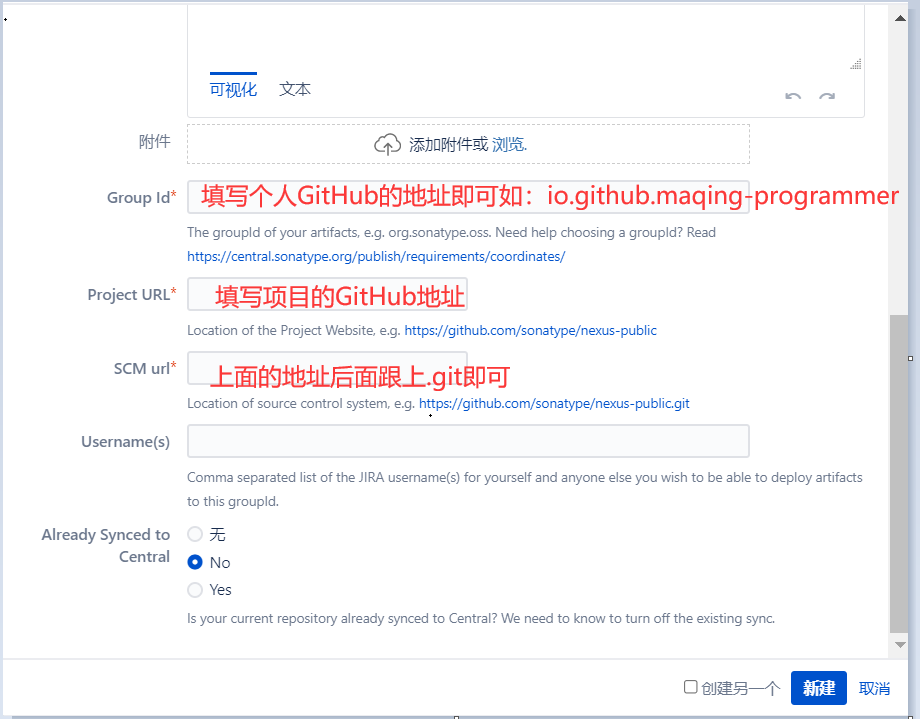
groupId: we'd better use our own gtihub address, which is easier to verify. If it's our own personal domain name, it's also OK; I filled in: io github. maqing-programmer
Project URL: we can create a new warehouse on our GitHub, and fill in the address of the warehouse here; What I fill in here is: https://github.com/maqing-programmer/openlibrary
SCM url: add the Project URL above gi is enough. What I fill in here is: https://github.com/maqing-programmer/openlibrary.git
After creating an issue, an administrator will handle your issue and wait for the administrator to reply to your issue. He will tell you to create a repo in your github. The name of the repo is the id of the issue. For example, my name is OSSRH-69933. The administrator replied to me as follows:
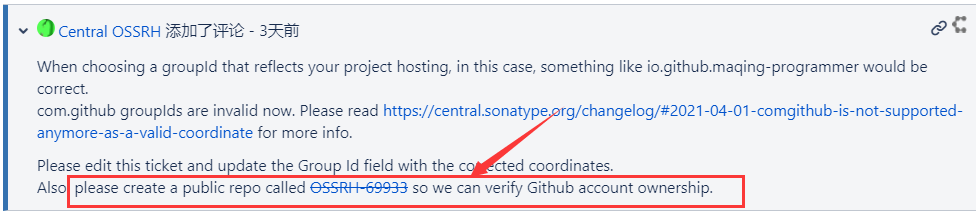
After creation, you need to add comments and reply that the administrator has created the warehouse;

After replying to the administrator, wait for the status of this issue to become RESOLVED.
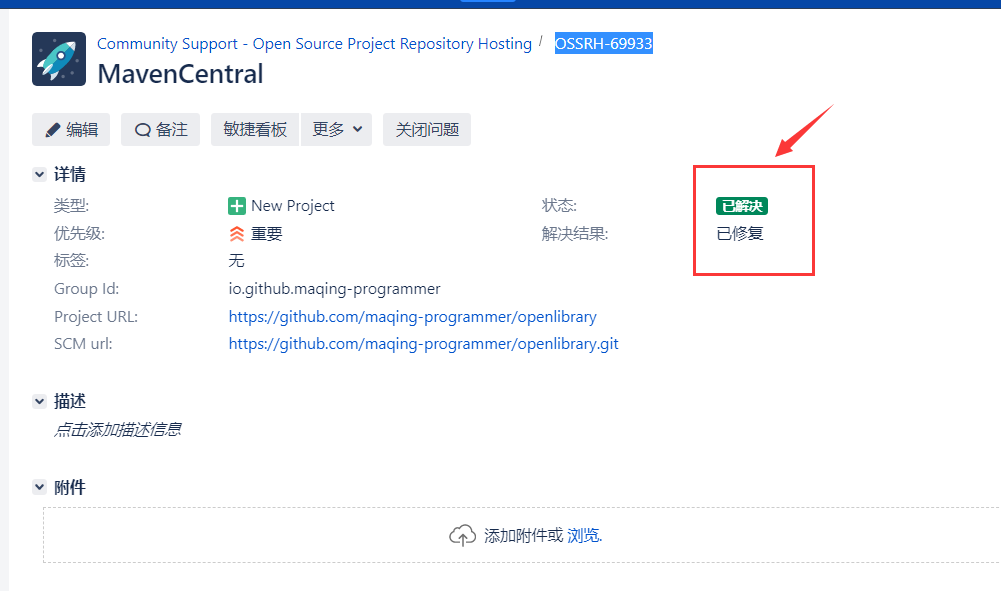
In this way, you will create an issue to undertake all the Libraries under the corresponding group id, Sonatype Jira
The basic configuration is completed;
2. Signature secret key application
Download gpg4win:
Go to GPG official website https://www.gpg4win.org/get-gpg4win.html Download gpg4win-3.1.14 exe;
The latest version of the official website is gpg4win-3.1.15, but after downloading, open Kleopatra exe
Always report errors, so download gpg4win-3.1.14 instead and open Kleopatra Exe did not report an error;
After downloading, click to install;
After installation, the kleopatra icon should appear on the desktop. Click to open it, or find kleopatra under / bin / in the installation directory of gpg4win-3.1.14 Exe Click to open;
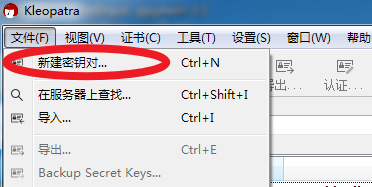
After opening kleopatra, create a new secret key
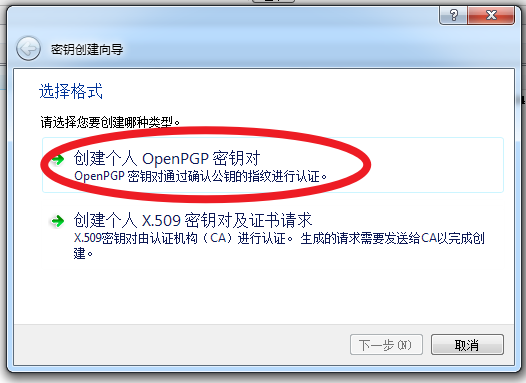
Then select create personal key:
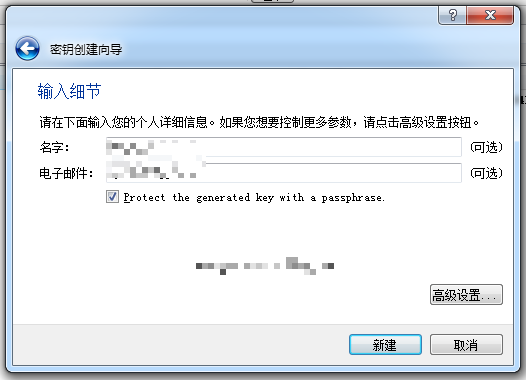
Then enter your account and email, and check Protect the generated key with a passphrase (use password to protect the generated key) in advanced settings, you can set more detailed, such as expiration time, but the expiration time can not be too long or report an error.
Click new, and you will be asked to set a password, which is the private key password. It will be used later;
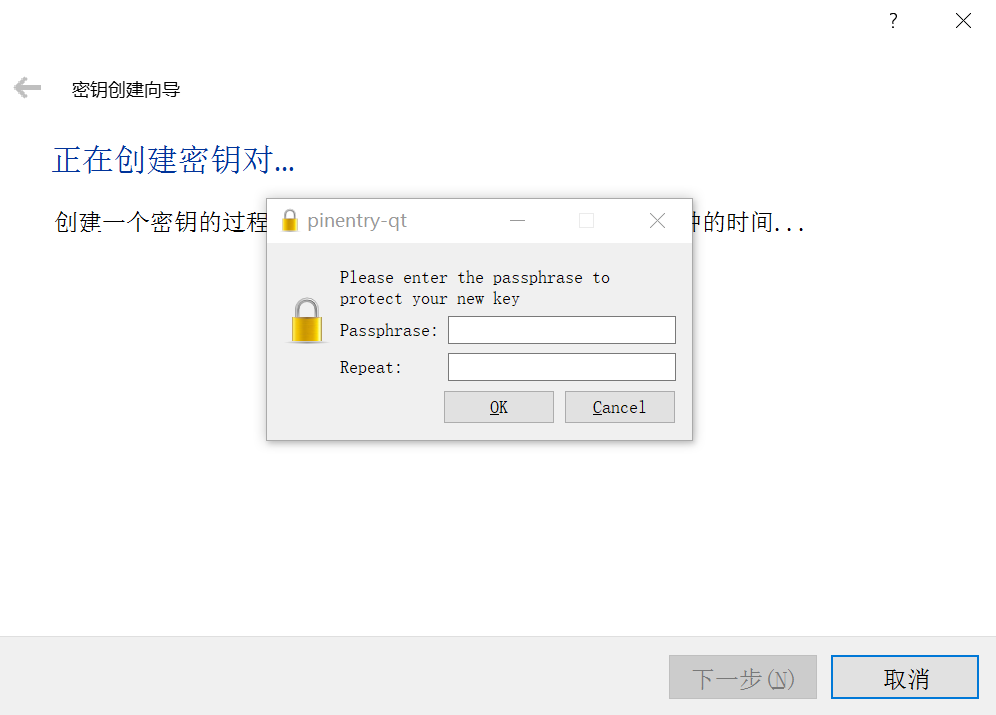
After entering the password, click next to create it successfully;
After the creation, you will see the secret key you created in the kleopatra interface:
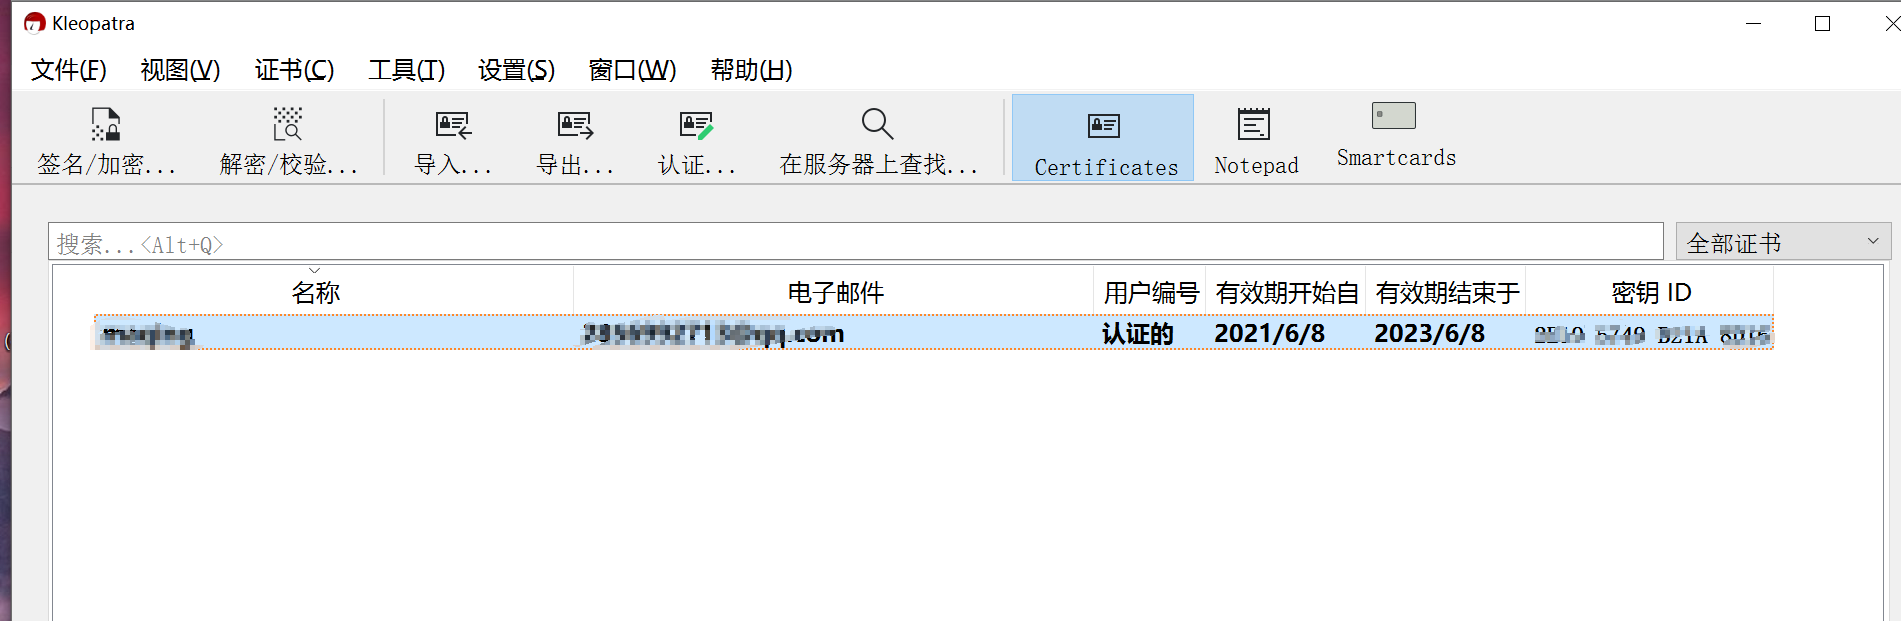
Double click to view
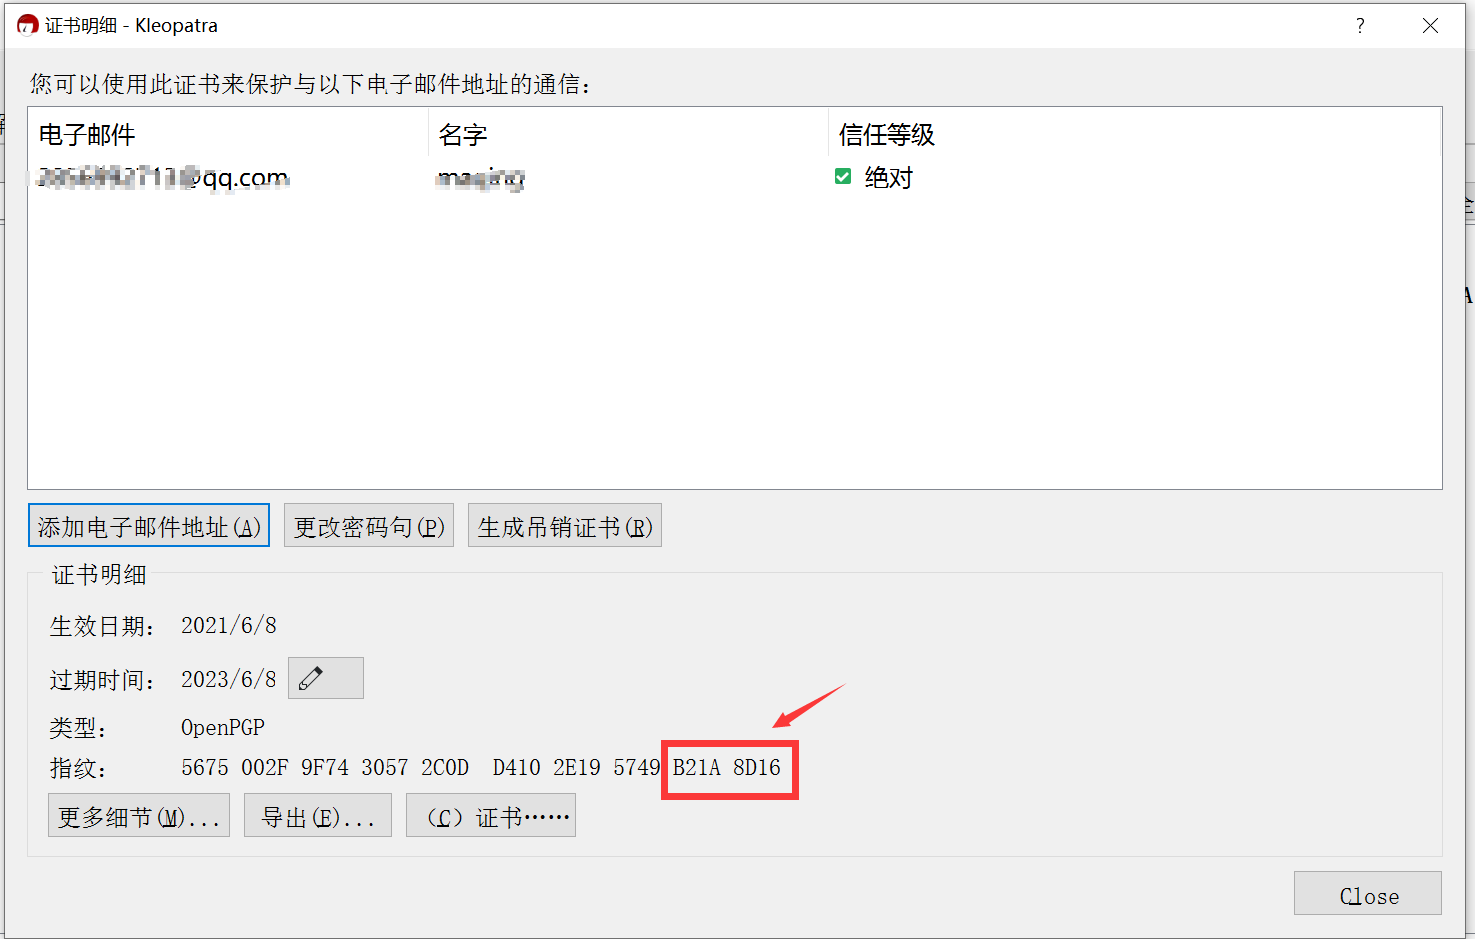
The 8-digit letters in the red box are followed by the letters to be used;
Click the generate revocation certificate button to save your revocation certificate,
Then we go to the installation directory of gpg4win-3.1.14 / bin /, open CMD or CMD, and then
Navigate to the installation directory of gpg4win-3.1.14 under / bin /, and then enter
gpg --export-secret-keys -o secring. The GPG command next creates secring GPG file
This secring GPG file, which will be used later;
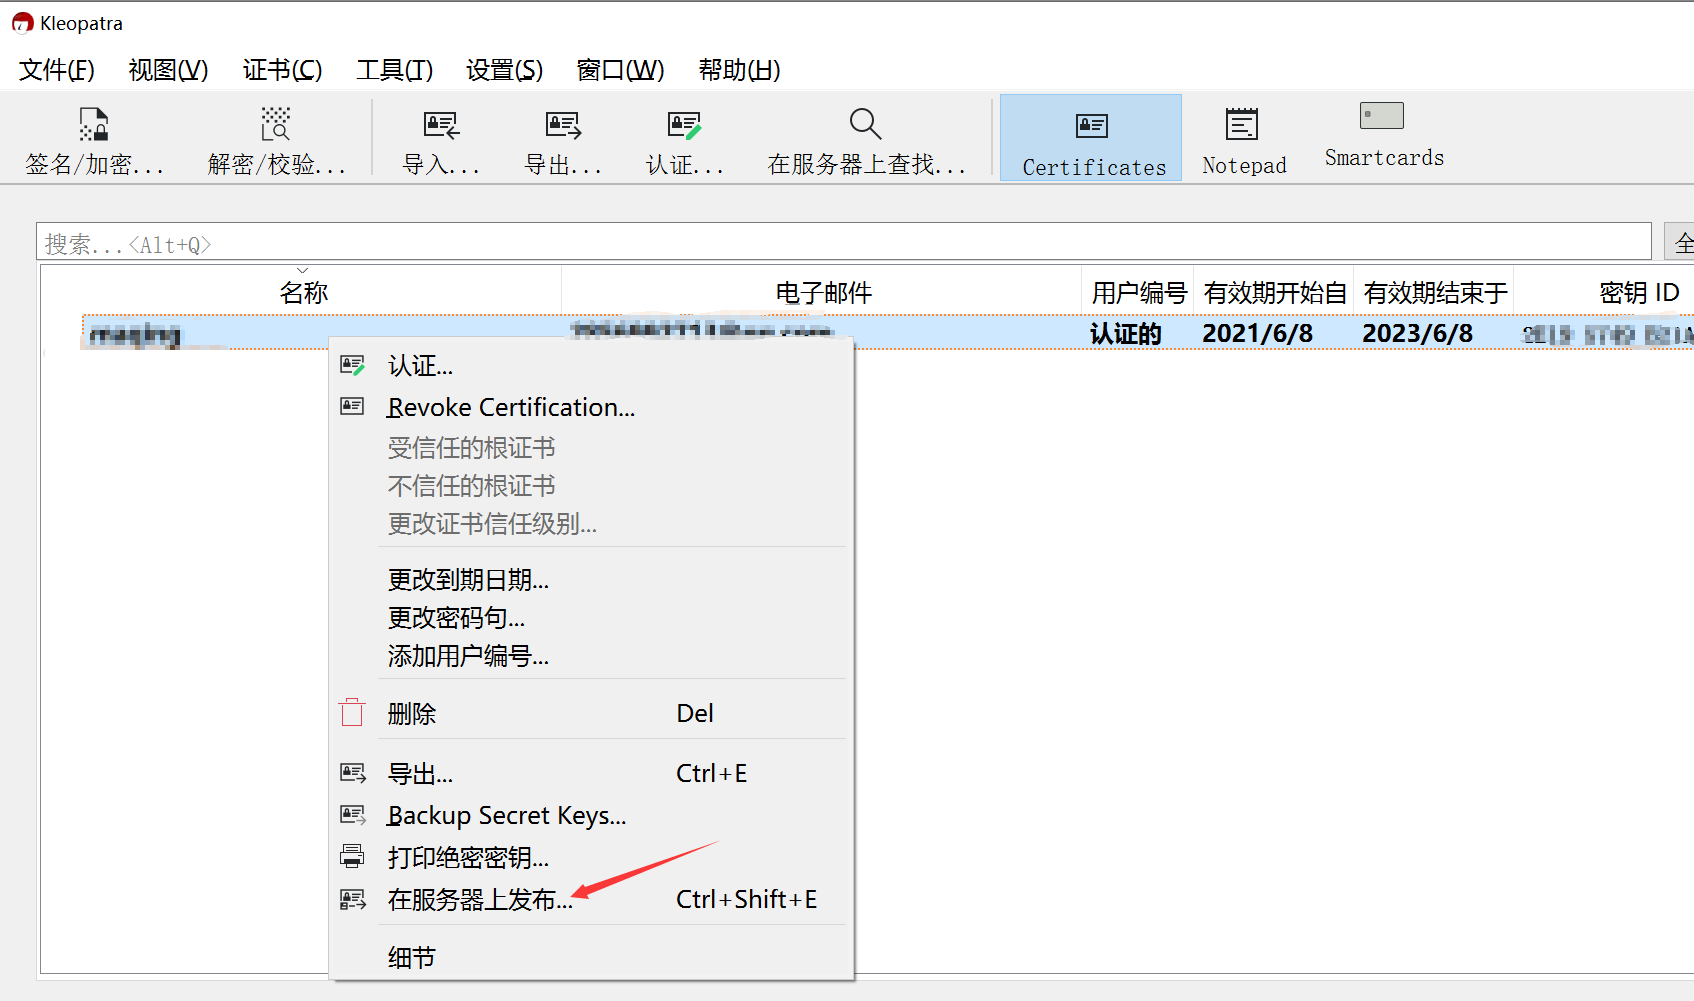
Then right click back to the main interface and publish on the server:
3.gradle preparation
When we enter Android Studio, for example, we want to upload a Java Library. We must have prepared the Android project in advance, and then created a new Java Library module in the Android project. After writing the code of the Library under the Java Library module, we are ready to upload;
We need to prepare an uploaded gradle script file and create a new gradle file in the root directory of the Android project. Here we call it publish_jar.gradle;
apply plugin: 'maven-publish'
apply plugin: 'signing'

task sourcesJar (type:Jar) {
    archiveClassifier = 'sources'
}

//Set the task dependency and type the source code package while typing the jar package
jar.dependsOn(sourcesJar)

/**
 * When gradlew clean install command is used by default, only the compiled package is installed, which is the source package
 * It will not be installed in the maven warehouse. Adding this configuration can import the source code package into the local maven warehouse
 * doc Bags can also be made like this
 */
artifacts {
    archives sourcesJar
}

ext {
    PUBLISH_GROUP_ID = "io.github.maqing-programmer"
    PUBLISH_ARTIFACT_ID = 'mylibrary'            //Project name
    PUBLISH_VERSION = 2.0                   //Version number
}

ext["signing.keyId"] = ''
ext["signing.password"] = ''
ext["signing.secretKeyRingFile"] = ''
ext["ossrhUsername"] = ''
ext["ossrhPassword"] = ''

File secretPropsFile = project.rootProject.file('local.properties')
if (secretPropsFile.exists()) {
    println "Found secret props file, loading props"
    Properties p = new Properties()
    p.load(new FileInputStream(secretPropsFile))
    p.each { name, value ->
        ext[name] = value
    }
} else {
    println "No props file, loading env vars"
}


publishing{
    publications{
        release(MavenPublication) {
            // The coordinates of the library, being set from variables that
            // we'll set up in a moment
            groupId "io.github.maqing-programmer" //Note that the GroupId set on Sonatype Jira must be written here
            artifactId "plugin"
            version '2.0'

            // Two artifacts, the `aar` and the sources
//            artifact("$buildDir/libs/${project.getName()}.jar")
//            artifact sourcesJar

            artifact(sourcesJar) {
                classifier = 'sources'
            }

            // Self-explanatory metadata for the most part
            pom {
                name = PUBLISH_ARTIFACT_ID
                description = 'Your project description'
                // If your project has a dedicated site, use its URL here
                url = 'https://github.com/maqing-programmer/openlibrary'
                licenses {
                    license {
                        //The protocol type is generally Apache License2.0 by default 0 does not need to be changed:
                        name = 'The Apache License, Version 2.0'
                        url = 'http://www.apache.org/licenses/LICENSE-2.0.txt'
                    }
                }
                developers {
                    developer {
                        id = 'maqing'  //username on Sonatype Jira
                        name = 'maqing' //username on Sonatype Jira
                        email = '2856992713@qq.com'
                    }
                }
                // Version control info, if you're using GitHub, follow the format as seen here
                scm {
                    //Change to your Git address: https://github.com/maqing-programmer/openlibrary.git
                    connection = 'scm:git:github.com/maqing-programmer/openlibrary.git'
                    developerConnection = 'scm:git:ssh://github.com/maqing-programmer/openlibrary.git'
                    //Branch address:
                    url = 'https://github.com/maqing-programmer/openlibrary/tree/master'
                }
                // A slightly hacky fix so that your POM will include any transitive dependencies
                // that your library builds upon
                withXml {

                    def dependenciesNode = asNode().appendNode('dependencies')

                    project.configurations.implementation.allDependencies.each {
                        def dependencyNode = dependenciesNode.appendNode('dependency')
                        dependencyNode.appendNode('groupId', it.group)
                        dependencyNode.appendNode('artifactId', it.name)
                        dependencyNode.appendNode('version', it.version)
                    }

                }
            }
        }
    }
    repositories {
        // The repository to publish to, Sonatype/MavenCentral
        maven {
            // This is an arbitrary name, you may also use "mavencentral" or
            // any other name that's descriptive for you
            name = "Releases"

            def releasesRepoUrl = "https://s01.oss.sonatype.org/service/local/staging/deploy/maven2/"
            def snapshotsRepoUrl = "https://s01.oss.sonatype.org/content/repositories/snapshots/"
            // You only need this if you want to publish snapshots, otherwise just set the URL
            // to the release repo directly
            url = version.endsWith('SNAPSHOT') ? snapshotsRepoUrl : releasesRepoUrl

            // The username and password we've fetched earlier
            credentials {
                username ossrhUsername
                password ossrhPassword
            }
        }
    }
}

signing {
    sign publishing.publications
}
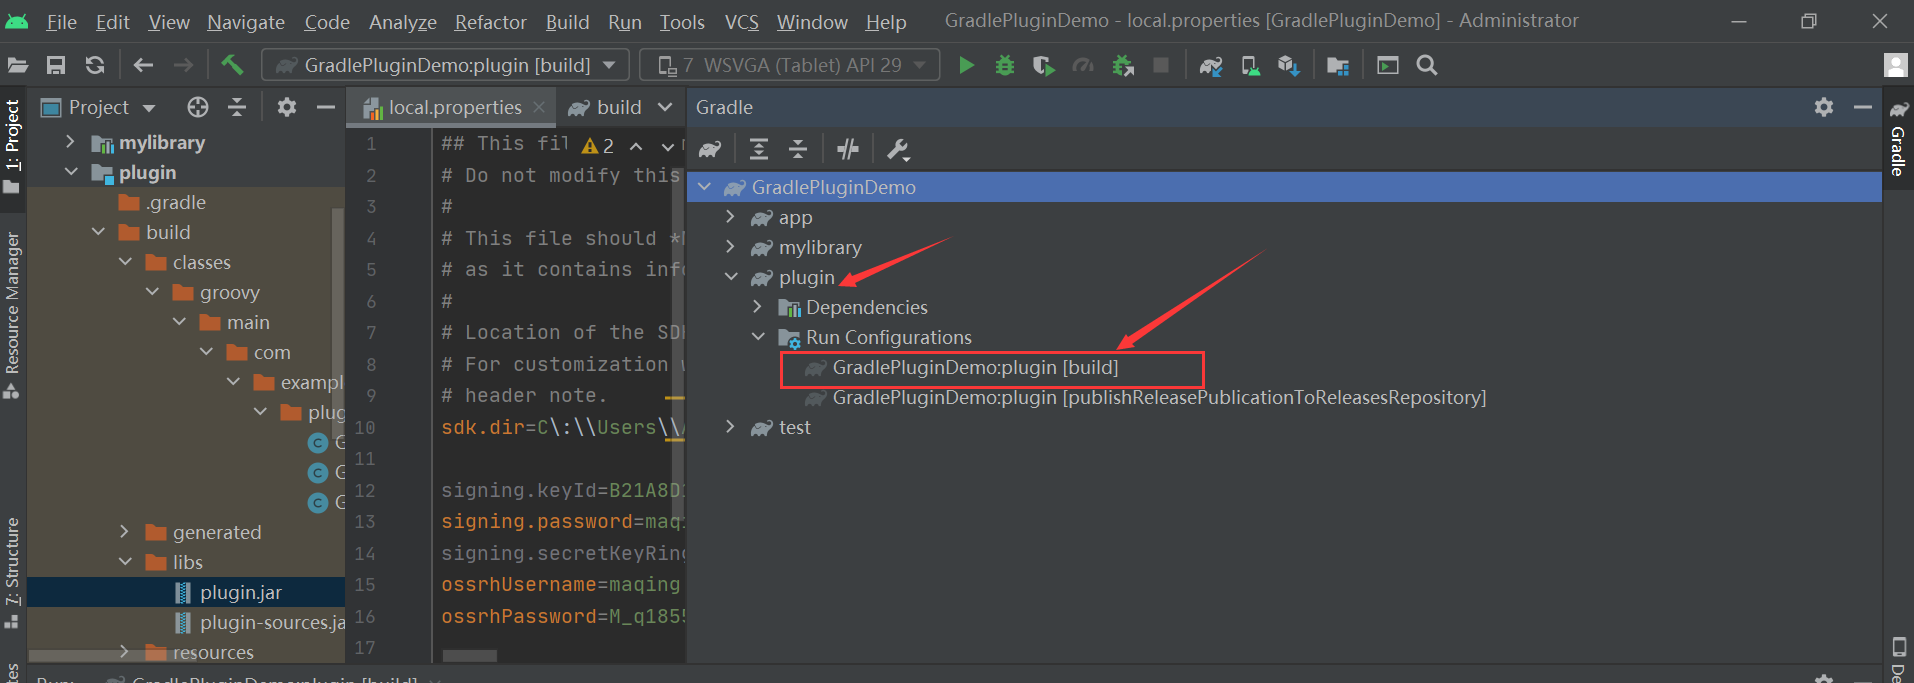
Then, in the root directory of the Android project, click local Add the following contents in properties;
signing.keyId=The last 8 digits of the new secret key
signing.password=Password set when creating a new key
signing.secretKeyRingFile=D\:\\key\\secring.gpg(Generated secring.gpg Location of)
ossrhUsername=Sonatype Registered user name
ossrhPassword=Sonatype Registered password
Then build. Under the module you want to submit Add the following code to the end of the gradle file:
apply from: '../publish_jar.gradle'
Then sync
4. Package and upload
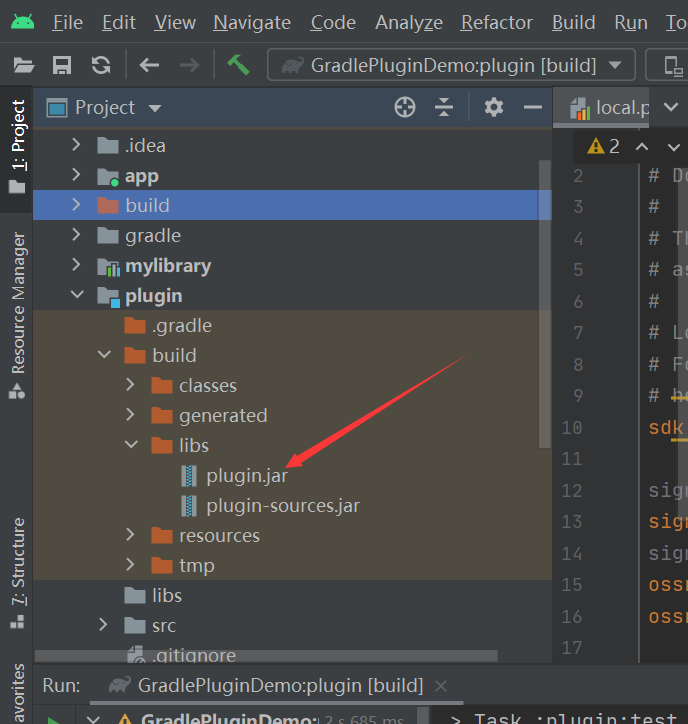
Before uploading, first package the source code of our Java Library as a jar file, and find the Module you want to submit in the task in the gradle window on the right side of Android Studio; Then execute the build task
After the build task is executed, there will be packaged jar files in the build/libs / directory of the Java Library directory
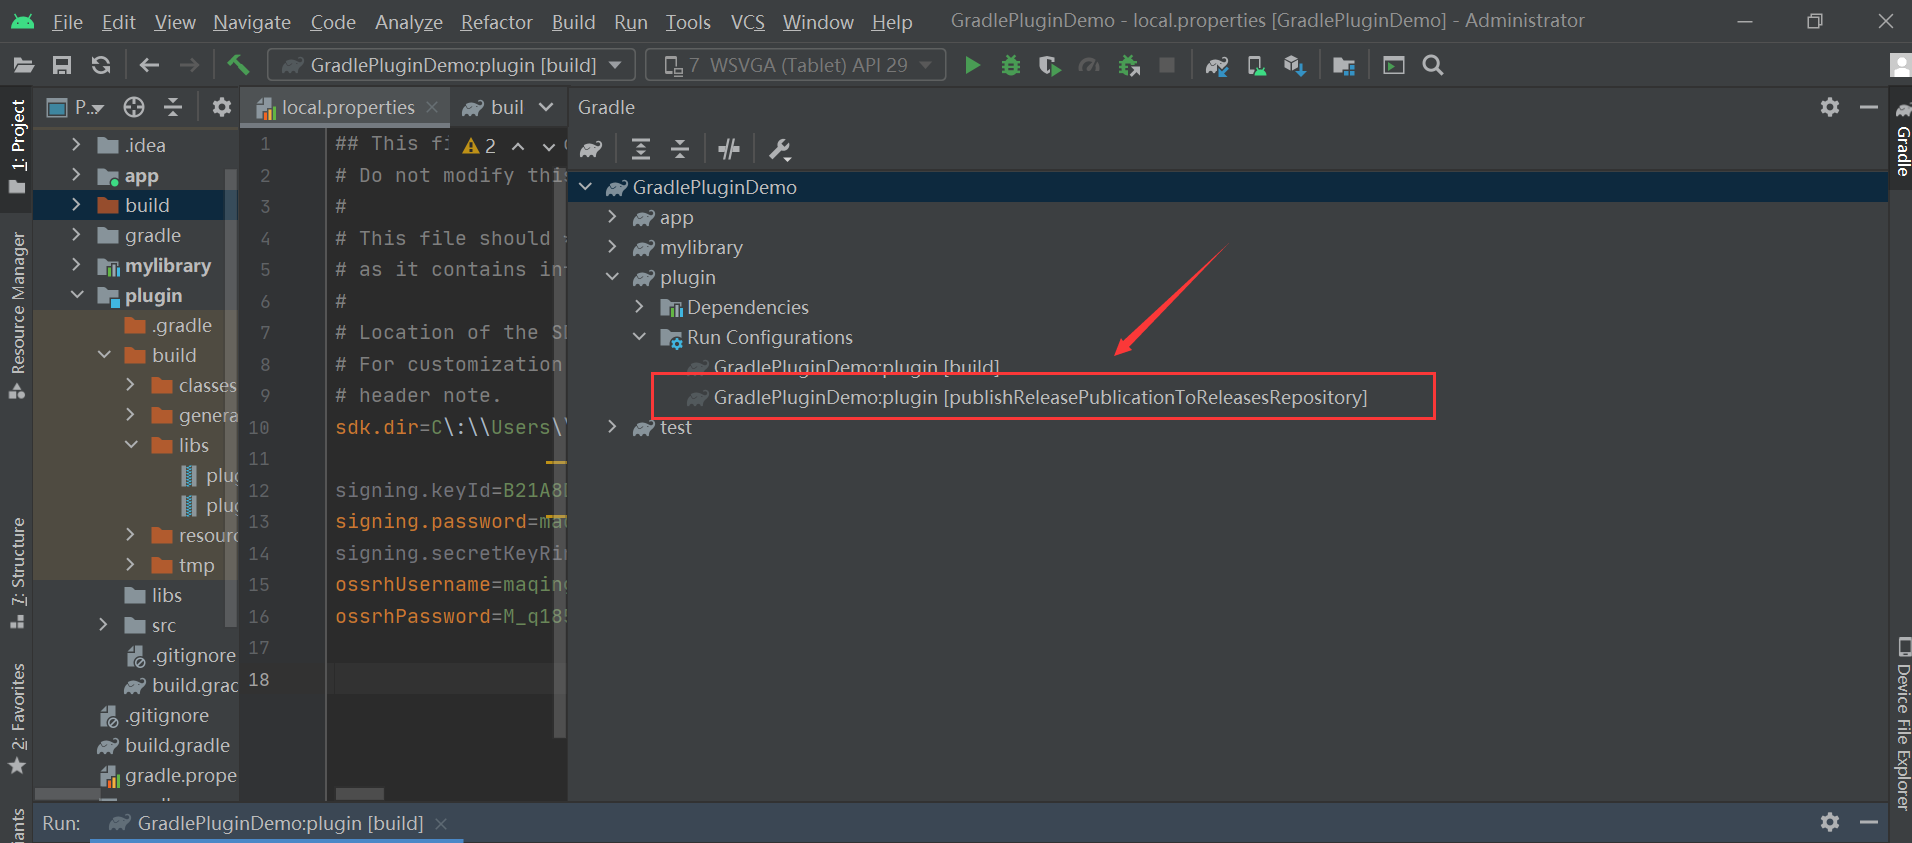
Then click the publishReleasePublicationToReleasesRepository task under the module
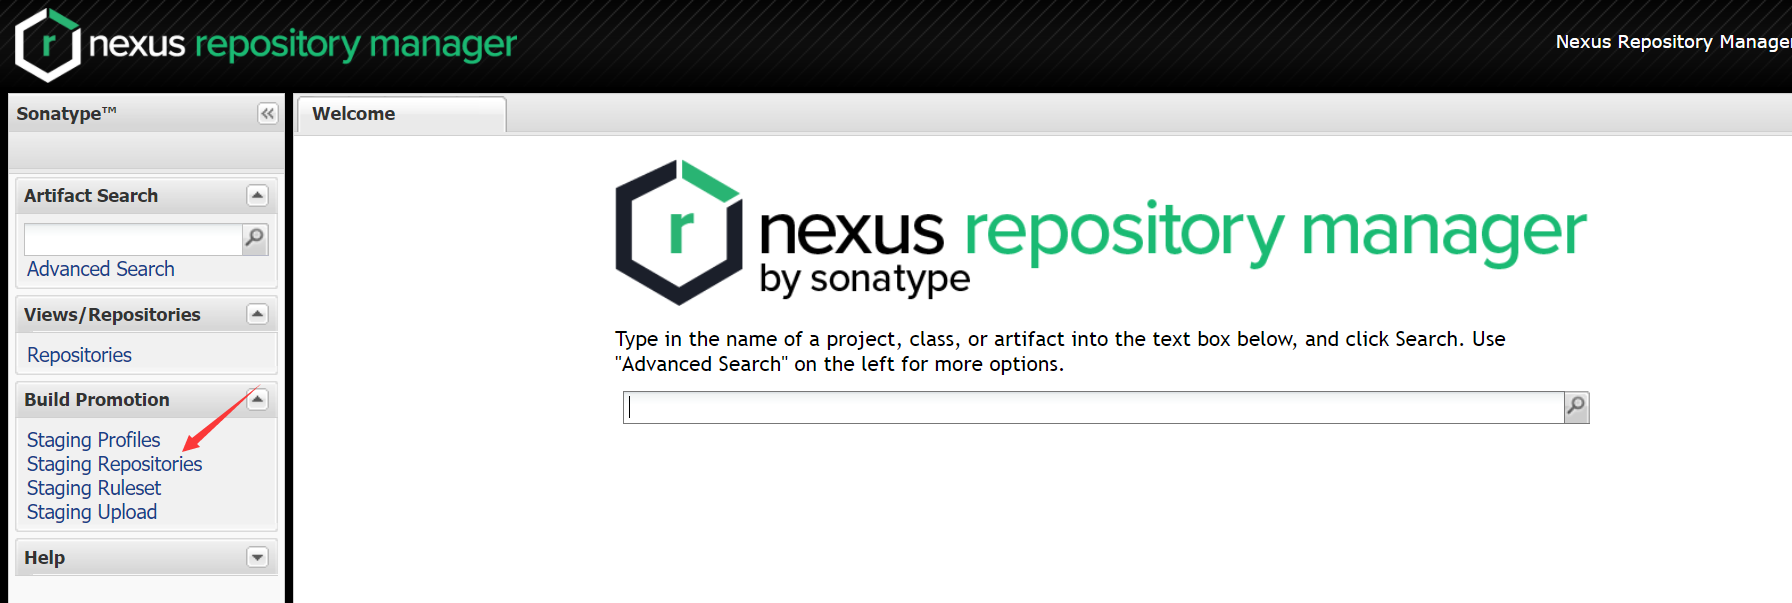
After the publishing task is executed, enter Nexus Repository Manager Log in, and the login account is the sonatype account. After logging in, find Staging Repositories in the menu on the left. Click this menu, you will see the temporary warehouse of the library corresponding to our groupId, and there will be a number. If there are multiple temporary warehouses, there will be multiple temporary warehouses with groupId number
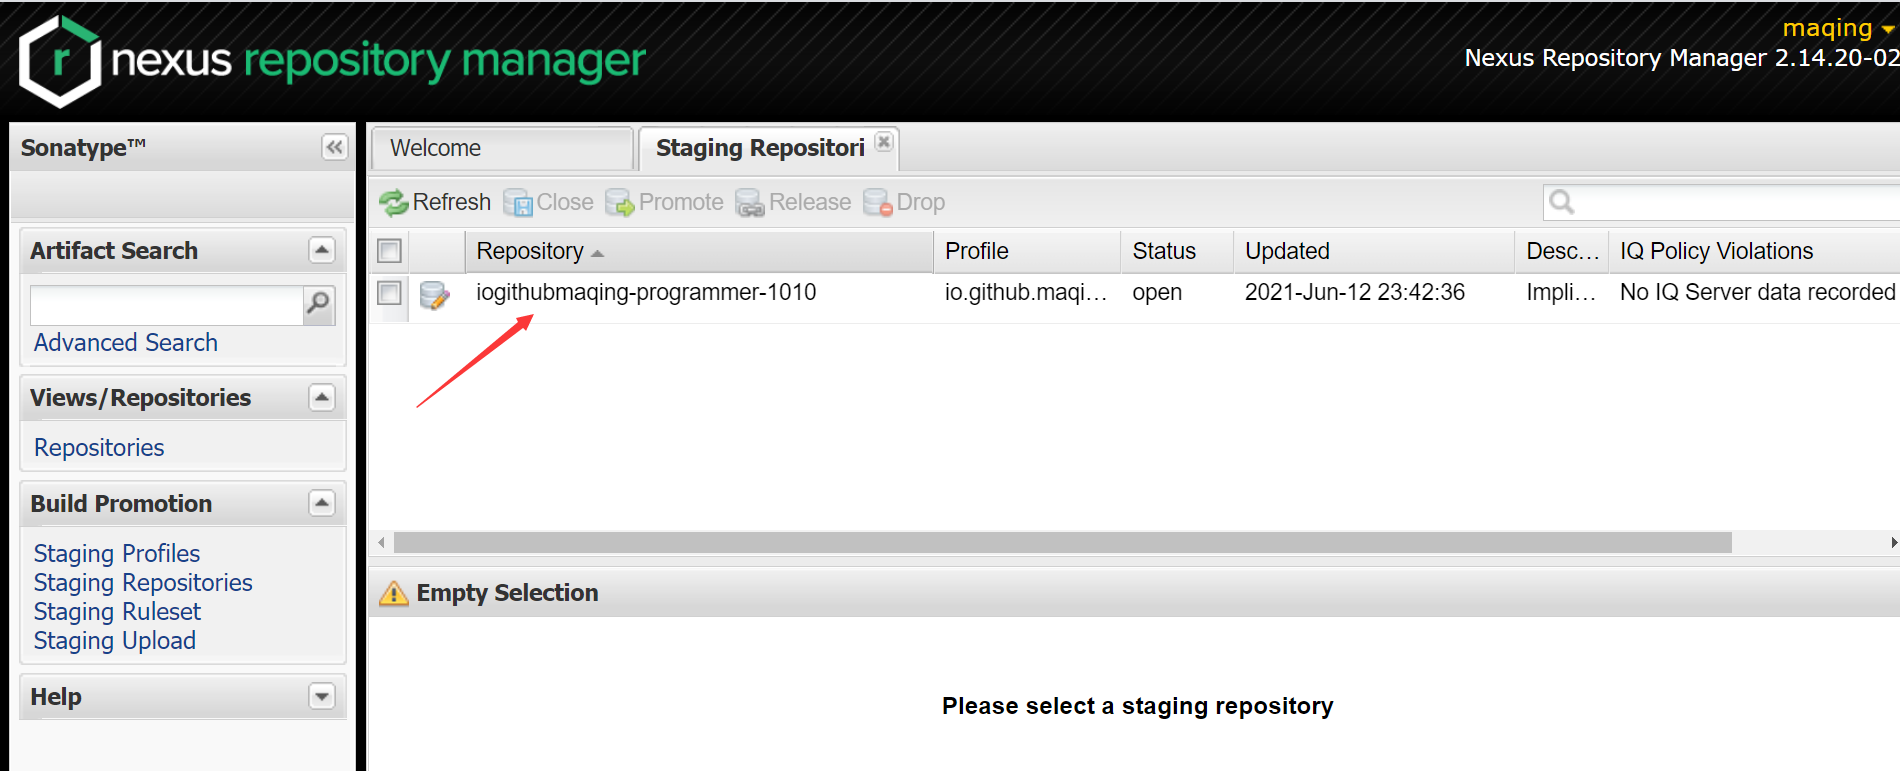
Then select the temporary warehouse corresponding to our library and click close to close the library
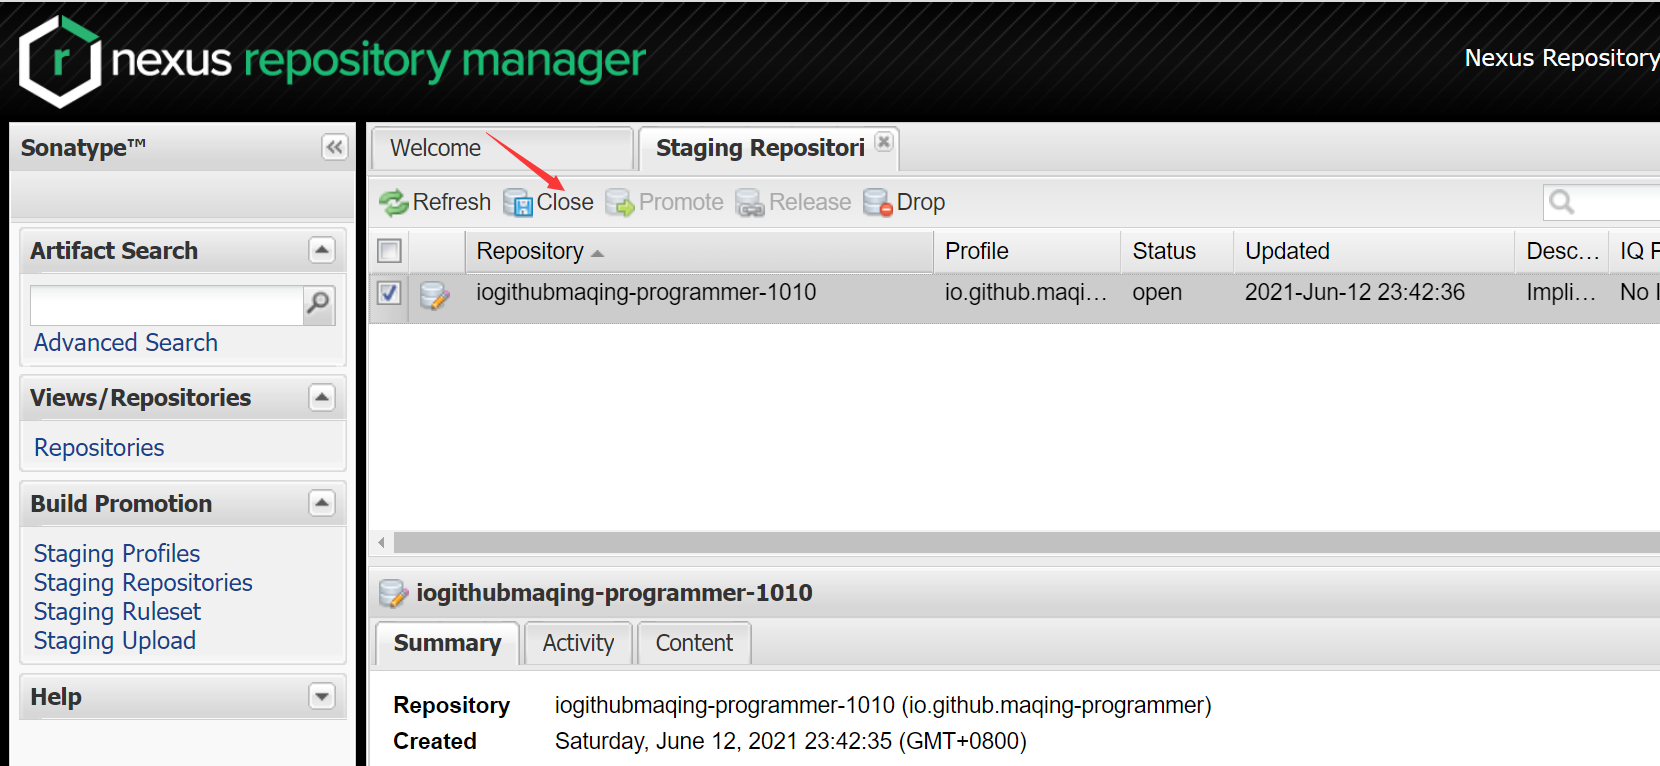
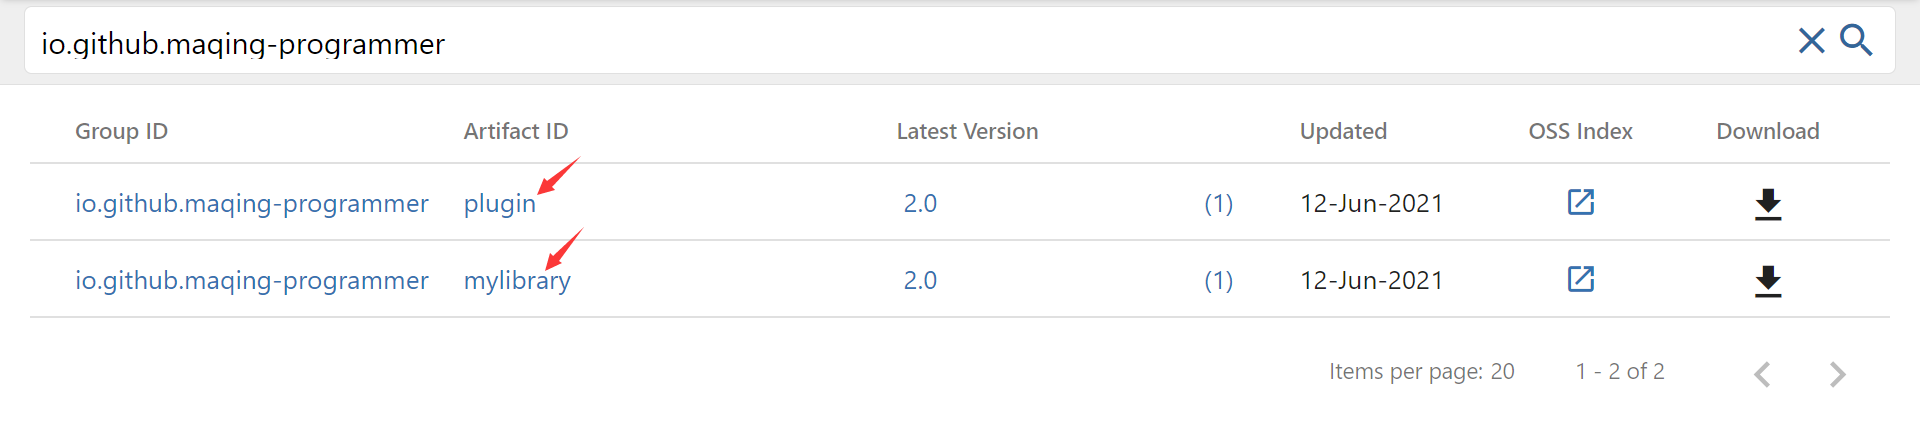
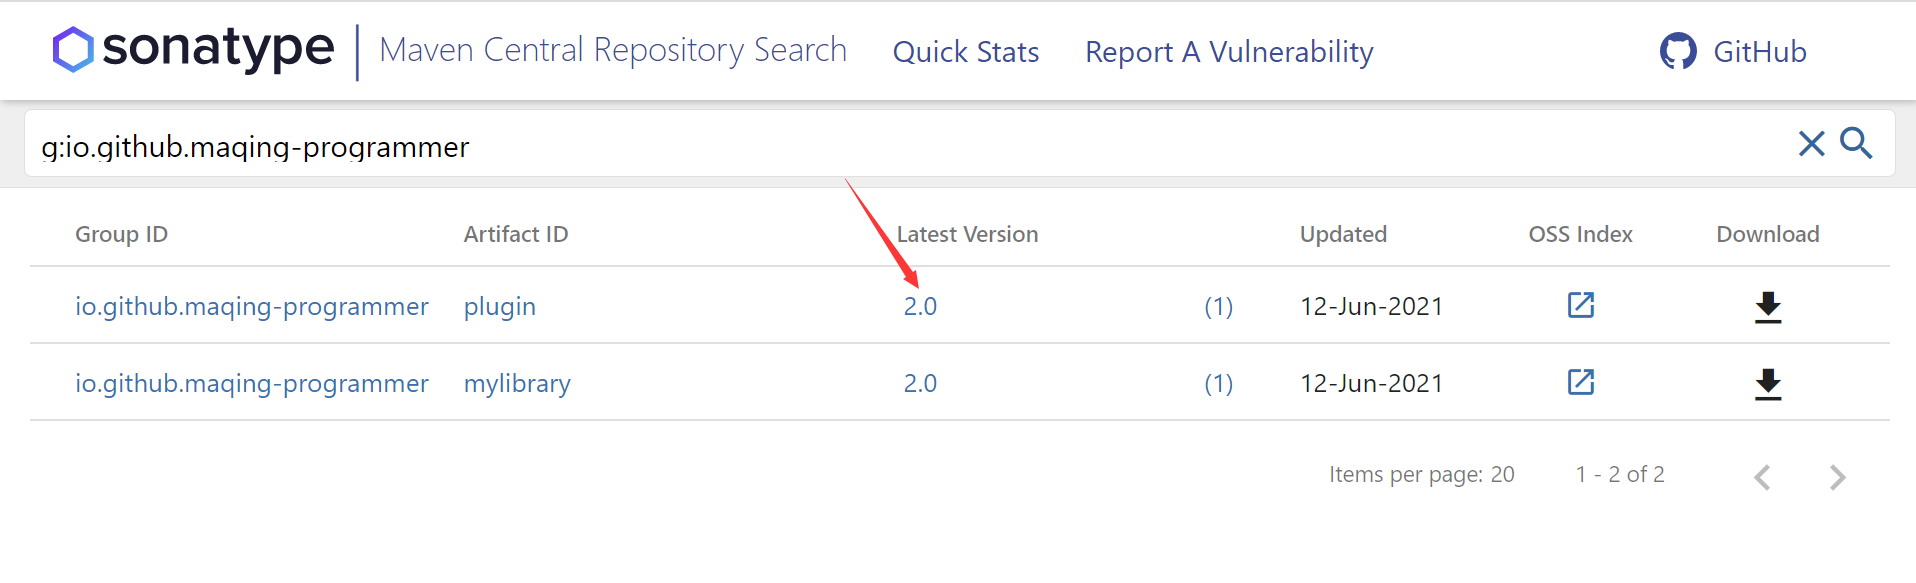
After closing successfully, click release to release the package. After releasing the package successfully, the temporary warehouse will no longer exist; Then wait for two hours, and then we https://search.maven.org/ You can search our library on. We can use groupId,
Or search by library name;
5. Use the library
If it is an ordinary Java Library, you can directly
implementation 'io. github. Maqing programmer: plugin: 2.0 'to use the library;
In fact, we can click the version number of this library on Maven central to enter the details of this library,
On the right is the method of how this library is referenced in various construction tools:
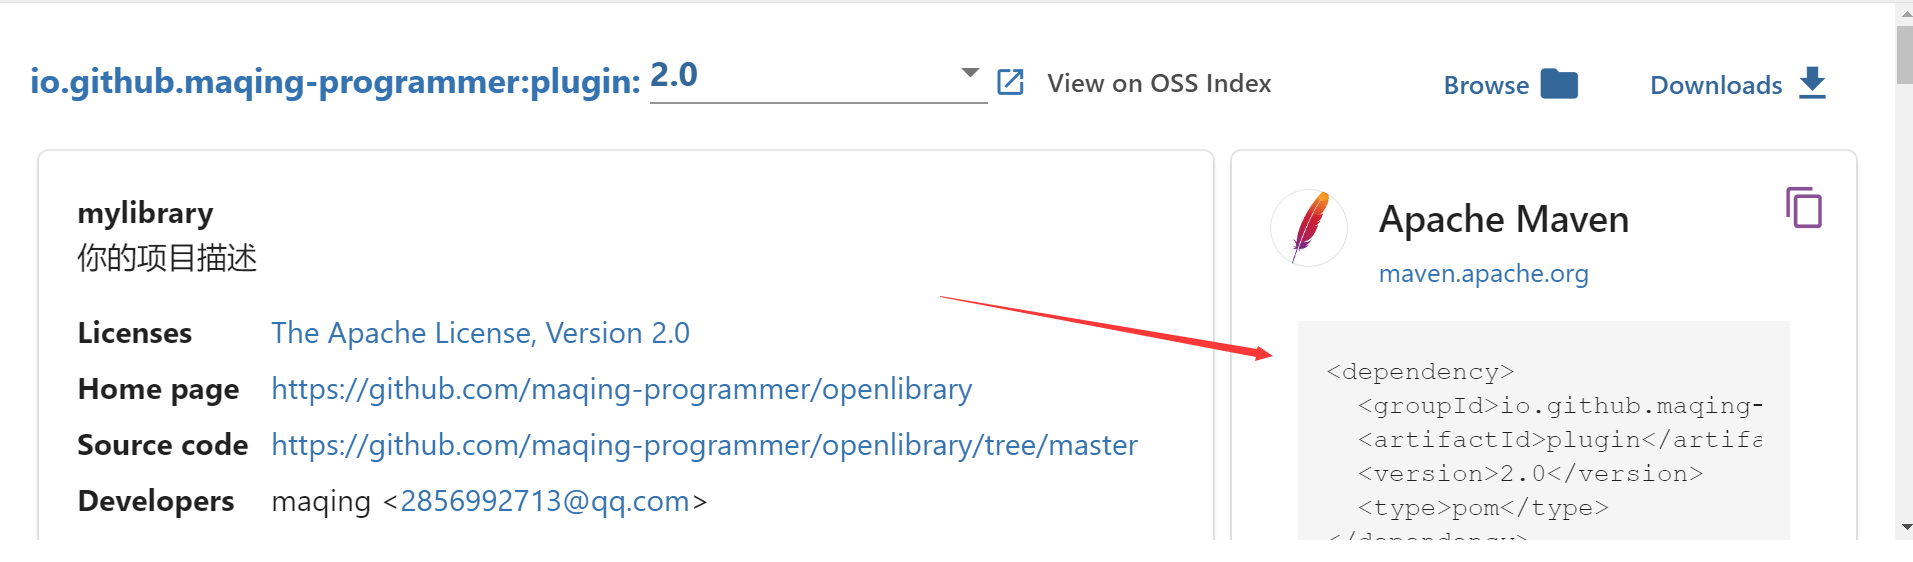
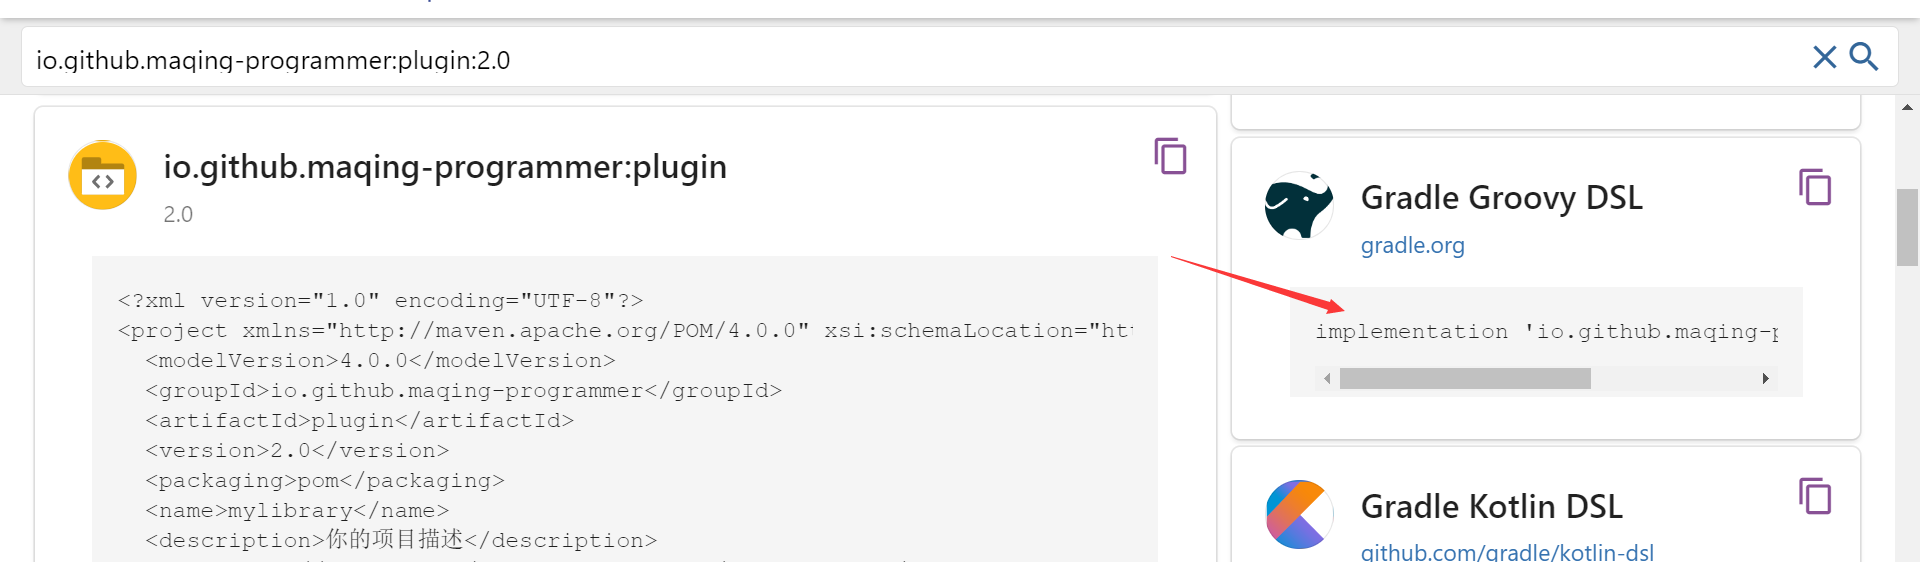
As shown in the figure above, it is in gradle
implementation 'io.github.maqing-programmer:plugin:2.0'
Use this way of reference;
The above is the process of uploading a Java Library(jar) library to Maven Central Library;
Upload an aar library to Maven Central
The basic steps of uploading aar library to Maven central are the same as those of uploading jar library, except that the type of moule we upload and the upload script in gradle preparation are different;
1. Create a new Android Library Module to upload
First, we need to create a new Android project, and then an Android Library Module. The new Android Library Module seems to have no res resource directory by default. We can create a new res resource directory under src/main, or directly copy the res resource directory under the main Module of the Android project to src/main under the Android Library Module;
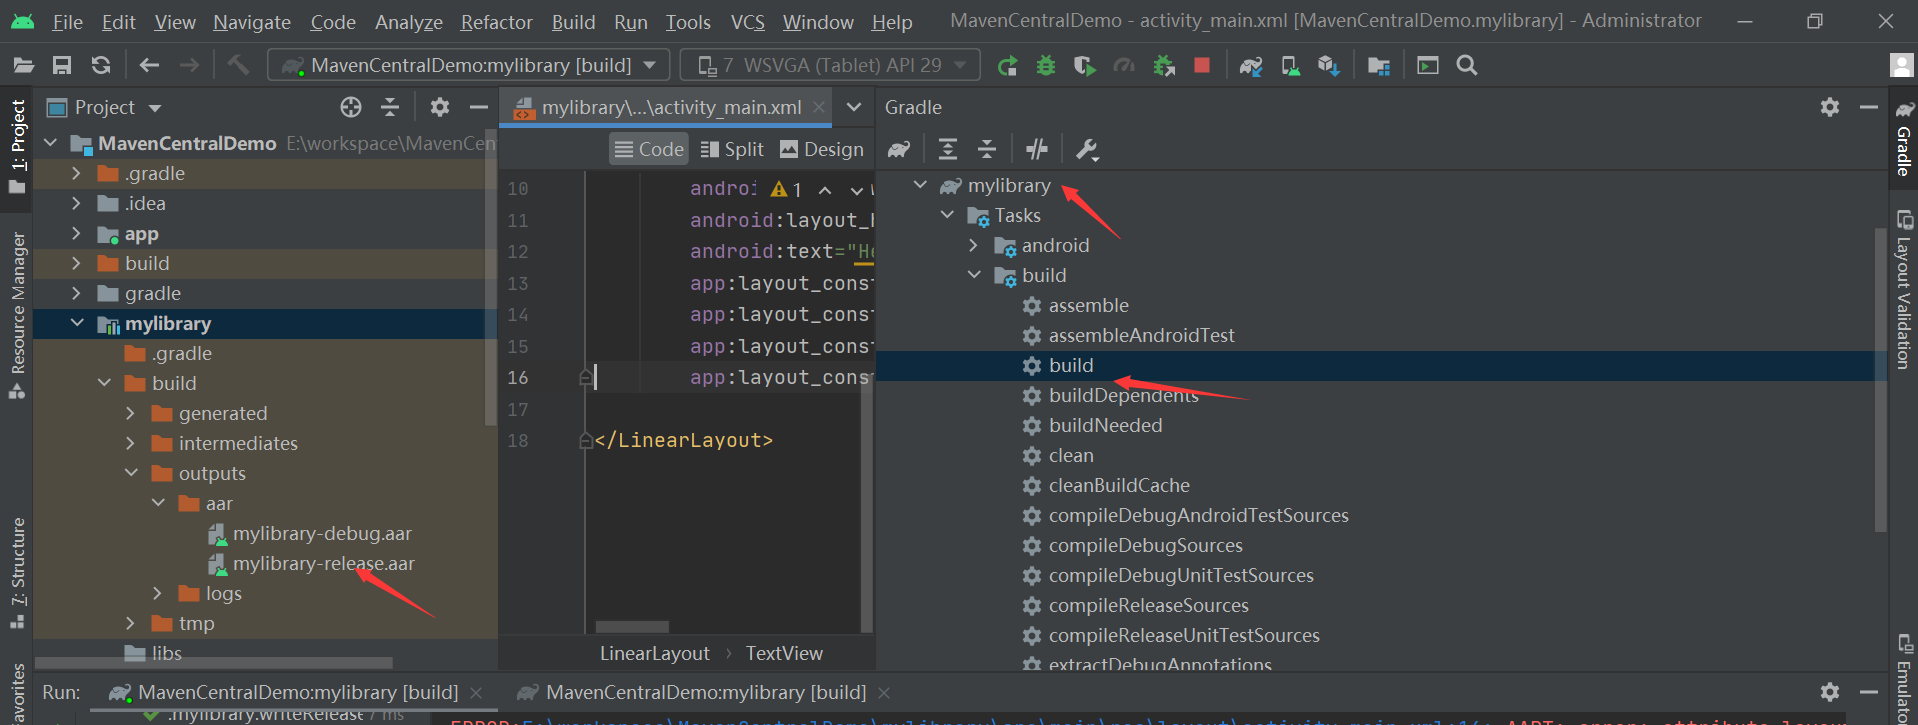
Then write our library code. After writing the library code, we will go to the gradle task on the right side of Android Studio
Window, find the build task in build under Tasks under our Android Library Module. After execution, our aar library file will be generated under the build/outputs/aar directory in Android Library Module;
2.gradle preparation
We need to prepare an uploaded gradle script file and create a new gradle file in the root directory of the Android project. Here we call it publish_aar.gradle;
apply plugin: 'maven-publish'
apply plugin: 'signing'

task androidSourcesJar(type: Jar) {
    classifier = 'sources'
//    from sourceSets.main.java.source
    from android.sourceSets.main.java.source
}

ext {
    PUBLISH_GROUP_ID = "io.github.maqing-programmer" //Project package name
    PUBLISH_ARTIFACT_ID = 'mylibrary'            //Project name
    PUBLISH_VERSION = 2.0                   //Version number
}

ext["signing.keyId"] = ''
ext["signing.password"] = ''
ext["signing.secretKeyRingFile"] = ''
ext["ossrhUsername"] = ''
ext["ossrhPassword"] = ''

File secretPropsFile = project.rootProject.file('local.properties')
if (secretPropsFile.exists()) {
    println "Found secret props file, loading props"
    Properties p = new Properties()
    p.load(new FileInputStream(secretPropsFile))
    p.each { name, value ->
        ext[name] = value
    }
} else {
    println "No props file, loading env vars"
}


publishing{
    publications{
        release(MavenPublication) {
            // The coordinates of the library, being set from variables that
            // we'll set up in a moment
            groupId "io.github.maqing-programmer"
            artifactId "mylibrary"
            version '2.0'

            // Two artifacts, the `aar` and the sources
            artifact("$buildDir/outputs/aar/${project.getName()}-release.aar")
            artifact androidSourcesJar
            // Self-explanatory metadata for the most part
            pom {
                name = PUBLISH_ARTIFACT_ID
                description = 'Your project description'
                // If your project has a dedicated site, use its URL here
                url = 'https://github.com/maqing-programmer/openlibrary'
                licenses {
                    license {
                        //The protocol type is generally Apache License2.0 by default 0 does not need to be changed:
                        name = 'The Apache License, Version 2.0'
                        url = 'http://www.apache.org/licenses/LICENSE-2.0.txt'
                    }
                }
                developers {
                    developer {
                        id = 'maqing'
                        name = 'maqing'
                        email = '2856992713@qq.com'
                    }
                }
                // Version control info, if you're using GitHub, follow the format as seen here
                scm {
                    //Change to your Git address: https://github.com/maqing-programmer/openlibrary.git
                    connection = 'scm:git:github.com/maqing-programmer/openlibrary.git'
                    developerConnection = 'scm:git:ssh://github.com/maqing-programmer/openlibrary.git'
                    //Branch address:
                    url = 'https://github.com/maqing-programmer/openlibrary/tree/master'
                }
                // A slightly hacky fix so that your POM will include any transitive dependencies
                // that your library builds upon
                withXml {

                    def dependenciesNode = asNode().appendNode('dependencies')

                    project.configurations.implementation.allDependencies.each {
                        def dependencyNode = dependenciesNode.appendNode('dependency')
                        dependencyNode.appendNode('groupId', it.group)
                        dependencyNode.appendNode('artifactId', it.name)
                        dependencyNode.appendNode('version', it.version)
                    }

                }
            }
        }
    }
    repositories {
        // The repository to publish to, Sonatype/MavenCentral
        maven {
            // This is an arbitrary name, you may also use "mavencentral" or
            // any other name that's descriptive for you
            name = "Releases"

            def releasesRepoUrl = "https://s01.oss.sonatype.org/service/local/staging/deploy/maven2/"
            def snapshotsRepoUrl = "https://s01.oss.sonatype.org/content/repositories/snapshots/"
            // You only need this if you want to publish snapshots, otherwise just set the URL
            // to the release repo directly
            url = version.endsWith('SNAPSHOT') ? snapshotsRepoUrl : releasesRepoUrl

            // The username and password we've fetched earlier
            credentials {
                username ossrhUsername
                password ossrhPassword
            }
        }
    }
}

signing {
    sign publishing.publications
}
Then we found gradle. Com in the Android root directory Add the following configuration under properties:
VERSION_NAME=1.0.2
VERSION_CODE=2
GROUP_ID=io.github.maqing-programmer

POM_DESCRIPTION=Android Download Library
POM_URL=https://github.com/maqing-programmer/openlibrary
POM_SCM_URL=https://github.com/maqing-programmer/openlibrary/tree/master
POM_SCM_CONNECTION=scm:git:github.com/maqing-programmer/openlibrary.git
POM_SCM_DEV_CONNECTION=scm:git:ssh://github.com/maqing-programmer/openlibrary.git
POM_LICENCE_NAME=The Apache Software License, Version 2.0
POM_LICENCE_URL=http://www.apache.org/licenses/LICENSE-2.0.txt
POM_LICENCE_DIST=Apache 2.0
POM_DEVELOPER_ID=maqing
POM_DEVELOPER_NAME=maqing
Of course, just like uploading the jar library, it should also be in the local directory under the root directory of the Android project Add the following configuration under properties
signing.keyId=The last 8 digits of the new secret key
signing.password=Password set when creating a new key
signing.secretKeyRingFile=D\:\\key\\secring.gpg(Generated secring.gpg Location of)
ossrhUsername=Sonatype Registered user name
ossrhPassword=Sonatype Registered password
Then in the build.exe of Android Library Module Add the following code to the tail of gradle
apply from: "${rootProject.projectDir}/publish_aar.gradle"
Then synchronize;
3. Upload aar library to Maven Central
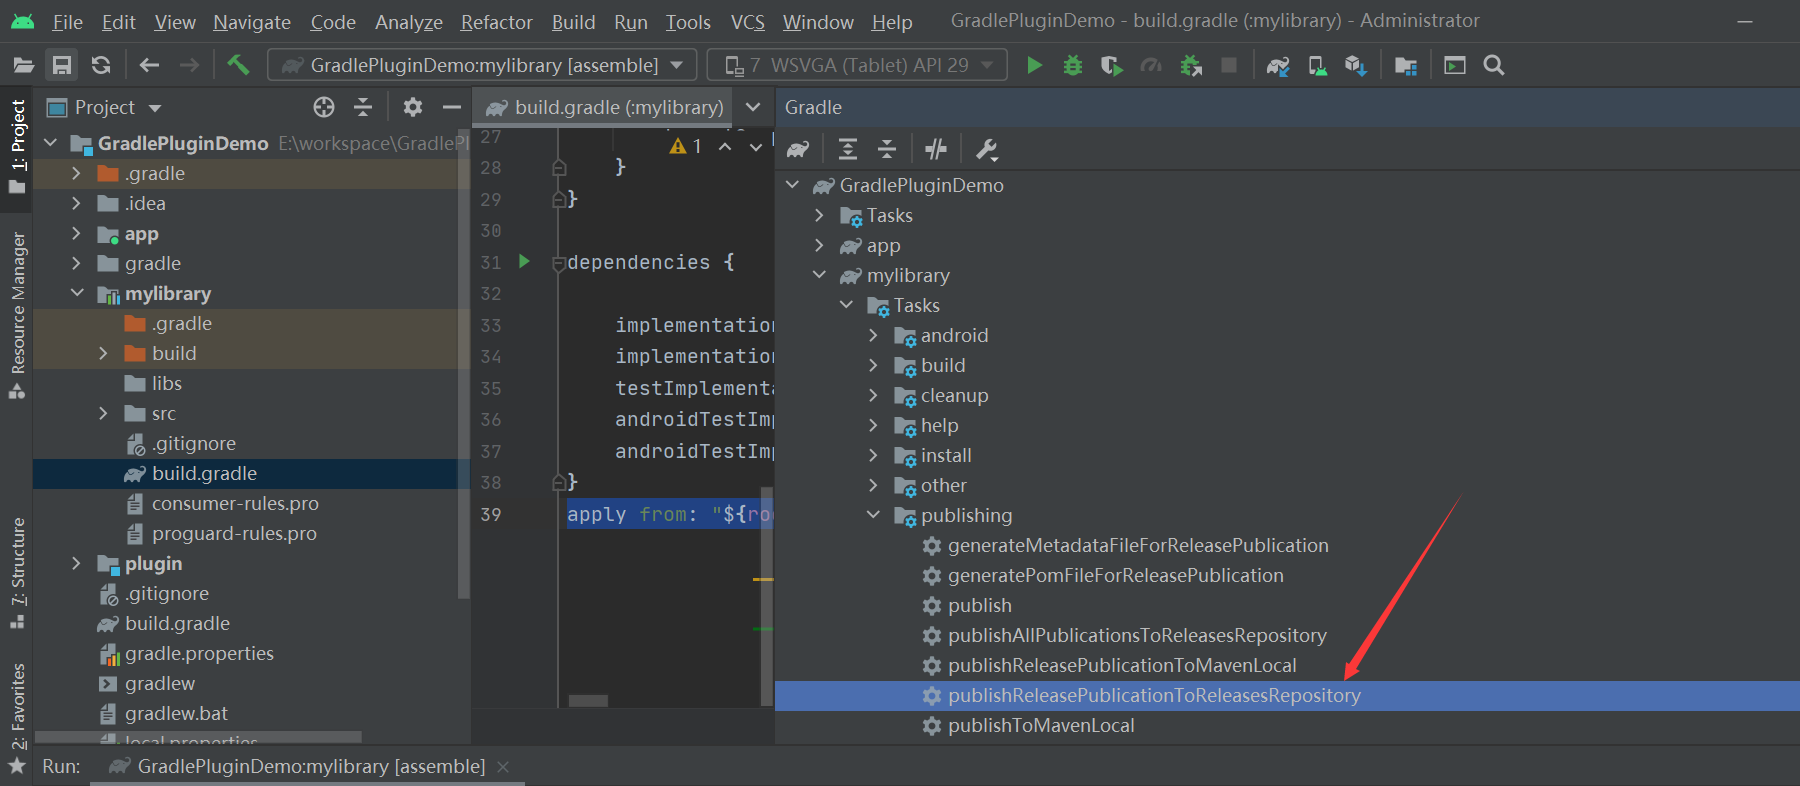
In the gradle task window on the right side of Android Studio, find our Android Library Module, then find the publishing task under Tasks under the Module, and then click publishReleasePublicationToReleasesRepository under the task;
After the task is executed, the subsequent steps are the same as those in uploading the jar library. Go to Nexus Repository Manager Execute the corresponding close and release operations on, and then wait for 2 hours, and then we https://search.maven.org/ You can search our library on. We can search through groupId or library name; Then you can use the aar library. The use method in gradle is the same as that in jar library;
implementation 'io.github.maqing-programmer:mylibrary:2.0'
The above is the process of uploading aar database to Maven central;
Article content reference: