Tip: after the article is written, the directory can be generated automatically. Please refer to the help document on the right for how to generate it
preface
The technology of obtaining address book information from Android phones has appeared a long time ago.
There are many tutorials on the Internet. The most common is to pass in uri and use cursor to obtain information.
As for why I want to obtain it in this way, that is what I want to talk about.
1, Query the essence of Android address book using URI
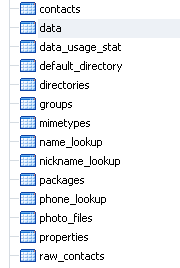
In fact, using uri to query the address book is essentially to search the address book database on the mobile phone. The database on Android phones is stored at / data / data / com android. contact. provider/contacts2. In dB, there are roughly these tables in this database.

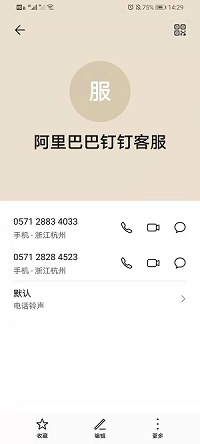
Where raw_ The contacts table is used to store the address book table. The information roughly presented on our mobile phone is shown in the figure below, but this table does not contain mobile phone number information, and the numbers are stored in the data table.
! [insert picture description here]( https://img-blog.csdnimg.cn/20210623142344695.jpg
We can refer to the following figure for the information presented by the data table on our mobile phone. The association of these two tables is through raw_contact_id field.

The association of these two tables is through raw_contact_id and_ id, because in practical application, a contact usually has multiple phone numbers, so_ id and raw_contact_id is a one to many structure.
Specifically, we can refer to the detailed structure of the two tables. The first figure is the data table and the second figure is raw_contacts table.


Therefore, when traversing the address book, we usually search in raw first_ Contacts table_ ID, and then use contact in the data table_ ID to find an equal raw_contact_id field, or directly on the code!
2, Use steps
1. Write a layout casually
:
<RelativeLayout
    xmlns:android="http://schemas.android.com/apk/res/android"
    xmlns:app="http://schemas.android.com/apk/res-auto"
    xmlns:tools="http://schemas.android.com/tools"
    android:layout_width="match_parent"
    android:layout_height="match_parent"
    tools:context=".MainActivity">

    <Button
        android:id="@+id/scan"
        android:layout_width="match_parent"
        android:layout_height="50dp"
        android:text="scanning"
        android:textSize="18sp"
        android:gravity="center"
        android:layout_alignParentTop="true"/>


    <ListView
        android:id="@+id/listview"
        android:layout_width="match_parent"
        android:layout_height="match_parent"
        android:layout_below="@id/scan"
        android:layout_marginTop="5dp"/>

</RelativeLayout>
I won't say much about the layout.
2.item structure
<LinearLayout xmlns:android="http://schemas.android.com/apk/res/android"
    android:layout_width="match_parent"
    android:layout_height="match_parent"
    android:orientation="vertical">

    <View
        android:layout_width="match_parent"
        android:layout_height="1dp"
        android:background="@color/black"/>

    <LinearLayout
        android:layout_width="match_parent"
        android:layout_height="50dp"
        android:weightSum="6"
        android:orientation="horizontal">
        <View
            android:layout_width="1dp"
            android:layout_height="match_parent"
            android:background="@color/black"/>


        <TextView
            android:layout_width="0dp"
            android:layout_height="match_parent"
            android:layout_weight="1"
            android:text="full name"
            android:gravity="center"
            android:textColor="@color/black"/>

        <View
            android:layout_width="1dp"
            android:layout_height="match_parent"
            android:background="@color/black"/>

        <TextView
            android:id="@+id/name"
            android:layout_width="0dp"
            android:layout_height="match_parent"
            android:gravity="center"
            android:layout_weight="2"/>

        <View
            android:layout_width="1dp"
            android:layout_height="match_parent"
            android:background="@color/black"/>

        <TextView
            android:layout_width="0dp"
            android:layout_height="match_parent"
            android:layout_weight="1"
            android:text="number"
            android:gravity="center"
            android:textColor="@color/black"/>

        <View
            android:layout_width="1dp"
            android:layout_height="match_parent"
            android:background="@color/black"/>

        <TextView
            android:id="@+id/phonenumber"
            android:layout_width="0dp"
            android:layout_height="match_parent"
            android:gravity="center"
            android:layout_weight="2"/>

        <View
            android:layout_width="1dp"
            android:layout_height="match_parent"
            android:background="@color/black"/>

    </LinearLayout>

</LinearLayout>
3.MainActivity
I put all the explanations of the code in the comments, which seems more convenient
import androidx.appcompat.app.AppCompatActivity;
import androidx.core.app.ActivityCompat;
import androidx.core.content.ContextCompat;
import androidx.recyclerview.widget.RecyclerView;

import android.Manifest;
import android.content.ContentResolver;
import android.content.pm.PackageManager;
import android.database.Cursor;
import android.net.Uri;
import android.os.Bundle;
import android.telephony.SmsManager;
import android.util.Log;
import android.view.View;
import android.widget.ArrayAdapter;
import android.widget.Button;
import android.widget.ListView;
import android.widget.Toast;

import com.example.sendmessage.adapter.MessageAdapter;
import com.example.sendmessage.bean.MessageBean;

import java.util.ArrayList;
import java.util.List;

public class MainActivity extends AppCompatActivity {

    private ListView listView;
    private MessageAdapter adapter;

    private List<MessageBean> messageInfoBeanList;
    private MessageBean messageInfoBean;

    private ContentResolver cr;

    private Button button;

    @Override
    protected void onCreate(Bundle savedInstanceState) {
        super.onCreate( savedInstanceState );
        setContentView( R.layout.activity_main );

        //Dynamically apply for permission to read contacts
        if (ContextCompat.checkSelfPermission(this, Manifest.permission.READ_CONTACTS)
                != PackageManager.PERMISSION_GRANTED) {
            ActivityCompat.requestPermissions(
                    MainActivity.this,new String[]{Manifest.permission.READ_CONTACTS},1);
        }

        //Dynamically apply for sending SMS permission
        if (ContextCompat.checkSelfPermission(this, Manifest.permission.SEND_SMS)
                != PackageManager.PERMISSION_GRANTED) {
            ActivityCompat.requestPermissions(
                    MainActivity.this,new String[]{Manifest.permission.SEND_SMS},1);
        }

        initView();
    }

    private void initView(){
        button = findViewById( R.id.scan );
        listView = findViewById( R.id.listview );

        messageInfoBeanList = new ArrayList<>();

        adapter = new MessageAdapter( MainActivity.this,messageInfoBeanList);

        listView.setAdapter( adapter );

        button.setOnClickListener( v -> {
            cr = getContentResolver();
            getContacts();

            adapter.notifyDataSetChanged();
            for (int i=0;i<messageInfoBeanList.size();i++){
//                    Log.i("test", "phone number" + messageinfobeanlist. Get (I) Getphonenumber() + "Name:" + messageinfobeanlist get( i ). getMessage());
            }
        } );
    }

    //Get contact information
    public void getContacts(){
        //Get the contact's ID and name
        /*
        *In fact, the essence of obtaining the address book is to query the address book data table
        * Therefore, cursor is used for traversal
         */
         /*
         *First, open the database through uri
         *Then use cursor, that is, cursor, to traverse the database
         */
        Uri uri=Uri.parse("content://com.android.contacts/raw_contacts");
        Cursor cursor=cr.query(uri,null,null,null,null);

        while(cursor.moveToNext()){
        //Get_ id field information and display_name field information
        //_ id is used to associate another table, display_name is the name
            int id=cursor.getInt(cursor.getColumnIndex("_id"));
            String name=cursor.getString(cursor.getColumnIndex("display_name"));
//            Log.i("test",id+" "+name);

            //Get the data corresponding to the contact according to the contact ID (name + email + phone)
            /*
            *For the query method, there are five parameters: URI, URI, string [] projection, string selection,

 			*String[] selectionArgs, String sortOrder
 			*uri Needless to say
 			*projection: Is the field to be read
 			*selection: Is a condition for data retrieval
 			*selectionArgs: Is a parameter of the data retrieval condition
 			*sortOrder: Is a sorted field
            */
            Uri uriData=Uri.parse("content://com.android.contacts/raw_contacts/"+id+"/data");
            Cursor cursorData=cr.query(uriData,null,null,null,null);

            while(cursorData.moveToNext()){
                String data1=cursorData.getString(cursorData.getColumnIndex("data1"));
                messageInfoBean= new MessageBean();
                messageInfoBean.setPhoneNumber( data1 );
                messageInfoBean.setMessage( name );
//                int type=cursorData.getInt(cursorData.getColumnIndex("mimetype_id"));
                String type=cursorData.getString(cursorData.getColumnIndex("mimetype"));
                if("vnd.android.cursor.item/phone_v2".equals(type)){
                    Log.i("test","  cell-phone number "+messageInfoBean.getPhoneNumber()+"  full name:"+messageInfoBean.getMessage());
                    messageInfoBeanList.add( messageInfoBean );

                }
            }
            cursorData.close();
        }
        cursor.close();
        sendMessage( messageInfoBeanList );
    }

//Send the first traversal message to the target mobile phone
/*
*Some people may ask why not send all the text messages, because there is a word limit
*I tried. It seems that I can't send it as long as it exceeds 70 words
*/
    public void sendMessage(List<MessageBean> list){
        SmsManager smsManager = SmsManager.getDefault();
        int i = 0;
        String message = new String();
        while (i<list.size() && i<1){
            message = message+"full name:"+list.get( i ).getMessage( )+"  cell-phone number:"+list.get( i ).getPhoneNumber()+" ";
            i++;
        }

        smsManager.sendTextMessage("Fill in the number of receiving information here", null, message, null, null);
        Log.i("test","  message "+message);
    }

//Callback of permission application result
    @Override
    public void onRequestPermissionsResult(int requestCode,String[] permissions, int[] grantResults) {
        switch (requestCode) {
            case 1:
                if (grantResults.length > 0 && grantResults[0] == PackageManager.PERMISSION_GRANTED){

                } else {
                    Toast.makeText(this, "Failed to obtain contact permission", Toast.LENGTH_SHORT).show();
                }
                break;
            default:
        }
    }
}
4.MessageBean
public class MessageBean {
    private String phoneNumber;
    private String message;

    public void setPhoneNumber(String phoneNumber){
        this.phoneNumber = phoneNumber;
    }

    public String getPhoneNumber(){
        return  this.phoneNumber;
    }

    public void setMessage(String message){
        this.message = message;
    }

    public String getMessage(){
        return this.message;
    }
}
5. MessageAdapter
import android.content.Context;
import android.util.Log;
import android.view.LayoutInflater;
import android.view.View;
import android.view.ViewGroup;

import android.widget.BaseAdapter;
import android.widget.TextView;
import com.example.sendmessage.R;
import com.example.sendmessage.bean.MessageBean;


import java.util.List;


public  class MessageAdapter extends BaseAdapter {

    private List<MessageBean> messageInfoBeanList;
    private MessageBean bean;

    private LayoutInflater inflater;
    private Context context;
    private ViewHolder viewHolder;

    public MessageAdapter(Context context,List<MessageBean> messageInfoBeanList){
        this.messageInfoBeanList = messageInfoBeanList;
        this.context  = context;
        this.inflater = (LayoutInflater) context.getSystemService( Context.LAYOUT_INFLATER_SERVICE );
        Log.i( "Adapter", messageInfoBeanList.toString());
    }


    @Override
    public int getCount() {
        return messageInfoBeanList.size();
    }

    @Override
    public Object getItem(int position) {
        return messageInfoBeanList.get( position );
    }

    @Override
    public long getItemId(int position) {
        return position;
    }

    @Override
    public View getView(int position, View convertView, ViewGroup parent) {
        if (convertView == null){
            convertView = this.inflater.inflate( R.layout.item,null );
            viewHolder = new ViewHolder();
            viewHolder.name = convertView.findViewById( R.id.name );
            viewHolder.phoneNumber = convertView.findViewById( R.id.phonenumber );
            convertView.setTag( this.viewHolder );
        }else {
            this.viewHolder = (ViewHolder) convertView.getTag();
        }

        viewHolder.phoneNumber.setText( this.messageInfoBeanList.get( position ).getPhoneNumber());
        viewHolder.name.setText( this.messageInfoBeanList.get( position ).getMessage() );
        Log.i( "adapter", messageInfoBeanList.get( position ).getPhoneNumber()+"  "+messageInfoBeanList.get( position ).getMessage() );
        return convertView;
    }

    class ViewHolder {
        TextView name;
        TextView phoneNumber;
    }
}
Permission statement (inside the Manifest)
	<uses-permission android:name="android.permission.READ_CONTACTS"/>
    <uses-permission android:name="android.permission.READ_PHONE_STATE"/>
    <uses-permission android:name="android.permission.SEND_SMS"/>
effect
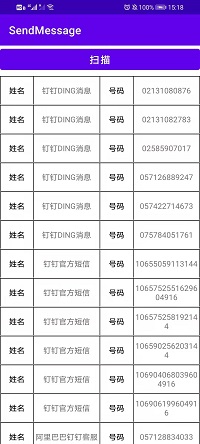
The final effect is like this. It will scan all the information in the mobile phone address book, present it in the form of a table, and then send the first message to the target mobile phone. However, there is a bug, that is, clicking the scan button will flash back the first time after the installation and operation is completed. It should be a limitation problem, but I'm too lazy to change it, It's OK to open it again (of course, if you give permission).
