Limited space
Full content and source code: official account: ReverseCode, send punch
Brush machine
https://developers.google.com/android/images#angler
Power on Key + volume reduction to enter recovery
Pixel
ES file browser View system files
Playing reverse requires a real machine, so it's Google's own son. The simulator lacks the native/so layer and belongs to the simplified version system, so it's still a real machine.
- Official website Download pixel 8.1.0 image , it is recommended to brush OPM1.171019.011 Android 8.1.0
adb reboot bootloader Or press and hold the volume down key and power on key to enter fastboot state
cd sailfish-opm4.171019.021.p1-factory-0bcf4315/sailfish-opm4.171019.021.p1 && flash-all.sh Start brushing
Settings - about mobile phone - click under version 8 - enter developer mode, enter system - Advanced - Open developer options - USB debugging
adb push Magisk-v20.4.zip /sdcard
adb push magisk-riru-v21.3.zip /sdcard/Download use magisk Module installation and restart
adb push magisk-EdXposed-SandHook-v0.4.5.1_beta.4463.-release.zip /sdcard/Download  use magisk Module installation and restart
adb install EdXposedManager-4.5.7-45700-org.meowcat.edxposed.manager-release.apk    install xposed
adb push MagiskHidePropsConf-v5.3.4.zip /sdcard/Download
adb install JustTrustMePlus-debug.apk  For combination xposed Breach SSL Pinning Packet capture limit
twrp As a third-party brush tool, brush into magic change systems such as Magisk and nethunter.
fastboot flash recovery twrp-3.3.0-0-angler.img
adb reboot bootloader
fastboot boot twrp-3.4.0-0-sailfish.img   get into recovery mode
install Magisk-v20.4.zip
adb install MagiskManager-v7.5.1.apk
settings put global captive_portal_http_url https://www.google.cn/generate_204 remove the on wifi ×
settings put global captive_portal_https_url https://www.google.cn/generate_204
settings put global ntp_server 1.hk.pool.ntp.org  Modify time zone
reboot
When linux downloads the latest platform tools, fastboot will report various unknown commands or close errors. Replace the fastboot file with the one compiled with aosp, and use the self compiled fastboot.
rm ~/Android/Sdk/platform-tools/fastboot
cp fastboot810r1 fastboot
fastboot --version
Group control can be realized by connecting adb with wifi
adb -s 192.168.0.104:5555 install com.ttxapps.wifiadb_2.1.3-810031745_minAPI15(nodpi)_apkmirror.com.apk install apk
adb connect 192.168.0.104:5555 use adb to connect the mobile phone
termux
adb -s 192.168.0.104:5555 install com.termux_ 92. When APK ADB is disabled, use the command line operation on the app side
PKG update & & PKG install htop installs the package of the management process on the app side
xdebuggable && XAppDebug
Start EdXposed, search xdebuggable and XAppDebug modules and install debug APK (with the help of a ladder)
ro.debuggable
ADB push magickhidepropsconf-v5.3.4.zip/sdcard/download and install magickhidepropsconf-v5.3.4.zip through magick manager module Download
reboot-adb shell-props
1 - Edit device fingerprint
2 - Force BASIC key attestation
3 - Device simulation (disabled)
4 - Edit MagiskHide props
5 - Add/edit custom props
6 - Delete prop values
7 - Script settings
8 - Collect logs
u - Perform module update check
r - Reset all options/settings
b - Reboot device
e - Exit

See the module readme or the
support thread @ XDA for details.

Enter your desired option: 4

1 - ro.debuggable
2 - ro.secure
3 - ro.build.type
4 - ro.build.tags
5 - ro.bootmode
6 - ro.boot.mode
a - Change all props
b - Go back to main menu
e - Exit

Pick several options at once by
separating inputs with a comma.
Example: 1,3,4

See the module readme or the
support thread @ XDA for details.

Enter your desired option: 1


You currently have the safe value set.
Are you sure you want to change it to 1?

Enter y(es), n(o) or e(xit): y

Do you want to reboot now (y/n)?

Enter y(es), n(o) or e(xit): y
getprop ro.debuggable to view 1 and turn on global adjustable
Pixel XL
adb reboot bootloader
fastboot boot twrp-3.4.0-0-marlin.img get into twrp
「TWRP main interface」->「Wipe」->「Format Data」  input yes
「Adavanced Wipe」-> Tick「Dalvik / ART Cache」,「Cache」,「System」,「Data」,「Internal Storage」(Do not check to「Vendor」) -> Cross the slider to confirm erasure
「TWRP main interface」->「Advanced」->「ADB Sideload」(Cross the slider bar and check double clear
adb sideload lineage-17.1-20201028-nightly-marlin-signed.zip  restart
 set up-About mobile phones-Version number-8 Open developer options once
 set up-system-senior-Developer options-Android debugging
adb install MagiskManager-v7.5.1.apk
adb install EdXposedManager-4.5.7-45700-org.meowcat.edxposed.manager-release.apk
adb push magisk-riru-v21.3.zip /sdcard/Download
adb push MagiskHidePropsConf-v5.3.4.zip /sdcard/Download
adb push EdXposed-SandHook-v0.4.6.2.4529.-release.zip /sdcard/Download
adb reboot bootloader
fastboot boot twrp-3.4.0-0-marlin.img
「TWRP main interface」->「Advanced」->「ADB Sideload」((just cross the slider)
adb sideload Magisk-v20.4.zip restart
 adopt Magisk Select the download directory and install the new module riru,MagiskHidePropsConf,EdXposed
adb install JustTrustMePlus-debug.apk
marlin,SR5-SuperSU-v2.82-SR5-20171001224502.zip,xposed-v89-sdk25-arm64.zip,XposedInstaller_3.1.5
adb reboot bootloader
./flash-all.bat
 set up-About mobile phones-Version number-8 Open developer options once
 set up-system-senior-Developer options-Android debugging
adb install XposedInstaller_3.1.5.apk
fastboot boot twrp-3.4.0-0-marlin.img
install SR5-SuperSU-v2.82-SR5-20171001224502.zip,xposed-v89-sdk25-arm64.zip
adb push timeadjust.sh /data/local/tmp && sh timeadjust.sh
xposed-v89-sdk25-arm64.zip cannot be used for the installation of pixel series. You can only download the xposed framework after ssr.
Nexus 6P
adb reboot bootloader
fastboot devices
fastboot erase cache If present< waiting for any device >,Plugging usb
fastboot erase userdata
fastboot flashing unlock
fastboot flash bootloader .\bootloader-angler-angler-03.68.img
fastboot reboot-bootloader
fastboot flash radio .\radio-angler-angler-03.81.img
fastboot reboot-bootloader
fastboot flash vendor .\image-angler-n2g48c\vendor.img
fastboot reboot-bootloader
fastboot flash system .\image-angler-n2g48c\system.img
fastboot flash boot .\image-angler-n2g48c\boot.img
fastboot flash recovery recovery.img
fastboot erase cache
fastboot erase userdata
fastboot flash cache cache.img
fastboot flash userdata userdata.img
fastboot flashing lock
Settings - about mobile phone - click under version 8 - enter developer mode - Open developer option
adb push UPDATE-SuperSU-v2.79-20161211114519.zip /sdcard
adb push xposed-v89-sdk25-arm64.zip /sdcard
rom:https://dl.google.com/dl/android/aosp/angler-n2g48c-factory-6a21e528.zip
Unzip to obtain angler-n2g48c-factory-6a21e528\angler-n2g48c\image-angler-n2g48c
superSu:https://download.chainfire.eu/1016/SuperSU/UPDATE-SuperSU-v2.79-20161211114519.zip
sdk corresponding to xposed Android 7.1: https://dl-xda.xposed.info/framework/sdk25/arm64/xposed-v89-sdk25-arm64.zip
twrp:https://dl.twrp.me/angler/twrp-3.4.0-0-angler.img
Kali NetHunter
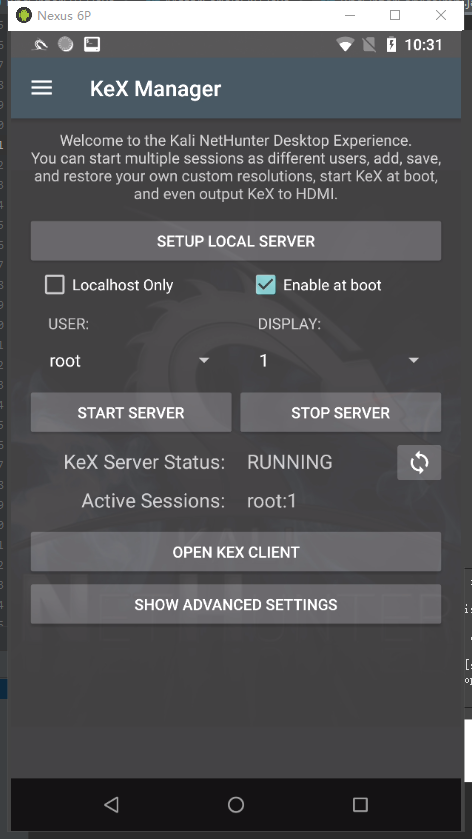
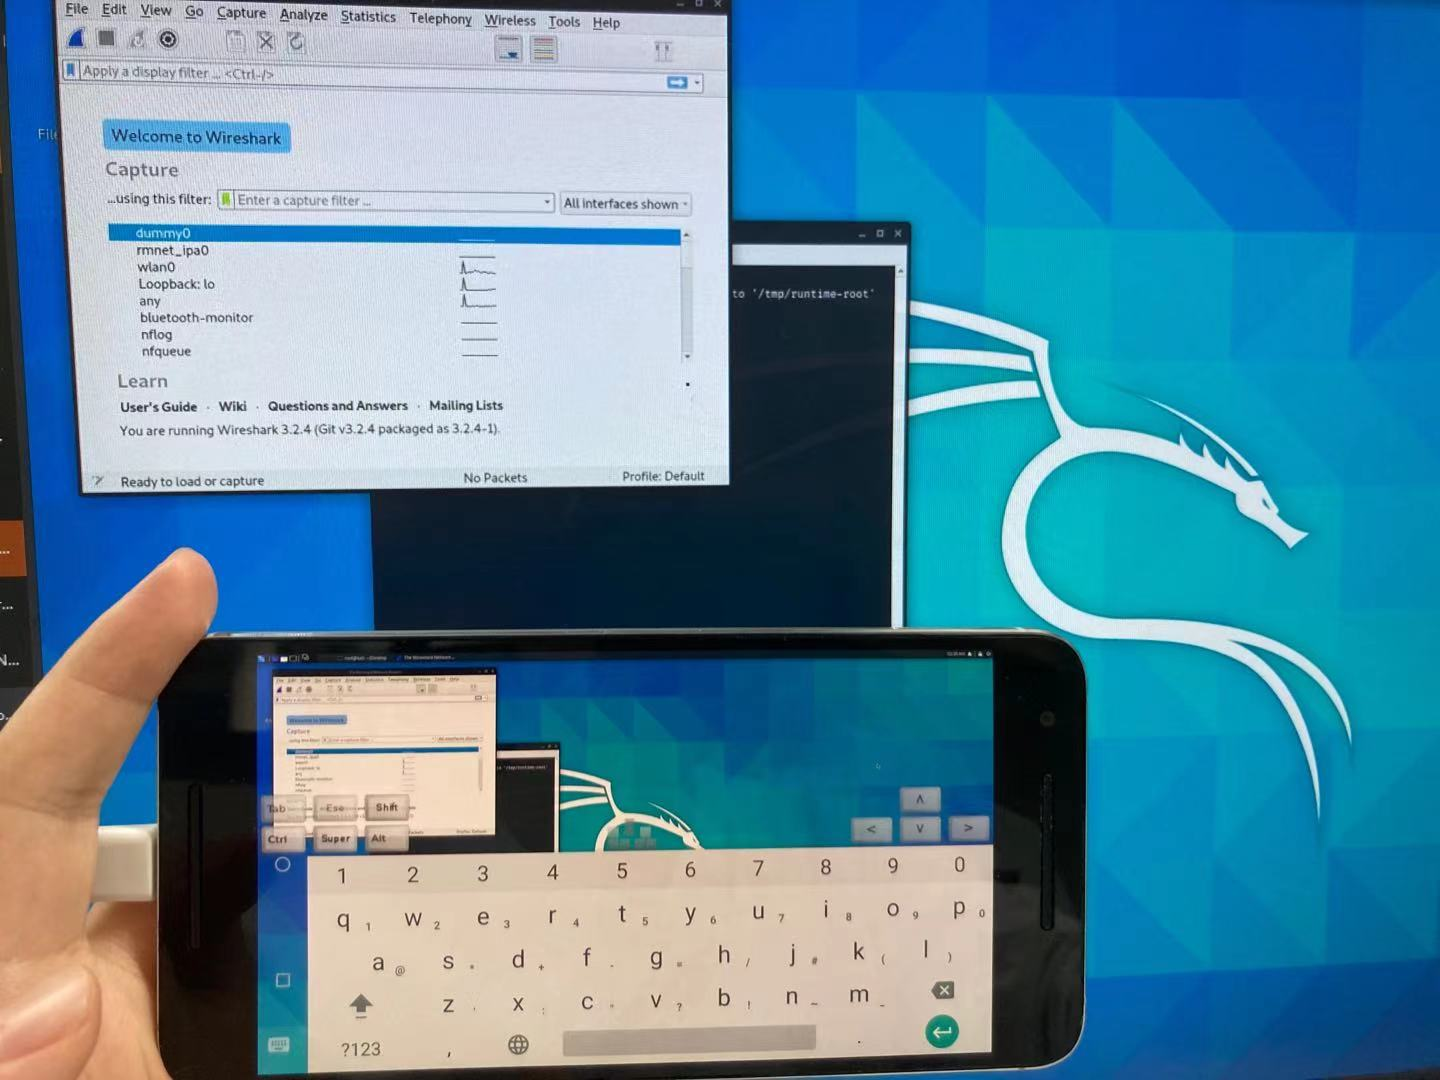
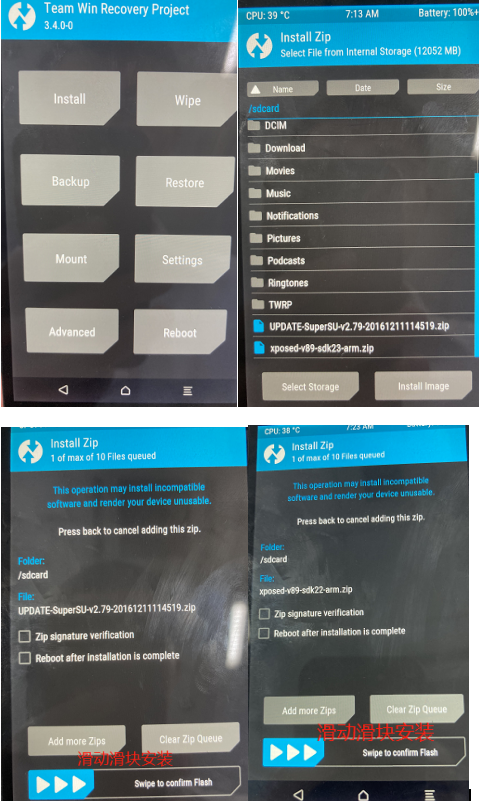
wget https://dl.google.com/dl/android/aosp/angler-opm1.171019.011-factory-39448337.zip
adb kill-server
adb start-server
adb reboot bootloader
./flash-all.sh Replace in case of error fastboot,which fastboot,use fastboot8.1.0r1,Open developer options, open USB debugging
https://www.kali.org/kali-nethunter/
https://www.offensive-security.com/kali-linux-nethunter-download/
Nexus 6P Oreo (ZIP)
adb push SR5-SuperSU-v2.82-SR5-20171001224502.zip /sdcard/
adb push nethunter-2021.1-angler-oreo-kalifs-full.zip /sdcard/
adb push timeadjust.sh /sdcard/
adb reboot bootloader
fastboot flash recovery twrp-3.4.0-0-angler.img
 After brushing, press the volume down key to select Recovery mode,Press the power key to enter,
get into Recovery After that, select Install→SR5-SuperSU-v2.82-SR5-20171001224502.zip Start brushing.
Enter again recovery,hold nethunter-2020.2-pre3-angler-oreo-kalifs-full.zip.torrent Brush it in and decompress it in the middle Kali rootfs The process will take up to 25 minutes
 connect wifi
sh timeadjust.sh  Synchronization time, reboot
 After brushing the machine, click it for the first time to enter the system Nethunter For the application, all the permissions applied are given. Navigate to the left Kali Chroot Manager,click START KALI CHROOT,As long as you initialize this time, any subsequent restart will appear as shown in the figure Everything is fine and Chroot has been started!.

Click on Nethunter Terminal this App,choice KALI,get into Kali system
apt update Upgrade the software library information in the system
apt install neofetch htop jnettop

Click on Nethunter Sign on the left of entry mark KeX Manager,Click“ SETUP LOCAL SERVER",You will be asked to enter a connection password and display password, enter and confirm, and then click“ START SERVER"Turn on the server. Click on“ Nethunter KeX"this App,After entering the password in the password column, click“ Connect"Connect and enter directly Kali Nethunter Desktop of the operating system.
With QtScrcpy, you can watch the content on the mobile phone screen on the computer, or fully operate the mouse and keyboard through usb. The system automatically integrates Java, burpsuit2020.06, Charles, python3 and python.
vnc
Click the Nethunter app
- Switch to Kali Chroot Manager,START KALI CHROOT
- Switch to Kali Services, start SSH and check Start at Boot to have sshd
- Switch to Kex Manage--SETUP LOCAL SERVER. After setting the password, cancel Localhost Only--START SERVER--OPEN KEX CLIENT
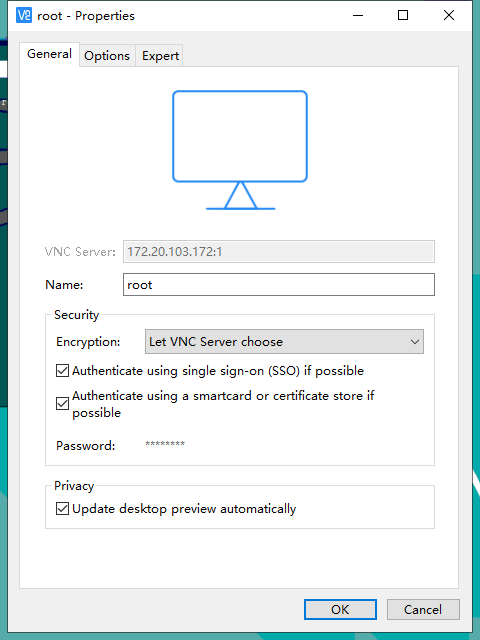
Open the VNC Viewer, view the ip address through the NetHunter terminal, the display is 1, and start VNC login
Turn the Nexus 6p into a kali computer by connecting the keyboard and mouse through the type of one drag four to USB.
Nexus
adb reboot bootloader
fastboot oem unlock
fastboot erase cache If present< waiting for any device >,Plugging usb
fastboot erase userdata
fastboot flash bootloader .\bootloader-hammerhead-hhz20h.img
fastboot flash radio .\radio-hammerhead-m8974a-2.0.50.2.30.img
fastboot reboot-bootloader
cd .\image-hammerhead-m4b30z\
fastboot flash recovery recovery.img
fastboot flash boot boot.img
fastboot flash system system.img
fastboot flash userdata userdata.img
fastboot erase cache
fastboot erase userdata
fastboot flash cache cache.img
fastboot flash userdata userdata.img
fastboot reboot
Settings - about mobile phone - click under version 8 - enter developer mode - Open developer option
adb push UPDATE-SuperSU-v2.79-20161211114519.zip /sdcard
adb push .\xposed-v89-sdk23-arm.zip /sdcard
adb reboot bootloader
fastboot flash recovery twrp-3.4.0-0-hammerhead.img Then enter recovery mode
adb install .\XposedInstaller_3.1.5.apk  install Xposed
adb shell
adb shell input su Get superuser privileges
chmod 711 /data/user/0/de.robv.android.xposed.installer
reboot Installation complete
Millet Mix 2
Open developer options - usb debugging
-Device unlock status - bind account and device
adb reboot bootloader unlocks the bootloader and executes miflash_unlock.exe
EdXposed-SandHook-v0.4.6.2.4529.-release.zip
adb reboot bootloader
fastboot flash recovery twrp-3.3.1-1-chiron.img
fastboot boot twrp-3.3.1-1-chiron.img
adb push lineage-17.0-chiron.zip  Can't have Chinese
 get into twrp Post clear Cache,System,Data partition
install lineage-17.0-chiron.zip
install Magisk-v20.4.zip
adb install MagiskManager-v7.5.1.apk
adb install EdXposedManager-4.5.7-45700-org.meowcat.edxposed.manager-release.apk
 stay magisk Medium installation
adb push magisk-riru-v21.3.zip /sdcard/Download
adb push MagiskHidePropsConf-v5.3.4.zip /sdcard/Download
adb push EdXposed-SandHook-v0.4.6.2.4529.-release.zip /sdcard/Download
Genymotion
Install global agent and nexus 5x 8.0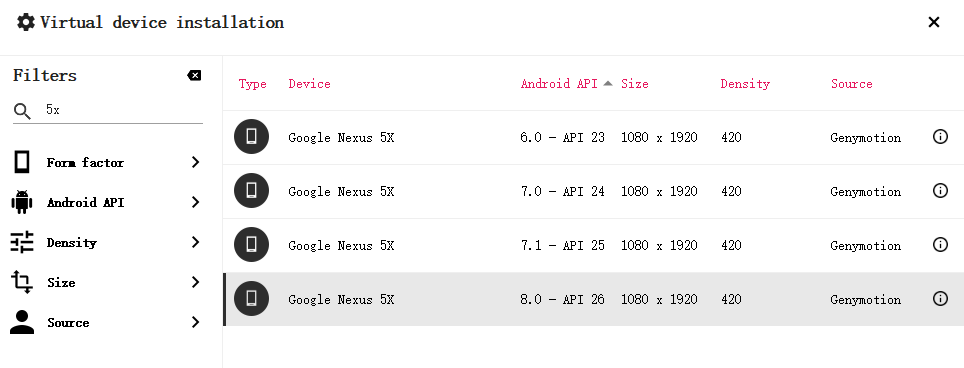
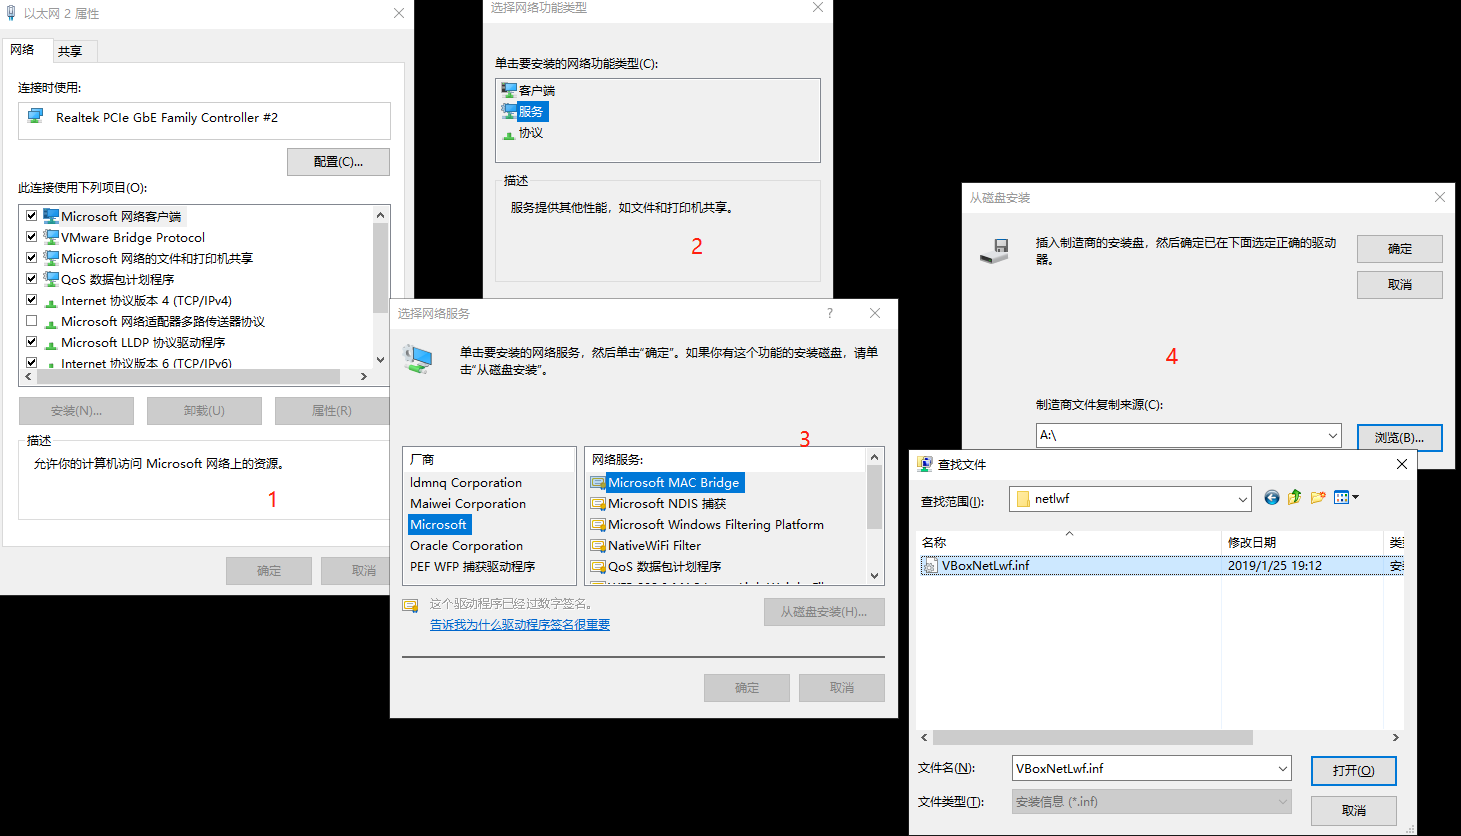
Select Bridge in network mode or change the network to Bridge in virtualbox. For example, there is no Bridge network card in virtualbox network connection
Modify D:\VirtualBox\drivers\network\netlwf\VBoxNetLwf.inf
Settings system Languages & input languages add a language simplified Chinese
What if adb cannot connect to genymotion?
Modify the settings of genymotion and Use custom Android SDK tools as the local android sdk path
adb kill server + adb start server restart adb
After installing WiFi ADB, 192 network segments can be connected by default, and bridging can be configured. adb connect 192.168.0.104:5555 can be used
arm bridging
Uname - a i686 check that the cpu architecture is x86 32-bit. arm is not supported and needs to be installed arm bridge , directly drag genymotion arm translation_for_8.0.zip into nexus 5x 8.0 for installation
adb reboot to install apk of so with arm
Kali
Don't use Windows. Lu Xun once said that more than half of his suffering in his reverse career was given by Windows.
vmwareinstall files Secret key: YC34H-6WWDK-085MQ-JYPNX-NZRA2
kali-linux-2020.4-vmware-amd64.7zseed , use vmware to open the vmx file, configure 6g memory and 80g disk storage, select bridge to local network card for network adaptation (virtual network editor), default account password: kali/kali, sudo passwd root, modify password 123456
After restart, log in as root, android-studio-ide-201.7042882-linux.tar.gz Installation package
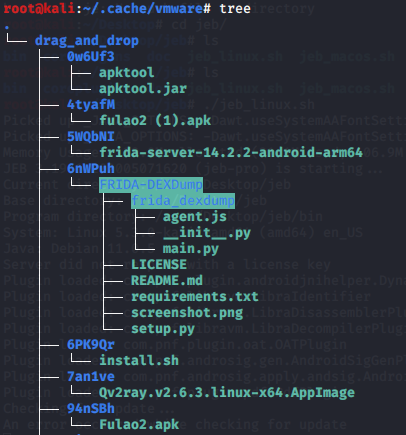
~/. cache/vmware/drag_and_drop periodically delete the copied file cache
Basic configuration
apt update;apt install htop jnettop tmux iotop
dpkg-reconfigure tzdata choice Asia-Shanghai
apt update Update auto sync time
apt install xfonts-intl-chinese Install Chinese font
apt-get install ttf-wqy-microhei
# nano /etc/ssh/sshd_config enable sshd
PermitRootLogin yes
# /etc/init.d/ssh start
Common software
tar zxf android-studio-ide-201.7042882-linux.tar.gz
cd ~/Desktop/android-studio/bin && ./studio.sh start-up android studio
ctrl+shift+t New terminal in current window
vim ~/.zshrc
export PATH="/root/Android/Sdk/platform-tools:$PATH"  Add environment variables
exec "$SHELL"
dpkg -i code_1.52.1-1608136922_amd64.deb  install vscode
as if an error is reported, To build this project, accept the SDK license agreements and install the missing components?
Execute / root / Android / SDK / tools / bin / sdkmanager -- licenses
jadx-1.2.0.zip Open multiple dex and modify set default in jadx GUI_ JVM_ Opts = "- xms512m" "- xmx8g", add export path = "/ root / Android / SDK / NDK bundle: / root / Android / SDK / platform tools: ${java_home} / bin: $path: / root / desktop / Charles / bin: / root / desktop / jadx-1.2.0 / bin: $ndk_home" to the environment variable of zshrc
curl -fsSL https://deb.nodesource.com/setup_14.x | bash -
apt-get install -y nodejs
npm install --save @types/frida-gum  frida Code prompt
jeb-pro-3.19.1.202005071620_pwd_ilbtcdnwiuypbzeo_.7z run. / jeb_linux.sh, enter the password: ilbtcdnwiuypbzeo, enter the interface, click the middle button of Manual Key Generation to obtain LICENSE DATA and run jebKeygen.py After obtaining the license key, enter it into the key in the interface and continue
The DDMS of as4 in Kali Linux fails to start because it needs to be started with jre provided by as. Directly. / monitor uses jdk of Kali system. The version is too high. Ln - S / root / desktop / Android studio / jre / / root / Android / SDK / tools / lib / monitor x86_ 64 /, and then open DDMS through ~ / Android/Sdk/tools/monitor
vim ~/.bashrc && source ~/.bashrc
export PATH=$PATH:/root/Android/Sdk/platform-tools
jdk1.8
apt-get remove openjdk-11-jre-headless:amd64
apt-get remove openjdk-11-jre:amd64
tar zxf jdk-8u191-linux-x64.tar.gz -C /opt/jdk
vim ~/.zshrc
export JAVA_HOME=/opt/jdk
export CLASSPATH=.:${JAVA_HOME}/lib
export PATH="/root/Android/Sdk/ndk-bundle:/root/Android/Sdk/platform-tools:${JAVA_HOME}/bin:$PATH"
source ~/.zshrc
update-alternatives --install /usr/bin/java java /opt/jdk/bin/java 1
update-alternatives --install /usr/bin/javac javac /opt/jdk/bin/javac 1
update-alternatives --set java /opt/jdk/bin/java
update-alternatives --set javac /opt/jdk/bin/javac
nexus 5x
Installation process twrp - > supersu - > nethunter
kali nethunter Download nexus 5x nethunter , using the projection screen can become a mini linux penetration system, install through twrp, sh userinit.sh synchronize time

| tab | smali and java code conversion |
|---|---|
| ctrl+b | Lower breakpoint (note that this must be available in the smali code interface) |
| esc | Fallback the previous level reference |
activity_ The view component configured in main.xml: jeb exists in the code in hexadecimal. The programmer mode of the calculator is converted to decimal. jadx stores the decimal in resources.arsc. gda has an APK entry to directly enter MainActivity, which is also stored in the code in hexadecimal.
Basic command
| getprop ro.product.cpu.abi | Judging the cpu version of the system, virtual machines are generally x86 |
|---|---|
| dumpsys meminfo pid | View the information of the memory map occupied by the process |
| cat /proc/pid/maps | Process loaded so |
| cat /proc/pid/maps | grep -i libart.so | All java code is parsed through libart.so, which is the key to the sheller |
| dumpsys activity top | Display the current Activity, View Hierarchy, and view class information |
| dumpsys package com.soviet.hook4crawler | View run package information |
| pm list packages | View all installed packages |
pyenv environment
Multi version management for different packages of python (Frida, object...)
Full installation latest version: proxychains PIP install object
3.8.0
PYTHON_CONFIGURE_OPTS="--disable-ipv6" proxychains4 pyenv install 3.8.0
pyenv local 3.8.0
PYTHON_CONFIGURE_OPTS="--disable-ipv6" proxychains4 pip install frida==12.8.0
PYTHON_CONFIGURE_OPTS="--disable-ipv6" proxychains4 pip install frida-tools==5.3.0
PYTHON_CONFIGURE_OPTS="--disable-ipv6" proxychains4 pip install objection==1.8.4
objection -g com.android.settings explore
7z x frida-server-12.8.0-android-arm64
adb push frida-server-12.8.0-android-arm64 /data/local/tmp
mv frida-server-12.8.0-android-arm64 fs128arm64 Rename to prevent anti debugging
chmod 777 frida-server-12.8.0-android-arm64
objection -g com.android.settings explore
android hooking list classes
Specific version frida
In this order, when installing the object, you will directly require already satisfied. You won't download the new frida to install it.
pip install frida==12.8.0
pip install frida-tools==5.3.0
pip install objection==1.8.4
frida development environment
pyenv local 3.8.0 && ./fs128arm64
- git clone https://github.com/oleavr/frida-agent-example.git
- cd frida-agent-example/
- npm install
- Open this project using IDE such as VSCode, and write typescript under agent. There will be intelligent prompt.
- npm run watch monitors code changes and automatically compiles and generates js files
- Frida - UF - L demo.js USB connection phone save will automatically call demo.js for hook Java.perform(function(){console.log("frida hook")})
- frida -UF -l demo.js --runtime=v8 use v8 engine Java. Perform (() = > {console. Log ("Hello world")})
- Frida PS - U view all processes
- Frida - H 192.168.0.100:5555 - F com.ttxapps.wifi ADB - L demo. JS -- runtime = V8 remote hook,-l specify script
- Frida - UF com.android.settings - L demo. JS -- runtime = V8 -- no pause actively starts the application via usb and calls demo.js,-f is the spawn mode, - no pause directly loads the application. If not,% resume is required to start the main thread
- Frida - UF -- runtime = V8 - e "Java. Perform (() = > {console. Log ('Hello world ')})" - O / root / log.txt directly execute the script and write to the file
Remote connection
. / fs128arm64 -v -l 0.0.0.0:8888 specify the port to start frida, and the default port is 27042
Frida PS - H 192.168.0.8:8888 specify - U for USB and - h for host ip
frida -H 192.168.0.8:8888 -F specifies that - H represents host ip and - F represents foreground application. Enter Frida to view Frida information
cd frida-agent-example /& & NPM install & & NPM run Watch & & Frida - H 192.168.0.8:8888 - F - L agent / demo.js remote call JS script
Java.perform(()=>{console.log("Hello World")})
function main(){
    Java.perform(function(){
        console.log("hello")
    })
}
setImmediate(main)
Remote call
import frida
device = frida.get_usb_device()
print(device.get_frontmost_application())
#pid = device.spawn(["com.onejane.demo02"])
pid=device.get_frontmost_application().pid  # For dual process protection, specify pid to hook
print(device.enumerate_processes())   # Enumerate all processes
print(device.enumerate_applications())  # Enumerate all package names
# device.resume(pid)
# time.sleep(1)
session = device.attach(pid)
with open("demo.js") as f:
    script = session.create_script(f.read())
script.load()
plugins
proxychains git clone https://github.com/hluwa/FRIDA-DEXDump ~/Downloads/FRIDA-DEXDump shelling
mv ~/Downloads/FRIDA-DEXDump/frida_dexdump ~/.objection/plugins/dexdump  stay plugins There must be a plug-in under the subdirectory__init__.py
proxychains git clone https://Github.com/hluwa/wallbreaker ~ /. Object / plugins / wallbreaker memory roaming
objection -N -h 192.168.0.8 -p 8888 -g com.android.settings explore -P ~/.objection/plugins  Remote connection bulk loading plug-in
This article is composed of blog one article multi posting platform OpenWrite release!