preface:
This article belongs to the article in the Android source code exploration column. The list of all articles in the column is linked as follows. You are welcome to read it.
I * * introduction to Handler mechanism**
1.1 what is a handler?
Handler is a common mechanism in Android, which is mainly used for communication between threads.
1.2 why understand the principle of Handler?
Before, I chatted in a group and said that the handler was often asked in the interview, and then I was sprayed. I said that now it is all MVVM, ViewBinding and other architectures. Who still uses the handler. Indeed, there are more and more frameworks encapsulated in Android, which makes it easier for us to use, and there will be fewer and fewer scenarios to use handler. But using less doesn't mean it's useless. These existing frameworks, even the foreseeable future, are based on the handler mechanism.
For example, we ordinary people drive, maybe as long as we can drive, we don't have to understand the principle of cars. But if you want to be a racing driver, you should have a certain understanding of the mechanism and principle of car operation.
Finally, what are the benefits of understanding the handler principle?
1. The handler mechanism is very classic, which can also be used according to the scene in the process of typing code.
2. In fact, in addition to ordinary synchronous messages, handler also includes barrier messages and asynchronous messages, which can also be used according to the scenario.
3.handler also provides idle time mechanism IdelHandler.
4. The handler can help us find out where the code causes the jam.
The above points will be explained in detail in the following articles.
1.3 what is the role of handler in the interview?
At the same time, Handler is also an Android mechanism that is often asked during the interview.
To sum up, about six points will be asked frequently. These six technical points are specially marked in red, which are easy to be asked in the interview.
For example: technical point 1
II. Overview of Handler principle**
As shown in the following figure: the mechanism of Handler in Android is to obtain a Handler object from the sub thread, and send tasks in MessageQueue through this Handler object. Open an infinite loop in the main thread and constantly get the Message task from the MessageQueue. If it gets it, it will execute the task in Messagez. If it doesn't get it, it will enter the sleep state.
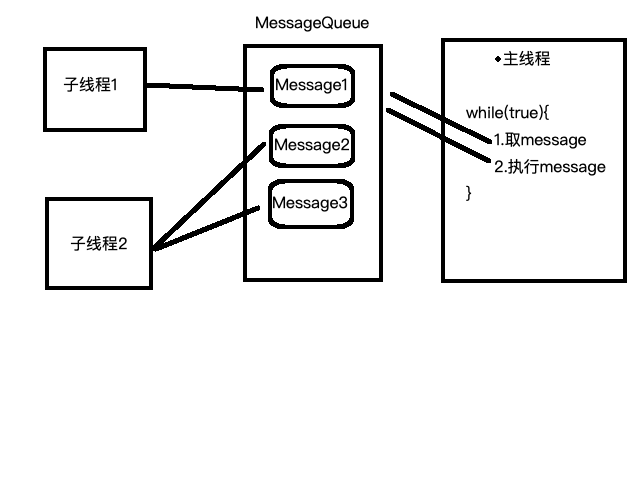
Several important objects involved
Handler: it is generally created in the main thread. It holds a Looper of the main thread and is responsible for message distribution to the main thread.
Message: it can be understood as task, the unit of task execution.
MessageQueue: inside is a single linked list, which stores Message tasks.
Looper: it is responsible for processing the Message task, and its loop method opens an infinite loop in the main thread.
3, Process added by Message
3.1 adding Meesage
We can see that there are many ways to add message. In fact, the sendMessageDelayed method is called in the end.
The general writing methods mainly include the following:
Writing method 1: sendMessageDelayed(Message msg, long delayMillis)
  public final boolean sendMessageDelayed(@NonNull Message msg, long delayMillis) {
        if (delayMillis < 0) {
            delayMillis = 0;
        }
        return sendMessageAtTime(msg, SystemClock.uptimeMillis() + delayMillis);
    }
Writing method 2: sendMessage(Message msg)
 public final boolean sendMessage(@NonNull Message msg) {
        return sendMessageDelayed(msg, 0);
    }
In fact, the sendMessageDelayed method is called.
Writing method 3:
mHandler.post(new Runnable() {
                @Override
                public void run() {
                   //do something
                }
            });
Actually, let's click in and have a look,
sendMessageDelayed(getPostMessage(r), 0);
Take another look at the getPostMessage method:
    private static Message getPostMessage(Runnable r) {
        Message m = Message.obtain();
        m.callback = r;
        return m;
    }
ok In fact, it is also to build a Message and send it out.
3.2 sendMessageDelayed method
 public final boolean sendMessageDelayed(@NonNull Message msg, long delayMillis) {
        if (delayMillis < 0) {
            delayMillis = 0;
        }
        return sendMessageAtTime(msg, SystemClock.uptimeMillis() + delayMillis);
    }
When calling sendMessageAtTime, the second parameter passed in is the execution time.
The execution time is calculated by the current time + delay time.
Here is the technical point 1: will modifying the mobile phone time affect the execution of Message? Systemclock is currently used Uptimemillis (), which refers to the non deep sleep time of the system after the mobile phone is turned on, not the mobile phone time. Therefore, modifying the current time on the mobile phone will not affect the execution of Message. Generally, we can also use this value to get how long the mobile phone is turned on.
3.3 sendMessageAtTime
1.sendMessageAtTime is used to judge a MessageQueue.
 public boolean sendMessageAtTime(@NonNull Message msg, long uptimeMillis) {
        MessageQueue queue = mQueue;
        if (queue == null) {
            RuntimeException e = new RuntimeException(
                    this + " sendMessageAtTime() called with no mQueue");
            Log.w("Looper", e.getMessage(), e);
            return false;
        }
        return enqueueMessage(queue, msg, uptimeMillis);
    }
3.4 enqueueMessage method
  private boolean enqueueMessage(@NonNull MessageQueue queue, @NonNull Message msg,
            long uptimeMillis) {
        msg.target = this;
        msg.workSourceUid = ThreadLocalWorkSource.getUid();

        if (mAsynchronous) {
            msg.setAsynchronous(true);
        }
        return queue.enqueueMessage(msg, uptimeMillis);
    }
Add queue to Message
3.5 enqueueMessage method
1. The code looks a little messy. However, the core logic is to insert the current message node into the single linked list according to the latitude from front to back of the execution time. Technical point 2: how is the linked list arranged. Execution time sequence
2. There is a parameter when in message, which will be assigned when it is added to the linked list, and the execution time is recorded.
3. At the same time, wake up sleep through nativeWake. Why Hibernate? It will be discussed in Chapter 4 below. Generally, when there is no pending Message, it will enter hibernate to release CPU resources.
boolean enqueueMessage(Message msg, long when) {
        if (msg.target == null) {
            throw new IllegalArgumentException("Message must have a target.");
        }

        synchronized (this) {
            if (msg.isInUse()) {
                throw new IllegalStateException(msg + " This message is already in use.");
            }

            if (mQuitting) {
                IllegalStateException e = new IllegalStateException(
                        msg.target + " sending message to a Handler on a dead thread");
                Log.w(TAG, e.getMessage(), e);
                msg.recycle();
                return false;
            }

            msg.markInUse();
            msg.when = when;
            Message p = mMessages;
            boolean needWake;
            if (p == null || when == 0 || when < p.when) {
                // New head, wake up the event queue if blocked.
                msg.next = p;
                mMessages = msg;
                needWake = mBlocked;
            } else {
                // Inserted within the middle of the queue.  Usually we don't have to wake
                // up the event queue unless there is a barrier at the head of the queue
                // and the message is the earliest asynchronous message in the queue.
                needWake = mBlocked && p.target == null && msg.isAsynchronous();
                Message prev;
                for (;;) {
                    prev = p;
                    p = p.next;
                    if (p == null || when < p.when) {
                        break;
                    }
                    if (needWake && p.isAsynchronous()) {
                        needWake = false;
                    }
                }
                msg.next = p; // invariant: p == prev.next
                prev.next = msg;
            }

            // We can assume mPtr != 0 because mQuitting is false.
            if (needWake) {
                nativeWake(mPtr);
            }
        }
        return true;
    }
At this point, the message is inserted into the MessageQueue, and the insertion process is completed.
4, The process in which Message is executed
4.1 call looper Prepare() binds to the current thread.
Generally, we don't need to call the prepare method, because after the application is started, looper has been called for us in the main method of ActivityThread Prepare method.
  private static void prepare(boolean quitAllowed) {
        if (sThreadLocal.get() != null) {
            throw new RuntimeException("Only one Looper may be created per thread");
        }
        sThreadLocal.set(new Looper(quitAllowed));
    }
The core logic of prepare is to bind with the current Thread through ThreadLocal. Ensure that a Looper will bind only one Thread.
4.2Looper.loop starts an infinite loop
Call Looper Loop method to start an infinite loop. A check will be made here. If the Looper is not bound to the current thread, an exception will be thrown.
public static void loop() {
        final Looper me = myLooper();
        if (me == null) {
            throw new RuntimeException("No Looper; Looper.prepare() wasn't called on this thread.");
        }
        ...Unimportant code ignored

        for (;;) { //Start infinite loop
            if (!loopOnce(me, ident, thresholdOverride)) {
                return;
            }
        }
    }
4.3 get the message and try to execute it
1. Messagequeue will be called Try to get message in next (). If you can't get it, it will be blocked. Specifically, we will analyze it in the next chapter.
2. If the message is not obtained and returned, it indicates that the application is in the exit state, so the loop is also closed.
3.msg.target.dispatchMessage() is transferred to the Handler to process the message. Since the current execution thread is the main thread, the callback executed in dispatchMessage is also in the main thread.
4. We can see that there is logging for input and printing in the code, which is very helpful for our performance monitoring. We will explain it in Chapter 7.
5.msg. The recycleunchecked flag MSG has been used and enters the reusable state.
4.4 dispatchmessage
There are two callback methods,
The callBack in the Message is always executed in this way;
Method 2: customize the Handler and override its handleMessage method.
Here we can clearly see that the priority of callBack will be higher. This is technical point 3: which of callBack and handleMessage will be executed first
public void dispatchMessage(@NonNull Message msg) {
        if (msg.callback != null) {
            handleCallback(msg);
        } else {
            if (mCallback != null) {
                if (mCallback.handleMessage(msg)) {
                    return;
                }
            }
            handleMessage(msg);
        }
    }
handleCallBack is directly through
message.callback.run();
Execute the runnable task of Message. PS: run() is a method defined in the runnable interface
5, Messagequeue Next() fetch message
First look at the code, which is divided into the following links.
Message next() {
        ...
        for (;;) {
            if (nextPollTimeoutMillis != 0) {
                Binder.flushPendingCommands();
            }

            nativePollOnce(ptr, nextPollTimeoutMillis);//4.1 nativePollOnece

            synchronized (this) {
                // Try to retrieve the next message.  Return if found.
                final long now = SystemClock.uptimeMillis();
                Message prevMsg = null;
                Message msg = mMessages;
                ...Barrier message related codes are ignored first
                if (msg != null) {//4.2 finding available message s
                    if (now < msg.when) {
                        // Next message is not ready.  Set a timeout to wake up when it is ready.
                        nextPollTimeoutMillis = (int) Math.min(msg.when - now, Integer.MAX_VALUE);
                    } else {
                        // Got a message.
                        mBlocked = false;
                        if (prevMsg != null) {
                            prevMsg.next = msg.next;
                        } else {
                            mMessages = msg.next;
                        }
                        msg.next = null;
                        if (DEBUG) Log.v(TAG, "Returning message: " + msg);
                        msg.markInUse();
                        return msg;
                    }
                } else {
                    // No more messages.
                    nextPollTimeoutMillis = -1;
                }

               ...idelHandler Relevant codes are ignored first
        }
    }
5.1 nativePollOnce method
This is a native method, blocked. The CPU sleep mentioned above is realized through the mechanism of nativePollOnce. When this method is called, CPU resources will be released until it is awakened by the outside world. The underlying implementation principle corresponds to the epoll mechanism of linux. We won't analyze it in detail in this article. We just need to know the function of its method.
nativePollOnce has two parameters, ptr and timeoutMillis
ptr can be understood as the unique value of a native tag, which is used to identify the binding thread.
timeoutMillis is the timeout. It is mainly divided into three types - 1, 0, > 0.
=-1 is in an infinite blocking state unless awakened by the outside world.
=0 will not block and will be executed immediately.
>0 will block the corresponding time, and then release the blocking state.
PS: the native implementation of nativePollOnce is actually similar to that of Android layer. It also has a blocked circular queue. The underlying implementation mechanism is epoll. Since the native layer is not the core of this article, it will not be extended here. Interested students can leave a message. I
5.2 traverse the linked list to find the message that can be used
1. Because we insert the linked list according to the execution time, the first Message must be at the head of the linked list;
2. First get the non sleep time of the current system;
3. First try to get the header of the linked list, then there is no data in the linked list. Then assign nextPollTimeoutMillis to - 1. In the next cycle, it will enter the infinite blocking state and be awakened directly. This corresponds to the native wake-up mechanism mentioned in Chapter 2.5.
4. If the header node is not empty, judge its execution time and compare it with the current time;
5. If the execution time is less than the current time, calculate the difference nextPollTimeoutMillis. And it will jump out of the Message selection process. And in the next cycle, nativePollOnce will use this value to sleep the corresponding time. Ensure that as soon as the sleep time arrives, it happens to be the execution time of the head node.
6. If the execution time is greater than the current time, it indicates that the node can be executed. Change the head node to the next level node. And through Message Markinuse marks that the current Message has been used.
7. Return the message object found in the previous step
5, Asynchronous message / barrier message
Technical point 4: implementation mechanism of barrier asynchronous message
1. A barrier Message is actually a Message with an empty target.
2 asynchronous messages must be used with barrier messages.
3 if the header node is a barrier message, it will look for asynchronous messages from the front to the back in the message chain list. If it finds asynchronous messages, it will jump out of the loop.
4 and remove the current asynchronous node from the linked list, and associate the front and rear nodes of the asynchronous node.
5 note here that the header node is still a barrier and the message has not been removed. Therefore, normal messages will not be executed.
if (msg != null && msg.target == null) {
                    // Stalled by a barrier.  Find the next asynchronous message in the queue.
                    do {
                        prevMsg = msg;//If the message is asynchronous, the message before the message is saved to facilitate subsequent association
                        msg = msg.next;
                    } while (msg != null && !msg.isAsynchronous());
                }
                if (msg != null) {
                    if (now < msg.when) {
                        // Next message is not ready.  Set a timeout to wake up when it is ready.
                        nextPollTimeoutMillis = (int) Math.min(msg.when - now, Integer.MAX_VALUE);
                    } else {
                        // Got a message.
                        mBlocked = false;
                        if (prevMsg != null) {
                            prevMsg.next = msg.next;//Assign the next of the asynchronous message to the next of the previous node
                        } else {
                            mMessages = msg.next;
                        }
                        msg.next = null;
                        if (DEBUG) Log.v(TAG, "Returning message: " + msg);
                        msg.markInUse();
                        return msg;
                    }
                } else {
                    // No more messages.
                    nextPollTimeoutMillis = -1;
                }
6, IdleHandler
Technical point 5: IdelHandler execution timing
6.1 introduction to idlehandler
As the name suggests, it is a leisure task. When there is no Message to be executed at present, it will trigger the execution of IdelHandler. Generally, we can put those tasks that need to be executed in the main thread but have low priority in IdelHandler, such as preloading the next page, second screen loading, etc.
6.2 when is idlehandler triggered
Looking at the code, I can see that when obtaining a Message, if no Message is obtained, it will enter the process of executing IdleHandler.
Message next() {
       ...Code omission
        for (;;) {

                        if (DEBUG) Log.v(TAG, "Returning message: " + msg);
                        msg.markInUse();
                        return msg;  //If the message is retrieved, return
                    }
                } else {
                    // No more messages.
                    nextPollTimeoutMillis = -1;
                }

                ...
                //If no message is retrieved, the following logic will be executed
                // If first time idle, then get the number of idlers to run.
                // Idle handles only run if the queue is empty or if the first message
                // in the queue (possibly a barrier) is due to be handled in the future.
                if (pendingIdleHandlerCount < 0
                        && (mMessages == null || now < mMessages.when)) {
                    pendingIdleHandlerCount = mIdleHandlers.size();
                }
                if (pendingIdleHandlerCount <= 0) {
                    // No idle handlers to run.  Loop and wait some more.
                    mBlocked = true;
                    continue;
                }

                if (mPendingIdleHandlers == null) {
                    mPendingIdleHandlers = new IdleHandler[Math.max(pendingIdleHandlerCount, 4)];
                }
                mPendingIdleHandlers = mIdleHandlers.toArray(mPendingIdleHandlers);
            }

            // Run the idle handlers.
            // We only ever reach this code block during the first iteration.
            for (int i = 0; i < pendingIdleHandlerCount; i++) {
                final IdleHandler idler = mPendingIdleHandlers[i];
                mPendingIdleHandlers[i] = null; // release the reference to the handler

                boolean keep = false;
                try {
                    keep = idler.queueIdle();
                } catch (Throwable t) {
                    Log.wtf(TAG, "IdleHandler threw exception", t);
                }

                if (!keep) {
                    synchronized (this) {
                        mIdleHandlers.remove(idler);
                    }
                }
            }

            // Reset the idle handler count to 0 so we do not run them again.
            pendingIdleHandlerCount = 0;

            // While calling an idle handler, a new message could have been delivered
            // so go back and look again for a pending message without waiting.
            nextPollTimeoutMillis = 0;
        }
    }
6.3 idlehandler execution process
There can be multiple idlehandlers, which are stored in MeesageQueue. During each execution, they are converted into an array and executed in turn.
 pendingIdleHandlerCount = mIdleHandlers.size();
mPendingIdleHandlers = mIdleHandlers.toArray(mPendingIdleHandlers);
 for (int i = 0; i < pendingIdleHandlerCount; i++) {
                final IdleHandler idler = mPendingIdleHandlers[i];
                mPendingIdleHandlers[i] = null; // release the reference to the handler

                boolean keep = false;
                try {
                    keep = idler.queueIdle();
                } catch (Throwable t) {
                    Log.wtf(TAG, "IdleHandler threw exception", t);
                }

                if (!keep) {
                    synchronized (this) {
                        mIdleHandlers.remove(idler);
                    }
                }
            }
It should be noted here that the callback of IdleHandler will be executed only once and will be removed after execution.
7, Message execution listening
Technical point 6: how to monitor the main line jam
7.1 trigger principle
In Chapter 3.3, we mentioned the object of logging. When we look back at the code, we can clearly see that logging will be called before and after message execution. The time between these two prints can be considered as the execution time of the callback in the message.
private static boolean loopOnce(final Looper me,
            final long ident, final int thresholdOverride) {
        ...Omit code
        final Printer logging = me.mLogging;
        if (logging != null) {
            logging.println(">>>>> Dispatching to " + msg.target + " "
                    + msg.callback + ": " + msg.what);
        }
        ...Omit code
        try {
            msg.target.dispatchMessage(msg);
            if (observer != null) {
                observer.messageDispatched(token, msg);
            }
            dispatchEnd = needEndTime ? SystemClock.uptimeMillis() : 0;
        } catch (Exception exception) {
        ...Omit code
        if (logging != null) {
            logging.println("<<<<< Finished to " + msg.target + " " + msg.callback);
        }


    }
7.2 mode of use
Let's take a look at the Printer class corresponding to logging, which is actually an interface,
public interface Printer {
    /**
     * Write a line of text to the output.  There is no need to terminate
     * the given string with a newline.
     */
    void println(String x);
}
And we found that logging allows us to set it on our own initiative. Looper.com is used Mlogging object.
The setMessageLogging method just sets mLogging.
 public void setMessageLogging(@Nullable Printer printer) {
        mLogging = printer;
    }
Therefore, we just need to create a Printer object and register it in Looper. Then we can judge which meepage has timed out through the time of two callbacks. The following code can monitor the scenario where all Message messages of the main thread execute for more than 100 milliseconds.
//Declare Printer object
private Printer printer = new Printer() {
        @Override
        public void println(String it) {
            long currentTimeMillis = System.currentTimeMillis();
            //In fact, there should be one-to-one correspondence judgment here, but since it is running in the main thread, it must be Finished after Dispatching and executed in turn
            if (it.contains("Dispatching")) {
                lastFrameTime = currentTimeMillis;
                return;
            }
            if (it.contains("Finished")) {
                long useTime = currentTimeMillis - lastFrameTime;
                //Record time
                if (useTime > 100) {
                    //Where does todo lead to time-consuming operations
                    Log.i(TAG, "Execute for more than 100 milliseconds");
                }
            }
        }
    };

//Then register
 Looper mainLooper = Looper.getMainLooper();
 mainLooper.setMessageLogging(printer);
7.3 application scenarios
If we only know whether the main route is stuck or not, it will not be enough. We must also want to know where the card is? This is also what BlockCanary wants to solve. However, we also have a simple implementation here. One class can complete performance monitoring.
1. We can start a sub thread to continuously capture the stack state of the main thread every specified time (such as 20 milliseconds).
2. When the println callback notifies that the callback execution of Message starts, we store the captured stack in the Map each time.
3. When the println callback notification ends, we judge the execution time. If the timeout is exceeded, all stack structures in the Map will be printed. If there are two identical stack structures in the Map, the method corresponding to this stack has been executed for at least 20 milliseconds (up to 40 milliseconds). If there are 3, it takes at least 40 milliseconds to execute, and so on.
4. So by printing the same stack times, we can know where the jam is caused. I often use it in the development and debugging stage, which is very easy to use.
Complete code of small performance monitoring attached:
package com.common.monitor;

import android.content.Context;
import android.os.Handler;
import android.os.HandlerThread;
import android.os.Looper;
import android.util.Log;
import android.util.Printer;

import com.common.monitor.monitor.BaseMonitor;

import java.util.HashMap;
import java.util.Hashtable;
import java.util.Map;

public class ANRMonitor{

    final static String TAG = "anr";

    public static void init(Context context) {
        if (true){//switch
            return;
        }
        ANRMonitor anrMonitor = new ANRMonitor();
        anrMonitor.start(context);
        Log.i(TAG, "ANRMonitor init");
    }

    private void start(Context context) {
        Looper mainLooper = Looper.getMainLooper();
        mainLooper.setMessageLogging(printer);
        HandlerThread handlerThread = new HandlerThread(ANRMonitor.class.getSimpleName());
        handlerThread.start();
        //If the time is long, the stack is recorded
        threadHandler = new Handler(handlerThread.getLooper());
        mCurrentThread = Thread.currentThread();
    }

    private long lastFrameTime = 0L;
    private Handler threadHandler;
    private long mSampleInterval = 40;
    private Thread mCurrentThread;//Main thread
    private final Map<String, String> mStackMap = new HashMap<>();

    private Printer printer = new Printer() {
        @Override
        public void println(String it) {
            long currentTimeMillis = System.currentTimeMillis();
            //In fact, there should be one-to-one correspondence judgment here, but since it is running in the main thread, it must be Finished after Dispatching and executed in turn
            if (it.contains("Dispatching")) {
                lastFrameTime = currentTimeMillis;
                //Start recording
                threadHandler.postDelayed(mRunnable, mSampleInterval);
                synchronized (mStackMap) {
                    mStackMap.clear();
                }
                return;
            }
            if (it.contains("Finished")) {
                long useTime = currentTimeMillis - lastFrameTime;
                //Record time
                if (useTime > 20) {
                    //Where does todo lead to time-consuming operations
                    Log.i(TAG, "ANR:" + it + ", useTime:" + useTime);
                    //If it is greater than 100 milliseconds, the Caton log will be printed out
                    if (useTime > 100) {
                        synchronized (mStackMap) {
                            Log.i(TAG, "mStackMap.size:" + mStackMap.size());
                            for (String key : mStackMap.keySet()) {
                                Log.i(TAG, "key:" + key + ",state:" + mStackMap.get(key));
                            }
                            mStackMap.clear();
                        }
                    }
                }
                threadHandler.removeCallbacks(mRunnable);
            }
        }
    };


    private Runnable mRunnable = new Runnable() {
        @Override
        public void run() {
            doSample();
            threadHandler
                    .postDelayed(mRunnable, mSampleInterval);
        }
    };

    protected void doSample() {
        StringBuilder stringBuilder = new StringBuilder();

        for (StackTraceElement stackTraceElement : mCurrentThread.getStackTrace()) {
            stringBuilder
                    .append(stackTraceElement.toString())
                    .append("
");
        }
        synchronized (mStackMap) {
            mStackMap.put(mStackMap.size() + "", stringBuilder.toString());
        }
    }

}