brief introduction
Each build variant represents a different version that you can build for your application. For example, you might want to build a free version of the application (with limited content) and a paid version (with more content). You can also build different versions of applications for different devices, according to API level or other device variants.
Build variants are the result of Gradle's settings, code, and resources that are set according to a specific set of rules and configured in build types and product flavors. Instead of configuring build variants directly, you configure the build types and product flavors that make up the variants.
For example, a "demo" product flavor can specify different functional and device requirements, such as custom source code, resources, and minimum API levels, while a "debug" build type applies different build and package settings, such as debug options and signing keys. The final build variant is the "demo debugging" version of the application, which contains not only the various configurations and resources contained in the "demo" product flavor, but also the "debug" build type and main/source set.
Configuration build type
You can create and configure build types within the Android {} code block of the module-level build.gradle file. When you create a new module, Android Studio automatically creates both debugging and publishing build types for you. Although debugging build types do not appear in the build configuration file, Android Studio configures debuggable true for them. In this way, you can debug applications on secure Android devices and configure APK signatures using a generic debug keystore.
If you want to add or change specific settings, you can add debug build types to your configuration. The following example specifies the application IdSuffix for the debug build type and configures a "jnidebug" build type initialized with settings in the debug build type.
android {
    ...
    defaultConfig {...}
    buildTypes {
        release {
            minifyEnabled true
            proguardFiles getDefaultProguardFile('proguard-android.txt'), 'proguard-rules.pro'
        }

        debug {
            applicationIdSuffix ".debug"
        }

        /**
         * The 'initWith' property allows you to copy configurations from other build types,
         * so you don't have to configure one from the beginning. You can then configure
         * just the settings you want to change. The following line initializes
         * 'jnidebug' using the debug build type, and changes only the
         * applicationIdSuffix and versionNameSuffix settings.
         */

        jnidebug {

            // This copies the debuggable attribute and debug signing configurations.
            initWith debug

            applicationIdSuffix ".jnidebug"
            jniDebuggable true
        }
    }
}
Configuration of product flavor
Creating product flavors is similar to creating build types: simply add them to the product Flavors {} code block and configure the settings you want. Product flavor supports the same properties as defaultConfig, because defaultConfig actually belongs to the Product Flavor class. This means that you can provide the basic configuration of all flavors in the defaultConfig {} code block, and each flavor can change any of these default values, such as application Id.
The following code example creates a "demo" and "complete" product flavor to give it its own application Id Suffix and version Name Suffix:
android {
    ...
    defaultConfig {...}
    buildTypes {...}
    productFlavors {
        demo {
            applicationIdSuffix ".demo"
            versionNameSuffix "-demo"
        }
        full {
            applicationIdSuffix ".full"
            versionNameSuffix "-full"
        }
    }
}
After creating and configuring your product flavor, click Sync Now in the notification bar. After synchronization, Gradle automatically creates build variants based on your build type and product flavor, and names them in the format. For example, if you create both "demo" and "complete" product flavors and retain the default "debug" and "release" build types, Gradle will create the following build variants:
- Demonstration debugging
- Demo release
- Complete debugging
- Full release
You can change the build variant to any variant you want to build and run, simply go to Build > Select Build Variant, and then select a variant from the drop-down menu. However, start customizing each build variant and its functions and resources.
Combine multiple product flavors
In some cases, you may want to combine configurations in multiple product flavors. For example, you might want to create different configurations for "complete" and "demonstration" product flavors based on API levels. To do this, you can create product flavor groups, called flavor dimensions, through Android plug-ins for Gradle. When building your application, Gradle combines product flavor configuration with build type configuration in each flavor dimension you define to create the final build variant. Gradle does not combine product flavors that belong to the same flavor dimension.
The following code example uses the flavorDimensions attribute to create a "pattern" flavor dimension to organize "complete" and "demonstration" product flavors, and an "api" flavor dimension to organize product flavor configuration at the API level:
android {
  ...
  buildTypes {
    debug {...}
    release {...}
  }

  // Specifies the flavor dimensions you want to use. The order in which you
  // list each dimension determines its priority, from highest to lowest,
  // when Gradle merges variant sources and configurations. You must assign
  // each product flavor you configure to one of the flavor dimensions.
  flavorDimensions "api", "mode"

  productFlavors {
    demo {
      // Assigns this product flavor to the "mode" flavor dimension.
      dimension "mode"
      ...
    }

    full {
      dimension "mode"
      ...
    }

    // Configurations in the "api" product flavors override those in "mode"
    // flavors and the defaultConfig {} block. Gradle determines the priority
    // between flavor dimensions based on the order in which they appear next
    // to the flavorDimensions property above--the first dimension has a higher
    // priority than the second, and so on.
    minApi24 {
      dimension "api"
      minSdkVersion '24'
      // To ensure the target device receives the version of the app with
      // the highest compatible API level, assign version codes in increasing
      // value with API level. To learn more about assigning version codes to
      // support app updates and uploading to Google Play, read Multiple APK Support
      versionCode 30000 + android.defaultConfig.versionCode
      versionNameSuffix "-minApi24"
      ...
    }

    minApi23 {
      dimension "api"
      minSdkVersion '23'
      versionCode 20000  + android.defaultConfig.versionCode
      versionNameSuffix "-minApi23"
      ...
    }

    minApi21 {
      dimension "api"
      minSdkVersion '21'
      versionCode 10000  + android.defaultConfig.versionCode
      versionNameSuffix "-minApi21"
      ...
    }
  }
}
...
The number of build variants created by Gradle is equal to the product of the number of flavors in each flavor dimension and the number of build types you configure. When Gradle names each build variant or corresponding APK, the product flavor belonging to the higher priority flavor dimension is first displayed, then the product flavor of the lower priority dimension, and then the construction type. As an example of the above build configuration, Gradle can use the following naming scheme to create a total of 12 build variants:
Construction variants: [minApi24, minApi23, minApi21][Demo, Full][Debug, Release]
Corresponding APK: app - [minApi24, minApi23, minApi21] - [demo, full] - [debug, release].
In addition to creating source set catalogues for each product flavor and build variant, you can also create source set catalogues for each product flavor combination. For example, you can create Java sources and add them to the src/demoMinApi24/java/directory, which Gradle uses only when building variants that combine the flavors of both products. The source set you create for your product flavor portfolio has a higher priority than the source set that belongs to each product flavor. Learn in detail how source sets and Gradles merge sources.
Filtration variants
Gradle creates build variants for every possible combination of product flavors and build types you configure. However, some specific build variants may not be necessary or meaningful in your project environment. You can create a variant filter in the module level build.gradle file to remove some of the build variant configurations.
The build configuration in the above section is an example, assuming that you plan to support only API level 23 and higher for the demo version of the application. You can use the variantFilter {} code block to filter out all build variant configurations that combine "minApi21" and "demo" product flavors:
android {
  ...
  buildTypes {...}

  flavorDimensions "api", "mode"
  productFlavors {
    demo {...}
    full {...}
    minApi24 {...}
    minApi23 {...}
    minApi21 {...}
  }

  variantFilter { variant ->
      def names = variant.flavors*.name
      // To check for a certain build type, use variant.buildType.name == "<buildType>"
      if (names.contains("minApi21") && names.contains("demo")) {
          // Gradle ignores any variants that satisfy the conditions above.
          setIgnore(true)
      }
  }
}
...
Creating Source Sets
By default, Android Studio creates main / source sets and directories to store all the resources you want to share among all build variants. However, you can create new source sets to control the exact files Gradle compiles and packages for specific build types, product flavors (and product flavor combinations when using flavor dimensions), and build variants. For example, you can define basic functions in the main / source set, use the product flavor source set to change the brand of the application for different customers, or only build variants that use debug build types contain special permissions and logging functions.
Gradle requires you to organize source set files and directories in a specific way similar to the main / source set. For example, Gradle requires that the Java class files specific to your "debug" build type be located in the src/debug/java/directory.
The Android plug-in for Gradle provides a useful Gradle task that shows you how to organize your files for each build type, product flavor, and build variants. For example, the following sections of the report describe where Gradle requires specific files of the "debug" build type to be found:
------------------------------------------------------------
Project :app
------------------------------------------------------------

...

debug
----
Compile configuration: compile
build.gradle name: android.sourceSets.debug
Java sources: [app/src/debug/java]
Manifest file: app/src/debug/AndroidManifest.xml
Android resources: [app/src/debug/res]
Assets: [app/src/debug/assets]
AIDL sources: [app/src/debug/aidl]
RenderScript sources: [app/src/debug/rs]
JNI sources: [app/src/debug/jni]
JNI libraries: [app/src/debug/jniLibs]
Java-style resources: [app/src/debug/resources]
To generate and view this report for your build configuration, proceed as follows 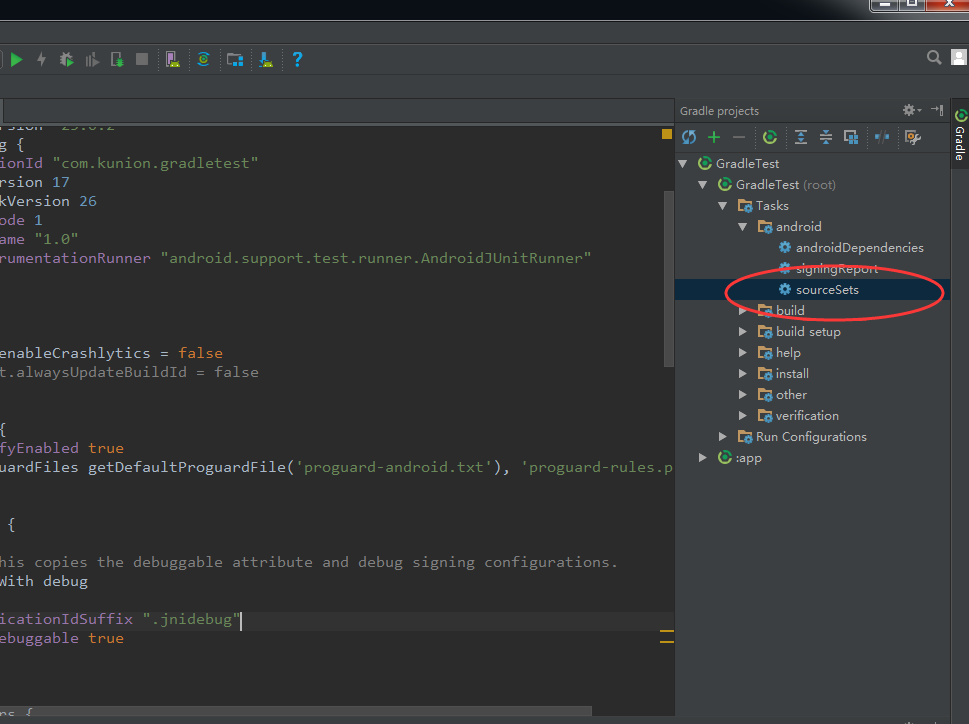
When you create a new build variant, Android Studio will not create the source set directory for you, but will provide you with several options to help you create it. For example, to create only java / directories for the Debug build type, do the following:
- Open the Project pane and select the Project view from the drop-down menu at the top of the pane.
- Navigate to MyProject/app/src/.
- Right-click the src directory and select New > Folder > Java Folder.
- From the drop-down menu next to the Target Source Set, select debug.
- Click Finish.
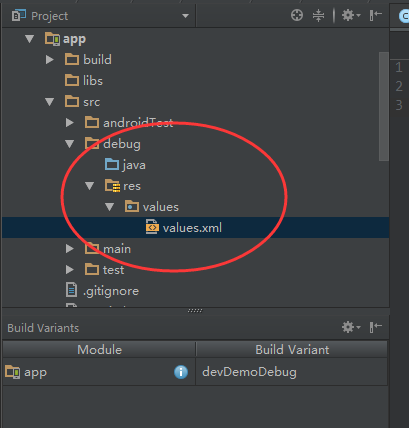
Android Studio will create a source set directory for your debug build type, and then create a java / directory within that directory. Alternatively, you can have Android Studio create directories for you when adding new files to your project for specific build variants. For example, to create an XML value file for the "debug" build type:
- In the same Project pane, right-click the src directory and select New > XML > Values XML File.
- Enter a name for an XML file or leave the default name.
- From the drop-down menu next to the Target Source Set, select debug.
- Click Finish.
Because the "debug" build type is specified as the target source set, Android Studio automatically creates the necessary directories when creating an XML file. The final directory structure should look like Figure 2.
In the same way, you can also create source set directories for product flavors (such as src/demo/), and source set directories for build variants (such as src/demoDebug/). In addition, you can create test source sets for specific build variants, such as src/androidTestDemoDebug /.
Change the default source set configuration
If your source is not organized into the default source set file structure that Gradle expects (as described in the Creation Source Sets section above), you can use the source Sets {} code block to change the location where Gradle wants to collect files for each component of the source set. You don't need to relocate the file; you just need to provide Gradle with a path relative to the module-level build.gradle file, under which Gradle should be able to find files for each source set component. To understand which components you can configure
The following code example maps the source in the app/other / directory to some components of the main source set and changes the root directory of the Android test source set
android {
  ...
  sourceSets {
    // Encapsulates configurations for the main source set.
    main {
      // Changes the directory for Java sources. The default directory is
      // 'src/main/java'.
      java.srcDirs = ['other/java']

      // If you list multiple directories, Gradle uses all of them to collect
      // sources. Because Gradle gives these directories equal priority, if
      // you define the same resource in more than one directory, you get an
      // error when merging resources. The default directory is 'src/main/res'.
      res.srcDirs = ['other/res1', 'other/res2']

      // Note: You should avoid specifying a directory which is a parent to one
      // or more other directories you specify. For example, avoid the following:
      // res.srcDirs = ['other/res1', 'other/res1/layouts', 'other/res1/strings']
      // You should specify either only the root 'other/res1' directory, or only the
      // nested 'other/res1/layouts' and 'other/res1/strings' directories.

      // For each source set, you can specify only one Android manifest.
      // By default, Android Studio creates a manifest for your main source
      // set in the src/main/ directory.
      manifest.srcFile 'other/AndroidManifest.xml'
      ...
    }

    // Create additional blocks to configure other source sets.
    androidTest {

      // If all the files for a source set are located under a single root
      // directory, you can specify that directory using the setRoot property.
      // When gathering sources for the source set, Gradle looks only in locations
      // relative to the root directory you specify. For example, after applying the
      // configuration below for the androidTest source set, Gradle looks for Java
      // sources only in the src/tests/java/ directory.
      setRoot 'src/tests'
      ...
    }
  }
}
...
Using Source Set Construction
You can use the Source Set Directory to contain the code and resources that you want to package only for certain configurations. For example, if you want to build a "demo debugging" build variant (which is a combination of the "demo" product flavor and the "debug" build type), Gradle will look at these directories and assign the following priority order:
- src/demoDebug/(Building Variant Source Set)
- src/debug/(build type source set)
- src/demo/(product flavor source set)
- src/main/(main source set)
The order listed above determines which source set has a higher priority when Gradle merges code and resources. Because the demoDebug / source set directory is likely to contain files specific to the build variant, Gradle will use the demoDebug / source set file if demoDebug / contains files defined in debug / as well. Likewise, Gradle gives higher priority to the files in the build type and product flavor source set than the same files in main/ Gradle considers this priority order when applying the following build rules:
- Compile all the source code in the java / directory together to generate a single output.
- All lists are merged into a single list. Priorities will be specified in the same order in the list above. That is to say, the list settings of a build type will replace the list settings of a product flavor, and so on. For more information, please read the merged list.
- Similarly, files in values / directories are merged together. If two files have the same name, such as two strings.xml files, priority will be assigned in the same order in the list above. That is to say, the values defined in the files that build the type source set will replace the values defined in the same file in the product flavor, and so on.
- Resources in res / and asset / directories will be packaged together. If two or more source sets define resources with the same name, priority will be assigned in the same order in the list above.
- Finally, when building an APK, Gradle assigns the lowest priority to the resources and checklists contained in the dependencies of the libraries module.
Declare dependencies
The following example can declare three different types of direct dependencies in the build.gradle file of the app/module:
android {...}
...
dependencies {
    // The 'compile' configuration tells Gradle to add the dependency to the
    // compilation classpath and include it in the final package.

    // Dependency on the "mylibrary" module from this project
    compile project(":mylibrary")

    // Remote binary dependency
    compile 'com.android.support:appcompat-v7:26.0.0'

    // Local binary dependency
    compile fileTree(dir: 'libs', include: ['*.jar'])
}
Each of these direct dependencies is described one by one below.
Module dependencies
The compile project(': mylibrary') line declares a local Android library module named "mylibrary" as a dependency and requires the build system to compile and include the local module when building the application.
Remote binary dependencies
The compile'com.android.support:appcompat-v7:26.0.0'guild declares a dependency for version 26.0.0 of the Android support library by specifying its JCenter coordinates. By default, Android Studio configures the project to use the JCenter store in the top-level build file. Gradle automatically extracts dependencies from JCenter when you synchronize the project with the build configuration file. Alternatively, you can download and install specific dependencies using the SDK manager.
Local binary dependencies
The compile file Tree (dir:'libs', include: ['*. jar']) line tells the build system to include any JAR files in the app/libs / directory in the compile classpath and the final application package. If you have modules that require local binary dependencies, copy the JAR files of these dependencies to / LIBS within the project.
Some of the module's direct dependencies may have their own dependencies, which are called the module's transitive dependencies. Gradle will automatically collect and add these delivery dependencies for you without having to declare them manually. The Android plug-in for Gradle provides a useful Gradle task to generate dependency trees for each build variant and test source set, so you can easily visualize the direct and transitive dependencies of the module. To generate this report, proceed as follows:
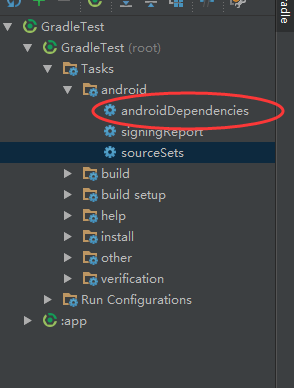
- Click Gradle on the right side of the IDE window.
- Navigate to MyApplication > Tasks > Android and double-click Android Dependencies.
- To view the report, click Gradle Console at the bottom of the IDE window.
The following example report shows the dependency tree of the debug build variant and contains the local module dependencies and remote dependencies in the previous example.
The following example report shows the dependency tree of the debug build variant and contains the local module dependencies and remote dependencies in the previous example.
Executing tasks: [androidDependencies]
:app:androidDependencies
debug
/**
 * Both the library module dependency and remote binary dependency are listed
 * with their transitive dependencies.
 */
+--- MyApp:mylibrary:unspecified
|    \--- com.android.support:appcompat-v7:26.0.0
|         +--- com.android.support:animated-vector-drawable:26.0.0
|         |    \--- com.android.support:support-vector-drawable:26.0.0
|         |         \--- com.android.support:support-v4:26.0.0
|         |              \--- LOCAL: internal_impl-26.0.0.jar
|         +--- com.android.support:support-v4:26.0.0
|         |    \--- LOCAL: internal_impl-26.0.0.jar
|         \--- com.android.support:support-vector-drawable:26.0.0
|              \--- com.android.support:support-v4:26.0.0
|                   \--- LOCAL: internal_impl-26.0.0.jar
\--- com.android.support:appcompat-v7:26.0.0
     +--- com.android.support:animated-vector-drawable:26.0.0
     |    \--- com.android.support:support-vector-drawable:26.0.0
     |         \--- com.android.support:support-v4:26.0.0
     |              \--- LOCAL: internal_impl-26.0.0.jar
     +--- com.android.support:support-v4:26.0.0
     |    \--- LOCAL: internal_impl-26.0.0.jar
     \--- com.android.support:support-vector-drawable:26.0.0
          \--- com.android.support:support-v4:26.0.0
               \--- LOCAL: internal_impl-26.0.0.jar
...
//For more information on managing dependencies in Gradle, see the dependency management basics in the Gradle User Guide.
Configuration dependencies
Configuration dependencies
You can use specific configuration keywords to tell Gradle how and when to use a dependency, such as the compile keyword in the preceding example. Here are some keywords you can use to configure dependencies:
compile
Specifies compile-time dependencies. Gradle adds the dependencies of this configuration to the classpath and the APK applied. This is the default configuration.
apk
Specify runtime-only dependencies that Gradle needs to package with the application's APK. You can use this configuration with JAR binary dependencies rather than with other library module dependencies or AAR binary dependencies.
provided
Specifies that Gradle does not package compile-time dependencies with the application APK. If this dependency is not required at runtime, it will help to reduce the size of the APK. You can use this configuration with JAR binary dependencies rather than with other library module dependencies or AAR binary dependencies.
In addition, you can configure dependencies for a particular build variant or test source set by applying the name of the build variant or test source set to the configuration keyword, as shown in the following example.
dependencies {
    ...
    // Adds specific library module dependencies as compile time dependencies
    // to the fullRelease and fullDebug build variants.
    fullReleaseCompile project(path: ':library', configuration: 'release')
    fullDebugCompile project(path: ':library', configuration: 'debug')

    // Adds a compile time dependency for local tests.
    testCompile 'junit:junit:4.12'

    // Adds a compile time dependency for the test APK.
    androidTestCompile 'com.android.support.test.espresso:espresso-core:2.2.2'
}
Configuration Signature Settings
Gradle will not sign the APK for publishing builds unless you explicitly define the signature configuration for publishing builds. You can easily create a publishing key and sign the publishing build type using Android Studio.
To use Gradle build configuration to manually configure signature configuration for your publish build type:
- Create a keystore. The keystore is a binary file that contains a set of private keys. You must keep the key store in a secure and reliable place.
- Create a private key. A private key represents an entity, such as a person or a company, that will be identified by the application.
- Add the signature configuration to the module-level build.gradle file:
...
android {
    ...
    defaultConfig {...}
    signingConfigs {
        release {
            storeFile file("myreleasekey.keystore")
            storePassword "password"
            keyAlias "MyReleaseKey"
            keyPassword "password"
        }
    }
    buildTypes {
        release {
            ...
            signingConfig signingConfigs.release
        }
    }
}

//To generate signed APK, select Build > Generate Signed APK from the menu bar. Now, the package in app/build/apk/app-release.apk has been signed with your publishing key.

//To obtain these passwords through environment variables:
storePassword System.getenv("KSTOREPWD")
keyPassword System.getenv("KEYPWD")
Let the build process prompt you to enter these passwords when you want to call the build from the command line:
storePassword System.console().readLine("\nKeystore password: ")
keyPassword System.console().readLine("\nKey password: ")
"`
After completing this process, you can distribute your application and publish it on Google Play.