First, Timer TimerTask
Reference resources Timer in Java and TimerTask in Android
In development, we sometimes have the need to perform a task at regular intervals. For example, controls on the UI need to change over time, and we can use Java's timer toolkit, timer and TimerTask.
Timer is a common class, which has several important methods; TimerTask is an abstract class, which has an abstract method run (), similar to the run () method in threads. We use a timer to create his object, and then use the timetable method of the object to complete the operation of this interval.
//true indicates that the timer runs in daemon mode (low priority, automatic end of program timer)
java.util.Timer timer = new java.util.Timer(true);

TimerTask task = new TimerTask() {
   public void run() {
   //Every time the code that needs to be executed is put here.
   }
};

//Here are several ways to schedule task:

//Time is Date type: executed once at a specified time.
timer.schedule(task, time);

//First Time is of type Date and period is long, meaning that it is executed every period millisecond from the first Time time.
timer.schedule(task, firstTime, period);

//delay is long: delay is executed once in milliseconds from now on.
timer.schedule(task, delay);

//Delay is long and period is long: from now on, after delay milliseconds, it is executed every period milliseconds.
timer.schedule(task, delay, period);

//This task updates the UI of the main thread every 2 seconds (the TextView of the main thread shows the latest system time System.currentTimeMillis()).
package zhangphil.timertask;

import java.util.Timer;
import java.util.TimerTask;

import android.os.Bundle;
import android.os.Handler;
import android.os.Message;
import android.app.Activity;
import android.widget.TextView;

public class MainActivity extends Activity {

    private Timer timer;
    private TimerTask task;

    @Override
    protected void onCreate(Bundle savedInstanceState) {
        super.onCreate(savedInstanceState);
        setContentView(R.layout.activity_main);

        final TextView tv = (TextView) findViewById(R.id.textView);

        final int WHAT = 102;
        final Handler handler = new Handler() {
            @Override
            public void handleMessage(Message msg) {
                switch (msg.what) {
                case WHAT:
                    tv.setText(msg.obj + "");
                    break;
                }
            }
        };

        task = new TimerTask() {
            @Override
            public void run() {
                Message message = new Message();
                message.what = WHAT;
                message.obj = System.currentTimeMillis();
                handler.sendMessage(message);
            }
        };

        timer = new Timer();
        // Parameters:
        // 1000, delayed 1 second to execute.
        // In 2000, task is performed every 2 seconds.
        timer.schedule(task, 1000, 2000);
    }

    @Override
    protected void onStop() {
        super.onStop();

        // suspend
        // timer.cancel();
        // task.cancel();
    }
}
There are three parameters in the timetable
The first parameter is an object of TimerTask type. The run () method of TimerTask is a task to be performed periodically.
The second parameter has two types. The first is long type, which indicates how long it will take to execute, and the other is date type, which means that it will begin to execute after that time.
The third parameter is the execution cycle, which is a long type.
There is also an overload of two parameters in the scheduling method. The first parameter is still TimerTask. The second one is long, which means how long to execute after, and the second one is date, which means that it executes after a certain time.
Timer is a thread. Timer Task can be scheduled by using the calendar method. Multiple TimerTasks can share a timer. That is to say, a timer object calls a scheduling method once to create a thread, and calls a scheduled TimerTask is an unlimited cycle, using the timer to cancel () stop the operation. Of course, after the same timer executes a cancel () method, all timer threads are terminated.
To update the main thread UI in TimerTask, since Android's programming model does not allow updating the main thread UI in non-main threads, it is necessary to update the main thread UI in Java TimerTask with Android's processor.
Second, Scheduled ThreadPool Executor
public static ExecutorService newScheduledThreadPool(int corePoolSize){
  return new ThreadPoolExecutor(corePoolSize,Integer.MAX_VALUE,0L,TimeUnit.SECONDS,new DelayedWorkQueue<Runnable>());
}
The number of Schduled ThreadPool Executor core threads is fixed, and the number of non-core threads is unlimited. It is mainly used to perform timed tasks and repetitive tasks with fixed cycle.
Reference resources Java Concurrency Theme: Scheduled Executor Service Replacement for Timer Defects
In the past, timers were often used in projects, such as cleaning some junk files every other time and cleaning data every other time. However, timers have some shortcomings, because timers only create a thread when performing a timed task, so if there are multiple tasks, and the task time is too long, which exceeds the interval time between two tasks. Some defects will occur.
1. Two tasks are defined, which are expected to be performed after the first task 1S and the second task 3S.
package com.zhy.concurrency.timer;

import java.util.Timer;
import java.util.TimerTask;

public class TimerTest
{
    private static long start;

    public static void main(String[] args) throws Exception
    {

        TimerTask task1 = new TimerTask()
        {
            @Override
            public void run()
            {

                System.out.println("task1 invoked ! "
                        + (System.currentTimeMillis() - start));
                try
                {
                    Thread.sleep(3000);
                } catch (InterruptedException e)
                {
                    e.printStackTrace();
                }

            }
        };
        TimerTask task2 = new TimerTask()
        {
            @Override
            public void run()
            {
                System.out.println("task2 invoked ! "
                        + (System.currentTimeMillis() - start));
            }
        };
        Timer timer = new Timer();
        start = System.currentTimeMillis();
        timer.schedule(task1, 1000);
        timer.schedule(task2, 3000);

    }
}
Operation results:
task1 invoked ! 1000
task2 invoked ! 4000
TASK2 is actually executed after 4, because there is a thread inside the timer, and task 1 takes more time than the interval between two tasks. Scheduled ThreadPool is used to solve this problem.
package com.zhy.concurrency.timer;

import java.util.TimerTask;
import java.util.concurrent.Executors;
import java.util.concurrent.ScheduledExecutorService;
import java.util.concurrent.TimeUnit;

public class ScheduledThreadPoolExecutorTest
{
    private static long start;

    public static void main(String[] args)
    {
        /**
         * Initialize a Scheduled ThreadPool using the factory method
         */
        ScheduledExecutorService newScheduledThreadPool = Executors
                .newScheduledThreadPool(2);

        TimerTask task1 = new TimerTask()
        {
            @Override
            public void run()
            {
                try
                {

                    System.out.println("task1 invoked ! "
                            + (System.currentTimeMillis() - start));
                    Thread.sleep(3000);
                } catch (Exception e)
                {
                    e.printStackTrace();
                }

            }
        };

        TimerTask task2 = new TimerTask()
        {
            @Override
            public void run()
            {
                System.out.println("task2 invoked ! "
                        + (System.currentTimeMillis() - start));
            }
        };
        start = System.currentTimeMillis();
        newScheduledThreadPool.schedule(task1, 1000, TimeUnit.MILLISECONDS);
        newScheduledThreadPool.schedule(task2, 3000, TimeUnit.MILLISECONDS);
    }
}
2. If Runtime Exception is thrown by TimerTask, the timer stops running all tasks:
package com.zhy.concurrency.timer;

import java.util.Date;
import java.util.Timer;
import java.util.TimerTask;


public class ScheduledThreadPoolDemo01
{


    public static void main(String[] args) throws InterruptedException
    {

        final TimerTask task1 = new TimerTask()
        {

            @Override
            public void run()
            {
                throw new RuntimeException();
            }
        };

        final TimerTask task2 = new TimerTask()
        {

            @Override
            public void run()
            {
                System.out.println("task2 invoked!");
            }
        };

        Timer timer = new Timer();
        timer.schedule(task1, 100);
        timer.scheduleAtFixedRate(task2, new Date(), 1000);


    }
}
There are two tasks above. Task 1 throws a runtime exception. Task 2 periodically performs an operation and outputs the results:
task2 invoked!
Exception in thread "Timer-0" java.lang.RuntimeException
    at com.zhy.concurrency.timer.ScheduledThreadPoolDemo01$1.run(ScheduledThreadPoolDemo01.java:24)
    at java.util.TimerThread.mainLoop(Timer.java:512)
    at java.util.TimerThread.run(Timer.java:462)
Task 2 also stopped running due to task 1 once... Here's how to solve this problem using Scheduled Executor Service:
package com.zhy.concurrency.timer;

import java.util.Date;
import java.util.Timer;
import java.util.TimerTask;
import java.util.concurrent.Executors;
import java.util.concurrent.ScheduledExecutorService;
import java.util.concurrent.TimeUnit;


public class ScheduledThreadPoolDemo01
{


    public static void main(String[] args) throws InterruptedException
    {

        final TimerTask task1 = new TimerTask()
        {

            @Override
            public void run()
            {
                throw new RuntimeException();
            }
        };

        final TimerTask task2 = new TimerTask()
        {

            @Override
            public void run()
            {
                System.out.println("task2 invoked!");
            }
        };


        ScheduledExecutorService pool = Executors.newScheduledThreadPool(1);
        pool.schedule(task1, 100, TimeUnit.MILLISECONDS);
        pool.scheduleAtFixedRate(task2, 0 , 1000, TimeUnit.MILLISECONDS);

    }
}
The code is basically the same, but Scheduled Executor Service can ensure that TASK1 does not affect the operation of TASK2 when there is an exception:
task2 invoked!
task2 invoked!
task2 invoked!
task2 invoked!
task2 invoked!
Three, Alarm Manager
YY can be executed, but due to the thread blocking caused by CPU dormancy, the current system time exceeds this time. Even if the CPU recovers from the terminal, then due to the unsatisfactory conditions, the timing task will naturally fail this time. The solution is that it requires activation locking to keep the CPU awake. Then the problem arises, which will consume a lot of cell phone power (CPU wake-up and screen wake-up are not the same concept), greatly reducing cell phone standby time. This way can not meet our needs. Note: TimerTask implements the Runnable interface, but its operation method is simply called in the thread encapsulated in the timer, and it is not executed in other threads, that is to say, the timer is executed in a single thread, so the problem arises. Why bother wrapping a Runnable interface without multithreading calls? My answer is that foreigners just want to show that it is an executable method. Regarding dormancy, you can refer to it. Android's Several Blood Cases Caused by DormancySolutions for inaccurate time after hibernation of Android phones Alarm Manager is an Android encapsulated RTC module for management. RTC (Real Time Clock) is a separate hardware clock that can run normally when the CPU is dormant and wake up the CPU by interruption when the scheduled time arrives. This means that if we use Alarm Manager to perform tasks regularly, the CPU can sleep normally and only wake up for a short period of time when we need to run tasks.
The following references Android Basic Introduction Course - 10.5 Alarm Manager (Alarm Clock Service)
The core processes are as follows:
-
AlarmManager
alarmManager = (AlarmManager) getSystemService(ALARM_SERVICE);
Objects to obtain the Alarm Manager service provided by the system -
Intention Settings to Start Components:
Intent intent = new Intent(MainActivity.this, ClockActivity.class); -
EndingIntent object settings action, start is the activity or service, or broadcast! _____________
PendingIntent pi = PendingIntent.getActivity(MainActivity.this, 0, intent, 0); -
Call AlarmManager's set () method to set the alarm type, start time and Pending Intent object for a single alarm clock!
alarmManager.set(AlarmManager.RTC_WAKEUP,c.getTimeInMillis(), pi);
//Execute a task in 10 seconds
AlarmManager alarmManager = (AlarmManager) getSystemService(ALARM_SERVICE);
long triggerAtTime = SystemClock.elapsedRealtime() + 10 * 1000;
manager.set(AlarmManager.ELAPSED_REALTIME_WAKEUP,triggerAtTime,pendingIntent);
Relevant methods:
- set (int type, long start time, Pending Intent pi): one-time alarm clock
-
setRepeating(int type,long startTime,long intervalTime,PendingIntent pi):
Repetitive alarm clock, different from 3, 3 alarm clock interval is not fixed -
setInexactRepeating(int type,long startTime,long intervalTime,PendingIntent pi):
Repeated alarm clock, time is not fixed - Pending Intent pi: Cancel Alarm Manager's Timing Service
- getNextAlarmClock (): Get the next alarm clock and return the value AlarmManager.AlarmClockInfo
-
setAndAllowWhileIdle(int type,long triggerAtMillis,PendingIntent operation)
Similar to the setup method, this alarm clock works well when the system is in low-power mode. -
setExact(int type,long triggerAtMillis,PendingIntent operation):
When the alarm clock is executed accurately at the prescribed time, the precision of comparison method is higher. - setTime (long millis): Set the time on the system wall
- SetTime Zone (String time Zone): Set the default time zone for the system to last
-
setWindow (int type, long windows Start Millis, long windows Length Millis, Pending Intent operation):
Set an alarm clock to trigger at a given time window. Similar to settings, this method allows applications to precisely control the extent to which the operating system adjusts the trigger time of the entire alarm clock.
Key parameters:
-
Type (alarm clock type):
There are five optional values:-
AlarmManager.ELAPSED_REALTIME:
The alarm clock is not available in the sleep state of the mobile phone. In this state, the alarm clock uses relative time (relative to the start of the system), and the state value is 3. -
AlarmManager.ELAPSED_REALTIME_WAKEUP
The alarm clock wakes up the system and executes the prompt function in the sleeping state. In this state, the alarm clock also uses the relative time with a state value of 2. -
AlarmManager.RTC
The alarm clock is not available in the sleep state, in which the absolute time of the alarm clock is used, that is, the current system time, the state value is 1; -
AlarmManager.RTC_WAKEUP
It means that the alarm clock will wake up the system and perform the prompt function in the sleeping state. In this state, the alarm clock uses absolute time and the state value is 0. -
AlarmManager.POWER_OFF_WAKEUP
It means that the alarm clock can also prompt normally in the mobile phone state, so it is one of the most frequently used states in the five states. In this state, the alarm clock also uses absolute time with a state value of 4. However, this state seems to be affected by SDK version, and some versions do not support it.
-
AlarmManager.ELAPSED_REALTIME:
- Start time: The first execution time of the alarm clock, in milliseconds, you can customize the time, but generally use the current time. It should be noted that this attribute is closely related to the first attribute (type). If the clock corresponding to the first parameter uses relative time (ELAPSED_REALTIME and ELAPSED_REALTIME_WAKEUP), then this attribute is explained by using relative time relative to the system start-up time, such as the current time is expressed as: System Clock. elapsed Realtime (); if the first parameter is used as the first parameter. The absolute time (RTC, RTC_WAKEUP, POWER_OFF_WAKEUP) of the alarm clock corresponding to the parameter, then the absolute time must be used for this attribute, such as the current time expressed as System. CurrtTimeMillis ().
- Interval Time: Represents the interval between two alarm clocks, also in milliseconds.
-
Pending Intent: The execution of an alarm clock is bound, such as sending a broadcast, giving prompts, etc. Pending Intent
It is the encapsulation class of Intent. It should be noted that,- If the alarm clock is prompted by starting the service, the Pending Intent object should be acquired by using the Pending.getService (Context c, int i, Intent intent, int j) method.
- If the alarm clock prompt is realized by broadcasting, the Pending Intent object should be acquired by Pending Intent. getBroadcast (Context c, int i, Intent intent, int j).
-
If the alarm clock prompt is implemented by Activity, the acquisition of Pending Intent object should adopt the method of activity.
Pending Intent. getActivity (Context c, int i, Intent intent, int j) method.
If these three methods are used incorrectly, the alarm clock will not be noticed, although it will not be wrong.
Here's a service that performs timing tasks in the background every hour.
public class LongRunningService extends Service{
   public IBinder onBind(Intent intent){
      return null;
   }

   public int onStartCommand(Intent intent, int flags, int startId){
      new Thread(new Runnable(){
         public void run(){
            Log.d("LongRunningService","executed at"+new Date().toString());
         }
      }).start();
   }
   AlarmManager manager = (AlarmManager) getSystemService(ALARM_SERVICE);
   int anHour = 60 * 60 * 1000;
   long triggerAtTime = SystemClock.elapsedRealtime() + anHour;
   Intent i = new Intent(this,AlarmReceiver.class);
   PendingIntent pi = PendingIntent.getBroadcast(this,0,i,0);
   manager.set(AlarmManager.ELAPSED_REALTIME_WAKEUP,triggerAtTime,pi);
   return super.onStartCommand(intent,flags,startId);
}

public class AlarmReceiver extends BroadcastReceiver{
   public void onReceive(Context context, Intent intent){
      Intent i = new Intent(context, LongRunningService.class);
      context.startService(i);
   }
}

public class MainActivity extends Activity{
   protected void onCreate(Bundle savedInstanceState){
      super.onCreate(savedInstanceState);
      Intent intent = new Intent(this,LongRunningService);
      startService(intent);
   }
}
Fourth, Count Down Timer
Reference resources
CountDownTimer for Android Countdown
[Android] CountDownTime Simple Usage and Source Parsing
Countdown is often used in development, including sending validation codes to mobile phones and so on. Before I used to use Handler + Timer + TimerTask to achieve this. Now I found this class and discarded it decisively. I believe that there are still many people like me who didn't know Android at the beginning, who have packaged a class called CountDownTime for us. Count Down Timer timer = new CountDownTimer(10000,1000); in milliseconds, the first parameter refers to the number of milliseconds during which the onFinish () method is invoked from the start of the invocation () method to the completion of the countdown, i.e. the total countdown time; the second parameter refers to the number of milliseconds between which the onTick method is invoked, such as the interval of 1000 milliseconds. Use timer.start() directly when calling.
//There are four methods, the first two of which need to be rewritten
public abstract void onTick(long millisUntilFinished);//Fixed interval call
public abstract void onFinish();//Called when the countdown is complete
public synchronized final void cancel();//Cancel the countdown and restart it when restarted
public synchronized final CountDownTimer start();//Start countdown
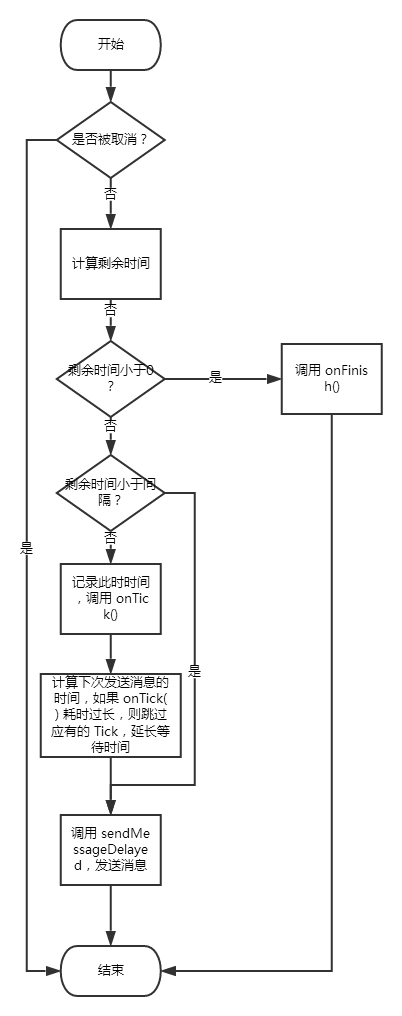
//There are fewer member variables and functions in this class. The key part of function implementation is mHandler. Look at the source code of mHandler below.
private Handler mHandler = new Handler() {
@Override public void handleMessage(Message msg) {
synchronized (CountDownTimer.this) {
if (mCancelled) {
return;
}
final long millisLeft = mStopTimeInFuture - SystemClock.elapsedRealtime();
if (millisLeft <= 0) {
onFinish();
} else if (millisLeft < mCountdownInterval) {
// no tick, just delay until done
sendMessageDelayed(obtainMessage(MSG), millisLeft);
} else {
long lastTickStart = SystemClock.elapsedRealtime();
onTick(millisLeft);
// take into account user's onTick taking time to execute
long delay = lastTickStart + mCountdownInterval - SystemClock.elapsedRealtime();
// special case: user's onTick took more than interval to
// complete, skip to next interval
while (delay < 0) delay += mCountdownInterval;
sendMessageDelayed(obtainMessage(MSG), delay);
}
}
}
};
Look at an example of use:
package com.per.countdowntimer;

import android.app.Activity;
import android.os.Bundle;
import android.os.CountDownTimer;
import android.view.View;
import android.widget.TextView;


public class MainActivity extends Activity {
    private TextView mTvShow;

    @Override
    protected void onCreate(Bundle savedInstanceState) {
        super.onCreate(savedInstanceState);
        setContentView(R.layout.activity_main);
        mTvShow = (TextView) findViewById(R.id.show);
    }

    /**
     * Cancel Countdown
     * @param v
     */
    public void oncancel(View v) {
        timer.cancel();
    }

    /**
     * Start countdown
     * @param v
     */
    public void restart(View v) {
        timer.start();
    }

    private CountDownTimer timer = new CountDownTimer(10000, 1000) {

        @Override
        public void onTick(long millisUntilFinished) {
            mTvShow.setText((millisUntilFinished / 1000) + "Repeat in seconds");
        }

        @Override
        public void onFinish() {
            mTvShow.setEnabled(true);
            mTvShow.setText("Get the authentication code");
        }
    };
}
Fifth, new Handler (). postDelayed ()
This method uses what we often call message processors. The principle of this method is to create a Handler message processor in the main thread, and then use one of the postDelayed (Runnable r, long delayMillis) methods. The first parameter of this method needs to pass in a runnable interface and implement the run () method. The second parameter is how long the code in the run () method is delayed to send a message through a message. Queue, and then execute the code in the message in the main thread, that is, the code in the running method, so as to update the interface UI in the main thread.
Post code:
new Handler().postDelayed(new Runnable() {//Update the UI by opening a message processor in the current thread (that is, in the main thread) and executing it in the main thread after 3 seconds
    @Override
    public void run() {
        //Code for updating UI
    }
}, 3000);//Send in 3 seconds