I. Application scenarios
1. Put on the effect map first:
Design sketch
2. Application scenario analysis:
- Suitable for Activity Interface Jump
- Switching for View
- Supporting animation effects for all View layouts
3. Code usage (very simple and easy to use):
- On the layout you need to animate, just put Reveal Animation Layout on it and support any layout!!!
    <com.revealanimation.RevealAnimationLayout
        android:id="@+id/animat_layout"
        android:layout_width="match_parent"
        android:layout_height="wrap_content"
        >
        <ImageView
            android:layout_width="match_parent"
            android:layout_height="400dp"
            android:layout_marginLeft="50dp"
            android:layout_marginRight="50dp"
            android:scaleType="centerCrop"
            android:src="@mipmap/test"/>
    </com.revealanimation.RevealAnimationLayout>

 // In java code, call
mClipAnimationLayout.startAnimal(RevealAnimationLayout.AnimaType.Circle);
II. Process analysis
1. android 5.0 already has the corresponding interface ViewAnimationUtils.createCircularReveal, but it still has some limitations:
- It can only be used in android 5.0
- Provide only circular exposure
- There are no other graphics interfaces to extend.
2. For this effect, we can only customize View to achieve. The thinking steps are as follows:
- Make an empty parent layout, provide it out, you can set any layout.
- In the empty layout on the nested sub-layout operation.
- To start with the draw function, and to tailor after super.draw(), the purpose is to ensure that the sub-layout draws first.
- Use the brush setXfermode to achieve this animation effect. First, use Path to draw a circle/rectangle, overlap on the canvas, and take out the overlapping View.
3. We rewrite draw function and rewrite draw function. Review the flow of draw functions:
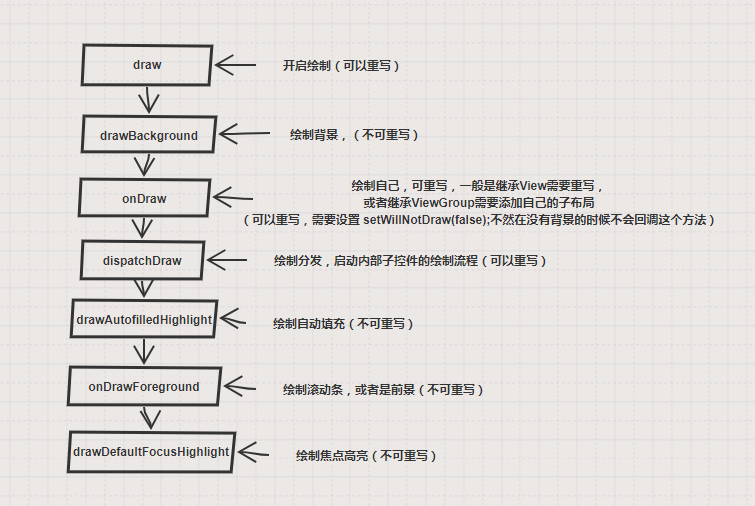
Drawing process
All that can be rewritten is:
- draw
- onDraw
- dispatchDraw
To sum up: only draw and dispatchDraw rewriting can meet the requirements, such as the following simulation code:
@Override
    public void draw(Canvas canvas) {
        canvas.saveLayer(mLayer, null, Canvas.ALL_SAVE_FLAG);
        super.draw(canvas); //Self-drawing on canvas, sub-layout drawing on canvas
        onClipDraw(canvas); //The above code is drawn, and then the whole canvas is operated on.
        canvas.restore();
    }
@Override
    protected void dispatchDraw(Canvas canvas) {
     canvas.saveLayer(mLayer, null,Canvas.ALL_SAVE_FLAG);
     /**
     *The sub-layout is drawn in canvas, but it is not finished yet, and it needs to be drawn.
     *drawAutofilledHighlight-onDrawForeground-drawDefau*ltFocusHighlight. But that's OK. We just need to do sub-layout operations.
     */
        super.dispatchDraw(canvas);
        onClipDraw(canvas); //After the sub-layout is drawn, the canvas is operated on.
        canvas.restore()
    }
3. Code Implementation
1. Start an animator and get the percentage of animation execution: mAnimatorValue.
   /**
     * Initialize animation class
     */

    private void initAnimator() {
        mUpdateListener = new ValueAnimator.AnimatorUpdateListener() {
            @Override
            public void onAnimationUpdate(ValueAnimator animation) {

                //Get the percentage of animation execution mAnimatorValue
                mAnimatorValue = (float) animation.getAnimatedValue();
                invalidate();
            }
        };

        mStartingAnimator = new ValueAnimator().setDuration(defaultDuration);
        mStartingAnimator.setInterpolator(new AccelerateInterpolator());
        mStartingAnimator.addUpdateListener(mUpdateListener);
    }


   /**
     * Open animation
     * @param animaType Animation Types
     */

public void startAnimal(AnimaType animaType) {
        this.mAnimaType = animaType;
        setVisibility(View.VISIBLE);
        mStartingAnimator.cancel();
        if(mAnimaType == AnimaType.BackCircle ||
                mAnimaType == AnimaType.BackLeftRight ||
                mAnimaType == AnimaType.BackUpDown ) {
            mStartingAnimator.setFloatValues(1,0);
        } else {
            mStartingAnimator.setFloatValues(0,1);
        }
        mStartingAnimator.start();
    }
2. Let's generate a clipping path mClipPath (Path class). The percentage mAnimatorValue is used to calculate the radius of the circle that mClipPath needs to add.
    @Override
    protected void onSizeChanged(int w, int h, int oldw, int oldh) {
        super.onSizeChanged(w, h, oldw, oldh);
        mLayer.set(0, 0, w, h);
        refreshRegion(this);
    }

    public void refreshRegion(View view) {
        int w = (int) mLayer.width();
        int h = (int) mLayer.height();
        RectF areas = new RectF();
        areas.left = view.getPaddingLeft();
        areas.top = view.getPaddingTop();
        areas.right = w - view.getPaddingRight();
        areas.bottom = h - view.getPaddingBottom();
        mClipPath.reset();

        PointF center = new PointF(w / 2, h / 2);
        if (mAnimaType == AnimaType.Circle || mAnimaType == AnimaType.BackCircle) {
            float d = (float) Math.hypot(areas.width(), areas.height());
            //Calculate the radius of the circle by the percentage of the animation mAnimatorValue
            float r = d / 2 * mAnimatorValue;
            if (Build.VERSION.SDK_INT <= Build.VERSION_CODES.O_MR1) {
            //A circle is added here.
                mClipPath.addCircle(center.x, center.y, r, Path.Direction.CW);
                mClipPath.moveTo(0, 0);  // Fill the Path area with canvas by empty operation
                mClipPath.moveTo(w, h);
            } else {
                float y = h / 2 - r;
                mClipPath.moveTo(areas.left, y);
                mClipPath.addCircle(center.x, center.y, r, Path.Direction.CW);
            }
        }
    }
3. Finally, let's start with Draw and draw the generated mClipPath to canvas (the whole layout has been drawn), using PorterDuff.Mode.DST_OUT to take out the overlapping part of the circle. (Here's a little trick for android 9.0 compatibility.)
@Override
    public void draw(Canvas canvas) {
        canvas.saveLayer(mLayer, null, Canvas.ALL_SAVE_FLAG);
        super.draw(canvas);
        onClipDraw(canvas);
        canvas.restore();
    }


    public void onClipDraw(Canvas canvas) {
        mPaint.setColor(Color.WHITE);
        mPaint.setStyle(Paint.Style.FILL);

        mPaint.setXfermode(new PorterDuffXfermode(PorterDuff.Mode.DST_OUT));

        mOpClipPath.reset();
        mOpClipPath.addRect(0, 0, mLayer.width(), mLayer.height(), Path.Direction.CW);
        //Conversely, because android 9.0 does not draw the layout outside of paint (paint itself has a specified area, where the area added to the brush is a circle).
        mOpClipPath.op(mClipPath, Path.Op.DIFFERENCE);
        canvas.drawPath(mOpClipPath, mPaint);

    }
The code is simple, just a layout. It can be used to realize the jump of Activity and the switch of View in the interface. It is also very easy to expand, I suggest you download it to see.
Finally, thanks: The author of gcssloop inspired me.