_This effect has been seen before, which is just a typical example related to animation. I'll share it with you here. If you have seen and are familiar with animation before, you can skip it. If you are not familiar with it or have not seen it, you can review and learn it. The picture above shows you (as if converting to gif is not complete):

What you want the source code to be [Click to download] But unfamiliar people still want to knock on themselves.
1. Objectives
_Today this article is just a complement to the previous source analysis by using attribute animation purely, so today's goal is as follows:
1. Review Property Animation Source Analysis (Choreographer "Choreographer") The principles of analysis Basic Usage of Attribute Animation.
2. By the way, a simple look at the use of Bezier curves.
Code Analysis
This example isn't very cumbersome. Let's first customize a BubbleLayout to inherit RelativeLayout. Why inherit it?In fact, because the onLayout method is forced to override when inheriting ViewGroup, which is not necessary here, inherit an existing layout.First we see our constructor:
 public BubbleLayout(Context context) {
        super(context);
        init();
    }

    public BubbleLayout(Context context, AttributeSet attrs) {
        super(context, attrs);
        init();
    }

    public BubbleLayout(Context context, AttributeSet attrs, int defStyleAttr) {
        super(context, attrs, defStyleAttr);
        init();
    }
It's easy to find the constructor, just call the init() method. Let's see what init() does directly?
 private void init() {
        initDrawable();
        initInterpolator();

        mParams = new LayoutParams(bubbleWidth,bubbleHeight);
        mParams.addRule(CENTER_HORIZONTAL,TRUE);
        mParams.addRule(ALIGN_PARENT_BOTTOM,TRUE);
    }
We see that initDrawable() is called inside the initialization method, then initInterpolator() method, and finally Params (to add bubbles to determine the initial position). Let's start with the first method:
   private void initDrawable() {
        redBubble = getResources().getDrawable(R.mipmap.red);
        blueBubble = getResources().getDrawable(R.mipmap.blue);
        yellowBubble = getResources().getDrawable(R.mipmap.yellow);

        mDrawables = new Drawable[3];
        mDrawables[0] = redBubble;
        mDrawables[1] = blueBubble;
        mDrawables[2] = yellowBubble;

        bubbleWidth = redBubble.getIntrinsicWidth();
        bubbleHeight = redBubble.getIntrinsicHeight();
    }
This place is mainly to get a few different colors of love, and then put them into the Drawable array, because after random numbers to randomly take different colors of love, and finally get the width and height of love, which will be used later.Next let's look at the second method:
  private void initInterpolator() {
        mInterpolators = new Interpolator[4];
        mInterpolators[0] = new AccelerateDecelerateInterpolator();
        mInterpolators[1] = new AccelerateInterpolator();
        mInterpolators[2] = new DecelerateInterpolator();
        mInterpolators[3] = new LinearInterpolator();
    }
This method is similar to the one above, in which different interpolators are put into the array and the interpolator is randomly taken out of the array to animate the rise.We add bubbles when we click the button, so let's look at the code for adding bubbles:
    public void addBubbles() {
        ImageView bubble = new ImageView(getContext());
        bubble.setImageDrawable(mDrawables[mRandom.nextInt(mDrawables.length)]);
        bubble.setLayoutParams(mParams);
        addView(bubble);

        startAnimation(bubble);
    }
First instantiate an ImageView, then set the picture and Params, add to this custom ViewGroup, and start the animation when you're done:
    private void startAnimation(final ImageView bubble) {
        ObjectAnimator alphaAnimator = ObjectAnimator.ofFloat(bubble,"alpha",0.2f,1f);
        ObjectAnimator scaleXAnimator = ObjectAnimator.ofFloat(bubble,"scaleX",0.2f,1f);
        ObjectAnimator scaleYAnimator = ObjectAnimator.ofFloat(bubble,"scaleY",0.2f,1f);

        AnimatorSet animatorSet = new AnimatorSet();
        animatorSet.addListener(new AnimatorListenerAdapter() {
            @Override
            public void onAnimationEnd(Animator animation) {
                startBezierAnimation(bubble);
            }
        });
        animatorSet.setDuration(300);
        animatorSet.playTogether(alphaAnimator,scaleXAnimator,scaleYAnimator);
        animatorSet.start();
    }
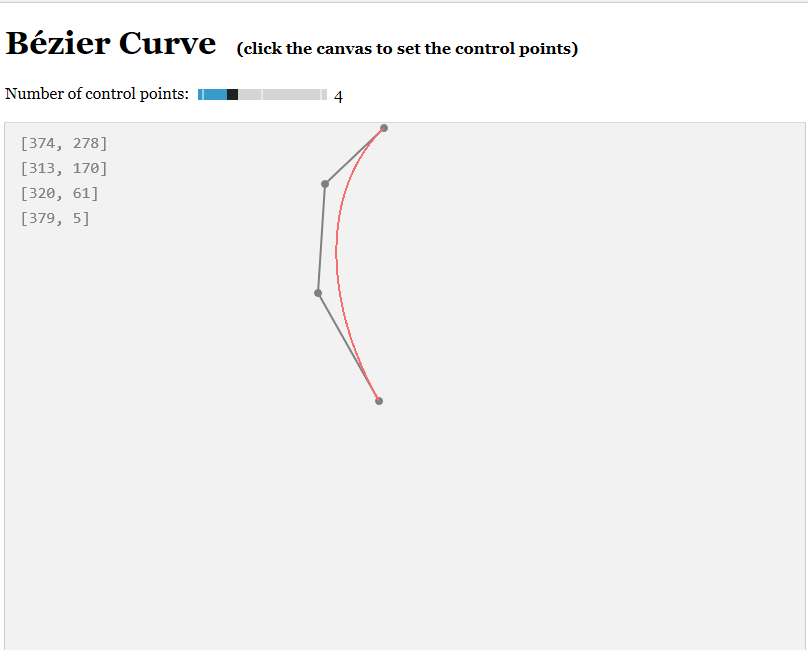
There are three main animations, first transparency changes, then scaling of x and y.Then play them together with the AnimatorSet.After the animation is finished this week, perform an animation that rises. The Bezier Curve knowledge is used below. Here I recommend an animation that simulates the Bezier Curve motion path. Online Web address As shown in the diagram:
Because we need to customize a TypeEvaluator here, let's first look at the Bezier curve formula:
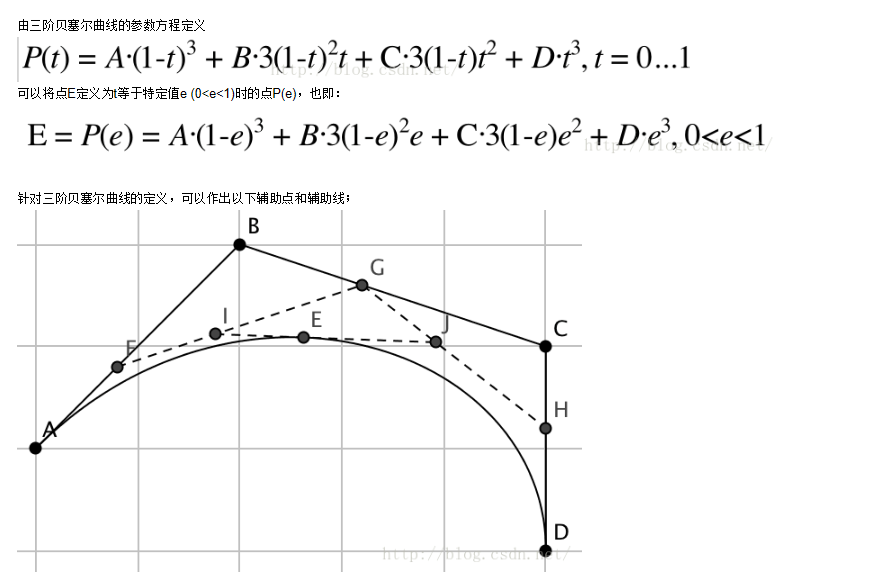
This formula is not difficult. We customize a TypeEvaluator based on this formula as follows:
public class BezierEvaluator implements TypeEvaluator<PointF> {
    private PointF B,C;
    public BezierEvaluator(PointF B,PointF C){
        this.B = B;
        this.C = C;
    }

    @Override
    public PointF evaluate(float v, PointF A, PointF D) {
        PointF evaluatedPoint = new PointF();
        evaluatedPoint.x = A.x*(1-v)*(1-v)*(1-v) + B.x*3*(1-v)*(1-v)*v + C.x*3*(1-v)*v*v +D.x*v*v*v;
        evaluatedPoint.y = A.y*(1-v)*(1-v)*(1-v) + B.y*3*(1-v)*(1-v)*v + C.y*3*(1-v)*v*v +D.y*v*v*v;
        return evaluatedPoint;
    }
}
This is simply the same formula as the one above.Then we apply this estimator:
 private void startBezierAnimation(final ImageView bubble) {
        //Two control points generated arbitrarily
        PointF B = new PointF(mRandom.nextInt(width/2) + width/4,mRandom.nextInt(height/2) + height/2);
        PointF C = new PointF(mRandom.nextInt(width/2) + width/4,mRandom.nextInt(height/2));
        //Start at the top center of this layout, end at the top x is arbitrary, y sets 0 here
        PointF A = new PointF((width - bubbleWidth)/2,height - bubbleHeight);
        PointF D = new PointF(mRandom.nextInt(width),0);

        BezierEvaluator bezierEvaluator = new BezierEvaluator(B,C);
        ValueAnimator valueAnimator = ValueAnimator.ofObject(bezierEvaluator,A,D);
        valueAnimator.addListener(new AnimatorListenerAdapter() {
            @Override
            public void onAnimationEnd(Animator animation) {
                removeView(bubble);
            }
        });
        valueAnimator.addUpdateListener(new ValueAnimator.AnimatorUpdateListener() {
            @Override
            public void onAnimationUpdate(ValueAnimator valueAnimator) {
                PointF currentPoint = (PointF) valueAnimator.getAnimatedValue();
                bubble.setX(currentPoint.x);
                bubble.setY(currentPoint.y);
                bubble.setAlpha(1 - valueAnimator.getAnimatedFraction());
            }
        });
        valueAnimator.setTarget(bubble);
        valueAnimator.setInterpolator(mInterpolators[mRandom.nextInt(mInterpolators.length)]);
        valueAnimator.setDuration(2000);
        valueAnimator.start();
    }
Points B and C of the code here are simulated with one of the web addresses recommended above. It feels like this track will look good. Point A is the middle of the control from the start point, point D is the random width of the control, and point y is the top.Then set the interpolator setInterpolator, remember to delete this ImageView last, to avoid adding too many ImageViews without deleting them.
Summary: The article has been explained here, it is very simple, as long as you combine the previous basic usage to see it, there is no difficulty.