Ansible introduction
Ansible, SaltStack and Puppet are configuration management system s
Ansible , and , SaltStack , are automatic operation and maintenance tools compiled by , Python , and both use module management. The difference is that ansible does not have a client (SSH channel transmission is used) while , SaltStack , has a client (although , SaltStack , can also use , SSH channel, but it is a joke compared with , ansible , which has its own advantages. Those with a client are more stable, while those without a client are more flexible and portable
Compared with , Puppet , Ansible , has no client (SSH channel transmission), is easy to use and centralized log control
Ansible # can help us complete some batch tasks, or complete some work that needs to be repeated frequently.
For example, install the NFS service on 100 servers at the same time and start the service after installation.
For example: copy a file to 100 servers at one time.
For example, whenever a new server is added to the working environment, you have to deploy a service for the new server, that is, you need to repeat the same work frequently.
We can use "Ansible" in these scenarios.
Ansible features
- Ansible , does not need to install the client separately. SSH , is equivalent to ansible , client.
- Ansible can record the SSH account password in the configuration file, or use the key pair to connect.
- Ansible does not need to start any services, just install the corresponding tools.
- Ansible relies on a large number of Python modules to realize batch management.
Ansible architecture
Ansible , is managed by modules, and modules are written by , Python , which requires , Python at both the control end and the controlled end, which is not a problem for , LInux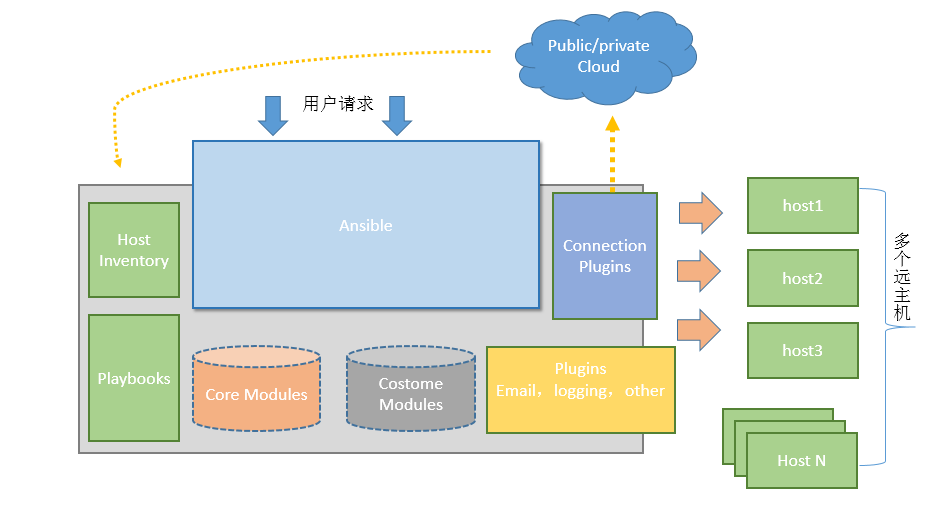
- Host inventory: records the host information managed by Ansible, including port, password, ip, etc. And logically grouped.
- AB hoc (command line): call the module to manage the controlled end through the command line
- Playbooks (script): YAML format file. Multiple tasks are defined in one file to define which modules the host needs to call to complete the functions
- Core modules: the main operation is to complete the management task by calling the core module
- CustomModules: complete functions that cannot be completed by the core module and support multiple languages
- plugins: complete the supplement of module functions
- Connection plugins: used to connect the host and the managed end
Ansible configuration
YUM # install Ansible
Ansible , package is in , epel , library, and partially depends on , base , library
[root@Ansible ~]# yum install ansible -y
## Check Ansible version information (for those with low version number, check whether epel source has it)
[root@Ansible ~]# ansible --version
ansible 2.7.10
  config file = /etc/ansible/ansible.cfg
  configured module search path = [u'/root/.ansible/plugins/modules', u'/usr/share/ansible/plugins/modules']
  ansible python module location = /usr/lib/python2.7/site-packages/ansible
  executable location = /usr/bin/ansible
  python version = 2.7.5 (default, Apr 11 2018, 07:36:10) [GCC 4.8.5 20150623 (Red Hat 4.8.5-28)]
The location of the configuration file of "Ansible" is specified above. However, for convenience and portability, the configuration file is not fixed. The following is read according to the sequence:
- Variable $ANSIBLE_CONFIG information
- Current directory: ansible Cfg file
- The home directory of the current user is "ansible" Cfg file
- /etc/ansible/ansible.cfg file
Common configuration
[defaults] #General default configuration
inventory      /etc/ansible/hosts #IP or DNS list of the controlled end
library = /usr/share/my_modules/ ##Location of the default discovery module
remote_tmp = ~/.ansible/tmp #Remote execution of temporary files
local_tmp = ~/.ansible/tmp
plugin_filters_cfg = /etc/ansible/plugin_filters.yml
forks = 5 ##Number of parallel threads
poll_interval = 15 ##Return frequency or polling interval
sudo_user = root ##sudo remote execution user name
ask_sudo_pass = True ##Do you need to enter a password to use sudo
ask_pass = True ##Do you need to enter a password
transport = smart ##Communication mechanism
remote_port = 22 ##Remote SSH port
module_lang = C ##Language for communication between modules and systems
module_set_locale = False
gathering = implicit ##Control default facts collection (remote system variable)
gather_subset = all
gather_timeout = 10
roles_path = /etc/ansible/roles ##Search for Ansible roles using playbook
host_key_checking = False ##Check remote public key fingerprint
sudo_exe = sudo ##sudo remote execution command
sudo_flags = -H -S -n ##Pass parameters other than sudo
timeout = 10 ##SSH timeout
remote_user = root ##Remote login user name
log_path = /var/log/ansible.log ##Log file storage path
module_name = command ##The Ansible command is executed by default
executable = /bin/sh ##Execution shell environment, user shell module
hash_behaviour = replace ##Specific priority override variables
jinja2_extensions = jinja2.ext.do,jinja2.ext.i18 ##Allow to open jinja2 extension module
private_key_file = /path/to/file ##Private key file storage location
display_skipped_hosts = True ##Displays the status of skipping any task
system_warnings = True ##Disable system running Ansible potential problem warning
deprecation_warnings = True ##PlayBook output disables the "not recommended" warning
command_warnings = False ##The command module Ansible issues a warning by default
nocolor = 1 ##The output band has color difference. 0 means on and 1 means off
pipelining = False ##Enable pipe SSH channel optimization

[accelerate] ##accelerate cache acceleration
accelerate_port = 5099 ##Accelerated connection port 5099
accelerate_timeout = 30 ##Command execution time exceeded, unit: s
accelerate_connect_timeout = 5.0 ##The time of the last active connection, in min
accelerate_daemon_timeout = 30 ##Allow multiple private keys to be loaded into the daemon
accelerate_multi_key = yes ##This option should be enabled for any client that wants to connect to the daemon
Host list
## Add the client host information and two hosts (IP, user, password, port) under the client list
[root@Ansible ~]# vim /etc/ansible/hosts
[client]
192.168.1.2 ansible_ssh_user='root' ansible_ssh_pass='redhat' ansible_ssh_port='22'
192.168.1.3 ansible_ssh_user='root' ansible_ssh_pass='redhat' ansible_ssh_port='22'
Verification: Ansible
You can set the host in the configuration file_ key_ Checking = false , the comment is removed to prevent the , Ansible connection failure caused by the public key fingerprint required for the first , SSH connection
## Test whether the host is connected with the ping module
[root@Ansible ~]# ansible client -m ping
192.168.1.2 | SUCCESS => {
    "changed": false,
    "ping": "pong"
}
192.168.1.3 | SUCCESS => {
    "changed": false,
    "ping": "pong"
}
## -m: What module to call- a: Perform what action
[root@Ansible ~]# ansible client -m command -a "df -h"
192.168.1.2 | CHANGED | rc=0 >>
File system capacity used available used% Mount point
/dev/mapper/centos-root 17G 3.1G 14G 18% /
devtmpfs 476M 0 476M 0% /dev
tmpfs 488M 0 488M 0% /dev/shm
tmpfs 488M 7.8M 480M 2% /run
tmpfs 488M 0 488M 0% /sys/fs/cgroup
/dev/sda1 1014M 173M 842M 18% /boot
tmpfs 98M 0 98M 0% /run/user/0
192.168.1.3 | CHANGED | rc=0 >>
File system capacity used available used% Mount point
/dev/mapper/centos-root 17G 3.1G 14G 18% /
devtmpfs 476M 0 476M 0% /dev
tmpfs 488M 0 488M 0% /dev/shm
tmpfs 488M 7.7M 480M 2% /run
tmpfs 488M 0 488M 0% /sys/fs/cgroup
/dev/sda1 1014M 173M 842M 18% /boot
tmpfs 98M 0 98M 0% /run/user/0
Connect using a key pair
## Create key pair
[root@Ansible ~]# ssh-keygen -t rsa
## Send to the corresponding host
[root@Ansible ~]# ssh-copy-id -i /root/.ssh/id_rsa.pub root@192.168.1.2
[root@Ansible ~]# ssh-copy-id -i /root/.ssh/id_rsa.pub root@192.168.1.3
## Delete the account and password behind the IP of the configuration file
[root@Ansible ~]# vim /etc/ansible/hosts
[client]
192.168.1.2
192.168.1.3
## Connection test
[root@Ansible ~]# ansible client -m command -a "hostname"
192.168.1.3 | CHANGED | rc=0 >>
Client2
192.168.1.2 | CHANGED | rc=0 >>
Client1
Groups can include other groups
## Redefine the host list (group calls other groups, and add: children after the group name)
[root@Ansible ~]# vim /etc/ansible/hosts
[web]
192.168.1.2

[nfs]
192.168.1.3

[local]
localhost ansible_connection=local

[hosts:children]
web
nfs
local
## Execute commands to test connectivity
[root@Ansible ~]# ansible web --list-host
  hosts (1):
    192.168.1.2
[root@Ansible ~]# ansible nfs --list-host
  hosts (1):
    192.168.1.3
[root@Ansible ~]# ansible local --list-host
  hosts (1):
    localhost
[root@Ansible ~]# ansible hosts --list-host
  hosts (3):
    192.168.1.2
    192.168.1.3
    localhost
## Ansible comes with an all group for all hosts
[root@Ansible ~]# ansible all --list-host
  hosts (3):
    192.168.1.2
    192.168.1.3
    localhost
Replace IP with alias
## Edit file
[root@Ansible ~]# vim /etc/ansible/hosts
[web]
web1 ansible_ssh_host=192.168.1.2

[nfs]
nfs1 ansible_ssh_host=192.168.1.3

[local]
localhost ansible_connection=local

[hosts:children]
web
nfs
local
## List all hosts
[root@Ansible ~]# ansible hosts --list-host
  hosts (3):
    web1
    localhost
    nfs1
Specify the file with - i #
[root@Ansible ~]# vim hosts
[client]
192.168.1.2
192.168.1.3
[root@Ansible ~]# ansible client -m command -a "w" -i ./hosts
192.168.1.2 | CHANGED | rc=0 >>
 20:08:04 up 14:03, 2 users, load average: 0.00, 0.04, 0.05
USER TTY FROM LOGIN@ IDLE JCPU PCPU WHAT
root pts/0 192.168.1.1 20:08 0.00s 0.14s 0.00s w
root pts/1 192.168.1.254 14:04 6:28 0.38s 0.38s -bash
192.168.1.3 | CHANGED | rc=0 >>
 20:08:04 up 14:02, 2 users, load average: 0.00, 0.01, 0.05
USER TTY FROM LOGIN@ IDLE JCPU PCPU WHAT
root pts/0 192.168.1.1 20:08 0.00s 0.14s 0.00s w
root pts/1 192.168.1.254 14:42 1:06m 0.43s 0.43s -bash