Drois introduction
Doris is an interactive SQL data warehouse based on MPP, which is mainly used to solve the problems of reports and multidimensional analysis
Noun interpretation
-
Frontend (FE): metadata and scheduling node of Doris system. In the import process, it is mainly responsible for the scheduling of import tasks.
-
Backend (BE): the computing and storage node of Doris system. In the import process, it is mainly responsible for data writing and storage.
-
Spark ETL: in the import process, it is mainly responsible for ETL of data, including global dictionary construction (BITMAP type), partition, sorting, aggregation, etc.
-
Broker: broker is an independent stateless process. It encapsulates the file system interface and provides Doris with the ability to read files in the remote storage system
Environment installation and deployment
docker installation
yum install net-tools -y
ifconfig
 to update yum Warehouse
yum update
 Install plug-ins
yum install -y yum-utils device-mapper-persistent-data lvm2
 add to yum Source Alibaba cloud
yum-config-manager --add-repo http://mirrors.aliyun.com/docker-ce/linux/centos/docker-ce.repo
 View what can be installed docker edition
yum list docker-ce --showduplicates | sort -r
 install docker
yum install docker-ce-18.03.1.ce
 Modify storage directory
vi /usr/lib/systemd/system/docker.service
ExecStart=/usr/bin/dockerd  --graph /home/docker
https://blog.csdn.net/u014069688/article/details/100532774
Install ETCD
Network environment: docker needs to turn on the firewall
systemctl restart firewalld.service && systemctl enable firewalld.service
Master installation: etcd installation and configuration[ root@master ~]# yum install -y etcd [root@master ~]# systemctl restart etcd
Configure startup:[ root@master ~]# systemctl enable etcd
Configure etcd[ root@master ~]# vim /etc/etcd/etcd. conf
modify
ETCD_LISTEN_CLIENT_URLS="http://localhost:2379" ETCD_ADVERTISE_CLIENT_URLS="http://localhost:2379"
by
ETCD_LISTEN_CLIENT_URLS="http://192.168.10.11:2379,http://127.0.0.1:2379"
ETCD_ADVERTISE_CLIENT_URLS="http://192.168.10.11:2379"
etcd setting network segment (this network segment will be assigned to flannel0 network card):[ root@master ~]# etcdctl mk /atomic.io/network/config '{"Network":"172.20.0.0/16","SubnetMin":"172.20.1.0","SubnetMax":"172.20.254.0"}'
[root@master ~]# etcdctl get /atomic.io/network/config
[root@master ~]# etcdctl get /
/atomic.io/network/config # this file corresponds to flannel in / etc/sysconfig/flannel_ETCD_PREFIX
[ root@master ~]#Systemctl restart etcd # after creating the network segment, you need to restart etcd, otherwise flannel cannot be started later
Install flannel
Flannel yes CoreOS Team targeting Kubernetes A network planning service is designed. In short, its function is to let different node hosts in the cluster create Docker Each container has a unique virtual of a complete set IP Address. But by default Docker In configuration, On each node Docker The service will be responsible for the of the node container IP Allocation. One problem caused by this is that containers on different nodes may get the same internal and external information IP Address. And enable the passage between these containers IP The addresses are found in each other, that is, phase mutual ping Pass. Flannel The design purpose of is to re plan all nodes in the cluster IP The use rules of addresses, so that containers on different nodes can obtain"Belong to the same Intranet"And"Non repetitive"IP Address and enable containers belonging to different nodes to directly pass through the intranet IP signal communication. Flannel In essence, it is a kind of"overlay network(overlay network)",That is, the network running on a network (application layer network) does not rely on ip Address to deliver messages, but a mapping mechanism is adopted ip Address and identifiers Do mapping to locate resources. Also Will be TCP Data is packaged in another network packet for routing, forwarding and communication. At present, it has been supported UDP,VxLAN,AWS VPC and GCE Routing and other data forwarding methods. The principle is to configure one for each host ip Number of segments and subnets. For example, you can configure an overlay network to use 10.100.0.0/16 Segment, per host/24 Subnet. So host a Acceptable 10.100.5.0/24,host B Acceptable 10.100.18.0/24 My bag. flannel use etcd To maintain the assigned subnet to the actual ip Mapping between addresses. For data paths, flannel use udp To encapsulate ip Datagram, forward to remote host. choice UDP As a forwarding protocol, it can penetrate the firewall. For example, AWS Classic Unable to forward IPoIP or GRE Network package because its security group only supports TCP/UDP/ICMP. flannel use etcd Store configuration data and subnet allocation information. flannel After startup, the background process first retrieves the configuration and the list of subnets in use, then selects an available subnet, and then tries to register it. etcd It also stores the data corresponding to each host ip. flannel use etcd of watch Mechanism monitoring/coreos.com/network/subnets Change information of all elements below, and maintain a routing table according to it. To improve performance, flannel Optimized Universal TAP/TUN Equipment, right TUN and UDP Between ip Acting in pieces.
The default data communication mode between nodes is UDP forwarding On the GitHub page of Flannel, there is a schematic diagram as follows:
1)After the data is sent from the source container, it is sent through the host docker0 Forward virtual network card to flannel0 Virtual network card, this is a P2P Virtual network card, flanneld Service monitoring is at the other end of the network card. 2)Flannel adopt Etcd The service maintains a routing table between nodes, which will be introduced in the configuration section later. 3)Source host flanneld The service will the original data content UDP After encapsulation, it is delivered to the destination node according to its own routing table flanneld Service, the data is unpacked after arriving, and then directly enters the destination node flannel0 Virtual network card, It is then forwarded to the destination host docker0 The virtual network card finally communicates like a local container docker0 Route to destination container. In this way, the transmission of the whole data packet is completed. Here are three questions to explain: 1)UDP What's the matter with encapsulation? stay UDP The data content part of is actually another ICMP(that is ping Command). The original data is at the starting node Flannel On Service UDP Encapsulated, delivered to the destination node and then sent to the other end Flannel service Restored to the original packet, on both sides Docker The service doesn't feel the existence of this process. 2)Why is there an error on each node Docker Will use different IP Address segment? It seems strange, but the truth is very simple. In fact, it's just because Flannel adopt Etcd Each node is assigned the available IP After the address segment, it was secretly modified Docker Start parameters for. It's running Flannel You can view it on the service node Docker Service process running parameters( ps aux|grep docker|grep "bip"),For example“--bip=182.48.25.1/24"This parameter, which limits the section Obtained from point container IP Range. this IP The scope is determined by Flannel Automatically assigned by Flannel By saving in Etcd Records in the service ensure that they do not duplicate. 3)Why is the data on the sending node from docker0 Route to flannel0 Virtual network card. The destination node will flannel0 Route to docker0 Virtual network card? For example, there is now a packet to be sent from IP 172.17.18.2 Send container to IP 172.17.46.2 Container for. According to the routing table of the data sending node, it is only associated with 172.17.0.0/16 Match this record matches, so the data from docker0 It was delivered to after it came out flannel0. Similarly, in the target node, since the delivery address is a container, the destination address must fall in docker0 For 172.17.46.0/24 This record was naturally delivered to docker0 network card.
Deployment record of Flannel environment
1) Machine environment (centos7 system)
182.48.115.233     deploy etcd,flannel,docker      Host name: node-1   Main control end (via) etcd)
182.48.115.235     deploy flannel,docker            Host name: node-2   Controlled end
2) node-1 (182.48.115.233) machine operation
Set host name and binding hosts
[root@node-1 ~]# hostnamectl --static set-hostname node-1
[root@node-1 ~]# vim /etc/hosts
182.48.115.233 node-1
182.48.115.233 etcd
182.48.115.235 node-2
Turn off the firewall. If you turn on the firewall, you'd better open ports 2379 and 4001
[root@node-1 ~]# systemctl disable firewalld.service
[root@node-1 ~]# systemctl stop firewalld.service
Install first docker environment
[root@node-1 ~]# yum install -y docker
install etcd
k8s Run dependency etcd,Need to deploy first etcd,Use below yum Installation mode:
[root@node-1 ~]# yum install etcd -y
yum Installed etcd Default profile in/etc/etcd/etcd.conf,Edit profile:
[root@node-1 ~]# cp /etc/etcd/etcd.conf /etc/etcd/etcd.conf.bak
[root@node-1 ~]# cat /etc/etcd/etcd.conf
#[member]
ETCD_NAME=master #Node name
ETCD_DATA_DIR="/var/lib/etcd/default.etcd" #Data storage location
#ETCD_WAL_DIR=""
#ETCD_SNAPSHOT_COUNT="10000"
#ETCD_HEARTBEAT_INTERVAL="100"
#ETCD_ELECTION_TIMEOUT="1000"
#ETCD_LISTEN_PEER_URLS="http://0.0.0.0:2380"
ETCD_LISTEN_CLIENT_URLS="http://0.0.0.0:2379,http://0.0.0.0:4001 "# listening client address
#ETCD_MAX_SNAPSHOTS="5"
#ETCD_MAX_WALS="5"
#ETCD_CORS=""
#
#[cluster]
#ETCD_INITIAL_ADVERTISE_PEER_URLS="http://localhost:2380"
# if you use different ETCD_NAME (e.g. test), set ETCD_INITIAL_CLUSTER value for this name, i.e. "test=http://..."
#ETCD_INITIAL_CLUSTER="default=http://localhost:2380"
#ETCD_INITIAL_CLUSTER_STATE="new"
#ETCD_INITIAL_CLUSTER_TOKEN="etcd-cluster"
ETCD_ADVERTISE_CLIENT_URLS="http://etcd:2379,http://etcd:4001 "# notification client address
#ETCD_DISCOVERY=""
#ETCD_DISCOVERY_SRV=""
#ETCD_DISCOVERY_FALLBACK="proxy"
#ETCD_DISCOVERY_PROXY=""
start-up etcd And verify the status
[root@node-1 ~]# systemctl start etcd
[root@node-1 ~]# ps -ef|grep etcd
etcd 28145 1 1 14:38 ? 00:00:00 /usr/bin/etcd --name=master --data-dir=/var/lib/etcd/default.etcd --listen-client-urls=http://0.0.0.0:2379,http://0.0.0.0:4001
root 28185 24819 0 14:38 pts/1 00:00:00 grep --color=auto etcd
[root@node-1 ~]# lsof -i:2379
COMMAND PID USER FD TYPE DEVICE SIZE/OFF NODE NAME
etcd 28145 etcd 6u IPv6 1283822 0t0 TCP *:2379 (LISTEN)
etcd 28145 etcd 18u IPv6 1284133 0t0 TCP localhost:53203->localhost:2379 (ESTABLISHED)
........
[root@node-1 ~]# etcdctl set testdir/testkey0 0
0
[root@node-1 ~]# etcdctl get testdir/testkey0
0
[root@node-1 ~]# etcdctl -C http://etcd:4001 cluster-health
member 8e9e05c52164694d is healthy: got healthy result from http://etcd:2379
cluster is healthy
[root@node-1 ~]# etcdctl -C http://etcd:2379 cluster-health
member 8e9e05c52164694d is healthy: got healthy result from http://etcd:2379
cluster is healthy
Install overlay network Flannel
[root@node-1 ~]# yum install flannel
to configure Flannel
[root@node-1 ~]# cp /etc/sysconfig/flanneld /etc/sysconfig/flanneld.bak
[root@node-1 ~]# vim /etc/sysconfig/flanneld
# Flanneld configuration options
# etcd url location. Point this to the server where etcd runs
FLANNEL_ETCD_ENDPOINTS="http://etcd:2379"
# etcd config key. This is the configuration key that flannel queries
# For address range assignment
FLANNEL_ETCD_PREFIX="/atomic.io/network"
# Any additional options that you want to pass
#FLANNEL_OPTIONS=""
to configure etcd About flannel of key(This is only installed etcd (operation on machine)
Flannel use Etcd Configure to ensure multiple Flannel The configuration between instances is consistent, so you need to etcd Perform the following configuration on the('/atomic.io/network/config'this key And above/etc/sysconfig/flannel Configuration items in FLANNEL_ETCD_PREFIX Is the corresponding one. If there is an error, the startup will make an error):
[root@node-1 ~]# etcdctl mk /atomic.io/network/config '{ "Network": "182.48.0.0/16" }'
{ "Network": "182.48.0.0/16" }
Warm tip: above flannel Set ip The network segment can be set arbitrarily, and any network segment can be set. Container ip It is automatically allocated according to this network segment, ip After allocation, the container can generally be connected to the Internet (bridge mode, as long as the host can access the Internet)
start-up Flannel
[root@node-1 ~]# systemctl enable flanneld.service
[root@node-1 ~]# systemctl start flanneld.service
[root@node-1 ~]# ps -ef|grep flannel
root 9305 9085 0 09:12 pts/2 00:00:00 grep --color=auto flannel
root 28876 1 0 May15 ? 00:00:07 /usr/bin/flanneld -etcd-endpoints=http://etcd:2379 -etcd-prefix=/atomic.io/network
start-up Flannel After, be sure to restart docker,such Flannel Configure assigned ip To take effect, i.e docker0 Virtual network card ip Will become above flannel Set ip paragraph
[root@node-1 ~]# systemctl restart docker3) node-2 (182.48.115.235) machine operation
Set host name and binding hosts [root@node-2 ~]# hostnamectl --static set-hostname node-2 [root@node-2 ~]# vim /etc/hosts 182.48.115.233 node-1 182.48.115.233 etcd 182.48.115.235 node-2 Turn off the firewall. If you turn on the firewall, you'd better open ports 2379 and 4001 [root@node-2 ~]# systemctl disable firewalld.service [root@node-2 ~]# systemctl stop firewalld.service Install first docker environment [root@node-2 ~]# yum install -y docker Install overlay network Flannel [root@node-2 ~]# yum install flannel to configure Flannel [root@node-2 ~]# cp /etc/sysconfig/flanneld /etc/sysconfig/flanneld.bak [root@node-2 ~]# vim /etc/sysconfig/flanneld # Flanneld configuration options # etcd url location. Point this to the server where etcd runs FLANNEL_ETCD_ENDPOINTS="http://etcd:2379" # etcd config key. This is the configuration key that flannel queries # For address range assignment FLANNEL_ETCD_PREFIX="/atomic.io/network" # Any additional options that you want to pass #FLANNEL_OPTIONS="" start-up Flannel [root@node-2 ~]# systemctl enable flanneld.service [root@node-2 ~]# systemctl start flanneld.service [root@node-2 ~]# ps -ef|grep flannel root 3841 9649 0 09:11 pts/0 00:00:00 grep --color=auto flannel root 28995 1 0 May15 ? 00:00:07 /usr/bin/flanneld -etcd-endpoints=http://etcd:2379 -etcd-prefix=/atomic.io/network start-up Flannel After, be sure to restart docker,such Flannel Configure assigned ip To take effect, i.e docker0 Virtual network card ip Will become above flannel Set ip paragraph [root@node-2 ~]# systemctl restart docker
First let go of the firewall accessed by the two hosts:
[root@master ~]# iptables -I INPUT -s 192.168.10.0/24 -j ACCEPT
[root@slave01 ~]# iptables -I INPUT -s 192.168.10.0/24 -j ACCEPT
4) Create a container to verify the network connectivity between cross host containers
First in node-1(182.48.115.233)On the container, as shown below, log in the container and find that it has been in accordance with the above flannel The configured is assigned a ip Segment (each host is assigned a segment).48.0.0/16 Network segment) [root@node-1 ~]# docker run -ti -d --name=node-1.test docker.io/nginx /bin/bash 5e403bf93857fa28b42c9e2abaa5781be4e2bc118ba0c25cb6355b9793dd107e [root@node-1 ~]# docker exec -ti node-1.test /bin/bash root@5e403bf93857:/# ip addr 1: lo: <LOOPBACK,UP,LOWER_UP> mtu 65536 qdisc noqueue state UNKNOWN group default link/loopback 00:00:00:00:00:00 brd 00:00:00:00:00:00 inet 127.0.0.1/8 scope host lo valid_lft forever preferred_lft forever inet6 ::1/128 scope host valid_lft forever preferred_lft forever 2953: eth0@if2954: <BROADCAST,MULTICAST,UP,LOWER_UP> mtu 1472 qdisc noqueue state UP group default link/ether 02:42:b6:30:19:04 brd ff:ff:ff:ff:ff:ff link-netnsid 0 inet 182.48.25.4/24 scope global eth0 valid_lft forever preferred_lft forever inet6 fe80::42:b6ff:fe30:1904/64 scope link valid_lft forever preferred_lft forever Then in node-2(182.48.115.233)Upper container [root@node-2 ~]# docker exec -ti node-2.test /bin/bash root@052a6a2a4a19:/# ip addr 1: lo: <LOOPBACK,UP,LOWER_UP> mtu 65536 qdisc noqueue state UNKNOWN group default link/loopback 00:00:00:00:00:00 brd 00:00:00:00:00:00 inet 127.0.0.1/8 scope host lo valid_lft forever preferred_lft forever inet6 ::1/128 scope host valid_lft forever preferred_lft forever 10: eth0@if11: <BROADCAST,MULTICAST,UP,LOWER_UP> mtu 1472 qdisc noqueue state UP group default link/ether 02:42:b6:30:43:03 brd ff:ff:ff:ff:ff:ff link-netnsid 0 inet 182.48.67.3/24 scope global eth0 valid_lft forever preferred_lft forever inet6 fe80::42:b6ff:fe30:4303/64 scope link valid_lft forever preferred_lft forever root@052a6a2a4a19:/# ping 182.48.25.4 PING 182.48.25.4 (182.48.25.4): 56 data bytes 64 bytes from 182.48.25.4: icmp_seq=0 ttl=60 time=2.463 ms 64 bytes from 182.48.25.4: icmp_seq=1 ttl=60 time=1.211 ms ....... root@052a6a2a4a19:/# ping www.baidu.com PING www.a.shifen.com (14.215.177.37): 56 data bytes 64 bytes from 14.215.177.37: icmp_seq=0 ttl=51 time=39.404 ms 64 bytes from 14.215.177.37: icmp_seq=1 ttl=51 time=39.437 ms ....... It is found that in the containers of the two host computers, there is no connection with each other ping Opposite container ip,Yes ping Yes! You can also directly connect to the external network (bridging mode) Check the network card information of the two host computers and find that docker0 Virtual network card ip(The equivalent of a container gateway) has also become flannel Configured ip Paragraph, and more flannel0 Virtual network card information [root@node-1 ~]# ifconfig docker0: flags=4163<UP,BROADCAST,RUNNING,MULTICAST> mtu 1472 inet 182.48.25.1 netmask 255.255.255.0 broadcast 0.0.0.0 inet6 fe80::42:31ff:fe0f:cf0f prefixlen 64 scopeid 0x20<link> ether 02:42:31:0f:cf:0f txqueuelen 0 (Ethernet) RX packets 48 bytes 2952 (2.8 KiB) RX errors 0 dropped 0 overruns 0 frame 0 TX packets 31 bytes 2286 (2.2 KiB) TX errors 0 dropped 0 overruns 0 carrier 0 collisions 0 eth0: flags=4163<UP,BROADCAST,RUNNING,MULTICAST> mtu 1500 inet 182.48.115.233 netmask 255.255.255.224 broadcast 182.48.115.255 inet6 fe80::5054:ff:fe34:782 prefixlen 64 scopeid 0x20<link> ether 52:54:00:34:07:82 txqueuelen 1000 (Ethernet) RX packets 10759798 bytes 2286314897 (2.1 GiB) RX errors 0 dropped 40 overruns 0 frame 0 TX packets 21978639 bytes 1889026515 (1.7 GiB) TX errors 0 dropped 0 overruns 0 carrier 0 collisions 0 flannel0: flags=4305<UP,POINTOPOINT,RUNNING,NOARP,MULTICAST> mtu 1472 inet 182.48.25.0 netmask 255.255.0.0 destination 182.48.25.0 unspec 00-00-00-00-00-00-00-00-00-00-00-00-00-00-00-00 txqueuelen 500 (UNSPEC) RX packets 12 bytes 1008 (1008.0 B) RX errors 0 dropped 0 overruns 0 frame 0 TX packets 12 bytes 1008 (1008.0 B) TX errors 0 dropped 0 overruns 0 carrier 0 collisions 0 Through the following command, you can view the status of the local container ip Scope [root@node-1 ~]# ps aux|grep docker|grep "bip" root 2080 0.0 1.4 796864 28168 ? Ssl May15 0:18 /usr/bin/dockerd-current --add-runtime docker-runc=/usr/libexec/docker/docker-runc-current --default-runtime=docker-runc --exec-opt native.cgroupdriver=systemd --userland-proxy-path=/usr/libexec/docker/docker-proxy-current --insecure-registry registry:5000 --bip=182.48.25.1/24 --ip-masq=true --mtu=1472 What's in here“--bip=182.48.25.1/24"This parameter limits the value obtained by the node container IP Range. this IP The scope is determined by Flannel Automatically assigned by Flannel By saving in Etcd Records in the service ensure that they do not duplicate
Doris
Prepare the virtual machine equipped with Docker. Here we deploy Doris in the cluster mode with the lowest configuration
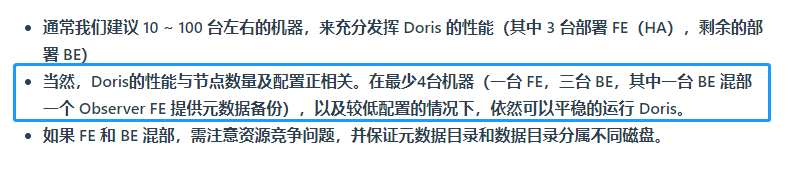
According to the official, the effect of the four machines is OK, and the expansion is not difficult
1. Download the container image of doris
docker pull apachedoris/doris-dev:build-env-1.2
2. Configure FE(Leader) for node 1
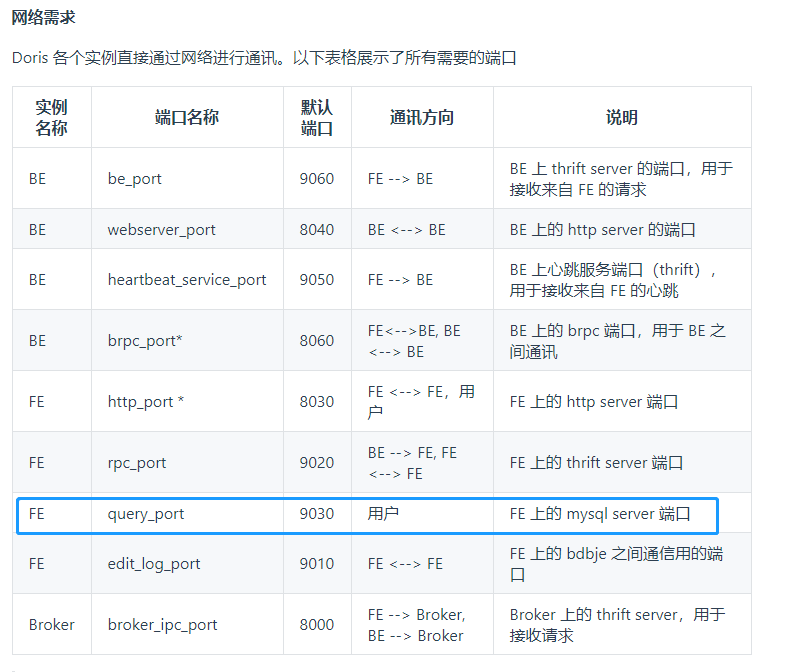
Create a Doris container node. If you want to access the cluster from the Internet, you need to configure the port mapping. Add - p 9030:9030 and other parameters after -- privileged. For details, please refer to the official document. I won't open it here
docker run -it --name doris-node1 -h doris-node1 --network tech --privileged apachedoris/doris-dev:build-env-1.2
Download Doris's installation package
cd /opt
Decompression installation
tar -zxvf apache-doris-0.12.0-incubating-src.tar.gz
cd apache-doris-0.12.0-incubating-src
sh build.sh
Configure the FE (Leader) of this node
cd output/fe
mkdir doris-meta
mkdir log
sh bin/start_fe.sh --daemon
This -- daemon means running in the background
After running, check whether there is doris, listening port, log information, etc
ps -ef

netstat -ntlp if there is no netstat command, execute Yum install net tools - y below

vi log/fe.log

After the subsequent node configuration runs, you should also execute these commands to check the status,
3. Configure FE (Observer) and BE for node 2
Create a Doris container node
docker run -it --name doris-node2 -h doris-node2 --network tech --privileged apachedoris/doris-dev:build-env-1.2
Download Doris's installation package
cd /opt
Decompression installation
tar -zxvf apache-doris-0.12.0-incubating-src.tar.gz
cd apache-doris-0.12.0-incubating-src
sh build.sh
Configure the FE (Observer) of this node
cd output/fe
mkdir doris-meta
mkdir log
Modify profile
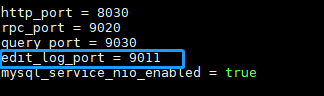
vi conf/fe.conf
edit_log_port's 9010 is changed to 9011 to prevent conflict with Leader
MySQL * * connect the Fe of the Leader node (without password) and find a node with MySQL client installed. If the Leader node is normal, it can be connected with MySQL client later. If not, you can find the data and install it on the Leader node by yourself**
mysql -uroot -h 192.168.124.9 -P 9030
-h * * the IP specified by the parameter is the IP of the Leader node**
Add node information of Observer
The IP here is the IP of the Observer and the Fe of the Observer node Edit in conf_ log_ Port number after port
ALTER SYSTEM ADD OBSERVER "192.168.124.10:9011";
Start the Observer node
The IP here is the IP of the Leader and the Fe of the Leader node Edit in conf_ log_ Port number after port
sh bin/start_fe.sh --helper 192.168.124.9:9010 --daemon
Check the status by configuring node 1
In addition, check whether the Leader node has added Observer
Connect FE with MySQL client and execute this statement:
SHOW PROC '/frontends';

At this time, check Fe The log Leader and Observer of log are constantly scrolling through heartbeat monitoring
Observer * * log**
Leader * * log**
Configure BE for this node
cd ../be
mkdir storage
mkdir log
MySQL * * connect the Fe of node 1 (no password)**
mysql -uroot -h 192.168.124.9 -P 9030
Execute the following statement
ALTER SYSTEM ADD BACKEND "192.168.124.10:9050";
exit;
start-up
sh bin/start_be.sh --daemon
Check the operation of BE
4. Configure BE for node 3
Create a Doris container node
docker run -it --name doris-node3 -h doris-node3 --network tech --privileged apachedoris/doris-dev:build-env-1.2
Download Doris's installation package
cd /opt
Decompression installation
tar -zxvf apache-doris-0.12.0-incubating-src.tar.gz
cd apache-doris-0.12.0-incubating-src
sh build.sh
Configure the FE (Observer) of this node
cd output/be
mkdir storage
mkdir log
MySQL * * connect the Fe of node 1 (no password)**
mysql -uroot -h 192.168.124.9 -P 9030
ALTER SYSTEM ADD BACKEND "192.168.124.11:9050";
exit;
start-up
sh bin/start_be.sh --daemon
Check the operation of BE
5. Configure BE for node 4
Create a Doris container node
docker run -it --name doris-node4 -h doris-node4 --network tech --privileged apachedoris/doris-dev:build-env-1.2
Download Doris's installation package
cd /opt
Decompression installation
tar -zxvf apache-doris-0.12.0-incubating-src.tar.gz
cd apache-doris-0.12.0-incubating-src
sh build.sh
Configure the FE (Observer) of this node
cd output/be
mkdir storage
mkdir log
MySQL * * connect the Fe of node 1 (no password)**
mysql -uroot -h 192.168.124.9 -P 9030
ALTER SYSTEM ADD BACKEND "192.168.124.12:9050";
exit;
start-up
sh bin/start_be.sh --daemon
Check the operation of BE
6. Check BE status
Use MySQL client to connect to FE and execute SHOW PROC '/backends'; Check the operation of BE. If everything is normal, the isAlive column should BE true.

View the running status of Follower or Observer. Use MySQL client to connect to any started FE and execute: SHOW PROC '/frontends'; You can view the FE that has joined the cluster and its corresponding roles.

Just follow this step
testing environment
Hardware configuration (3 X86 servers)
| CPU | Intel(R) Xeon(R) CPU E5-2650 0 @ 2.00GHz | |
|---|---|---|
| Memory | 64G | 8G*8 |
| disk | 1TB * 8 | |
| network card | Gigabit |
software environment
| operating system | Centos 7.8 | |
|---|---|---|
| docker | Docker version 18.03.1-ce, build 9ee9f40 | |
| virtual network | flannel -0.7.1 | |
| Distributed storage warehouse | etcd Version: 3.3.11 |
Data volume
The membership data is 4.13 million per day and about 3.1 billion in two years
Test query statement
with mtable as (
select Jygs, Mkt Mkt, '' Channel, Sc Sc, Gz Gz, Dl Dl, Zl Zl, Xl Xl,
Ppid Ppid, Gdid Gdid, Gdname Gdname, Hylb, Hyxb, Hynl, '' Ecust, Hyid,
Xfsd Xfsd, Jzdj Jzdj,
count(distinct case hyid when '0' then Null else billno end) Hykds,
Sum(Hykjs) Hykjs,
Sum(Hyxfe) Hyxfe,
Sum(Hymle) Hymle,
count(distinct billno) Kds,
Sum(Kjs) Kjs,
Sum(Xfe) Xfe,
Sum(Kds - Hykds) + count(distinct case hyid when '0' then Null else hyid end ) Zxfrs,
Sum(mle) Mle,
Count(distinct case datediff(CAST(fkrq as date),cast('2016-01-01' as date)) when -1 then '0' when null then '0' else case Hyid when '0' then Null else Hyid end end) Xzhyrs,
Sum(case DATEDIFF(fkrq,'2016-01-01') when -1 then 0 else 1 end * Hyxfe) Xzhyxfe,
round(DATEDIFF(rq,'2016-01-01')/1,0)+1 as XFZQNUM,
concat_ws( '--' ,Min(Rq), Max(Rq)) Xfzqno --Consumption cycle segment
from (
Select
Jygs ,Mkt Mkt, '' Channel, Sc Sc, Gz Gz, Dl Dl, Zl Zl, Xl Xl,
Ppid Ppid, Gdid Gdid, Gdname Gdname, Hylb, Hyxb, Hynl, '' Ecust, Hyid,
Xfsd Xfsd, Jzdj Jzdj,Hyxfe,billno,Kjs,Xfe,Kds,Hykds,mle, 0 Xzhyxfe,Hykjs,Hymle,fkrq,rq
From dr_selllist_gd
Where
mkt in ('3004')
and rq BETWEEN '2016-01-01' and '2016-05-30'
And Zl = '002-302'
And Hylb in('001','002')
And Ppid = '002-023601'
And Xfsd = '08'
) a Group By Jygs, Mkt, Sc, Gz, Dl, Zl, Xl, Ppid, Gdid, Gdname, Hylb, Hyxb, Hynl, Hyid, Xfsd, Jzdj,rq
)
Select
Jygs,
Mkt Mkt,
'v3' Channel,
Sc Sc,
Gz Gz,
Dl Dl,
Zl Zl,
Xl Xl,
Ppid Ppid,
Gdid Gdid,
Gdname Gdname,
Hylb,
Hyxb,
Hynl,
'' Ecust,
Hyid,
Xfsd Xfsd,
Zkds,
Hykds,
Kdszb,
Zxfe,
Hyxfe,
Xfezb,
Zmle,
Hymle,
Mlezb,
Zkdj,
Hykdj,
Xfpc as Hyrs,
Zxfrs,
case Zxfrs when 0 then 0 else Round(Xfpc/Zxfrs, 2) end Hyxfrszb,
Xzhyrs,
Zkjs,
Hykjs,
Kjszb,
Zkjj,
Hykjj,
Xfpc,
Xzhyxfe,
XFZQNUM,
Xfzqno,
case Xfpc when 0 then 0 else Round(Hyxfe/Xfpc, 4) end Hygml,
case Xfpc when 0 then 0 else Round(Hykds / Xfpc, 4) end Hypjkds
From (
Select
Jygs,
Mkt,
Channel,
Sc,
Gz,
Dl,
Zl,
Xl,
Ppid,
Gdid,
Gdname,
Xfsd,
Hylb,
Hyxb,
Hynl,
Ecust,
Hyid,
(Kds) Zkds,
(Kjs) Zkjs,
(Xfe) Zxfe,
(Mle) Zmle,
(Zxfrs) Zxfrs,
Sum(Hykds) Hykds,
Sum(Hykjs) Hykjs,
Sum(Hyxfe) Hyxfe,
Sum(Hymle) Hymle,
case Kds when 0 then 0 else Round(Sum(Hykds)/Kds, 4) end Kdszb,
case Kjs when 0 then 0 else Round(Sum(Hykjs)/Kjs, 4) end Kjszb,
case Xfe when 0 then 0 else Round(Sum(Hyxfe)/Xfe, 4) end Xfezb,
case Mle when 0 then 0 else Round(Sum(Hymle)/Mle, 4) end Mlezb,
case Kds when 0 then 0 else Round(Xfe/Kds, 2) end Zkdj,
case Sum(Hykds) when 0 then 0 else Round(Sum(Hyxfe)/Sum(Hykds), 2) end Hykdj,
case Kjs when 0 then 0 else Round(Xfe/Kjs, 2) end Zkjj,
case Sum(Hykjs) when 0 then 0 else Round(Sum(Hyxfe)/Sum(Hykjs), 2) end Hykjj,
Count(Distinct (case Hyid when '0' then Null else Hyid end )) Xfpc,
Xzhyrs,
Sum(Xzhyxfe) Xzhyxfe,
XFZQNUM,
Xfzqno
From mtable
Group By Jygs,
Mkt,
Channel,
Sc,
Gz,
Dl,
Zl,
Xl,
Ppid,
Gdid,
Gdname,
Xfsd,
Hylb,
Hyxb,
Hynl,
Ecust,
Hyid,
Xfe,
Mle,
Kds,
Kjs,
Zxfrs,
XFZQNUM,
Xfzqno,Xzhyrs
) b Test Case and results
| Query SQL description | Query time |
|---|---|
| Query 1.5 billion data in one year for the first time | 1s15ms |
| Query 1.5 billion data a year for the second time | 241ms |
| Query 3.1 billion data in two years | 2s95ms |
| Second query | 982ms |
| 10 concurrent queries of different store data | 6s |
| 20 concurrent queries of different store data | 6s |
| 100 concurrent queries of different store data | 6-47s |
| 500 concurrent queries of different store data | 6-687s |
In the case of high concurrency, the query waiting time will be very long. The main reason may be that my side is deployed by Docker. The virtual network is not very familiar and the deployment performance is not very good, resulting in many queries waiting all the time,
The overall evaluation performance is very good
Data table creation statement
Detailed data of member behavior
create table dr_selllist_gd(
rq        date,
mkt       varchar(40),
hyid      varchar(40),
hyno      varchar(40),
hylb      varchar(40),
hyxb      varchar(40),
hynl      varchar(40),
hyzy      varchar(40),
hysr      varchar(40),
hyxl      varchar(40),
hyr       varchar(40),
hyf       varchar(40),
hym       varchar(40),
sc        varchar(40),
bm        varchar(40),
gz        varchar(40),
dl        varchar(40),
zl        varchar(40),
xl        varchar(40),
ppid      varchar(40),
supid     varchar(40),
gdid      varchar(40),
invno     varchar(40),
kds       decimal(20,2),
xfe       decimal(20,4),
mle       decimal(20,4),
hykds     decimal(20,2),
hyxfe     decimal(20,4),
hymle     decimal(20,4),
hdhys     decimal(20,4),
num1      decimal(20,4),
num2      decimal(20,4),
num3      decimal(20,4),
num4      decimal(20,4),
num5      decimal(20,4),
num6      decimal(20,4),
num7      decimal(20,4),
num8      decimal(20,4),
num9      decimal(20,4),
gzlx      varchar(50),
gdname    varchar(200),
custname  varchar(200),
ldfs      varchar(100),
jzqy      varchar(100),
addattr2  varchar(100),
addattr3  varchar(100),
addattr4  varchar(100),
khjl      varchar(100),
jzdj      varchar(100),
ssd       varchar(100),
telyys    varchar(100),
billno    varchar(50),
syjid     varchar(100),
cyid      varchar(20),
kjs       int,
hykjs     int,
hyqy      varchar(40),
xfsd      varchar(40),
ld        varchar(40),
lc        varchar(40),
ppdj      varchar(40),
xz        varchar(40),
xx        varchar(40),
jr        varchar(40),
fkrq      date,
jygs      varchar(20),
rqyear    int,
rqmonth   int,
channel   varchar(20),
ecust     varchar(20),
regmkt    varchar(20),
hybirth   varchar(20)
)
DUPLICATE KEY(rq,mkt,hyid)
PARTITION BY RANGE(rq) (
    PARTITION P_201801 VALUES [("2017-01-01"),("2017-02-01")),
    PARTITION P_201801 VALUES [("2017-02-01"),("2017-03-01")),
    PARTITION P_201801 VALUES [("2017-03-01"),("2017-04-01")),
    PARTITION P_201801 VALUES [("2017-04-01"),("2017-05-01")),
    PARTITION P_201801 VALUES [("2017-05-01"),("2017-06-01")),
    PARTITION P_201801 VALUES [("2017-06-01"),("2017-07-01")),
    PARTITION P_201801 VALUES [("2017-07-01"),("2017-08-01"))
)
DISTRIBUTED BY HASH(mkt) BUCKETS 112
PROPERTIES(
"replication_num" = "2",
"in_memory"="true",
"dynamic_partition.enable" = "true",
"dynamic_partition.time_unit" = "MONTH",
"dynamic_partition.start" = "-2147483648",
"dynamic_partition.end" = "2",
"dynamic_partition.prefix" = "P_",
"dynamic_partition.buckets" = "112"
);
Related dictionary table
--Enterprise brand code table
create table dws_brand(
brand_code varchar(10) commit 'Brand code',
brand_cname varchar(20) commit 'Chinese brand name',
brand_ename varchar(20) commit 'English brand name',
brand_class int commit 'Brand tree hierarchy',
brand_pid int commit 'Parent code of this level',
brand_flag char(1) commit 'Is it the last level'
)
DUPLICATE KEY(brand_code)
PROPERTIES(
"replication_num" = "2",
"in_memory"="true"
);
--Channel table
create table dws_channel(
channel_code varchar(10) commit 'Channel code',
channel_cname varchar(20) commit 'Chinese name of channel',
channel_class int commit 'Channel tree hierarchy',
channel_precode int commit 'Parent code of this level',
channel_lastflag char(1) commit 'Is it the last level',
channel_status char(1) commit 'Channel status'
)
DUPLICATE KEY(channel_code)
PROPERTIES(
"replication_num" = "2",
"in_memory"="true"
);
--Membership type table
create table dws_custtype(
ctcode char(3) commit 'Member type code',
ctname varchar(20) commit 'Member type name'
)
DUPLICATE KEY(ctcode)
PROPERTIES(
"replication_num" = "2",
"in_memory"="true"
);
--Store table
create table dws_store(
store_code varchar(5) commit 'Store number',
store_name varchar(20) commit 'Store name',
store_type varchar(20) commit 'Store type',
store_city varchar(20) commit 'City',
store_region varchar(20) commit 'Province',
store_area_center varchar(20) commit 'Regional center in the organizational structure',
store_group varchar(20) commit 'Store Group',
store_address varchar(200) commit 'Store address',
store_opendate date commit 'Opening date',
store_closedate date commit 'Closing date',
store_floors int commit 'Total floor of the store',
store_size int commit 'Business area'
)
DUPLICATE KEY(store_code)
PROPERTIES(
"replication_num" = "2",
"in_memory"="true"
);
--The member dictionary table is used to synchronize or define the basic data of members (it feels useless)
create table dws_custdict(
cust_type varchar(10) commit 'category',
cust_id varchar(20) commit 'number',
cust_status char(1) commit 'state',
cust_name varchar(40) commit 'Chinese name',
cust_valuetype varchar(10) commit 'Value method',
cust_value varchar(80) commit 'value',
cust_mindate date commit 'start time',
cust_maxdate date commit 'End time',
cust_minnum int commit 'Start value',
cust_maxnum int commit 'End value',
cust_chr1 varchar(20) commit 'Start string',
cust_chr2 varchar(20) commit 'End string',
cust_range varchar(20) commit 'Parameter definition category'
)
DUPLICATE KEY(cust_type,cust_id,cust_status)
PROPERTIES(
"replication_num" = "2",
"in_memory"="true"
);
--organizational structure
create table dws_org(
mf_code varchar(10) commit 'code',
mf_status char(1) commit 'state',
mf_cglx char(1) commit 'Bin type',
mf_lsfs char(1) commit 'Store chain mode',
mf_cname varchar(20) commit 'Chinese name',
mf_ename varchar(20) commit 'English name',
mf_subject varchar(20) commit 'Accounting code',
mf_class int commit 'Superior code',
mf_fcode varchar(20) commit 'Store code',
mf_pcode varchar(20) commit 'Superior code',
mf_yymj decimal(12,4) commit 'Business area',
mf_jzarea int commit 'built-up area',
mf_zjarea int commit 'Rental area'
)
DUPLICATE KEY(mf_code,mf_status,mf_cglx,mf_lsfs)
PROPERTIES(
"replication_num" = "2",
"in_memory"="true"
);
--Business division table
create table dws_sub(
sub_code varchar(4) commit 'code',
sub_name varchar(20) commit 'name',
sub_status char(1) commit 'state'
)
DUPLICATE KEY(mf_code,mf_status,mf_cglx,mf_lsfs)
PROPERTIES(
"replication_num" = "2",
"in_memory"="true"
);
--Classification table
create table dws_catgory(
cat_code varchar(10) commit 'code',
cat_cname varchar(40) commit 'Chinese name',
cat_ename varchar(60) commit 'English name',
cat_pcode varchar(10) commit 'Superior code',
cat_class TINYINT commit 'Level',
cat_status char(1) commit 'state'
)
DUPLICATE KEY(cat_code)
PROPERTIES(
"replication_num" = "2",
"in_memory"="true"
);
Membership form
--Basic information of members
create table dws_customer(
cust_code varchar(20),
cust_name varchar(20),
cust_idno varchar(20),
cust_market varchar(20),
cust_type varchar(20),
cust_status char(1),
cust_mindate datetime,
cust_maxdate datetime,
cust_jfbalance int,
cust_xfje decimal(18,2),
cust_khmode varchar(20),
cust_sex char(1),
cust_birthday date,
cust_manager varchar(20),
cust_invitedby varchar(20),
cust_chaid varchar(20),
enterprise_code varchar(10),
sub_code varchar(10),
erp_code varchar(10)
)
DUPLICATE KEY(cust_code,cust_name)
DISTRIBUTED BY HASH(cust_code) BUCKETS 10
PROPERTIES(
"replication_num" = "3",
"in_memory"="true"
);
drop table if EXISTS dws_card_log;
create table dws_card_log(
cdldate datetime,
mktid varchar(10),
ent_id varchar(10),
cdlseqno varchar(20),
chid varchar(10),
cdltype varchar(10),
cdlcno varchar(20),
cdlcustid varchar(10),
cdlcid varchar(10),
cdlmkt varchar(10),
cdlmcard char(1),
cdlflag char(1),
cdltrans varchar(10),
billno varchar(20),
moduleid varchar(10),
operby varchar(10),
cdlchgamt decimal(10,2),
cdlflamt decimal(10,2),
cdlchgreason varchar(200),
cdlkhtype varchar(20),
cdlchgyno varchar(20),
cdlmemo varchar(200),
tmdd varchar(20),
enterprise_code varchar(10),
sub_code varchar(10),
erp_code varchar(10)
)
DUPLICATE KEY(cdldate,mktid)
PARTITION BY RANGE(cdldate) (
PARTITION P_201701 VALUES [("2017-01-01 00:00:00"),("2017-02-01 23:59:59"))
)
DISTRIBUTED BY HASH(mktid) BUCKETS 50
PROPERTIES(
"replication_num" = "2",
"dynamic_partition.enable" = "true",
"dynamic_partition.time_unit" = "MONTH",
"dynamic_partition.start" = "-2147483648",
"dynamic_partition.end" = "2",
"dynamic_partition.prefix" = "P_",
"dynamic_partition.buckets" = "50"
);
drop table if EXISTS dws_accnt_log;
create table dws_accnt_log(
logdate datetime,
occur_buid varchar(20),
ent_id varchar(20),
group_id varchar(20),
type_id varchar(20),
log_seq int,
batch_id int,
cid varchar(20),
summary varchar(20),
accnt_no varchar(20),
face_value decimal(10,2),
amount decimal(10,2),
balance decimal(10,2),
eff_date date,
exp_date date,
status char(1),
src_channel varchar(20),
src_corp varchar(20),
src_buid varchar(20),
issue_date date,
occur_channel varchar(20),
occur_corp varchar(20),
occur_term varchar(20),
occur_invno int,
occur_orderno varchar(20),
occur_consseq int,
occur_workno varchar(30),
occur_op varchar(20),
dealtype char(1),
transtype varchar(20),
occur_salebill varchar(20),
freezeamt decimal(10,2),
tot_balance decimal(10,2),
zxrate decimal(10,2),
reo decimal(10,2),
enterprise_code varchar(10),
sub_code varchar(10),
erp_code varchar(10)
)
DUPLICATE KEY(logdate,occur_buid)
PARTITION BY RANGE(logdate) (
PARTITION P_201701 VALUES [("2017-01-01 00:00:00"),("2017-02-01 23:59:59"))
)
DISTRIBUTED BY HASH(occur_buid) BUCKETS 50
PROPERTIES(
"replication_num" = "2",
"dynamic_partition.enable" = "true",
"dynamic_partition.time_unit" = "MONTH",
"dynamic_partition.start" = "-2147483648",
"dynamic_partition.end" = "2",
"dynamic_partition.prefix" = "P_",
"dynamic_partition.buckets" = "50"
);
drop table if EXISTS dws_cust_cons_log;
create table dws_cust_cons_log(
cdldate datetime,
cdlcmkt varchar(20),
ent_id int,
cdltype varchar(20),
cdlseqno varchar(20),
cdlrowno int,
cdljygs varchar(20),
cdlmkt varchar(20),
cdlchannel varchar(20),
cdlcustid varchar(20),
cdlcno varchar(20),
cdlflag char(2),
cdlmcard char(1),
cdltrans varchar(20),
cdlsyjid varchar(20),
cdlinvno int,
cdltrace varchar(20),
cdlmfid varchar(50),
cdlgdid varchar(20),
cdlgdname varchar(100),
cdlunitcode varchar(20),
cdlcatid varchar(100),
cdlppcode varchar(100),
cdlbzhl decimal(10,2),
cdlsl decimal(10,2),
cdlsj decimal(10,2),
cdlprice decimal(10,2),
cdlzkje decimal(10,2),
cdlcjje decimal(10,2),
cdljf decimal(10,2),
cdlyxje decimal(10,2),
cdljfa decimal(10,2),
cdljfb decimal(10,2),
cdljfc decimal(10,2),
cdljfd decimal(10,2),
cdljfe decimal(10,2),
cdljff decimal(10,2),
cdljfk decimal(10,2),
cdlczz decimal(10,2),
tmdd varchar(20),
enterprise_code varchar(20),
sub_code varchar(20),
erp_code varchar(20)
)
DUPLICATE KEY(cdldate,cdlcmkt)
PARTITION BY RANGE(cdldate) (
PARTITION P_201701 VALUES [("2017-01-01 00:00:00"),("2017-02-01 23:59:59"))
)
DISTRIBUTED BY HASH(cdlcmkt) BUCKETS 50
PROPERTIES(
"replication_num" = "2",
"dynamic_partition.enable" = "true",
"dynamic_partition.time_unit" = "MONTH",
"dynamic_partition.start" = "-2147483648",
"dynamic_partition.end" = "2",
"dynamic_partition.prefix" = "P_",
"dynamic_partition.buckets" = "50"
);
Dynamically add partitions
ALTER TABLE dr_selllist_gd ADD PARTITION P_201806 VALUES LESS THAN("2018-07-01");
ALTER TABLE dr_selllist_gd ADD PARTITION P_201807 VALUES LESS THAN("2018-08-01");
ALTER TABLE dr_selllist_gd ADD PARTITION P_201808 VALUES LESS THAN("2018-09-01");
ALTER TABLE dr_selllist_gd ADD PARTITION P_201809 VALUES LESS THAN("2018-10-01");
ALTER TABLE dr_selllist_gd ADD PARTITION P_201810 VALUES LESS THAN("2018-11-01");
ALTER TABLE dr_selllist_gd ADD PARTITION P_201811 VALUES LESS THAN("2018-12-01");
ALTER TABLE dr_selllist_gd ADD PARTITION P_201812 VALUES LESS THAN("2019-01-01");
User manual
ROLLUP use
Rollup can only be used on Aggregate and Uniq models and cannot be used in Duplicate
Create delete syntax
rollup The following creation methods are supported:
1. establish rollup index
Syntax:
ADD ROLLUP rollup_name (column_name1, column_name2, ...)
[FROM from_index_name]
[PROPERTIES ("key"="value", ...)]
properties: Support setting timeout, and the default timeout is 1 day.
example:
ADD ROLLUP r1(col1,col2) from r0
1.2 Batch creation rollup index
Syntax:
ADD ROLLUP [rollup_name (column_name1, column_name2, ...)
[FROM from_index_name]
[PROPERTIES ("key"="value", ...)],...]
example:
ADD ROLLUP r1(col1,col2) from r0, r2(col3,col4) from r0
1.3 be careful:
1) If not specified from_index_name,Default from base index establish
2) rollup Columns in the table must be from_index Existing columns in
3) stay properties In, you can specify the storage format. Please refer to CREATE TABLE
2. delete rollup index
Syntax:
DROP ROLLUP rollup_name [PROPERTIES ("key"="value", ...)]
example:
DROP ROLLUP r1
2.1 Batch delete rollup index
Syntax: DROP ROLLUP [rollup_name [PROPERTIES ("key"="value", ...)],...]
example: DROP ROLLUP r1,r2
2.2 be careful:
1) Cannot delete base indexExamples
First, we create the Base table
CREATE TABLE IF NOT EXISTS expamle_tbl
(
    `user_id` LARGEINT NOT NULL,
    `date` DATE NOT NULL,
    `city` VARCHAR(20),
    `age` SMALLINT,
    `sex` TINYINT,
    `last_visit_date` DATETIME REPLACE DEFAULT "2020-08-12 00:00:00" ,
    `cost` BIGINT SUM DEFAULT "0" ,
    `max_dwell_time` INT MAX DEFAULT "0",
    `min_dwell_time` INT MIN DEFAULT "99999"
)
AGGREGATE KEY(`user_id`, `date`, `city`, `age`, `sex`)
PARTITION BY RANGE(`date`) (
   PARTITION P_202008 VALUES [("2020-08-01"),("2020-09-01"))
)
DISTRIBUTED BY HASH(`city`) BUCKETS 2
PROPERTIES(
   "replication_num" = "2"
);
Then create Rollup on the Base table
ALTER TABLE expamle_tbl
ADD ROLLUP example_rollup_index(user_id, date, cost)
PROPERTIES("storage_type"="column");
ALTER TABLE expamle_tbl
ADD ROLLUP cost_rollup_index(user_id, cost)
PROPERTIES("storage_type"="column");
ALTER TABLE expamle_tbl
ADD ROLLUP dwell_rollup_index(user_id,date, max_dwell_time,min_dwell_time)
PROPERTIES("storage_type"="column");You can see the rollup we created under the mysql command
Then you can query by pouring in the data. The example data is as follows:
10000,2020-08-01,Beijing,20,0,2020-08-01 06:00:00,20,10,10
10000,2020-08-01,Beijing,20,0,2020-08-01 07:00:00,15,2,2
10001,2020-08-01,Beijing,30,1,2020-08-01 17:05:45,2,22,22
10002,2020-08-02,Shanghai,20,1,2020-08-02 12:59:12,200,5,5
10003,2020-08-02,Guangzhou,32,0,2020-08-02 11:20:00,30,11,11
10004,2020-08-01,Shenzhen,35,0,2020-08-01 10:00:15,100,3,3
10004,2020-08-03,Shenzhen,35,0,2020-08-03 10:20:22,11,6,6
10000,2020-08-04,Beijing,20,0,2020-08-04 06:00:00,20,10,10
10000,2020-08-04,Beijing,20,0,2020-08-04 07:00:00,15,2,2
10001,2020-08-04,Beijing,30,1,2020-08-04 17:05:45,2,22,22
10002,2020-08-04,Shanghai,20,1,2020-08-04 12:59:12,200,5,5
10003,2020-08-04,Guangzhou,32,0,2020-08-04 11:20:00,30,11,11
10004,2020-08-04,Shenzhen,35,0,2020-08-04 10:00:15,100,3,3
10004,2020-08-04,Shenzhen,35,0,2020-08-04 10:20:22,11,6,6
10000,2020-08-05,Beijing,20,0,2020-08-05 06:00:00,20,10,10
10000,2020-08-05,Beijing,20,0,2020-08-05 07:00:00,15,2,2
10001,2020-08-05,Beijing,30,1,2020-08-05 17:05:45,2,22,22
10002,2020-08-05,Shanghai,20,1,2020-08-05 12:59:12,200,5,5
10003,2020-08-05,Guangzhou,32,0,2020-08-05 11:20:00,30,11,11
10004,2020-08-05,Shenzhen,35,0,2020-08-05 10:00:15,100,3,3
10004,2020-08-05,Shenzhen,35,0,2020-08-05 10:20:22,11,6,6
Using Segment V2 storage format
The V2 version supports the following new features:
-
bitmap index
-
Memory table
-
page cache
-
Dictionary compression
-
Delayed materialization
Version support
V2 data format is supported from version 0.12
Compile with the following version:
https://github.com/baidu-doris/incubator-doris/tree/DORIS-0.12.12-release
Enable method
-
default_rowset_type: FE sets a Global Variable, which defaults to "alpha", i.e. V1 version.
-
default_rowset_type: a configuration item of BE, which defaults to "ALPHA", i.e. V1 version.
-
Start full format conversion from BE
In BE Add the variable default to conf_ rowset_ Type = beta and restart the BE node. In the subsequent compaction process, the data will BE automatically converted from V1 to V2.
-
Open full format conversion from FE
After connecting Doris through mysql client, execute the following statement:
SET GLOBAL default_rowset_type = beta;
After the execution is completed, the FE will send the information to BE through the heartbeat, and then the data will BE automatically converted from V1 to V2 in the competition process of BE.
Data model, ROLLUP and prefix index
In Doris, data is logically described in the form of a Table. A Table includes rows and columns. Row is a row of data of the user. Column is used to describe different fields in a row of data.
Column s can be divided into two categories: Key and Value. From a business perspective, Key and Value can correspond to dimension columns and indicator columns respectively.
Doris's data model is mainly divided into three categories:
-
Aggregate
-
Uniq
-
Duplicate
Aggregate model
When we import data, the same rows and of the Key column will be aggregated into one row, while the Value column will be aggregated according to the set AggregationType. AggregationType currently has the following four aggregation methods:
-
SUM: SUM, and accumulate the values of multiple lines.
-
REPLACE: REPLACE. The Value in the next batch of data will REPLACE the Value in the previously imported row.
-
MAX: keep the maximum value.
-
MIN: keep the minimum value.
Example:
CREATE TABLE IF NOT EXISTS example_db.expamle_tbl
(
    `user_id` LARGEINT NOT NULL COMMENT "user id",
    `date` DATE NOT NULL COMMENT "Data input date and time",
    `city` VARCHAR(20) COMMENT "User's City",
    `age` SMALLINT COMMENT "User age",
    `sex` TINYINT COMMENT "User gender",
    `last_visit_date` DATETIME REPLACE DEFAULT "1970-01-01 00:00:00" COMMENT "Last access time of user",
    `cost` BIGINT SUM DEFAULT "0" COMMENT "Total user consumption",
    `max_dwell_time` INT MAX DEFAULT "0" COMMENT "Maximum user residence time",
    `min_dwell_time` INT MIN DEFAULT "99999" COMMENT "User minimum residence time",
)
AGGREGATE KEY(`user_id`, `date`, `timestamp`, `city`, `age`, `sex`)
... /* Omit Partition and Distribution information */
The columns in the table are divided into Key (dimension column) and Value (indicator column) according to whether AggregationType is set. AggregationType is not set, such as user_id,date,age ... And so on are called keys, while those with AggregationType set are called values.
Data aggregation occurs in Doris in the following three stages:
-
ETL stage of data import for each batch. This stage will aggregate the data imported in each batch.
-
The stage in which the underlying BE performs data comparison. At this stage, BE will further aggregate the imported data of different batches.
-
Data query phase. During data query, the data involved in the query will be aggregated accordingly.
The degree of data aggregation may be inconsistent at different times. For example, when a batch of data is first imported, it may not be aggregated with the existing data. However, for users, they can only query the aggregated data. That is, different degrees of aggregation are transparent to user queries. Users should always believe that the data exists at the final degree of aggregation, and should not assume that some aggregation has not yet occurred. (see the limitations of the aggregation model section for more details.
Uniq model
In some multidimensional analysis scenarios, users pay more attention to how to ensure the uniqueness of the Key, that is, how to obtain the uniqueness constraint of the Primary Key. Therefore, the data model of Uniq is introduced. The model is essentially a special case of aggregation model and a simplified representation of table structure
Duplicate model
In some multidimensional analysis scenarios, data has neither primary key nor aggregation requirements. Therefore, we introduce Duplicate data model to meet such requirements
This data model is different from Aggregate and Uniq models. The data is stored completely according to the data in the import file without any aggregation. Even if the two rows of data are identical, they will be retained. The DUPLICATE KEY specified in the table creation statement is only used to indicate which columns the underlying data is sorted according to. (the more appropriate name should be "Sorted Column". Here, the name "DUPLICATE KEY" is only used to clearly indicate the data model used.). In the selection of DUPLICATE KEY, we suggest to select the first 2-4 columns appropriately
Doris optimization
##Set execution memory
set global exec_mem_limit=2147483648;
##Set query cache
set global query_cache_type=1;
set global query_cache_size=134217728;
##Set the query timeout of 60 seconds, and the default is 300 seconds
set global query_timeout = 60;
###Record sql execution log
set global is_report_success=true;
##Enable V2 data storage format
SET GLOBAL default_rowset_type = beta;
##Set time zone
SET global time_zone = 'Asia/Shanghai'
##Enable fe dynamic partitioning
ADMIN SET FRONTEND CONFIG ("dynamic_partition_enable" = "true")Data import
Kafka data import
-
Support Kafka access without authentication and Kafka cluster authenticated by SSL.
-
The supported message format is csv text format. Each message is a line, and the end of the line does not contain a newline character.
-
Only Kafka version 0.10.0.0 and above is supported
Examples
CREATE ROUTINE LOAD retail1.kafka123 on dr_selllist_gd_kafka
PROPERTIES
(
    "desired_concurrent_number"="1"
)
FROM KAFKA
(
    "kafka_broker_list"= "192.168.9.22:6667,192.168.9.23:6667",
    "kafka_topic" = "selllist"
);
Insert Into
The use of Insert Into statement is similar to that of Insert Into statement in MySQL and other databases. However, in Doris, all data writing is an independent import job. Therefore, Insert Into is also introduced here as an import method.
The main Insert Into commands include the following two types:;
-
INSERT INTO tbl SELECT ...
-
INSERT INTO tbl (col1, col2, ...) VALUES (1, 2, ...), (1,3, ...);
The second command is for Demo only and should not be used in test or production environments
Import syntax:
INSERT INTO table_name [WITH LABEL label] [partition_info] [col_list] [query_stmt] [VALUES];
Example:
INSERT INTO tbl2 WITH LABEL label1 SELECT * FROM tbl3;
INSERT INTO tbl1 VALUES ("qweasdzxcqweasdzxc"), ("a");
be careful
When you need to use CTE(Common Table Expressions) as the query part in the insert operation, you must specify the WITH LABEL and column list parts. Examples
INSERT INTO tbl1 WITH LABEL label1 WITH cte1 AS (SELECT * FROM tbl1), cte2 AS (SELECT * FROM tbl2) SELECT k1 FROM cte1 JOIN cte2 WHERE cte1.k1 = 1; INSERT INTO tbl1 (k1) WITH cte1 AS (SELECT * FROM tbl1), cte2 AS (SELECT * FROM tbl2) SELECT k1 FROM cte1 JOIN cte2 WHERE cte1.k1 = 1;
-
partition_info
Import the target partition of the table. If you specify the target partition, only the data matching the target partition will be imported. If not specified, the default value is all partitions of this table.
-
col_list
The target columns of the imported table can exist in any order. If no target column is specified, the default value is all columns of this table. If a column in the to be table does not exist in the target column, the column needs to have a default value, otherwise Insert Into will fail.
If the type of the result column of the query statement is inconsistent with that of the target column, implicit type conversion will be called. If conversion cannot be performed, the Insert Into statement will report a syntax parsing error.
-
query_stmt
Through a query statement, the results of the query statement are imported into other tables in Doris system. The query statement supports any SQL query syntax supported by Doris.
-
VALUES
Users can insert one or more pieces of data through VALUES syntax.
Note: VALUES mode is only applicable to importing several pieces of data as DEMO, and is not applicable to any testing and production environment at all. Doris system itself is not suitable for the scene of importing a single piece of data. It is recommended to use INSERT INTO SELECT for batch import.
-
WITH LABEL
As an import task, INSERT can also specify a label. If it is not specified, the system will automatically specify a UUID as the label.
Note: it is recommended to specify Label instead of being automatically assigned by the system. If it is automatically allocated by the system, but the connection is disconnected due to network errors during the execution of the Insert Into statement, it is impossible to know whether the Insert Into is successful. If you specify a Label, you can view the task results through the Label again
Import results
Insert Into itself is an SQL command. The returned results are divided into the following types according to the execution results:
-
The result set is empty
If the result set of the select statement corresponding to the insert is empty, the return is as follows:
mysql> insert into tbl1 select * from empty_tbl;
Query OK, 0 rows affected (0.02 sec)
Query OK indicates successful execution. 0 rows affected indicates that no data has been imported.
-
Result set is not empty
When the result set is not empty. The returned results are divided into the following situations:
-
Insert is executed successfully and visible:
mysql> insert into tbl1 select * from tbl2; Query OK, 4 rows affected (0.38 sec) {'label':'insert_8510c568-9eda-4173-9e36-6adc7d35291c', 'status':'visible', 'txnId':'4005'} mysql> insert into tbl1 with label my_label1 select * from tbl2; Query OK, 4 rows affected (0.38 sec) {'label':'my_label1', 'status':'visible', 'txnId':'4005'} mysql> insert into tbl1 select * from tbl2; Query OK, 2 rows affected, 2 warnings (0.31 sec) {'label':'insert_f0747f0e-7a35-46e2-affa-13a235f4020d', 'status':'visible', 'txnId':'4005'} mysql> insert into tbl1 select * from tbl2; Query OK, 2 rows affected, 2 warnings (0.31 sec) {'label':'insert_f0747f0e-7a35-46e2-affa-13a235f4020d', 'status':'committed', 'txnId':'4005'}Query OK indicates successful execution. 4 rows affected indicates that a total of 4 rows of data have been imported. 2 warnings indicates the number of rows filtered.
At the same time, a json string will be returned:
{'label':'my_label1', 'status':'visible', 'txnId':'4005'}
{'label':'insert_f0747f0e-7a35-46e2-affa-13a235f4020d', 'status':'committed', 'txnId':'4005'}
{'label':'my_label1', 'status':'visible', 'txnId':'4005', 'err':'some other error'}
Label is a user specified label or an automatically generated label. Label is the ID of the Insert Into import job. Each import job has a unique label within a single database.
status indicates whether the imported data is visible. If visible, it displays visible; if not, it displays committed.
txnId is the id of the import transaction corresponding to this insert.
The err field displays some other unexpected errors.
When you need to view the filtered rows, you can use the following statement
show load where label="xxx";
The URL in the returned result can be used to query the wrong data. For details, see the summary of the error line later.
Data invisibility is a temporary state, and this batch of data will eventually be visible
You can view the visible status of this batch of data through the following statement:
show transaction where id=4005;
If the TransactionStatus column in the returned result is visible, the presentation data is visible
-
Related configuration
-
timeout
The timeout time (in seconds) of the import task. If the import task is not completed within the set timeout time, it will be CANCELLED by the system and become CANCELLED.
At present, Insert Into does not support custom import timeout time. The timeout time of all Insert Into imports is unified. The default timeout time is 1 hour. If the imported source file cannot be imported within the specified time, you need to adjust the FE parameter insert_load_default_timeout_second.
At the same time, the Insert Into statement receives the Session variable query_timeout limit. You can use SET query_timeout = xxx; To increase the timeout in seconds.
-
enable_insert_strict
The Insert Into import itself cannot control the tolerable error rate of the import. Users can only use enable_ insert_ The strict Session parameter is used to control.
When this parameter is set to false, it means that at least one piece of data has been imported correctly, and success is returned. If there is failure data, a Label will also be returned.
When this parameter is set to true, it means that if there is a data error, the import fails.
The default is false. You can use SET enable_insert_strict = true; To set.
-
query_timeout
Insert Into itself is also an SQL command, so the Insert Into statement is also affected by the Session variable query_timeout limit. You can use SET query_timeout = xxx; To increase the timeout in seconds
Data volume
Insert Into has no limit on the amount of data, and large amount of data import can also be supported. However, Insert Into has a default timeout. If the user estimates that the amount of imported data is too large, it is necessary to modify the system's Insert Into import timeout.
Import data volume = 36G about≤ 3600s * 10M/s
Of which 10 M/s Is the maximum import speed limit. The user needs to calculate the average import speed according to the current cluster situation to replace 10 in the formula M/s
common problem
View error lines
Because Insert Into cannot control the error rate, it can only be enabled_ insert_ Strict is set to fully tolerate or ignore error data. So if enable_ insert_ If strict is set to true, Insert Into may fail. And if enable_ insert_ If strict is set to false, only some qualified data may be imported.
When the url field is provided in the return result, you can view the error line through the following command:
SHOW LOAD WARNINGS ON "url";
Example:
SHOW LOAD WARNINGS ON "http://ip:port/api/_load_error_log?file=__shard_13/error_log_insert_stmt_d2cac0a0a16d482d-9041c949a4b71605_d2cac0a0a16d482d_9041c949a4b71605";
The causes of errors usually include: the length of the source data column exceeds the length of the destination data column, column type mismatch, partition mismatch, column order mismatch, etc.
Stream Load
Stream load is a synchronous import method. Users import local files or data streams into Doris by sending a request through HTTP protocol. Stream load synchronously executes the import and returns the import result. The user can directly judge whether the import is successful through the return body of the request.
Stream load is mainly used to import local files or import data in data streams through programs.
Stream load submits and transmits data through HTTP protocol. The curl command shows how to submit the import.
Users can also operate through other HTTP client s.
curl --location-trusted -u user:passwd [-H ""...] -T data.file -XPUT http://fe_host:http_port/api/{db}/{table}/_stream_load
Header See the following for the supported properties in 'Import task parameters' explain
Format is: -H "key1:value1"The user cannot manually cancel the Stream load. The Stream load will be automatically cancelled by the system after timeout or import error
Signature parameters
-
user/passwd
Stream load uses the HTTP protocol to create the imported protocol and signs through Basic access authentication. Doris system will verify the user identity and import permission according to the signature.
Import task parameters
Stream load uses HTTP protocol, so all parameters related to import task are set in Header. The following mainly introduces the meaning of some parameters of stream load import task parameters.
-
label
ID of the import task. Each import task has a unique label within a single database. Label is a user-defined name in the Import command. Through this label, users can view the execution of the corresponding import task.
Another function of label is to prevent users from importing the same data repeatedly. It is strongly recommended that users use the same label for the same batch of data. In this way, repeated requests for the same batch of data will only be accepted once, ensuring at most once
When the status of the import job corresponding to the label is CANCELLED, the label can be used again.
-
max_filter_ratio
The maximum tolerance rate of import task. The default value is 0. The value range is 0 ~ 1. When the import error rate exceeds this value, the import fails.
If you want to ignore the wrong rows, you can set this parameter greater than 0 to ensure that the import can succeed.
The calculation formula is:
(dpp.abnorm.ALL / (dpp.abnorm.ALL + dpp.norm.ALL ) ) > max_filter_ratio
dpp.abnorm.ALL indicates the number of rows with unqualified data quality. Such as type mismatch, column number mismatch, length mismatch, etc.
dpp.norm.ALL refers to the number of correct data in the import process. You can query the correct data amount of the import task through the SHOW LOAD command.
Number of lines in the original file = DPP abnorm. ALL + dpp. norm. ALL
-
where
Import the filter criteria specified by the task. Stream load supports filtering the where statement specified in the original data. The filtered data will not be imported or participate in the calculation of filter ratio, but will be included in num_rows_unselected.
-
partition
The Partition information of the table to be imported. If the data to be imported does not belong to the specified Partition, it will not be imported. These data will be included in the DPP abnorm. ALL
-
columns
The function transformation configuration of the data to be imported. At present, the function transformation methods supported by Stream load include column order change and expression transformation. The method of expression transformation is consistent with that of query statement.
Example of column order transformation: the original data has two columns, and the current table also has two columns( c1,c2)However, the first column of the original file corresponds to the first column of the target table c2 column, The second column of the original file corresponds to the second column of the target table c1 Column, write as follows: columns: c2,c1 Expression transformation example: the original file has two columns, and the target table also has two columns( c1,c2)However, the two columns of the original file need function transformation to correspond to the two columns of the target table. The writing method is as follows: columns: tmp_c1, tmp_c2, c1 = year(tmp_c1), c2 = month(tmp_c2) among tmp_*Is a placeholder representing the two original columns in the original file.
-
exec_mem_limit
Import memory limit. The default is 2GB, and the unit is bytes.
-
strict_mode
Stream load import enables strict mode. The opening method is to declare strict in HEADER_ mode=true . The default strict mode is off.
strict mode mode means to strictly filter the column type conversion in the import process. The strict filtering strategy is as follows:
-
For column type conversion, if strict mode is true, the wrong data will be filter ed. The error data here refers to the data whose original data is not null and whose result is null after participating in column type conversion.
-
When an imported column is generated by function transformation, strict mode has no effect on it.
-
If the imported column type contains a range limit, if the original data can pass the type conversion normally, but cannot pass the range limit, strict mode will not affect it. For example, if the type is decimal(1,0) and the original data is 10, it belongs to the scope that can be converted by type but is not within the scope of column declaration. This data strict has no effect on it.
-
Related parameters
FE parameter configuration
-
stream_load_default_timeout_second
The timeout time (in seconds) of the import task. If the import task is not completed within the set timeout time, it will be CANCELLED by the system and become CANCELLED.
The default timeout time is 600 seconds. If the imported source file cannot be imported within the specified time, the user can set a separate timeout in the stream load request.
Or adjust the FE parameter stream_load_default_timeout_second to set the global default timeout
BE parameter configuration
-
streaming_load_max_mb
The maximum import size of Stream load. The default is 10G, and the unit is MB. If the user's original file exceeds this value, you need to adjust the parameter streaming of BE_ load_ max_ mb
Data volume
Since the principle of Stream load is to import and distribute data initiated by BE, the recommended amount of imported data is between 1G and 10G. Since the default maximum Stream load import data volume is 10G, if you want to import more than 10G files, you need to modify the BE configuration streaming_load_max_mb
For example, the size of the file to be imported is 15 G
 modify BE to configure streaming_load_max_mb 16000.
The default timeout of Stream load is 300 seconds. According to Doris's current maximum import speed limit, files over 3G need to modify the default timeout of import tasks.
Import task timeout = Import data volume / 10M/s (The specific average import speed needs to be calculated by users according to their own cluster conditions)
For example: import a 10 G Documents
timeout = 1000s Equal to 10 G / 10M/s
Mini load
curl --location-trusted -u root: -T /data09/csv/2017/2017-06-01.csv http://drois01:8030/api/retail/dr_selllist_gd/_load?label=2017-06-01&column_separator=%2c
The import file format is CSV,
column_separator: indicates the field separator
Label: the label of each batch should be globally unique
-T files to import
-u: Import the signature of the task, user name and password. The user name and password are divided by English semicolons
retail/dr_selllist_gd: the database and data table you want to import data
Broker Load
Broker load is an asynchronous import method. The supported data sources depend on the data sources supported by the broker process.
The user needs to create a Broker load import through MySQL protocol and check the import results by viewing the Import command
Spark Load
Spark load realizes the preprocessing of imported data through spark, improves the import performance of Doris large amount of data, and saves the computing resources of Doris cluster. It is mainly used in the scenario of initial migration and large amount of data import into Doris.
Spark load is an asynchronous import method. Users need to create spark type import tasks through MySQL protocol and view the import results through SHOW LOAD.
Query settings
query timeout
At present, the default query time is set to 300 seconds. If a query is not completed within 300 seconds, the query will be cancel led by Doris system. Users can customize the timeout of their own applications through this parameter to achieve a blocking mode similar to wait(timeout).
To view the current timeout settings:
mysql> SHOW VARIABLES LIKE "%query_timeout%"; +---------------+-------+ | Variable_ name | Value | +---------------+-------+ | QUERY_ Timeout | 300 | + ---------------- + ------- + 1 row in set (0.00 sec) modify the timeout to 1 minute:
SET query_timeout = 60;
The current timeout check interval is 5 seconds, so a timeout less than 5 seconds will not be accurate. The above modification is also session level. Global validity can be modified through SET GLOBAL
SQL statement rules
Doris is strictly case sensitive for table names and field names
All sub queries of Doris must be aliased
BE inter disk load balancing
drop_backend_after_decommission
This configuration is used to control whether the system drops the BE after it successfully goes offline. If true, the BE node will BE deleted after being successfully offline. If it is false, the BE will remain in the state of commitment after being successfully offline, but will not BE deleted.
This configuration can work in some scenarios. Suppose that the initial state of a Doris cluster is that each BE node has a disk. After running for a period of time, the system is expanded vertically, that is, two disks are added to each BE node. Because Doris currently does not support data balancing among disks within BE, the data volume of the initial disk may always BE much higher than that of the new disk. At this time, we can manually balance the disks through the following operations:
-
Set the configuration item to false.
-
For a BE node, execute the decommission operation, which will migrate all the data on the BE to other nodes.
-
After the decommission operation is completed, the BE will not BE deleted. At this time, cancel the decommission status of the BE. Then the data will start to BE balanced back to this node from other BE nodes. At this time, the data will BE evenly distributed to all disks of the BE.
-
Execute 2 and 3 steps for all BE nodes in turn, and finally achieve the goal of disk balancing of all nodes
Enable V2 storage format
If you encounter BE downtime exception, please refer to the following handling methods
https://github.com/apache/incubator-doris/pull/3791
And use the following version
https://github.com/baidu-doris/incubator-doris/tree/DORIS-0.12.12-release