avm.js It is a multi terminal development framework launched by apiccloud. Use AVM Js a technology stack can develop Android & iOS native app, applet and iOS light app at the same time, and the multi terminal rendering effect is unified; The new App Engine 3.0 does not rely on webView and provides 100% native rendering to ensure that app performance and experience are consistent with native apps.
list-view Define a vertical scrolling view of reusable content, which can optimize memory consumption and rendering performance, and support pull-down refresh and pull-up loading. You can use the basic properties of scroll view.
Cell, list header, list footer, refresh and other components can be placed in the list view, and the cell component is used as the display content of each item.
Here is an example of a list view:
<template>
    <list-view id="listView" class="main" enable-back-to-top onscrolltolower={this.onscrolltolower}>
        <cell class="cell c-lc-rl_ac c-sy-border_bottom c-lc-ptb" onclick={this.itemClick}>
            <img class="img" src={item.url} alt="">
            <text class="title c-filling-w c-pl">{item.title}</text>
        </cell>
        <list-footer class="footer">
            <text>Loading...</text>
        </list-footer>
    </list-view>
</template>
<style src='../../css/c-layout-mini.css' scoped>
</style>
<style>
.main {
    width: 100%;
    height: 100%;
}

.cell {
    width: 100%;
    height: 70px;
}

.img {
    height: 50px;
    width: 50px;
    margin-left: 10px;
}
.title {
    height: 50px;
    font-size: 20px;
    line-height: 50px;
}

.footer {
    justify-content: center;
    align-items: center;
}
</style>

<script>
export default {
    name: 'test',
    methods: {
        apiready() {
            this.initData(false);
        },
        initData(loadMore) {
            var that = this;
            var skip = that.dataList ? that.dataList.length : 0;
            var dataList = [];
            for (var i = 0; i < 20; i++) {
                dataList[i] = {
                    title: 'project' + (i + skip),
                    url: '../../image/nav_tab_2.png'
                }
            }
            var listView = document.getElementById('listView');
            if (loadMore) {
                that.dataList = that.dataList.concat(dataList);
                listView.insert({
                    data: dataList
                });
            } else {
                that.dataList = dataList;
                listView.load({
                    data: dataList
                });
            }
        },
        onscrolltolower() {
            this.initData(true);
        },
        itemClick(e) {
            api.alert({
                msg: 'Current item index:' + e.currentTarget.index
            });
        }
    }
}
</script>
The effect is as follows: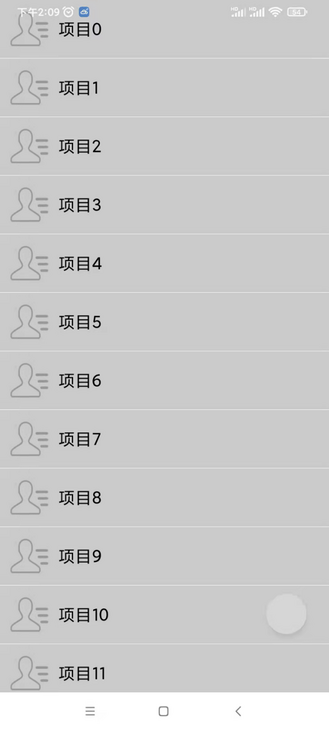
List view only supports APP and needs to be debugged with custom loader or APPloader. Debugging tutorials can be viewed in the documentation APICloud Studio3 WiFi real machine synchronization and WiFi real machine preview instructions
List view has its own memory recycling function, which can scroll to load more.
Add a drop-down refresh component refresh to the list view
According to the refresh component document, add the refresh tag to the list view tag, as follows:
<template>
    <list-view id="listView" class="main" enable-back-to-top onscrolltolower={this.onscrolltolower}>
        <refresh class="refresh" state={refreshState} onstatechange={this.onstatechange}>
            <image class={refreshIconClass} src="../../image/refresh.png"></image>
            <image class={refreshLoadingClass} src="../../image/loading_more.gif"></image>
            <text class="refreshStateDesc">{refreshStateDesc}</text>
        </refresh>

        <cell class="cell c-lc-rl_ac c-sy-border_bottom c-lc-ptb" onclick={this.itemClick}>
            <img class="img" src={item.url} alt="">
            <text class="title c-filling-w c-pl">{item.title}</text>
        </cell>
        <list-footer class="footer">
            <text>Loading...</text>
        </list-footer>
    </list-view>
</template>
Copy the css and js code of the refresh component into the corresponding style and script tags, and add two drop-down refresh images under the image tag of the project directory. The complete code is as follows:
<template>
<list-view id="listView" class="main" enable-back-to-top onscrolltolower={this.onscrolltolower}>
<refresh class="refresh" state={refreshState} onstatechange={this.onstatechange}>
<image class={refreshIconClass} src="../../image/refresh.png"></image>
<image class={refreshLoadingClass} src="../../image/loading_more.gif"></image>
<text class="refreshStateDesc">{refreshStateDesc}</text>
</refresh>
<cell class="cell c-lc-rl_ac c-sy-border_bottom c-lc-ptb" onclick={this.itemClick}>
<img class="img" src={item.url} alt="">
<text class="title c-filling-w c-pl">{item.title}</text>
</cell>
<list-footer class="footer">
<text>Loading...</text>
</list-footer>
</list-view>
</template>
<style src='../../css/c-layout-mini.css' scoped>
</style>
<style>
.main {
width: 100%;
height: 100%;
}
.cell{
width: 100%;
height: 70px;
}
.img{
height: 50px;
width: 50px;
margin-left: 10px;
}
.title {
height: 50px;
font-size: 20px;
line-height: 50px;
}
.footer {
justify-content: center;
align-items: center;
}
.refresh {
align-items: center;
justify-content: center;
background-color: #eee;
}
.refreshStateDesc {
color: #e3007f;
font-size: 13px;
}
.refreshIcon {
position: absolute;
width: 25px;
height: 22px;
bottom: 21px;
left: 70px;
transition-property: transform;
transition-duration: 100ms;
}
.refreshIcon-normal {
transform: rotate(0);
visibility: visible;
}
.refreshIcon-dragging {
transform: rotate(180deg);
visibility: visible;
}
.refreshIcon-refreshing {
visibility: hidden;
}
.refreshLoading {
position: absolute;
width: 22px;
height: 22px;
bottom: 21px;
left: 70px;
visibility: hidden;
}
.refreshLoading-refreshing {
visibility: visible;
}
</style>
<script>
export default {
name: 'test',
data(){
return {
refreshState: 'normal'
}
},
computed: {
refreshIconClass(){
if (this.data.refreshState == 'normal') {
return 'refreshIcon refreshIcon-normal';
} else if (this.data.refreshState == 'dragging') {
return 'refreshIcon refreshIcon-dragging';
} else if (this.data.refreshState == 'refreshing') {
return 'refreshIcon refreshIcon-refreshing';
}
},
refreshLoadingClass() {
if (this.data.refreshState == 'refreshing') {
return 'refreshLoading refreshLoading-refreshing';
} else {
return 'refreshLoading';
}
},
refreshStateDesc() {
if (this.data.refreshState == 'normal') {
return 'Drop down to refresh';
} else if (this.data.refreshState == 'dragging') {
return 'Release to refresh';
} else if (this.data.refreshState == 'refreshing') {
return 'Refreshing...';
}
}
},
methods:{
apiready() {
this.initData(false);
},
initData(loadMore) {
var that = this;
var skip = that.dataList?that.dataList.length:0;
var dataList = [];
for (var i=0;i<20;i++) {
dataList[i] = {
title: 'project' + (i + skip),
url: '../../image/nav_tab_2.png'
}
}
var listView = document.getElementById('listView');
if (loadMore) {
that.dataList = that.dataList.concat(dataList);
listView.insert({
data: dataList
});
} else {
that.dataList = dataList;
listView.load({
data: dataList
});
}
},
onscrolltolower() {
this.initData(true);
},
itemClick(e) {
api.alert({
msg: 'Current item index:' + e.currentTarget.index
});
},
onstatechange(e) {
var state = e.detail.state;
if (state == 'normal') {
this.data.refreshState = 'normal';
} else if (state == 'dragging') {
this.data.refreshState = 'dragging';
} else if (state == 'refreshing') {
this.data.refreshState = 'refreshing';
var that = this;
setTimeout(function(){
that.data.refreshState = 'normal';
}, 2000);
}
}
}
}
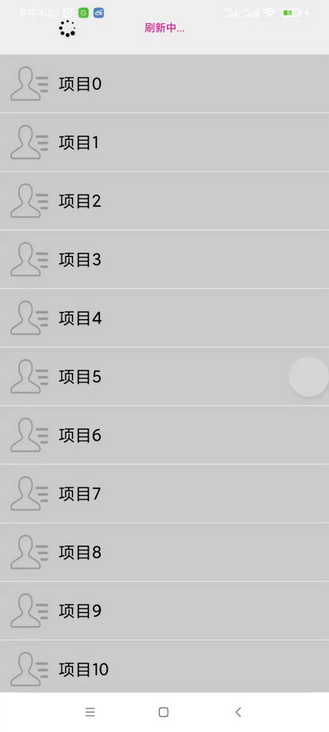
</script>Wi Fi is synchronized to the mobile phone loader and the drop-down page. The operation effect is as follows:
Introduction to Flex layout:
Flex layout means elastic box layout, which is more suitable for mobile terminal scenes and different screen sizes.
<div>
   <div>item</div>
   <div>item</div>
   <div>item</div>
</div>
Usually, the parent element can be defined as an elastic box or container, and its child element is the item of the elastic box. The main function of flex layout is to arrange and distribute items as expected on the main axis or cross axis, define the proportion of space occupied by each item, and scale according to the size of the container.
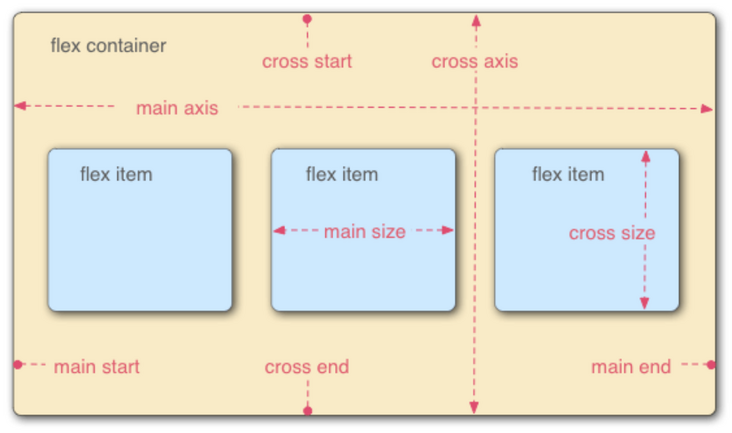
The above figure is quoted from the following blog. It is recommended to read:
http://www.ruanyifeng.com/blo...
Recommend a flex git:
https://gitee.com/jiang_xinch...