catalogue
(2) appium client and server parameters
2.2.2 Server -args startup parameters
(3) Find_element element positioning
3.1 positioning method of element:
3.2 Selenium positioning mode:
3.5 by_xpath('xpath ') positioning method:
3.7 By_android_uiautomator positioning:
3.8 By_accessibility_id location
(4) Introduction and construction of Appium automated testing framework
4.1 several elements of the framework
4.3 how to continuously integrate
4.5 Nose framework introduction
4.6 framework data management:
(5) Design and compilation of AppiumServer module in framework
(6) Automated test case design and method encapsulation within the framework
(7) Jenkins continuous integration
7.2 SMTP mail service configuration
7.3 app Automation Test Engineering
(1) Appium introduction
1.1 common app types:
-
Native app --- pure native app
-
Hybrid app - webview is embedded in the native app
-
Web app -- Application of html5
1.2 why Appium
Borrow a picture online:
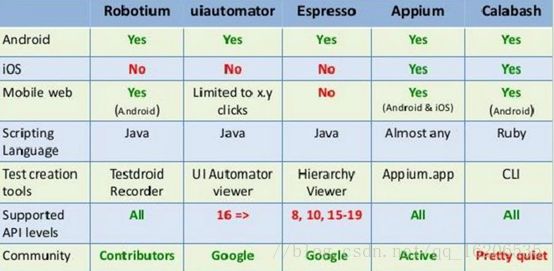
1.3 Appium benefits
-
Open Source
-
Cross architecture: NativeApp, Hybird App, Web App
-
Cross device: Android, iOS, Firefox OS
-
Source independent
-
Write test cases in any WebDriver compatible language. For example, Java, Objective-C, JavaScript with node JS, PHP, Python, Ruby, c#, Clojure or Perl
-
APP does not need to be recompiled
1.4 Appium design
Appium's real work engine is a third-party automation framework that supports:
-
Apple's UI Automator framework supports ios platform app automation;
-
google's uiautomator # only supports Android 4 Above 2, only NativeApp native controls are supported;
-
Selendrid is based on the Instrumentation framework and can test Android 2 Systems above 3 support Hybrid and NativeApp;
-
Chromedriver # supports webapp and hybrid App;
Appium encapsulates these third-party frameworks into a set of APIs, namely WebDriver API
Appium extends the WebDriver protocol and adds automation related API methods on the original basis.
(2) appium client and server parameters
2.1 Appium client
Appium architecture diagram, Client, i.e. webdriver script part (script part)
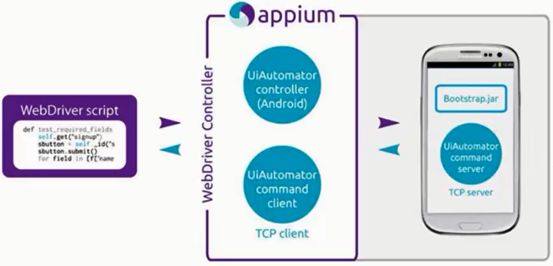
When Appium runs, the Server side will listen to the commands sent by the Client side, then execute these commands on the mobile device, and then return the execution results to the Client in the HTTP response.
2.2 Appium server
2.2. 1 Principle
Appium server is based on node The program developed by JS is an http server, which specially receives commands sent from the client, and then sends the commands to bootstrap Jar client (bootstrap is a part of the server side). Bootstrap drives UIautomator according to the command to realize the operation of the command. After completion, the result is returned to the server, and the server notifies appium client.
How to start appium server:
(1) Start through the source code, that is, go to the directory of the source code and execute Node
(2) Enter appium on the command line to start
(3) Start with appium.exe
Personally, it is recommended to use the appium command for CI integration (jenkins)
2.2.2 Server -args startup parameters
Settings at Server startup:
-
Specify the device when starting the server
-
Specify the port number when starting the server
-
Set some operations of session startup, etc
appium startup command:
appium -p port --full-reset
Common args:
(1) Designated equipment
- U,-udid: Specifies the UDID of the connected physical devices (check which devices are connected through adb devices)
(2) Specify the path of apk
-- app: Specifies the absolute path of the apk file
(3) Specifies the output of the log
- g,--log: output the log to the specified file
(4) Inter session state management
-- full reset: the application will be uninstalled after the session ends
-- no reset: the application will not be operated between sessions
(5) Specify the ip and port to listen on
- a,--address: Specifies the listening port
- p,--port: Specifies the port of the server. The default is 4723
- BP, -- bootstrap port: Specifies the port number of the connected device. The default is 4724
-- selendroid port: Specifies the port to interact with selendroid. The default is 8080
-- chromedriver: Specifies the port on which chromedriver runs. The default is 9515
(3) Find_element element positioning
3.1 positioning method of element:
(1)find_element_by_""
Get an element object by locating the attribute of the element. If there is no return, throw an exception
(2) find_elements_by "" (multiple elements)
Get a list (array) containing one or more elements by locating the attributes of the elements. Throw an exception if there is no return
3.2 Selenium positioning mode:
(1) Find_element_by_id ('id ')' ID 'is unique
(2) Find_element_by_xpath('xpath ')' XPath 'can be an attribute or a standard path
(3) Find_element_by_link_text('login ')' Login 'is the text in the a tag < a > login</a>
(4) Find_element_by_name ('name '), which is used in the < input name ='username' > input tag
(5) Find_element_by_class_name('className ') is similar to id, not necessarily unique
(6) Find_element_by_css_selector('css') unique positioning method of webUI
3.3 Appium positioning mode:
(1) Find_element_by_android('uiautomatorcode ') uses UIautomator code to locate directly. UIautomator code refers to all UIautomator positioning methods (such as new UiSelector or new UiScrollable positioning)
(2)Find_element_by_accessibility_id('text'or'id'or'content-desc')
(3) Find_element_by_ios('uiautomationcode ') has the same usage (1)
3.4 by_id('id ') location:
(1)resourceId
@appium1. Versions prior to 4.0
clock=driver.find_element_by_id('com.android.deskclock:id/analog_appwidget')
@Appium1.4.0 or later
clock=driver.find_element_by_id('analog_appwidget')
The Resourceid is relatively unique. For example, there are multiple items (itemids) under the definition list(listid). At this time, the id will be repeated and find needs to be used_ elements
(2)Content-desc
For example: clock = driver find_ element_ by_ id('02:51')
Match resourceId first, and then content desc
3.5 by_xpath('xpath ') positioning method:
(1) Full path
NewsText=driver.find_element_by_xpath("//FrameLayout[1]/LinearLayout[1]/.......")
(2) Specified by element attributes
//uiautomator mode
NewsText=driver.find_element_by_xpath("//android.widget.TextView[contains(@text, "news")] ")
//selendroid mode
Driver.find_element_by_xpath("TextView[contains(@value,"Journalism")]")
NewsText.click()
3.6 by_class_name location:
className is the class in android, which is applicable to the case where there are few controls
Find_element_by_class_name('android.widget.TextView')[1] / / get all textviews of the current page, and then get them in order
3.7 By_android_uiautomator positioning:
(1)UiSelector
Find_element_by_android_uiautomator('newUiSelector().resourceId("com.sankuai.meituan:id/city_button")')
(2)UIScrollable
Find_element_by_android_uiautomator('new UiScrollable(newUiSelector().scrollable(true)).scrollintoView(new
UiSelector().text(""News"))')
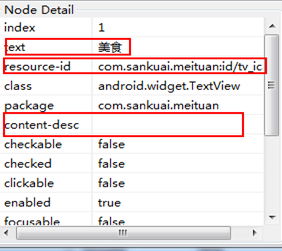
3.8 By_accessibility_id location
(1)resourceId
(2)Content-desc
(3)Text
Find_element_by_accessibility_id(u 'food')
Match content desc first, then resourceId, and finally text
(4) Introduction and construction of Appium automated testing framework
4.1 several elements of the framework
Automation common elements (web / interface / app):
-
Data / environment management - how to maintain data (test environment / online environment account, different data, maintenance), environment switching (test environment / online environment / pre release environment)
-
Log log -- the log of appium server, the log of script code print, the log of framework operation, and the log of mobile phone operation
-
General method (util) -- in the processing of data and environment, it is a common method for database operation, file reading and writing, etc
-
Framework operation mechanism - in what order does the framework run, when appium server starts, when it gets equipment, how to run the use case testcase suite, etc
-
Result report - after the test case is run, view the running information, errors and failures for report analysis
android automation specific drivers:
-
Appium server management - if there are many devices and many use cases, manage different appium server ports, appium server corresponding device numbers, and appium server different startup states
-
Driver management - that is, sessions. Each session may correspond to different desired capabilities and different scenarios. Whether to see sessions in each use case script needs to be considered, which has an impact on the test efficiency
-
Element object management -- such as pageobject design pattern
-
Android device management - combined with appiumserver management, pay attention to whether the device is idle. For example, distribute 100 use cases to different devices to improve efficiency and help Android compatibility testing
4.2 layered idea of framework
Developer perspective:
Test Suite (test framework junit/testNG/unitest) -- the test framework of nose (based on unitest) is used this time to solve the management of data operation, the operation mechanism of the framework and the result report (testNG is recommended for java and nose is recommended for python)
Server - includes device and appium management, so that concurrent tests can be well allocated (you need to understand multithreading and thread lock, etc.)
Scripting perspective:
Script (testcase) -- write only testcase, not data
data
Element
The three levels cannot be mixed. The script calls the data. When using, you only need to fill the data in one place, and the script call is ok. The data change will not affect the script
4.3 how to continuously integrate
What is continuous integration
CI platform (Continuous Integration)
Include elements:
Unified code platform
Automatically trigger build, complete test and generate report
Submitting code triggers the build
Continuous integration should be a complete solution

Actual combat content:
-
Python version:
Based on Python + nose + nose testconfig (management data configuration) + logging (logging system) + Appium +jenkins+SVN(Git)
-
Java version:
Java+TestNG+ReportNG+Maven+Appium+SVN(Git)
4.4 environment construction
-
Java environment: jdk1 8.0_ one hundred and fifty-one
-
Android development environment: ADT bundle windows x86_ 64-20140702
-
Python environment: python2 seven point nine
-
Appium environment: nodejs V5 6.0,appium1. three point four
-
Script development IDE: pycharm
-
Other components: Nose & & nose testconfig, selenium, appium Python client, nose htmloutput-2, nose HTML reporting plug-ins, etc
There are a lot of information on environment construction online, which will not be repeated here.
4.5 Nose framework introduction
(1) Inherited from unitest, it is simpler and more powerful than unitest
(2) Nose provides the function of recursively finding test suites, unitest is to call the testrun method of unitest Library in the code to execute the test cases under the current module (code level control is inconvenient). In nose, you can recursively find python files through the nose command, find the files and methods beginning with test or containing test through regular matching, and execute the test.
Nosetest supports many convenient and practical plug-ins, such as integration plug-ins such as html report generation
(3) Support setup and teardown functions
There are four scopes:
-
package layer
-
Module layer
-
Class layer
-
Function layer
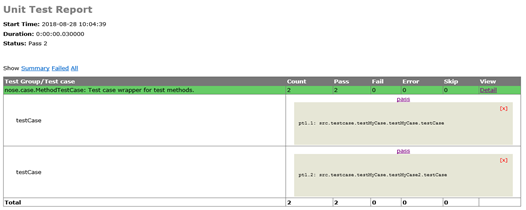
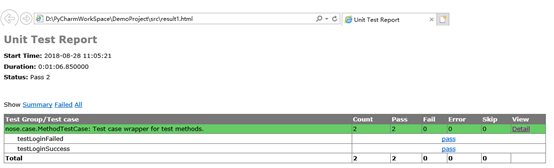
(4) xml reports or html reports can be generated
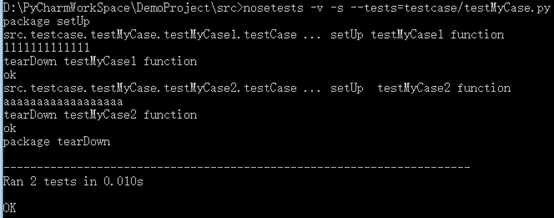
Examples are as follows:
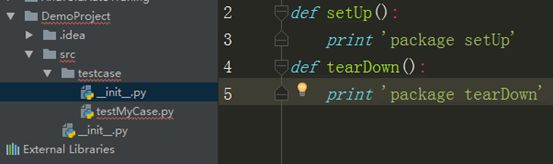
_ init_.py file
def setUp():
    print 'package setUp'
def tearDown():
    print 'package tearDown'
TestMyCase.py file
4.6 framework data management:
Global data (data affecting the running process of the framework) --- support through the testconfig file
(1) Store universal global data. Common domain names such as domain name address, test / online environment during interface test are different;
(2) For appium, you can store the port number (for example, appium startup port 4723. If you start multiple server s for concurrent testing, you need to manage multiple port numbers) and some global control parameters (encapsulated click method, screenshot in case of error).
Local data (global data that will not affect the operation of the framework) -- obtained through html or excel
For example, the data used when posting articles and comments
Private data --- data written to specific examples of code modules
Use of nose testconfig (a plug-in for global data)
① Yes Declare the testconfig file directory in the cfg file;
[nosetests]
;--with-unit output xml report
with-html-output=True
html-out-file=result1.html
tests=testcase/testLogin/testLogin.py
nocapture=True
verbose=True

tc-format=python
tc-file=conf/env/testconfig.py

;exclude=testcase/testMyCase.py
② Define the config dictionary, which can be filled with global variables
global config
config = {}

config['packageName'] = 'com.hwd.test'
config['all']  = 'acj'

config['appiumPort'] = 4723
config['selendroidPort'] = 8120
config['bootstrapPort'] = 4750
config['chromiumPort'] = 9553

config['app'] = r'D:\PyCharmWorkSpace\DemoProject\src\testData\xxxx-release-v4.2.0-2018-03-07.apk'
config['appPackage'] = 'com.cashregisters.cn'
config['appActivity'] ='com.hkrt.qpos.presentation.screen.welcome.WelcomeActivity'

config['appWaitActivity'] = ''
③ Import the module in the automation script and use variables
#coding:utf-8
from appium import webdriver
from testconfig import config
import logging,time

class testLogin:
    def __init__(self):
        self.logger =logging.getLogger(__name__)

    def setUp(self):
        desired_caps = {}
        desired_caps['platformName'] = 'android'
        desired_caps['platformVersion'] = '6.0.0'
        desired_caps['deviceName'] = 'TWGDU1700002279'
        desired_caps['app'] = config['app']
        desired_caps['appPackage'] = config['appPackage']
        desired_caps['appActivity'] = config['appActivity']
        desired_caps['noReset'] = 'true'
        desired_caps['unicodeKeyboard'] = 'true'
        desired_caps['resetKeyboard'] = 'true'
        if config['appWaitActivity'] != None:
            desired_caps['appWaitActivity'] = config['appWaitActivity']

        self.logger.info('Session Starting...')

        self.driver =webdriver.Remote('http://localhost:4723/wd/hub',desired_caps)
    def tearDown(self):
        self.logger.info('Quit!')
        self.driver.quit()


    def testLogin(self):
        self.logger.info('test logining!!!')
        self.driver.implicitly_wait(10)
        userFiled =self.driver.find_element_by_id('com.cashregisters.cn:id/phone_id')
        pwdFiled =self.driver.find_element_by_id('com.cashregisters.cn:id/password_id')
        userFiled.send_keys('18610000920')
        pwdFiled.send_keys('1234qwer')
       self.driver.find_element_by_id('com.cashregisters.cn:id/phone_id').click()
       self.driver.find_element_by_id('com.cashregisters.cn:id/loginbutton').click()
        time.sleep(2)
(5) Design and compilation of AppiumServer module in framework
How Appium Server starts
(1) Use appium.exe (Windows) / appium.exe app(mac)
(2) The code controls the command line startup. You can see it through the following example
example:
①appium.py file to write the startup module of appium
import logging,os,time
import subprocess
from testconfig import config

class appium(object):

    def __init__(self):
        self.logger = logging.getLogger(__name__)

    def start(self):
        self.logger.info('Starting Appium Server ...')
        currentTime = time.strftime('%Y%m%d%H%M%S',time.localtime())

        udid = self.getUdid()
        appiumPort = config['appiumPort']
        bootStrapPort = config['bootstrapPort']
        selendroidPort = config['selendroidPort']
        chromiumPort = config['chromePort']
        logPath = os.path.abspath(os.path.join(os.getcwd(),'log','AS'+currentTime+'.log'))
        try:
            self.process = subprocess.Popen('appium --port={} --bootstrap-port={} --selendroid-port={} --chromedriver-port={}'
                                            '--log={} -U{}'.format(appiumPort,bootStrapPort,selendroidPort,chromiumPort,logPath,udid),
                                            stdout=subprocess.PIPE,
                                            shell=True)
        except Exception,e:
            self.logger.error('start appium server failed!')
            self.logger.error('errorMsg:{}'.format(e))
        time.sleep(5)

    def stop(self):
        self.logger.info('stop appium server.')
        self.process.kill()
        os.system('taskkill /im node.exe /f')

    def getUdid(self):
        'adb devices'
        cmd = 'adb devices'
        output = subprocess.Popen(cmd,stdout=subprocess.PIPE,shell=True)
        infoList = output.stdout.read().strip('List of devices attached').split()
        devicesList = []
        if infoList != 0:
            for deviceinfo in infoList:
                if deviceinfo != 'devices':
                    devicesList.append(deviceinfo)
        return devicesList[0]
②testconfig.py file to set startup port
global config
config = {}

config['packageName'] = 'com.hwd.test'
config['all']  = 'acj'

config['port'] = 4723
config['selendroidPort'] = 8120
config['bootstrapPort'] = 4750
config['chromePort'] = 9553
③ Initialize startup file in use case__ init__.py
#coding:utf-8
import logging
from src.AppiumServer  import appiumserver

logger = logging.getLogger(__name__)

def setUp(self):
    logger.info(u'start-up Appium Server')
    appiumserver().start()

def tearDown(self):
    logger.info(u'close Appium Server')
    appiumserver().stop()
④ Write test cases
#coding:utf-8
from appium import webdriver
from testconfig import config
import logging,time

class testLogin:
    def __init__(self):
        self.logger =logging.getLogger(__name__)

    def setUp(self):
        desired_caps = {}
        desired_caps['platformName'] = 'android'
        desired_caps['platformVersion'] = '6.0.0'
        desired_caps['deviceName'] = 'TWGDU17000002279'
        desired_caps['app'] = config['app']
        desired_caps['appPackage'] = config['appPackage']
        desired_caps['appActivity'] = config['appActivity']
        desired_caps['noReset'] = 'true'
        desired_caps['unicodeKeyboard'] = 'true'
        desired_caps['resetKeyboard'] = 'true'
        if config['appWaitActivity'] != None:
            desired_caps['appWaitActivity'] = config['appWaitActivity']

        self.logger.info('Session Starting...')

        self.driver =webdriver.Remote('http://localhost:4723/wd/hub',desired_caps)
    def tearDown(self):
        self.logger.info('Quit!')
        self.driver.quit()


    def testLogin(self):
        self.logger.info('test logining!!!')
        self.driver.implicitly_wait(10)
        userFiled =self.driver.find_element_by_id('com.cashregisters.cn:id/phone_id')
        pwdFiled =self.driver.find_element_by_id('com.cashregisters.cn:id/password_id')
        userFiled.send_keys('18610000920')
        pwdFiled.send_keys('1234qwer')
       self.driver.find_element_by_id('com.cashregisters.cn:id/phone_id').click()
       self.driver.find_element_by_id('com.cashregisters.cn:id/loginbutton').click()
        time.sleep(2)
Execution sequence:
Frame entry src/__init__.py (things related to initialization log) - > testcase/__ init__. Py file (init of package layer) - > testLogin/__ init__. Py start appiumserver - > testLogin method
(6) Automated test case design and method encapsulation within the framework
(1) Create appium server, as described above
(2) In run_test.cfg, specify to run only the automated test script testLoginSuccess.py file
[nosetests]
;--with-unit output xml report
with-xunit=True
tests=testcase/testLogin/testLoginSuccess.py
nocapture=True
verbose=True

tc-format=python
tc-file=conf/env/testconfig.py

;exclude=testcase/testMyCase.py
(3) Create a new BaseTestCase base class (it can be used by inheriting BaseTestCase in the test case)
#coding:utf-8
from appium import webdriver
from testconfig import config
import logging

class BaseTestCase:
    def __init__(self):
        self.logger = logging.getLogger(__name__)

    def setUp(self):
        desired_caps = {}
        desired_caps['platformName'] = 'android'
        desired_caps['platformVersion'] = '6.0.0'
        desired_caps['deviceName'] = 'Google Nexus 5'
        desired_caps['app'] = config['app']
        desired_caps['appPackage'] = config['appPackage']
        desired_caps['appActivity'] = config['appActivity']
        desired_caps['noReset'] = 'true'
        desired_caps['unicodeKeyboard'] = 'true'
        desired_caps['resetKeyboard'] = 'true'
        if config['appWaitActivity'] != None:
            desired_caps['appWaitActivity'] = config['appWaitActivity']
        self.logger.info('Session Starting...')

        self.driver = webdriver.Remote('http://localhost:4723/wd/hub', desired_caps)
    def tearDown(self):
        self.logger.info('Quit!')
        self.driver.quit()
(4) Create different otherConfig files, specify different ports, implement different apk applications, and run different use cases, as described above
global config
config = {}

config['packageName'] = 'com.hwd.test'
config['all']  = 'acj'

config['appiumPort'] = 4724
config['selendroidPort'] = 8124
config['bootstrapPort'] = 4754
config['chromiumPort'] = 9554

config['app'] = r'D:\PyCharmWorkSpace\DemoProject\src\testData\xxx-release-v4.2.0-2018-03-07.apk'
config['appPackage'] = 'com.cashregisters.cn'
config['appActivity'] = 'com.hkrt.qpos.presentation.screen.welcome.WelcomeActivity'

config['appWaitActivity'] = None
(5) Import and use in test script
import logging,time
from src.util.commonBase import  *
from src.testcase.baseTestCase import BaseTestCase

class testLoginSucess(BaseTestCase):

    def __init__(self):
        BaseTestCase.__init__(self)
        self.logger = logging.getLogger(__name__)

    def setUp(self):
        BaseTestCase.setUp(self)

    def tearDown(self):
        BaseTestCase.tearDown(self)

    def testLoginFailed(self):
        self.logger.info('test begaining!')
        self.driver.implicitly_wait(10)
        inputById(self.driver,'com.cashregisters.cn:id/phone_id','111111')
        inputById(self.driver, 'com.cashregisters.cn:id/password_id', 'aaaaaa')
        clickElementById(self.driver,'com.cashregisters.cn:id/loginbutton')
        time.sleep(2)

    def testLoginSuccess(self):
        self.logger.info('test case 2.')
        self.driver.implicitly_wait(10)
        userFiled = self.driver.find_element_by_id('com.cashregisters.cn:id/phone_id')
        pwdFiled = self.driver.find_element_by_id('com.cashregisters.cn:id/password_id')
        userFiled.send_keys(18610000920)
        pwdFiled.send_keys(1234qwer)
        self.driver.find_element_by_id('com.cashregisters.cn:id/loginbutton').click()
        time.sleep(2)
self.driver.find_element_by_id('android:id/button2').click()
(6) Encapsulation methods - such as encapsulating login buttons, screenshots, etc. the use cases look more concise
import logging
logger = logging.getLogger(__name__)
def clickElementById(driver,elementId):
    '''
    :click element by id
    '''
    logging.info('click element by Id:{}'.format(elementId))
    try:
        driver.find_element_by_id(elementId).click()
    except Exception,e:
        logger.error('Click Id:{} Fail,error Msg:{}'.format(elementId,e))

def inputById(driver,elementId,text):
    '''
    :input sth into element by id
    '''
    logger.info('input {} into element by id:{}'.format(text,elementId))
    try:
        driver.find_element_by_id(elementId).send_keys(text)
    except Exception,e:
        logger.error('input fail,error msg:{}'.format(e))
(7) This can be used in test cases:
inputById(self.driver,'com.cashregisters.cn:id/phone_id','111111')
inputById(self.driver, 'com.cashregisters.cn:id/password_id', 'aaaaaa')
clickElementById(self.driver,'com.cashregisters.cn:id/loginbutton')
(8) Test report
(7) Jenkins continuous integration
Jenkins configuration: there are many online tutorials, so I won't repeat them. Pick some project related examples
7.1 plug ins to be installed
Two plug-ins are used here:
(1) Mail extension

(2) Reporting plug-ins HTML reporting and groovy

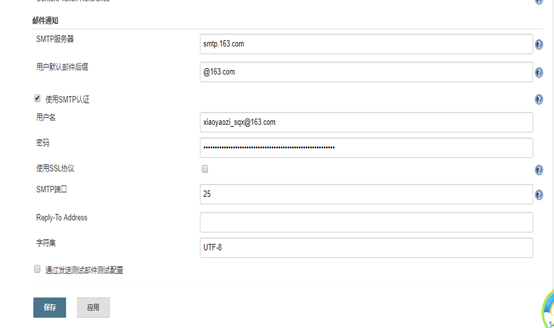
7.2 SMTP mail service configuration
(1) Administrator mail configuration:
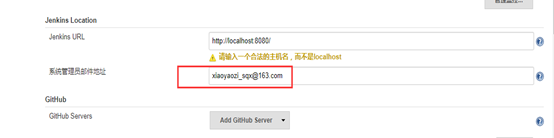
(2) SMTP server configuration:
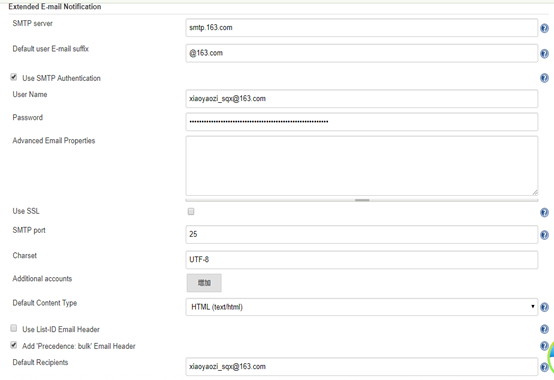
(3) Mail notification configuration:
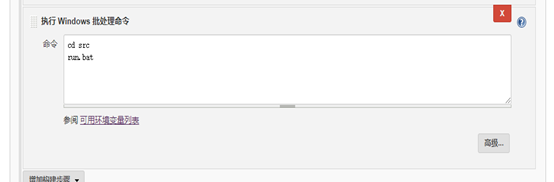
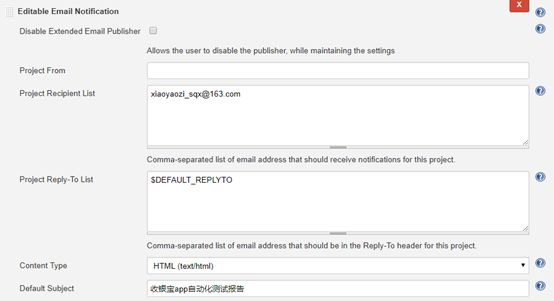
7.3 app Automation Test Engineering
(1) Configure scripts to perform automated tests:
(2) Test report settings:

(3) Recipient configuration:
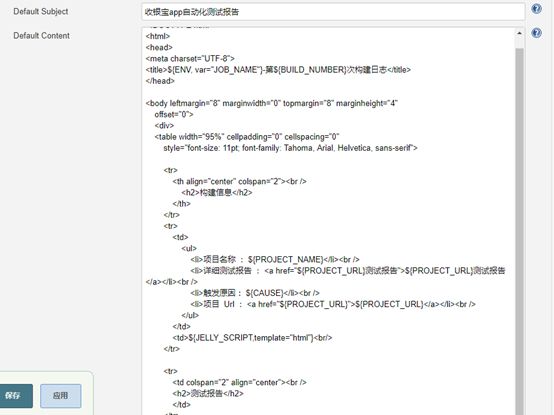
(4) Test report template:
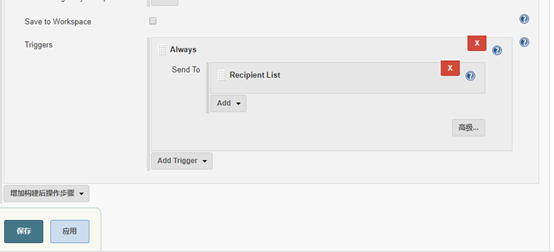
(5) Configure when messages are sent (successful / failed):
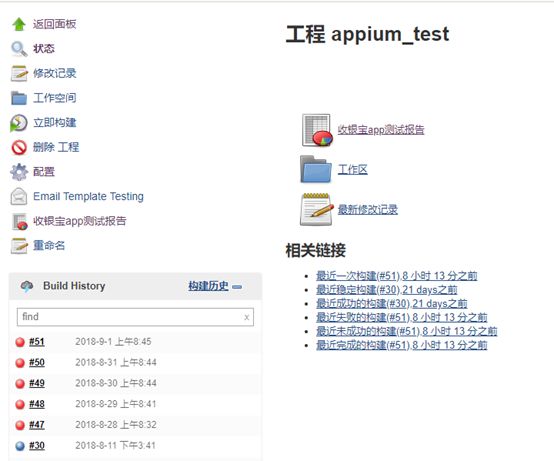
(6) After construction, the jenkins page displays:
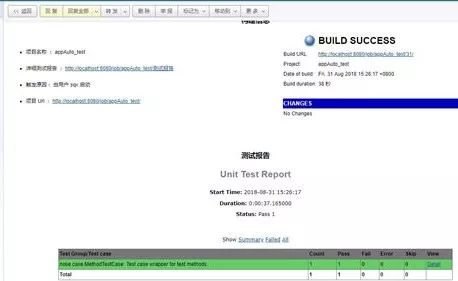
(7) Final mail received report:
Well, the study is over. If you want to know more about it, please pay attention to me! The following is a letter that Xiaobian wants to write to readers! Remember to read it carefully!

Thanks to everyone who reads my article carefully. Seeing the rise and attention of fans all the way, reciprocity is always necessary. Although it is not very valuable, you can take it away for free if you can use it:
① More than 2000 software test e-books (both mainstream and classic books should be available)
② Software testing / automated testing standard library data (the most complete Chinese version)
③ Project source code (forty or fifty interesting and classic hand training projects and source code)
④ Python programming language, API interface automation test, web automation test, App automation test (suitable for Xiaobai)
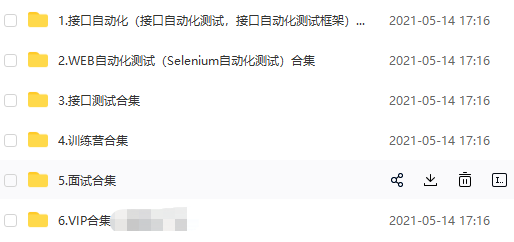
⑤ Python learning roadmap (bid farewell to non mainstream learning)
The above information is in my QQ technology exchange group (technology exchange and resource sharing, you will be interrupted when the advertisement comes in)
You can take it away by yourself. The free information in group 768747503 notes (csdn999) is the essence of the author's more than 10 year test career. And the great gods of the same industry exchange technology together
--------
"Learning materials note taking tool document collection"

Scan QR code,
Note "csdn999"
Miss, I invite you to study together~~
Discuss test technology with like-minded test partners!

Be sure to note the code: CSDN999
-------—
