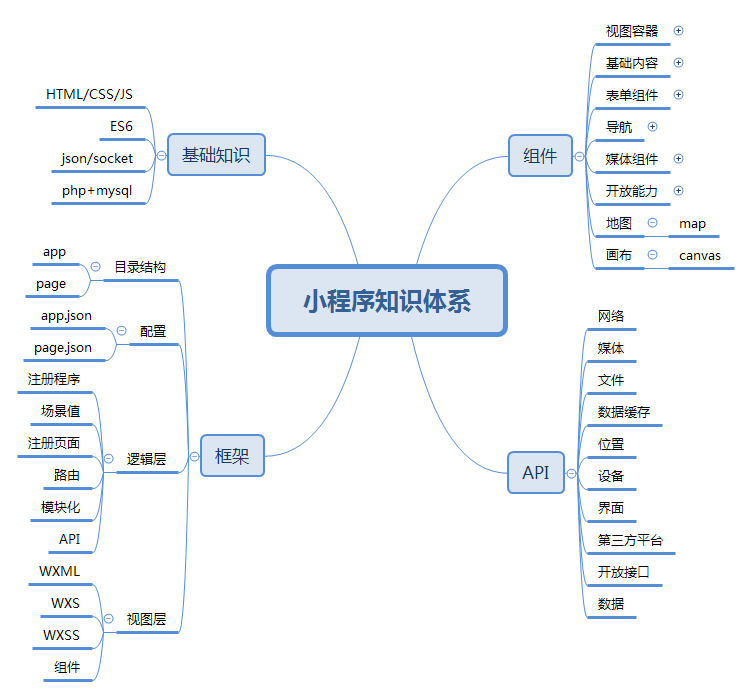
Overall knowledge system

Main directory file function of applet project
- project.config.json project configuration file, do some personalized configuration, such as interface color, compilation configuration, etc
- app.json is the global configuration of the current applet, including all page paths, interface performance, network timeout, bottom tab, etc
- sitemap configures whether the applet and its page are allowed to be indexed by wechat
- Pages contain specific pages
- Wxss page style, app As a global style, wxss will act on all pages of the current applet, and the local page style is page Wxss is only valid for the current page.
- app.js applet logic
- js page logic
- json page configuration
- wxml page structure
WXML syntax introduction and common components
1, Syntax features of WXML
1. the layout structure as like as two peas HTML.
2. The tags are not as comprehensive as HTML. There is no continuation of the tag name of HTML. Some more convenient and practical tags are customized.
3.WXML tags can directly bind events, which HTML cannot do. WXML tags are not only simple layout tags, but also realize many functions.
4. Comparison between traditional HTML and PHP data transmission and the separation of front and back code of applet.
2, View container view
How to use hover class
<view class="out" hover-class="outHover"></view>
3, Use of scroll view component
1. Add the scroll view tag and add the scroll-x attribute to the tag
2. Add white space: nowrap to the scroll view tag so that the child elements do not wrap automatically
3. Add display: inline block to the scroll view sub element and convert it into row level block element.
Detailed explanation of wxml syntax
1, Data binding
Data binding uses Mustache syntax (double braces) to wrap variables in a simple format:
wxml part
<view> {{ message }} </view>
*. js section
Page({
  data: {
    message: 'Hello world!'
  }
})
Add objects and arrays in data respectively, and render the data in data in wxml.
Problems needing attention in variable rendering:
1. Double braces are required to render data in wxml
2. Get the value of the object through the attribute, and get the value of the array through the subscript
3. The control attribute should be within double quotation marks
4. Keyword, which should be within double quotation marks
5. Operation can be carried out
2, Conditional rendering
3, List rendering
Custom component
1, Define folder
1. Create a folder called "component" under the root directory
2. Create a subdirectory under component, such as listitem
3. Right click "create new component" under the listitem directory“
2, Create wxml layout and wxcss style
1. Define component layout in wxml
2. Define layout style in wxss
3, In listitem JSON (if a component is created normally, "component": true will exist automatically and does not need to be set)
{
  "component": true, //This item is required
  "usingComponents": {}
}
4, Introduce in the pages page
1. In index The component name is defined in JSON and in the "usingComponents" attribute, such as listitem
2. In index Insert in wxml component, such as:
<listitem></listitem>
=If you do not need to add data in the middle and later stages of the component, this is the end====
If you need to transfer data from the front end, follow the following steps:
5, In listitem Define component properties in JS
Find the properties property and define the variable type and default value in the property, such as:
properties: {
    listPic:{
      type:String,
      value:"/images/news1.jpg"
    },
    listTit:{
      type:String,
      value:"Default title"
    }
  }
6, In listitem Binding defined attributes in wxml
Format such as:
<view class="box">
  <view class='boxPic'>
    <image src='{{listPic}}'></image>
  </view>
  <view class='boxTxt'>
    <view class='boxTit'>{{listTit}}</view>
  </view>
</view>
7, In the index of pages Pass parameters in wxml
The format is as follows:
<listitem listPic="/images/news2.jpg" listTit="News headline 1111 news headline 1111"></listitem>
ES6 practical technology
1, const defines constants
ES6 has not defined the way to declare constants before. A new keyword const is introduced into ES6 standard to define constants.
const a=123;
a=456;  //An error will be reported and the constant cannot be overwritten
console.log(a);
2, let block level variable
Variables defined with let only work in blocks, and blocks (parentheses) that leave the outside of variables will be destroyed.
if(true){
    var a=123;
    let b=456
}
console.log(a);
console.log(b); //Error reported, unable to access variable

let a=123;
let a=456;
console.log(a);  //Duplicate variables cannot be overwritten
Three, template literal
Used for string splicing and writing template, use ` (back quotation mark, wavy line in the upper left corner), and use ${} for variables
var user="Zhang San";
var age =22;
var sex ="male";
console.log(`Hello, my name is"${user}",this year ${age}Years old, I am ${sex}living`);
console.log("Hello, my name is"+user+",this year"+age+"Years old, I am"+sex+"living");//Traditional writing
4, Deconstruction assignment
Exchange value
var a=1;
var b=2;
[a,b]=[b,a];
console.log(a,b);  // 2 1
Get elements from array
var array=[1,2,3,4];
var [a, ,b]=array;
console.log(a,b);  // 1 3
Get value from object
var obj={user:"Zhang San",age:"22 year",sex:"male",job:"Front end development"}
var {user,job}=obj;
console.log(user,job)
Return value deconstruction
 function arr(){
    var a=1,b=2,c=3,d=4;
    return {a,b,c,d}
 }
 var {a,c}=arr();
 console.log(a,c);   // 1 3
5, Arrow function
The arrow function is equivalent to an anonymous function and simplifies the function definition. () put the parameter in the middle, omit it if there is no parameter, and the function body is after the arrow.
var fun=(x,y)=>{
    console.log(x+y);
}
fun(2,3)
Before ES6, it was troublesome to access this outside the function. The arrow function can directly access the outermost this without conversion
6, Declaration of functions in objects
var obj={
    user:"Zhang San",
    job(){
        return "web Front end development"
    }
}
console.log(obj.job())
7, For of loop traversal
var arr=["aaaa","bbbb","cccc","ddddd"];
for(var i of obj){
    console.log(i)
}
8, Default parameters
function fun(x=0,y=2,z=true){
    console.log(x,y,z);
}
fun();  // 0 2 true
fun(4,0,false); // 4 0 false
9, Expand operator
arr1=[1,2,3,4,5];
arr2=["a","b","c","d"];
arr3=arr1.concat(arr2);
arr4=[...arr1,...arr2];

console.log( arr3 );   //[1, 2, 3, 4, 5, "a", "b", "c", "d"]
console.log( arr4 );   //[1, 2, 3, 4, 5, "a", "b", "c", "d"]