1. Create a Maven parent project
For example, the project name is: 07-jt-redis.
Create two more subprojects under the parent project.
1.2 Create a jt-jedis subproject
Add dependencies:
<dependencies>
        <!--jedis yes java Medium operation redis A group of API-->
        <dependency>
            <groupId>redis.clients</groupId>
            <artifactId>jedis</artifactId>
            <version>3.5.2</version>
        </dependency>
        <dependency>
            <groupId>junit</groupId>
            <artifactId>junit</artifactId>
            <version>4.12</version>
            <scope>test</scope>
        </dependency>
        <!--In this dependency-->
        <dependency>
            <groupId>com.google.code.gson</groupId>
            <artifactId>gson</artifactId>
            <version>2.8.6</version>
        </dependency>
    </dependencies>
1.3 Create a jt-template subproject
Add dependencies:
<dependencyManagement>
        <dependencies>
            <dependency>
                <groupId>org.springframework.boot</groupId>
                <artifactId>spring-boot-dependencies</artifactId>
                <version>2.3.2.RELEASE</version>
                <scope>import</scope>
                <type>pom</type>
            </dependency>
        </dependencies>
    </dependencyManagement>
    <dependencies>
        <dependency>
            <groupId>org.springframework.boot</groupId>
            <artifactId>spring-boot-starter-web</artifactId>
        </dependency>
        <dependency>
            <groupId>org.springframework.boot</groupId>
            <artifactId>spring-boot-starter-data-redis</artifactId>
        </dependency>
        <dependency>
            <groupId>org.springframework.boot</groupId>
            <artifactId>spring-boot-starter-test</artifactId>
            <scope>test</scope>
        </dependency>
    </dependencies>
2. Application of Jedis
2.1 Overview
Jedis is a client in Java that operates on redis, similar to accessing the mysql database through jdbc.
2.2 Modify redis.conf profile
To connect redis remotely in java, you need to redis. Bind 127.0 in conf configuration file. The 0.1 element is commented out and its protected-mode is set to no (which is turned on by default after redis3.0), so when you modify the configuration, be sure to restart redis before accessing it.
2.3 Basic Type Operations
Define unit test classes and test methods in the Jedis project.
package com.jt;

import com.google.gson.Gson;
import org.junit.Test;
import redis.clients.jedis.Jedis;

import java.util.HashMap;
import java.util.Map;
import java.util.Set;
import java.util.concurrent.TimeUnit;

public class JedisTest {
    @Test
    public void testStringType() throws InterruptedException {
        //1. Link (with redis)
        Jedis jedis = new Jedis("192.168.64.129",6379);
        jedis.auth("123456");//Password authentication
        String result = jedis.ping();
        System.out.println(result);
        //2. Storing data
        jedis.set("count", "1");
        //3. Update Data
        jedis.incr("count");
        jedis.expire("count", 2);//Set validity period to 1 second
        //get data
       TimeUnit.SECONDS.sleep(1);//Hibernate for 1 second
        String count = jedis.get("count");
        System.out.println("Number of shopping carts:"+count);
        System.out.println("Data from database:"+jedis.get("a"));

        //Release Resources
        jedis.close();
    }

    //String type operation
    @Test
    public void testStringObject(){
        //1. Link (with redis)
        Jedis jedis = new Jedis("192.168.64.129",6379);
        jedis.auth("123456");//Password authentication
        String result = jedis.ping();
        System.out.println(result);

        //2. Storing objects based on string type
        Map<String,Object> map = new HashMap<>();
        map.put("id",1001);
        map.put("name", "googleyyds");
        //Convert map objects to json-formatted strings (borrow google's gson to convert objects to JSON strings)
        Gson gson = new Gson();
        String jm = gson.toJson(map);
        jedis.set("Obj", jm);
        jm = jedis.get("obj");
        System.out.println("Get the string as:"+jm);

        //map = gson.fromJson(jm, );
        jedis.close();
    }
    @Test
    //Hash hash type operation
    public void testHashType(){
        Jedis jedis = new Jedis("192.168.64.129",6379);
        jedis.auth("123456");//Password authentication
        String result = jedis.ping();
        System.out.println(result);

        Map<String,String> map = new HashMap<>();
        map.put("id","1001");
        map.put("name", "googleyyds");
        jedis.hset("person", map);
        map = jedis.hgetAll("person");
        System.out.println(map);
        jedis.close();
    }

    //List list list type operation
   @Test
    public void testListType(){
        Jedis jedis = new Jedis("192.168.64.129",6379);
        jedis.auth("123456");//Password authentication
        String result = jedis.ping();
        System.out.println(result);

        jedis.lpush("l1","A","B","C");
        jedis.brpop(60, "l1");
        jedis.brpop(60, "l1");
        jedis.brpop(60, "l1");
        System.out.println("Collection is empty");
        jedis.brpop(60, "l1");
        System.out.println("Blocked 60 s");
        jedis.close();
    }

    //Set Collection Type Operation
    @Test
    public void testSetType(){
        Jedis jedis = new Jedis("192.168.64.129",6379);
        jedis.auth("123456");//Password authentication
        String result = jedis.ping();
        System.out.println(result);

        jedis.sadd("set1","A","B","C");
        Set<String> set = jedis.smembers("set1");
        System.out.println(set);
    }
}
3. Application of JedisPool connection pool
When we access redis directly from Jedis, releasing the connection each time we get it can incur a significant performance overhead. Therefore, we can use the Jedis connection pool to reuse the created connections to improve their performance, which can be easily applied in the following ways.
       //Define the configuration of the connection pool
        JedisPoolConfig config = new JedisPoolConfig();
        config.setMaxTotal(100);//maximum connection
        config.setMaxIdle(20);//Maximum idle time
        //Create connection pool
        JedisPool jedisPool = new JedisPool(config,"192.168.64.129",6379);
        //Get a link from the pool
        Jedis resoure = jedisPool.getResource();
        //Accessing data through a jedis connection
        resoure.auth("123456");
        resoure.set("class", "cgb2104");
        String clazz = resoure.get("class");
        System.out.println(clazz);
        //Return link to pool
        resoure.close();
        //Close Connection Pool
        jedisPool.close();
4. RedisTemplate application
4.1 Overview
RedisTemplate is a Java object that operates on the redis database in the SpringBoot project and encapsulates some basic operations on redis.
4.2 Create startup classes and configuration files
Step 1: Create a configuration file
spring:
  redis:
    host: 192.168.64.129
    port: 6379
    password: 123456
Step 2: Create a startup class
@SpringBootApplication
public class RedisApp {
    public static void main(String[] args) {
        SpringApplication.run(RedisApp.class, args);
    }
}
4.3 StringRedisTemplate Application
StringRedisTemplate is an object designed to manipulate redis string-type data and is used as follows:
@SpringBootTest
public class StringRedisTemplateTest {
    @Autowired
    private StringRedisTemplate redisTemplate;  //Data mainly used to manipulate string types

  // Test whether redis is connected
   @Test
    public void testConnection(){
       RedisConnection connection =  redisTemplate.getConnectionFactory().getConnection();
       String ping = connection.ping();
       System.out.println(ping);
    }

    //Test String Type Data
    @Test
    public void testStringOper() {
        //1. Get string manipulation object
        ValueOperations<String, String> valueOperations = redisTemplate.opsForValue();
        //2. Store data to redis
        valueOperations.set("id", "0");
        //3. Update data in redis
        valueOperations.increment("id");
        //4. Get data from redis
        String id = valueOperations.get("id");
        System.out.println(id);
    }
    @Test
    //Test list type data
    public void testListOper(){
        ListOperations<String, String> listOperations = redisTemplate.opsForList();
        listOperations.leftPush("list1", "100");
        listOperations.leftPushAll("list1","200","300","400","500");
        List list = listOperations.range("list1", 0, -1);
        System.out.println(list);
        Object ele = listOperations.rightPop("list1");//FIFO FIFO FIFO
        System.out.println(ele);
    }
    //Test set type data
    @Test
    public void testSetOper(){
         SetOperations setOperations= redisTemplate.opsForSet();
         setOperations.add("set1", "200","300","400","500","300");
         Set set = setOperations.members("set1");
         System.out.println(set);
         Long count =  setOperations.remove("set1","200","500");
         System.out.println("Removed elements:"+count+"individual");
    }

    @Test
    //Test hash type data
    public void testHashOper(){
       HashOperations hashOperations =  redisTemplate.opsForHash();
       //Store data
        hashOperations.put("hash", "name","Xiao Zhang");
        hashOperations.put("hash", "age", "20");
       //Get data
        Object name =  hashOperations.get("hash","name");
        Object hh = hashOperations.entries("hash");
        System.out.println(name);
        System.out.println(hh);
    }
}
5. Practice of Project Projects
5.1 Single Sign On System
In a distributed system, there will be many services. If we log in to one service and then access other services, we need a separate authentication system. We usually call it a single sign-on system. In this system, we provide a authentication server, the service completes user authentication. In some small and medium-sized distributed systems, We usually use redis to store user authentication information, such as:

Implementation Code
package com.jt.demos;
public class SSODemo01 {
    //Verify session validity
    public static boolean isValidSession(String token){
        if(token==null||"".equals(token)){
            return false;
        }
        //1. Connect
        Jedis jedis=new Jedis("192.168.126.130",6379);
        jedis.auth("123456");
        //2. Get session information from redis
        //2.1 User token corresponding user information, which may be a json-formatted string in the future
        String user=jedis.hget("session",token);//Session This represents the session object
        System.out.println("user="+user);
        if(user==null||"".equals(user)){
            System.out.println("Not yet logged in");
            jedis.close();
            return false;
        }
        //3. Decide if login timed out
        String dateStr=jedis.hget("session",token+":expired");
        Date expired=new Date(Long.valueOf(dateStr));
        if(dateStr==null||"".equals(dateStr)||expired.before(new Date())) {
            System.out.println("login timeout");
            jedis.close();
            return false;
        }
        return true;
    };

    //Perform login operation
    public static String login(String username,String password){
        System.out.println("Be based on"+username+"/"+password+"Log on");
        //1. Create a token (typically with a random string)
       String token= UUID.randomUUID().toString()
               .replace("-","");
       System.out.println(token);
       //2. Create a valid login
        Calendar calendar=Calendar.getInstance();
        calendar.add(Calendar.MINUTE,30);
       //3. Store session information
        Map<String,String> map=new HashMap<>();
        map.put(token,username);//username This could be a json string with more user information
        map.put(token+":expired",String.valueOf(calendar.getTimeInMillis()));
        Jedis jedis=new Jedis("192.168.126.130",6379);
        jedis.auth("123456");
        jedis.hset("session",map);
        jedis.close();
        return token;
    }
    public static void main(String[] args) {
        System.out.println("===Accessing system resources===");
        //First access: Visit redis to check for valid session information
        String token=null;
        boolean flag=isValidSession(token);
        System.out.println(flag?"For the first time:Logged in":"For the first time:Not logged in");
        //Execute login
        if(!flag){
            System.out.print("Execute login:");
            token=login("jack","123456");
            //The token that logged in successfully responded to the client in the future
        }
       //Second visit:
        flag=isValidSession(token);
        System.out.println(flag?"The second time:Logged in":"The second time:Not logged in");
        //Third visit:
        flag=isValidSession(token);
        System.out.println(flag?"Third time:Logged in":"Third time:Not logged in");
    }
}
5.2 Voting System
In many system designs, there is an activity design that allows you to conduct a survey of the level of support for an activity, such as designing a voting system based on that activity, before opening it.

Implementation Code
package com.jt.demos;

import redis.clients.jedis.Jedis;

import java.util.Set;

/**
 * Voting System Demo: Simulate a voting process based on an activity
 * Business Note: A user can only vote once (no duplication is allowed)
 * Data structure design: data storage based on redis set type
 */
public class VoteDemo01 {
    private static Jedis jedis=
            new Jedis("192.168.126.130",6379);
    static{
        jedis.auth("123456");
    }
    //Vote (key is active id,value is userId)
    static void vote(String activityId,String userId){
         jedis.sadd(activityId,userId);
    }
    //View votes
    static Long getVoteCount(String activityId){
        Long count = jedis.scard(activityId);
        return count;
    }
    //See which user voted for this event
    static Set<String> getVoteUsers(String activityId){
        Set<String> smembers = jedis.smembers(activityId);
        return smembers;
    }
    //Check if this user has voted for this event
    static Boolean checkVote(String activityId,String userId){
        Boolean flag = jedis.sismember(activityId, userId);
        return flag;
    }

    public static void main(String[] args) {
        //0.Initialization
        String activityId="10001";
        String user1="201";
        String user2="202";
        String user3="203";
        //1. Voting
        vote(activityId,user1);
        vote(activityId,user2);
        vote(activityId,user3);
        //2. Get votes
        Long voteCount = getVoteCount(activityId);
        System.out.println("Number of votes:"+voteCount);
        //3. Output who voted
        Set<String> users=getVoteUsers(activityId);
        System.out.println(users);
        //4. Check whether the user has voted
        boolean flag=checkVote(activityId,user1);
        System.out.println(user1+":"+(flag?"Voted":"Not yet voted"));
    }

}
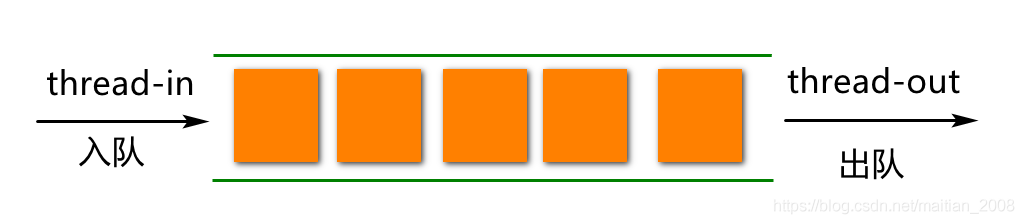
5.3 seconds killing queue
When designing a second-kill or snap-up system, in order to improve the response speed of the system, users'second-kill or snap-up requests are usually stored in a redis queue first, where we implement a first-in-first-out queue based on redis.
Implementation Code
package com.jt.demos;

import redis.clients.jedis.Jedis;

//Secondary Kill Queue Demo
//The description logic first writes the commodity rush information to redis (stored in a queue).
//Because writing redis in-memory databases is many times faster than writing your mysql database
//Algorithms: First in, first out (FIFO) - reflecting fairness
public class SecondKillDemo01 {

    //Commodity rush is first enlisted
    static void enque(String msg){//Entry
         Jedis jedis=new Jedis("192.168.126.130",6379);
         jedis.auth("123456");//No authentication required to write this statement
         jedis.lpush("queue",msg);
         jedis.close();
    }

    //Bottom asynchronous queue (based on this message, order generation, inventory deduction,...)
    static String deque(){//Queue
        Jedis jedis=new Jedis("192.168.126.130",6379);
        jedis.auth("123456");//No authentication required to write this statement
        String result=jedis.rpop("queue");
        jedis.close();
        return result;
    }
    public static void main(String[] args){
        //1. Buy more than once (simulate multiple clicks on the interface)
        new Thread(){
            @Override
            public void run() {
                for(int i=1;i<=10;i++){//Analog Page Button Click
                    enque(String.valueOf(i));
                    try{Thread.sleep(100);}catch(Exception e){}
                }
            }
        }.start();

        //2. Retrieve content from queue (simulate background retrieve data from queue)
        new Thread(){
            @Override
            public void run() {
                for(;;){
                    String msg=deque();
                    if(msg==null)continue;
                    System.out.print(msg);
                }
            }
        }.start();
    }
}