1, YOLO v5 training your own dataset tutorial
- 1.1 create your own dataset profile
- 1.2 create a label file corresponding to each picture
- 1.3 document placement specification
- 1.4 clustering a priori box (optional)
- 1.5 choose a model you need
- 1.6 start training
- 1.7 see the results after training
2, Detect
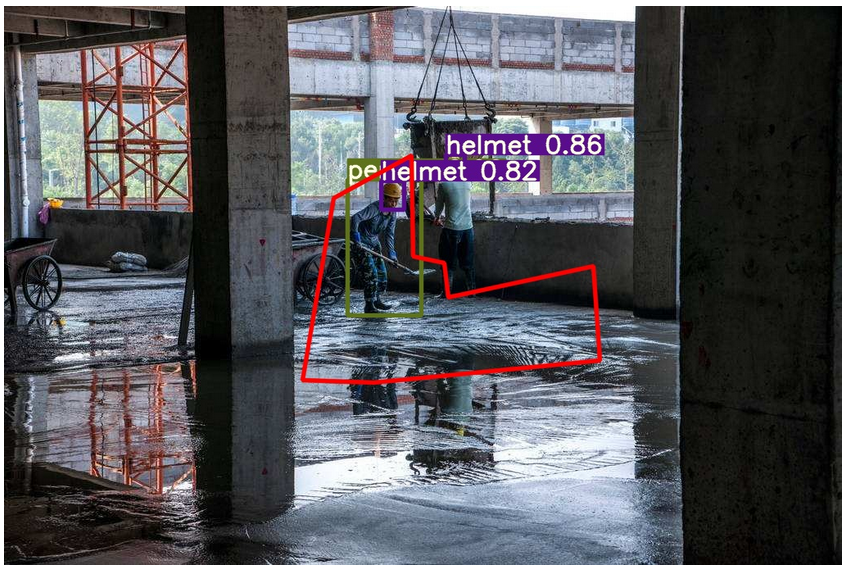
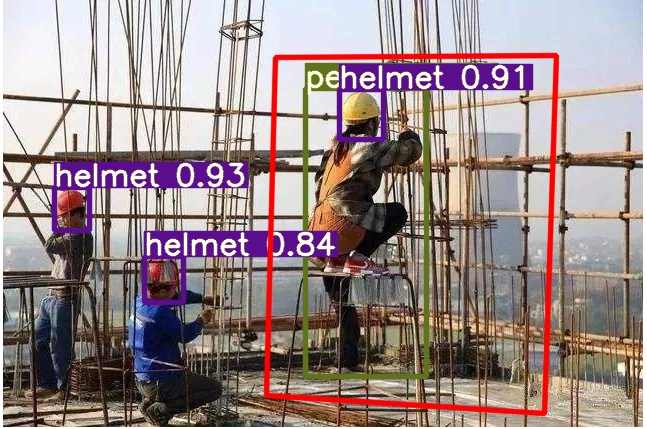
3, Detect whether there are people in the dangerous area
- 3.1 marking method of hazardous area
- 3.2 execution detection
- 3.3 effect: the human body in the dangerous area will be selected by the red box
4, Generate ONNX
5, Add classification of data sets
The project uses yolov5 v2 X to train the application of helmet target detection in the field of intelligent site safety. Let's start with a wave of demonstration!
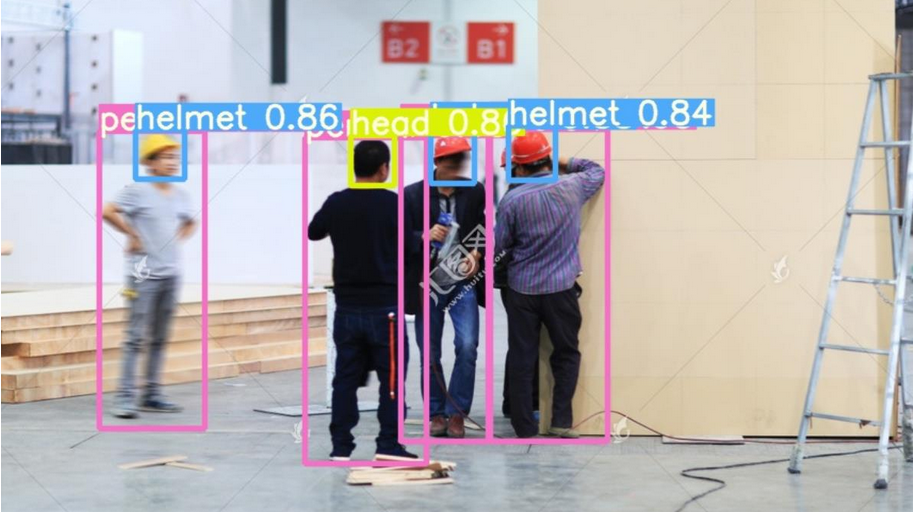
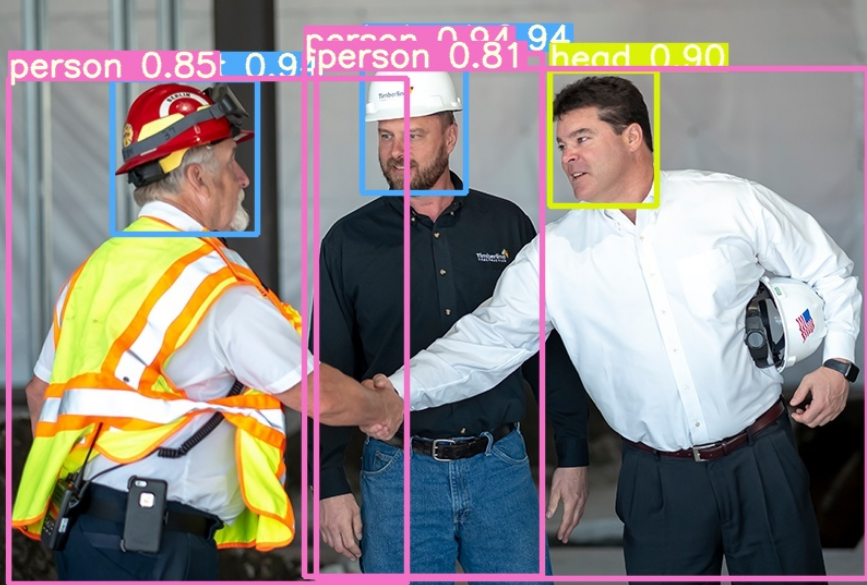
index
yolov5s based training, epoch = 50
classification | P | R | mAP0.5 |
|---|---|---|---|
population | 0.884 | 0.899 | 0.888 |
human body | 0.846 | 0.893 | 0.877 |
head | 0.889 | 0.883 | 0.871 |
safety hat | 0.917 | 0.921 | 0.917 |
Corresponding weight file: https://pan.baidu.com/share/init?surl=ELPhtW-Q4G8UqEr4YrV_5A, extraction code: b981
Basic training = 100, vyoch
classification | P | R | mAP0.5 |
|---|---|---|---|
population | 0.886 | 0.915 | 0.901 |
human body | 0.844 | 0.906 | 0.887 |
head | 0.9 | 0.911 | 0.9 |
safety hat | 0.913 | 0.929 | 0.916 |
Corresponding weight file: https://pan.baidu.com/share/init?surl=0hlKrgpxVsw4d_vHnPHwEA , extraction code: psst
yolov5l based training, epoch = 100
classification | P | R | mAP0.5 |
|---|---|---|---|
population | 0.892 | 0.919 | 0.906 |
human body | 0.856 | 0.914 | 0.897 |
head | 0.893 | 0.913 | 0.901 |
safety hat | 0.927 | 0.929 | 0.919 |
Corresponding weight file: https://pan.baidu.com/share/init?surl=iMZkRNXY1fowpQCcapFDqw , extraction code: a66e
1 YOLOv5 training your own dataset tutorial
Dataset used: safety helmet wearing dataset. Thank you for the open source dataset of the great God!
https://github.com/njvisionpower/Safety-Helmet-Wearing-Dataset
This article is written in combination with the official course of YOLOv5
Environmental preparation
First, ensure your environment:
Python >= 3.7
Pytorch == 1.5.x
Train your own data
Tips:
For the method of adding data set classification, see [5. Adding data set classification]
1.1 create your own dataset profile
Because I only judge the three categories of [people without helmets], [people with helmets] and [human body], based on data / coco128 Yaml file, create your own dataset configuration file custom_data.yaml
# Location of labels and image files of training set and verification set
train: ./score/images/train
val: ./score/images/val

# number of classes
nc: 3

# class names
names: ['person', 'head', 'helmet']
1.2 create a label file corresponding to each picture
After labeling with labeling tools such as Labelbox, CVAT and Sprite labeling assistant, you need to generate the corresponding labels for each picture txt file with the following specifications:
- Every line is a goal
- The category sequence number starts with a zero index (starting with 0)
- The coordinates of each row are class x_center y_center width height format
- The frame coordinates must be in the normalized xywh format (from 0 to 1). If your box is in pixels, it will x_center and width divided by the width of the image, y_center and height divided by image height. The code is as follows:
import numpy as np
def convert(size, box):
    """
    To label xml [top left corner] generated by file x,top left corner y,Lower right corner x,Lower right corner y]Convert dimensions to yolov5 Training coordinates
    :param size: Picture size:[w,h]
    :param box: anchor box Coordinates of [top left corner x,top left corner y,Lower right corner x,Lower right corner y,]
    :return: Converted [x,y,w,h]
    """
    x1 = int(box[0])
    y1 = int(box[1])
    x2 = int(box[2])
    y2 = int(box[3])
    dw = np.float32(1. / int(size[0]))
    dh = np.float32(1. / int(size[1]))
    w = x2 - x1
    h = y2 - y1
    x = x1 + (w / 2)
    y = y1 + (h / 2)
    x = x * dw
    w = w * dw
    y = y * dh
    h = h * dh
    return [x, y, w, h]
Generated The name of the txt file is the name of the picture, which is placed in the label folder, for example:
./score/images/train/00001.jpg  # image
./score/labels/train/00001.txt  # label
Generated txt example
1 0.1830000086920336 0.1396396430209279 0.13400000636465847 0.15915916301310062
1 0.5240000248886645 0.29129129834473133 0.0800000037997961 0.16816817224025726
1 0.6060000287834555 0.29579580295830965 0.08400000398978591 0.1771771814674139
1 0.6760000321082771 0.25375375989824533 0.10000000474974513 0.21321321837604046
0 0.39300001866649836 0.2552552614361048 0.17800000845454633 0.2822822891175747
0 0.7200000341981649 0.5570570705458522 0.25200001196935773 0.4294294398277998
0 0.7720000366680324 0.2567567629739642 0.1520000072196126 0.23123123683035374
1.3 document placement specification
The file tree is as follows
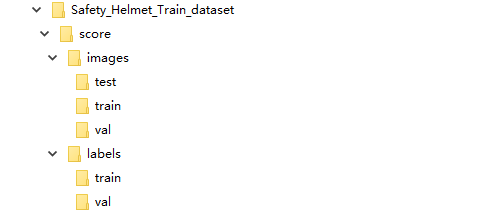
1.4 a priori frame obtained by clustering (Yolov5 has been adapted internally, optional)
Use code/ data/gen_anchors/clauculate_anchors.py to modify the path of the dataset
FILE_ROOT = r"xxx" # Root path
ANNOTATION_ROOT = r"xxx"  # Dataset label folder path
ANNOTATION_PATH = FILE_ROOT + ANNOTATION_ROOT
After running, a file anchors.com will be generated Txt, which contains the proposed a priori box:
Best Accuracy = 79.72%
Best Anchors = [[14.74, 27.64], [23.48, 46.04], [28.88, 130.0], [39.33, 148.07], [52.62, 186.18], [62.33, 279.11], [85.19, 237.87], [88.0, 360.89], [145.33, 514.67]]
1.5 select a model you need
In the folder/ Select a model you need under models, and then copy it. Modify nc = at the beginning of the file to the classification number of the data set. Here is a reference/ models/yolov5s.yaml to modify
# parameters
nc: 3  # Number of classes
depth_multiple: 0.33  # model depth multiple
width_multiple: 0.50  # layer channel multiple

# anchors
anchors: # < ====================== according to/ data/gen_anchors/anchors.txt, rounded (optional)
  - [14,27, 23,46, 28,130]
  - [39,148, 52,186, 62.,279]
  - [85,237, 88,360, 145,514]

# YOLOv5 backbone
backbone:
  # [from, number, module, args]
  [[-1, 1, Focus, [64, 3]],  # 0-P1/2
   [-1, 1, Conv, [128, 3, 2]],  # 1-P2/4
   [-1, 3, BottleneckCSP, [128]],
   [-1, 1, Conv, [256, 3, 2]],  # 3-P3/8
   [-1, 9, BottleneckCSP, [256]],
   [-1, 1, Conv, [512, 3, 2]],  # 5-P4/16
   [-1, 9, BottleneckCSP, [512]],
   [-1, 1, Conv, [1024, 3, 2]],  # 7-P5/32
   [-1, 1, SPP, [1024, [5, 9, 13]]],
   [-1, 3, BottleneckCSP, [1024, False]],  # 9
  ]

# YOLOv5 head
head:
  [[-1, 1, Conv, [512, 1, 1]],
   [-1, 1, nn.Upsample, [None, 2, 'nearest']],
   [[-1, 6], 1, Concat, [1]],  # cat backbone P4
   [-1, 3, BottleneckCSP, [512, False]],  # 13

   [-1, 1, Conv, [256, 1, 1]],
   [-1, 1, nn.Upsample, [None, 2, 'nearest']],
   [[-1, 4], 1, Concat, [1]],  # cat backbone P3
   [-1, 3, BottleneckCSP, [256, False]],  # 17

   [-1, 1, Conv, [256, 3, 2]],
   [[-1, 14], 1, Concat, [1]],  # cat head P4
   [-1, 3, BottleneckCSP, [512, False]],  # 20

   [-1, 1, Conv, [512, 3, 2]],
   [[-1, 10], 1, Concat, [1]],  # cat head P5
   [-1, 3, BottleneckCSP, [1024, False]],  # 23

   [[17, 20, 23], 1, Detect, [nc, anchors]],  # Detect(P3, P4, P5)
  ]
1.6 start training
Yolov5s model is selected for training, and the weight is also based on yolov5s Pt to train
python train.py --img 640 --batch 16 --epochs 10 --data ./data/custom_data.yaml --cfg ./models/custom_yolov5.yaml --weights ./weights/yolov5s.pt
Among them, yolov5s PT needs to download and put it in the root directory of the project, and the download address is the official weight
1.7 see the results after training
After training, the weights are saved in the/ Weights / best.exe in each exp file in the runs folder Py, you can also see the effect of training
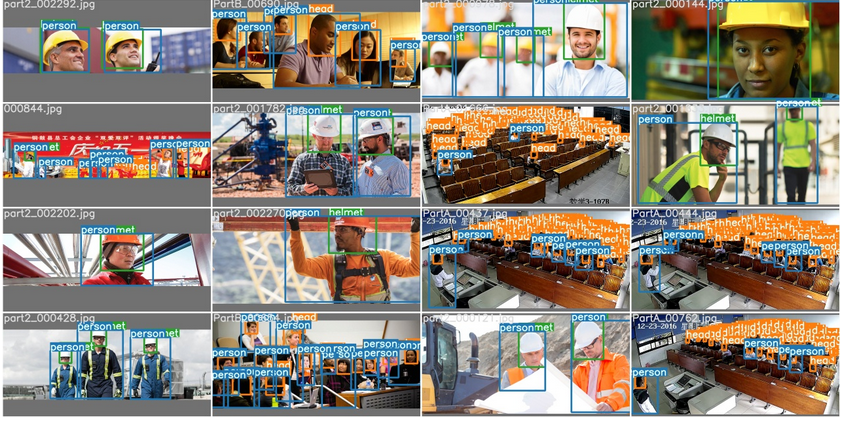
2 inference
The detected image will be saved in/ Under the folder inferenct/output /
Run command:
python detect.py --source   0  # webcam
                            file.jpg  # image
                            file.mp4  # video
                            path/  # directory
                            path/*.jpg  # glob
                            rtsp://170.93.143.139/rtplive/470011e600ef003a004ee33696235daa  # rtsp stream
                            http://112.50.243.8/PLTV/88888888/224/3221225900/1.m3u8  # http stream
For example, using my s weight to detect images, you can run the following command, and the detected images will be saved in/ Under the folder inferenct/output /
python detect.py --source Picture path --weights ./weights/helmet_head_person_s.pt
3 detect whether there are people in the dangerous area
3.1 marking method of hazardous area
What I use here is the wizard annotation assistant annotation, which generates the json file of the corresponding image
3.2 execution detection
The detected image will be saved in/ Under the folder inferenct/output /
Run command:
python area_detect.py --source ./area_dangerous --weights ./weights/helmet_head_person_s.pt
3.3 effect: the human body in the dangerous area will be selected by the red box
4
Generate ONNX
II
4.1 installation onnx Library
pip install onnx
4.2 execution generation
python ./models/export.py --weights ./weights/helmet_head_person_s.pt --img 640 --batch 1
onnx and torchscript files are generated in/ weights folder
4. Add data classification
How to add data set classification:
There is no person category in the SHWD dataset. First execute the script of the existing dataset to generate yolov5 required label files txt, and then use yolov5x PT plus yolov5x Yaml, use the command to detect the human body
python detect.py --save-txt --source ./File directory of your own dataset --weights ./weights/yolov5x.pt
yolov5 Will infer all classifications and inference/output To generate the corresponding picture .txt Label documents;
Modification/ data/gen_ data/merge_ data. The path of your own dataset label in python. Executing this python script will merge the person type
end