1: AR development environment configuration in Unity
1. Android development environment configuration
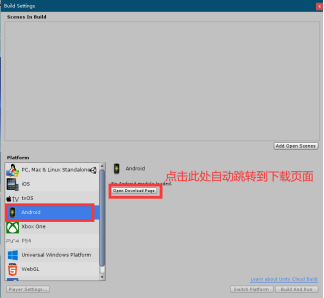
(1) : create a project, click File build settings, and select the Android platform. If the Android development package is not downloaded, you need to download the Android development package first. You can directly click the link on this page to download it, as shown in the following figure:
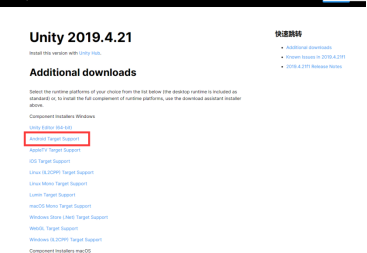
(2) : if there is no jump, go to the official website to download. First go to the official website to download the Unity version, find the version you need, and then click the Release notes button

Then click Android target support to download it.
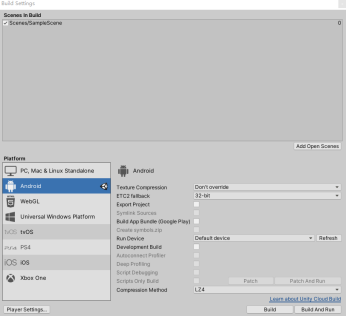
(3) : after downloading, install it in the same directory as this version. Then restart Unity. At this time, click File - build settings and select Android platform.
(4) : SDK and JDK installation
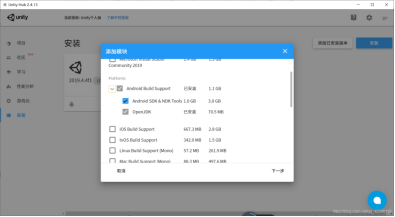
For versions before unity 2019, you need to download the SDK and JDK separately and install the specified. (this method is not recommended. It is cumbersome and is likely to make mistakes)
The jdk and sdk modules can be directly added and installed when installing Unity in versions after Unity 2019. (the version before 2019 may also be OK, but I tested 2019)
PS: after this step, the packaging test can be carried out. If the packaging is successful and the apk file can be installed and run normally, the Android environment configuration is successful; Otherwise, the Android environment configuration fails.
(5) : common causes of error reporting

The possible reasons for this error are:
① : there is a Chinese path.
② Setting: project name, company name, package name
③ : sdk setting error
2.Vuforia development environment related settings
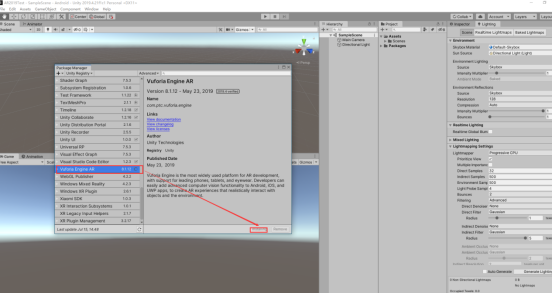
(1) Vuforia plug-in package import:
Click Windows - PackageManager to install the Vuforia plug-in package. (Vuforia plug-in is integrated into Unity package in versions after February 2017, and previous versions need to be downloaded separately)
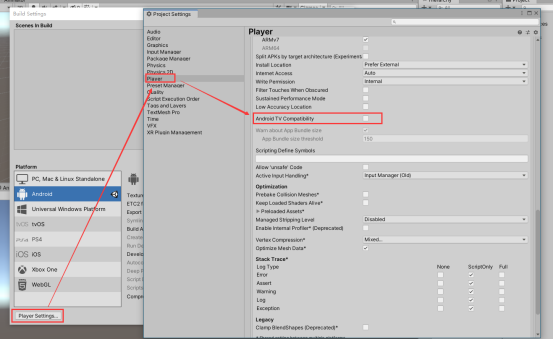
(2) : open the player settings panel, in other setting s, go down to android TV Compatibility and uncheck it.
(3) : select XR setting and tick the vuforia augmented reality option, as shown in the figure below

II Key and identification diagram
1. Apply for key
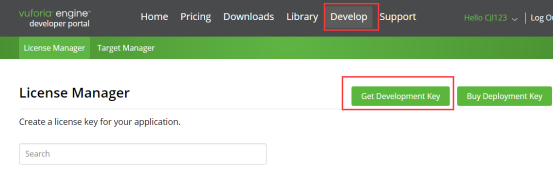
(1) Go to Vuforia official website( https://developer.vuforia.com )Apply to register an account, then log in, open the Develop page of the navigation bar, and then click the get development key button.
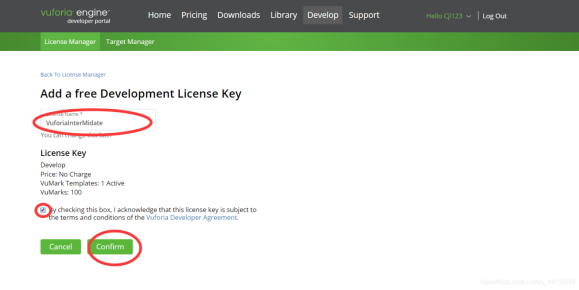
(2) After clicking, enter the following page to create the project, and then click OK to apply for the key:
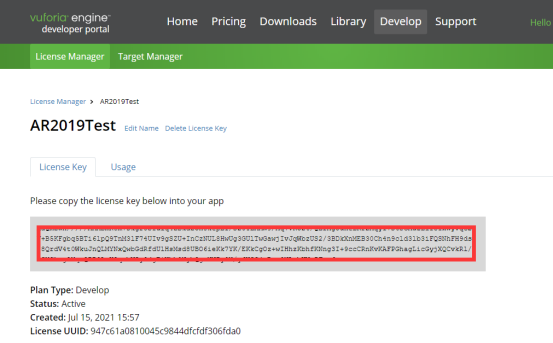
(3) After clicking, the following page will appear. The key you applied for is in the red box in the figure below.
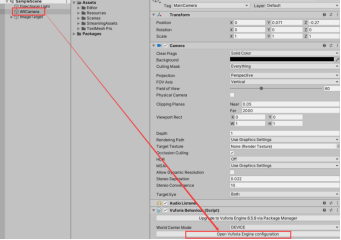
(4) Add the applied key to the Unity project that has just configured the AR development environment, as shown in the following figure:
Now delete the Camera that comes with the scene, right-click VuforiaEngine – ARCamera to create an ARCamera, and then click ARCamera to add the key.
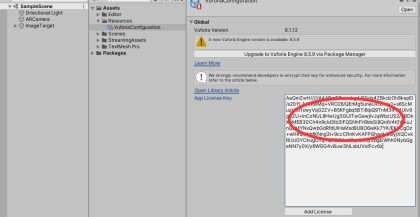
(5) Next, paste the previously applied key into the red box below
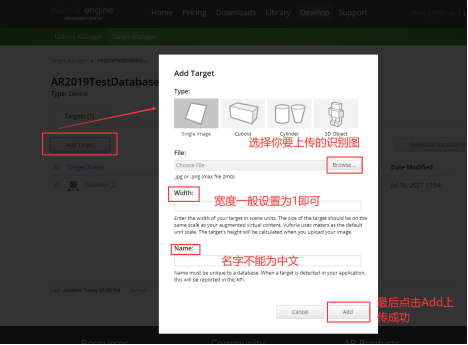
2. Upload identification map
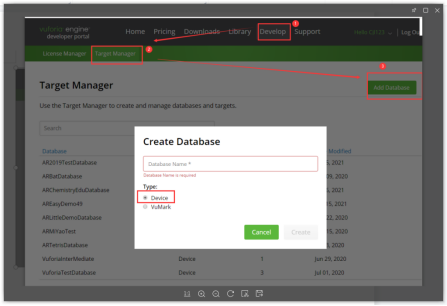
(1) Go back to the official website of Vuforia, follow the steps below to open the following page and create an identification diagram database
(2) Open the newly created database and upload the identification map you want to set
(3) After the identification map is uploaded successfully, we can see this picture in the Database just created. If we don't see it, it proves that the upload failed. If we want to modify the identification map in subsequent projects, we need to modify it here and download it again.
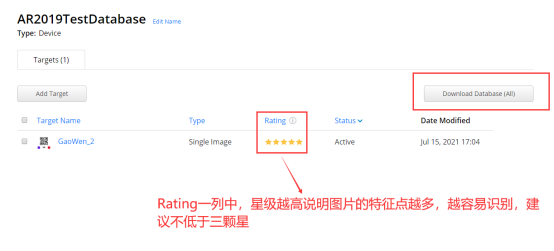
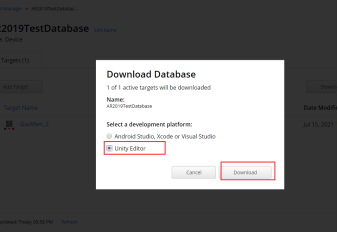
(4) After uploading all the required identification maps successfully, generate the feature point data package of the identification map, click the Download Database button on the right to download the Unity data package (note that the platform selects Unity editor)
Summary of frequently asked questions:
(1) There is no model problem when scanning the identification map. Reason: the identification map Databases you use in ARCamera is not activated.
Activation method: select ARCamera, open the page of adding keys, find the Databases you use, select and activate.
(2) In addition to affecting the recognition efficiency, the recognition map also affects the display effect of objects under Imagetarget. For example, the image recognition feature points are 3 stars or more, but the displayed objects will continue to shake slightly. The reasons for this may be:
① The distribution of feature points is uneven. A large number of feature points may be crowded together in the lower left corner, and the feature points in the upper right corner are indeed scattered.
② The displayed object is too far from the center of the recognition map. If the object can be located at the position where the feature points of the recognition map are evenly distributed and close to the recognition map, the jitter can be well solved.
III Common knowledge points of AR project development
1. Scan and identify the appearance model of the diagram
(1) Method 1
The first method is the default method of Vuforia. If there are no special requirements for the generation model, this method is sufficient.
The steps are as follows:
① : import the identification diagram data set we downloaded in the previous step into the Unity project with the environment configured in the first step.
② : right click VuforiaEngine - Image in the Hierarchy layer to create an ImageTarget.
3. Place the model that needs to be placed in the ImageTarget created in the second place as its sub object, then adjust it to a position and angle that you think is appropriate.
PS: don't hide the model, just keep it displayed. If you do this, you can conduct packaging test.
Scan the identification diagram and the model appears, which means that the AR development environment is successfully built and can be developed in the next step.
(2) Method 2
The second method is to replace the model generation method with the one you want in the default method.
The specific steps are as follows:
① : Click ImageTarget on the hierarchy panel, find the Default Trackable Event Handler script on it, then copy one, rename it, and replace the renamed Default Trackable Event Handler with the default mounted one.
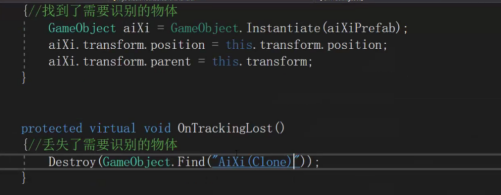
② : double click to open the script we copied and renamed, and then find the OnTrackingFound and OnTrackingLost methods in the script.
OnTrackingFound: when the identification image is found, the methods in this method will be executed.
OnTrackingLost: when the recognition picture is lost, the method in this method will be executed.
③ : replace the default generation method of the two methods with the one we want,
As shown in the figure below:
2. Model interaction
(1) The finger slides on the screen to follow and rotate the model
Just mount the script shown below on the model that needs to implement this function.
using System.Collections;
using System.Collections.Generic;
using UnityEngine;

public class M_Rotate : MonoBehaviour
{
    //speed
    float xSpeed = 150f;

    // Use this for initialization
    void Start()
    {

    }

    // Update is called once per frame
    void Update()
    {

        //If you touch the screen
        if (Input.GetMouseButton(0))
        {
            //How many fingers to touch
            if (Input.touchCount == 1)
            {
                //First touch the finger phase state Moved sliding
                if (Input.GetTouch(0).phase == TouchPhase.Moved)
                {
                    //According to the model you rotate, which axis does the object rotate vector3 Up is the rotation around Y
                    transform.Rotate(Vector3.up * Input.GetAxis("Mouse X") * xSpeed * Time.deltaTime);
                    transform.Rotate(Vector3.right * Input.GetAxis("Mouse Y") * xSpeed * Time.deltaTime);
                }
            }
        }
    }
}
(2) Two fingers zoom on the screen to control the zoom of the model
Just mount the script shown below on the model that needs to implement this function.
using System.Collections;
using System.Collections.Generic;
using UnityEngine;

public class M_Scale : MonoBehaviour
{
    Vector2 oldPos1;
    Vector2 oldPos2;


    private void OnEnable()
    {

    }
    // Use this for initialization
    void Start()
    {

    }

    // Update is called once per frame
    void Update()
    {
        if (Input.touchCount == 2)
        {
            if (Input.GetTouch(0).phase == TouchPhase.Moved || Input.GetTouch(1).phase == TouchPhase.Moved)
            {
                Vector2 temPos1 = Input.GetTouch(0).position;
                Vector2 temPos2 = Input.GetTouch(1).position;

                if (isEnLarge(oldPos1, oldPos2, temPos1, temPos2))
                {
                    float oldScale = transform.localScale.x;
                    //If you want to modify the column of magnification, for example, oldScale * 1.025f to oldScale * 1.25f, modify it according to your own needs
                    float newScale = oldScale * 1.025f;

                    transform.localScale = new Vector3(newScale, newScale, newScale);
                }
                else
                {
                    float oldScale = transform.localScale.x;
                    //If you want to modify the reduced multiple column, such as oldScale / 1.025f to oldScale / 1.25f, modify it according to your own needs
                    float newScale = oldScale / 1.025f;

                    transform.localScale = new Vector3(newScale, newScale, newScale);
                }

                oldPos1 = temPos1;
                oldPos2 = temPos2;

            }
        }
    }

    bool isEnLarge(Vector2 oP1, Vector2 oP2, Vector2 nP1, Vector2 nP2)
    {

        float length1 = Mathf.Sqrt((oP1.x - oP2.x) * (oP1.x - oP2.x) + (oP1.y - oP2.y) * (oP1.y - oP2.y));
        float length2 = Mathf.Sqrt((nP1.x - nP2.x) * (nP1.x - nP2.x) + (nP1.y - nP2.y) * (nP1.y - nP2.y));

        if (length1 < length2)
        {
            return true;
        }
        else
        {
            return false;
        }

    }
}
(3) Click interaction of model
Mount the script shown below to the object that needs to detect click interaction, and the object can detect click interaction and realize corresponding functions. (it should be noted that the object needs to mount the impactor component to detect single double click)
using System.Collections;
using System.Collections.Generic;
using UnityEngine;

public class M_SingleClick : MonoBehaviour
{      // Start is called before the first frame update
    void Start()
    {
    }

    // Update is called once per frame
    void Update()
    {
        if (Input.GetMouseButtonDown(0))
        {
            Ray ray = Camera.main.ScreenPointToRay(Input.mousePosition);
            RaycastHit hitInfo;
            if (Physics.Raycast(ray,out hitInfo))
            {
                if (Input.touchCount==1&&Input.GetTouch(0).phase==TouchPhase.Began)
                {
                   //TODO what to do after clicking
                }
            }
        }
    }
}
(4) Double click interaction of model
using System.Collections;
using System.Collections.Generic;
using UnityEngine;

public class M_SingleClick : MonoBehaviour
{      // Start is called before the first frame update
    void Start()
    {
    }

    // Update is called once per frame
    void Update()
    {
        if (Input.GetMouseButtonDown(0))
        {
            Ray ray = Camera.main.ScreenPointToRay(Input.mousePosition);
            RaycastHit hitInfo;
            if (Physics.Raycast(ray,out hitInfo))
            {
                if (Input.touchCount==1&&Input.GetTouch(0).phase==TouchPhase.Began)
                {
                   if(Input.GetTouch(0).tapCount==2)//tapCount equals 1 for click and 2 for double click
                   {
                   		//TODO actions to be performed after double clicking
                   }
                }
            }
        }
    }
}
3. Collection of other common functions of AR
(1) Multi Graph Recognition
AR scans multiple recognition maps at the same time, and the corresponding models appear respectively
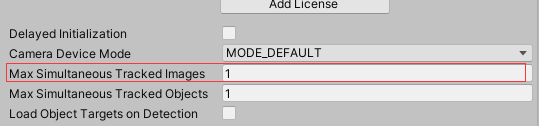
Click ARCamera - > open vuforia engine configuration to open the following interface and modify the Max Simultaneous Tracked Images parameter.
(2) Implementation of virtual button
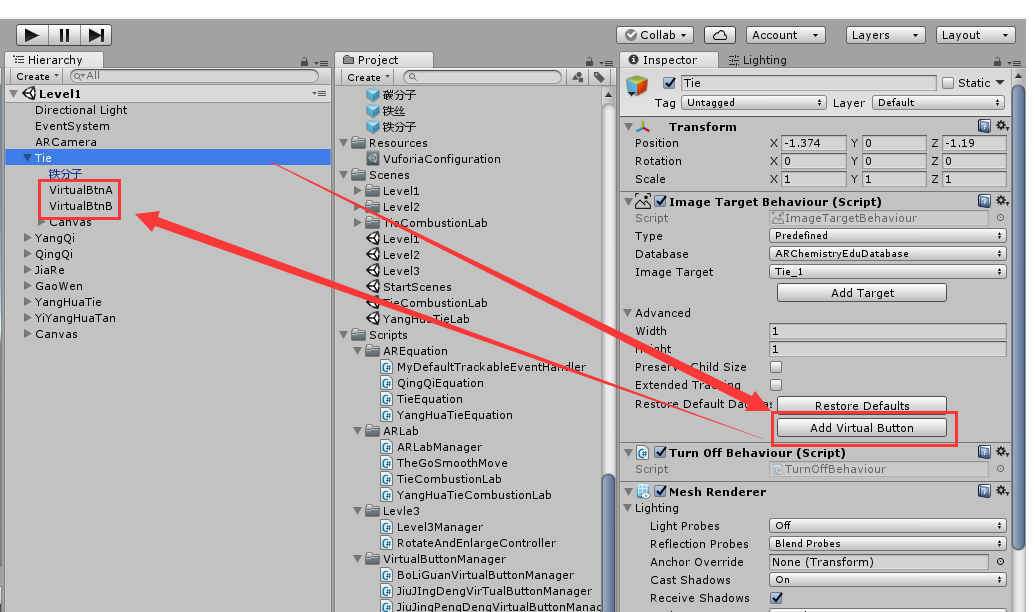
① : create virtual button
The virtual button is different from the button in the ordinary UI. The ordinary button is clicked on the computer screen or mobile phone screen to realize the basic event response; The virtual button is to click within the position range you set on your identification map in the real world to realize the response to basic events.
First, select the identification diagram where you want to create a virtual button, then click add virtual button on the component on the right to add a virtual button, and then a virtual button will be created under the identification diagram. As shown in the figure below:
② : register events for virtual buttons. Mount the following script on ImageTarget, which inherits and implements IVirtualButtonEventHandler interface
using System.Collections;
using System.Collections.Generic;
using UnityEngine;
using Vuforia;
using DG.Tweening;
public class TieVirtualButtonManager : MonoBehaviour, IVirtualButtonEventHandler
{
    [SerializeField]
    VirtualButtonBehaviour[] TieVbs;
    // Use this for initialization
    void Start () {

        TieVbs = this.GetComponentsInChildren<VirtualButtonBehaviour>();
        for (int i = 0; i < TieVbs.Length; i++)
        {
            TieVbs[i].RegisterEventHandler(this);
        }
    }

	// Update is called once per frame
	void Update () {

	}

    public void OnButtonPressed(VirtualButtonBehaviour vb)
    {
        switch (vb.VirtualButtonName)//According to the virtual button name detection, press the corresponding button to execute the corresponding event
        {
            case "TieA":
              //TODO what to do by pressing the virtual button named TieA
                break;
            case "TieB":
               //TODO what to do by pressing the virtual button named TieB
                break;
        }
    }

    public void OnButtonReleased(VirtualButtonBehaviour vb)
    {
        switch (vb.VirtualButtonName)//According to the virtual button name detection, press the corresponding button to execute the corresponding event
        {
            case "TieA":
                //TODO what to do to release the virtual button named TieA
                break;
            case "TieB":
                 //TODO what to do to release the virtual button named TieB
                break;
        }

    }

}
③ : from the above script, we can find that we add the corresponding listening event for the virtual button according to the name of the virtual button. Next, we also set the name corresponding to the script for the corresponding virtual button. This name does not refer to the name on the Unity Hierarchy panel, It refers to the name set on the virtual button behavior script mounted on the virtual button, as shown in the following figure:
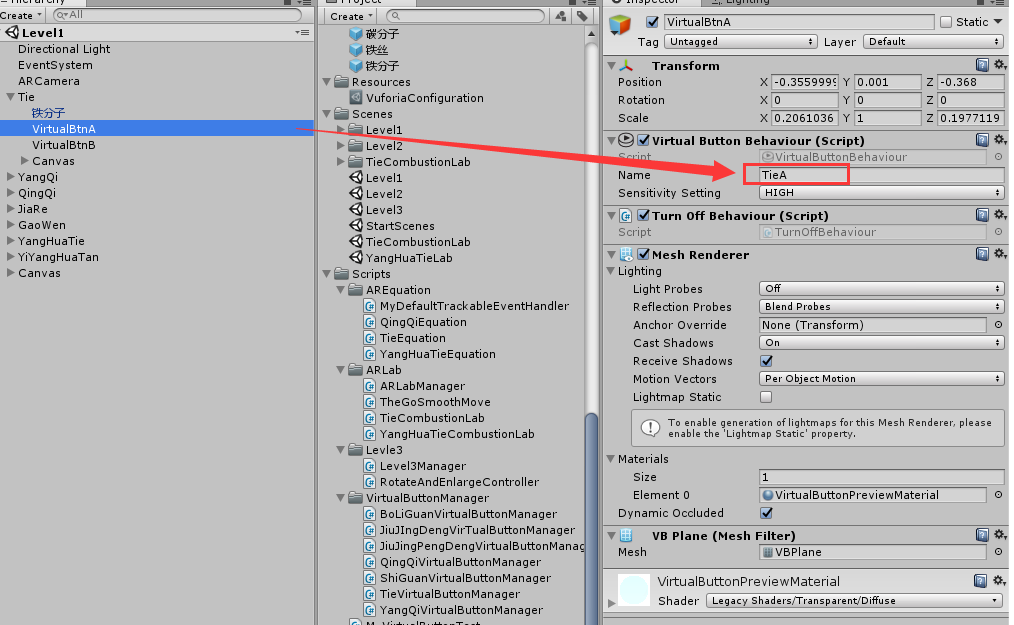
④ : in the figure above, the sensitivity of the virtual button below the virtual button name setting box is generally set to HIGH.
matters needing attention:
a: The rectangle defined by the virtual button area should be greater than or equal to 10% of the whole target area;
b: The virtual button shall be placed above the picture with rich feature information;
c: The virtual button should not be placed on the border of the target;
d: Avoid button accumulation;
(3) Expand the tracking function (card removal) (Ps this part of the function has not been measured yet, and will be updated comprehensively and in detail when necessary in the future)
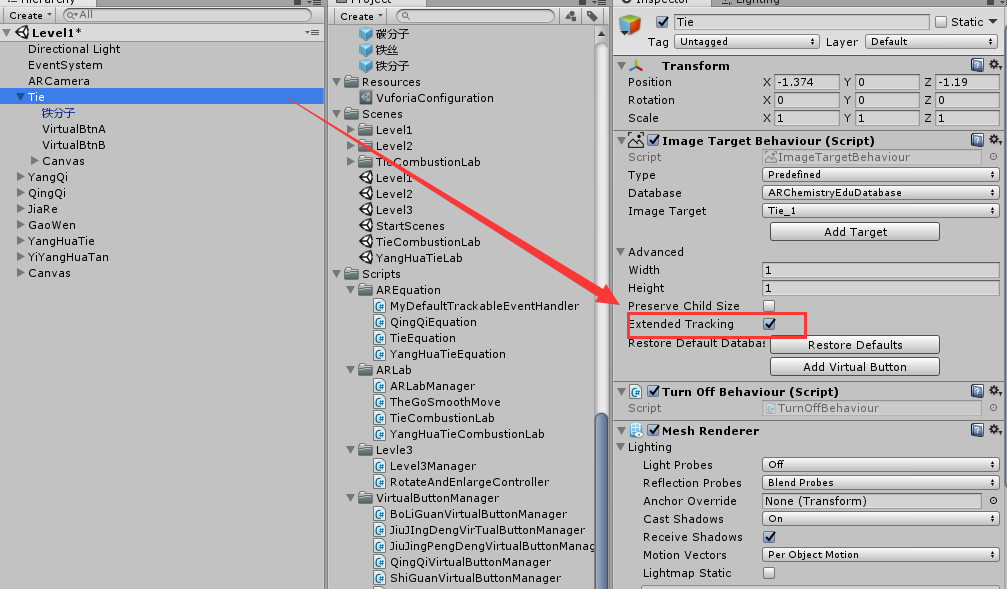
① : as shown in the figure below, check extended tracking to realize the card removal function of the identification diagram (only in static environment)
Dynamic card removal can also be realized through code
public void ToogleExtenedTracking(bool enabled)
    {
        IEnumerable<TrackableBehaviour> tbs = TrackerManager.Instance.GetStateManager().GetTrackableBehaviours();

        foreach (TrackableBehaviour  tb in tbs)
        {
            if (tb is ImageTargetBehaviour)
            {
                ImageTargetBehaviour itb = tb as ImageTargetBehaviour;
                if (enabled)
                {
                    itb.ImageTarget.StartExtendedTracking();
                }
                else
                {
                    itb.ImageTarget.StopExtendedTracking();
                }
            }else if (tb is CylinderTargetBehaviour)
            {

                CylinderTargetBehaviour ctb = tb as CylinderTargetBehaviour;
                if (enabled)
                {
                    ctb.CylinderTarget.StartExtendedTracking();
                }
                else
                {
                    ctb.CylinderTarget.StopExtendedTracking();
                }
            }
        }
    }
② : Custom DefaultTrackableEventHandler script
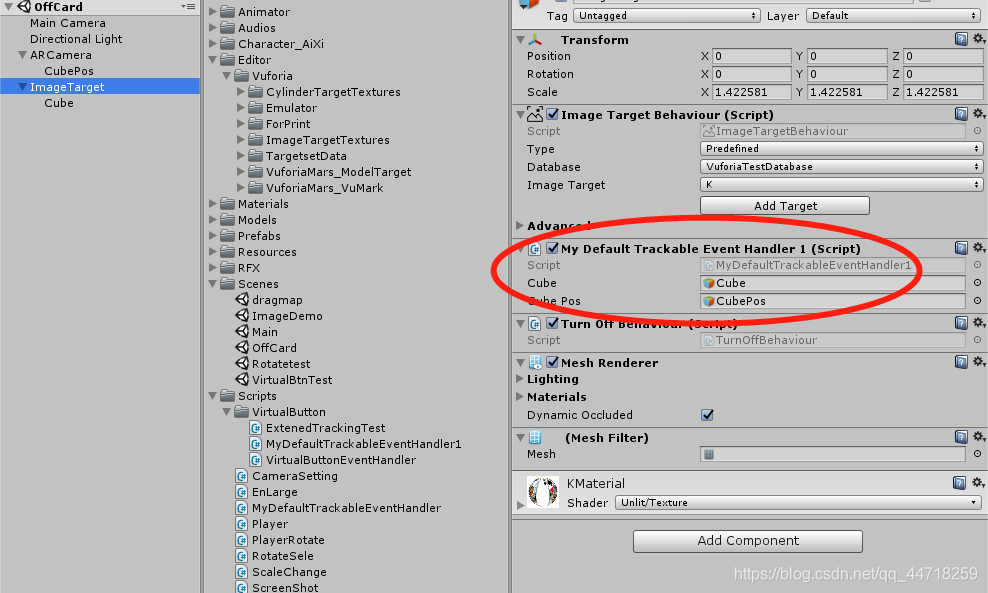
When the tracking target is lost, fix the cube in the middle of the screen
When the target is tracked again, the cube is displayed in the original position
public GameObject cube;
    public GameObject cubePos;

    private Vector3 oldPos;//Record the location and selection of initialization
    private Quaternion oldQua;

    private bool hasFirstLoad = false;
    #region PROTECTED_MEMBER_VARIABLES

    protected TrackableBehaviour mTrackableBehaviour;

    #endregion // PROTECTED_MEMBER_VARIABLES

    #region UNITY_MONOBEHAVIOUR_METHODS

    protected virtual void Start()
    {
        mTrackableBehaviour = GetComponent<TrackableBehaviour>();
        if (mTrackableBehaviour)
            mTrackableBehaviour.RegisterTrackableEventHandler(this);

        oldPos = cube.transform.position;
        oldQua = cube.transform.rotation;
    }

    protected virtual void OnDestroy()
    {
        if (mTrackableBehaviour)
            mTrackableBehaviour.UnregisterTrackableEventHandler(this);
    }

    #endregion // UNITY_MONOBEHAVIOUR_METHODS

    #region PUBLIC_METHODS

    /// <summary>
    ///     Implementation of the ITrackableEventHandler function called when the
    ///     tracking state changes.
    /// </summary>
    public void OnTrackableStateChanged(
        TrackableBehaviour.Status previousStatus,
        TrackableBehaviour.Status newStatus)
    {
        if (newStatus == TrackableBehaviour.Status.DETECTED ||
            newStatus == TrackableBehaviour.Status.TRACKED ||
            newStatus == TrackableBehaviour.Status.EXTENDED_TRACKED)
        {
            Debug.Log("Trackable " + mTrackableBehaviour.TrackableName + " found");
            OnTrackingFound();
        }
        else if (previousStatus == TrackableBehaviour.Status.TRACKED &&
                 newStatus == TrackableBehaviour.Status.NOT_FOUND)
        {
            Debug.Log("Trackable " + mTrackableBehaviour.TrackableName + " lost");
            OnTrackingLost();
        }
        else
        {
            // For combo of previousStatus=UNKNOWN + newStatus=UNKNOWN|NOT_FOUND
            // Vuforia is starting, but tracking has not been lost or found yet
            // Call OnTrackingLost() to hide the augmentations
            OnTrackingLost();
        }
    }

    #endregion // PUBLIC_METHODS

    #region PROTECTED_METHODS

    protected virtual void OnTrackingFound()
    {

        cube.transform.SetParent(this.transform);//When the target is tracked again, the cube is displayed in the initialization position again
        cube.transform.localPosition = oldPos;
        cube.transform.rotation = oldQua;

        hasFirstLoad = true;
    }


    protected virtual void OnTrackingLost()//Execute when trace is lost
    {
        if (hasFirstLoad)
        {
            //When the tracking is lost, fix the cube in a fixed position on the screen
            cube.transform.SetParent(cubePos.transform);
            cube.transform.localPosition = Vector3.zero;
            cube.transform.localRotation = cube.transform.rotation;
        }
    }