1. Introduction
Using arduino development board, the number generated randomly is displayed on the nixie tube.
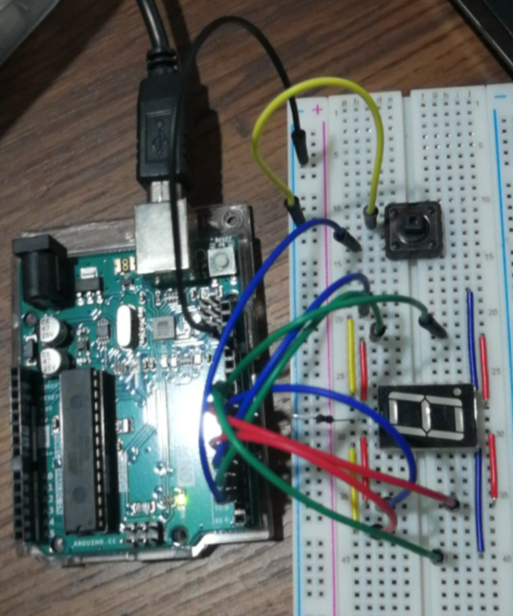
2. Circuit construction
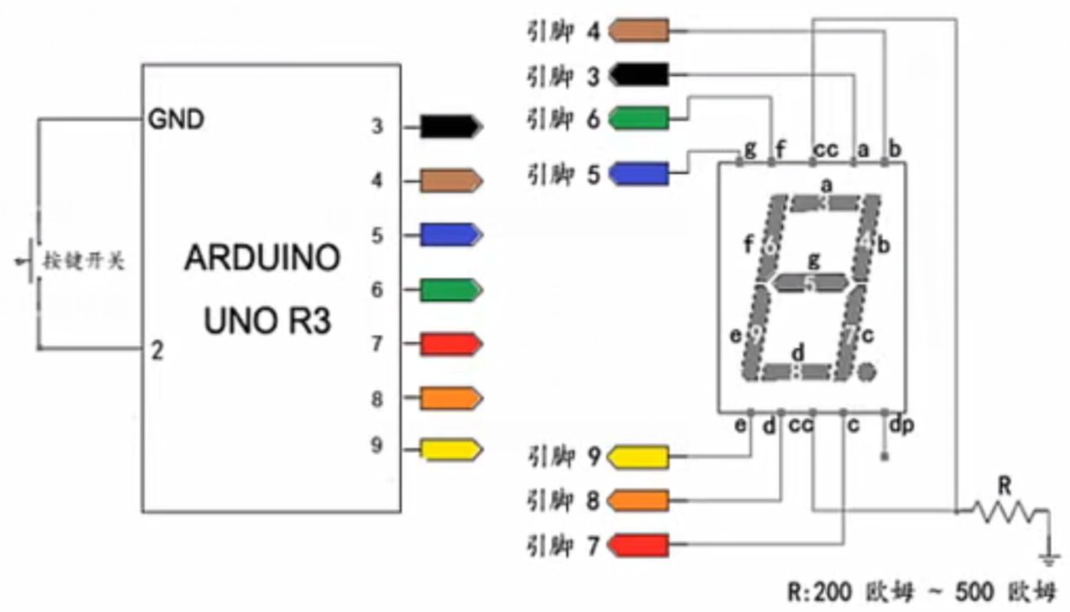
Physical construction:
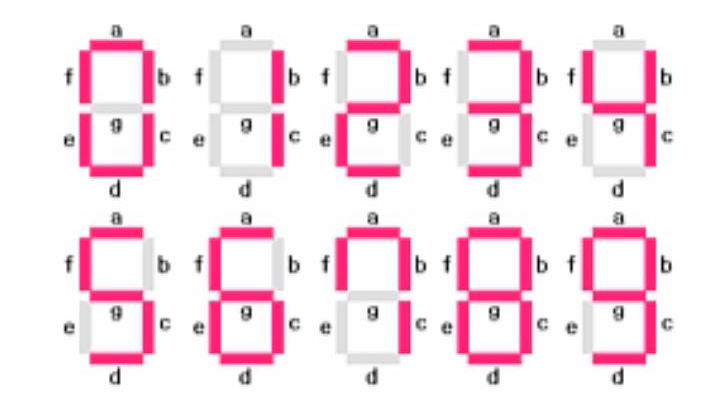
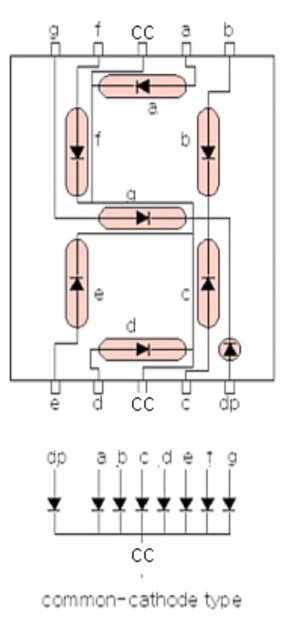
3. Nixie tube
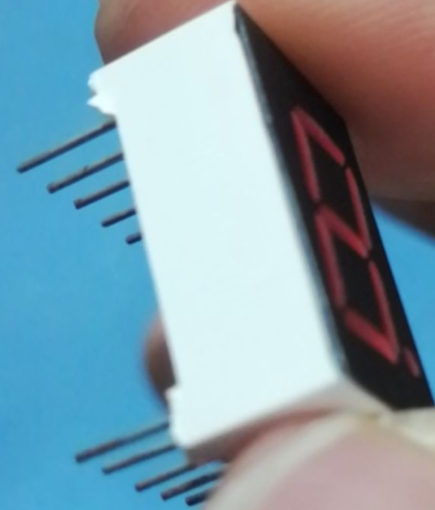
Precise name: one digit eight Segment LED code tube (common cathode)
/*
19 MC Guess number - 1 circuit construction
 Taiji maker
www.taichi-maker.com

This program is used in the Arduino tutorial for zero basic introduction by Taiji makers
MC Guess the use of digital circuit test.

2017-04-21
*/
void setup() {
  pinMode(2, INPUT_PULLUP);
  for (int i = 2; i <= 9; i++) {
    pinMode(i, OUTPUT);
  }

}

// the loop function runs over and over again forever
void loop() {
  int myNumber = 0;
  while(myNumber <= 9){
    displayNumber(myNumber);
    delay(500);
    displayClear();
    myNumber++;
    while(!digitalRead(2)){
      digitalWrite(5, HIGH);
      digitalWrite(6, HIGH);
      digitalWrite(7, HIGH);
      digitalWrite(8, HIGH);
      digitalWrite(9, HIGH);
    }
    delay(500);
  }
}
void displayClear(){
  // Clean up display
  digitalWrite(3, LOW);
  digitalWrite(4, LOW);
  digitalWrite(5, LOW);
  digitalWrite(6, LOW);
  digitalWrite(7, LOW);
  digitalWrite(8, LOW);
  digitalWrite(9, LOW);
}

void displayNumber(int number){
  switch(number){
    case 1:
      digitalWrite(4, HIGH);
      digitalWrite(7, HIGH);
      break;
    case 2:
      digitalWrite(3, HIGH);
      digitalWrite(4, HIGH);
      digitalWrite(5, HIGH);
      digitalWrite(8, HIGH);
      digitalWrite(9, HIGH);
      break;
    case 3:
      digitalWrite(3, HIGH);
      digitalWrite(4, HIGH);
      digitalWrite(5, HIGH);
      digitalWrite(7, HIGH);
      digitalWrite(8, HIGH);
      break;
    case 4:
      digitalWrite(4, HIGH);
      digitalWrite(5, HIGH);
      digitalWrite(6, HIGH);
      digitalWrite(7, HIGH);
      break;
    case 5:
      digitalWrite(3, HIGH);
      digitalWrite(5, HIGH);
      digitalWrite(6, HIGH);
      digitalWrite(7, HIGH);
      digitalWrite(8, HIGH);
      break;
    case 6:
      digitalWrite(3, HIGH);
      digitalWrite(5, HIGH);
      digitalWrite(6, HIGH);
      digitalWrite(7, HIGH);
      digitalWrite(8, HIGH);
      digitalWrite(9, HIGH);
      break;
    case 7:
      digitalWrite(3, HIGH);
      digitalWrite(4, HIGH);
      digitalWrite(7, HIGH);
      break;
    case 8:
      digitalWrite(3, HIGH);
      digitalWrite(4, HIGH);
      digitalWrite(5, HIGH);
      digitalWrite(6, HIGH);
      digitalWrite(7, HIGH);
      digitalWrite(8, HIGH);
      digitalWrite(9, HIGH);
      break;
    case 9:
      digitalWrite(3, HIGH);
      digitalWrite(4, HIGH);
      digitalWrite(5, HIGH);
      digitalWrite(6, HIGH);
      digitalWrite(7, HIGH);
      digitalWrite(8, HIGH);
      break;
    case 0:
      digitalWrite(3, HIGH);
      digitalWrite(4, HIGH);
      digitalWrite(6, HIGH);
      digitalWrite(7, HIGH);
      digitalWrite(8, HIGH);
      digitalWrite(9, HIGH);
      break;
    default:
      digitalWrite(5, HIGH);
    }
}
void setup() {
  pinMode(3, OUTPUT);
  pinMode(4, OUTPUT);
  pinMode(5, OUTPUT);
  pinMode(6, OUTPUT);
  pinMode(7, OUTPUT);
  pinMode(8, OUTPUT);
  pinMode(9, OUTPUT);

}

// the loop function runs over and over again forever
void loop() {

   // Display 1:
    digitalWrite(4, HIGH);
    digitalWrite(7, HIGH);
    delay(500);

  // Clean up display
    digitalWrite(3, LOW);
    digitalWrite(4, LOW);
    digitalWrite(5, LOW);
    digitalWrite(6, LOW);
    digitalWrite(7, LOW);
    digitalWrite(8, LOW);
    digitalWrite(9, LOW);
    delay(500);

  // Display 2:
    digitalWrite(3, HIGH);
    digitalWrite(4, HIGH);
    digitalWrite(5, HIGH);
    digitalWrite(8, HIGH);
    digitalWrite(9, HIGH);
    delay(500);

  // Clean up display
    digitalWrite(3, LOW);
    digitalWrite(4, LOW);
    digitalWrite(5, LOW);
    digitalWrite(6, LOW);
    digitalWrite(7, LOW);
    digitalWrite(8, LOW);
    digitalWrite(9, LOW);
    delay(500);

  // Display 3:
    digitalWrite(3, HIGH);
    digitalWrite(4, HIGH);
    digitalWrite(5, HIGH);
    digitalWrite(7, HIGH);
    digitalWrite(8, HIGH);
    delay(500);

  // Clean up display
    digitalWrite(3, LOW);
    digitalWrite(4, LOW);
    digitalWrite(5, LOW);
    digitalWrite(6, LOW);
    digitalWrite(7, LOW);
    digitalWrite(8, LOW);
    digitalWrite(9, LOW);
    delay(500);
}
4.While loop
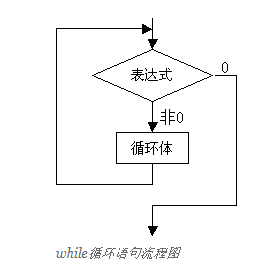
The while loop will loop continuously and indefinitely until the expression in parentheses () becomes false. The expression variable being tested must be changed, otherwise the while loop will never stop. You can change the test variable in the code, such as increasing the variable, or changing the test variable through external conditions, such as assigning the reading of a sensor to the test variable.
The while statement means to calculate the value of the expression first. When the value is true (not 0), execute the loop body statement; After executing the loop body statement, calculate the value of the expression again. If it is true, continue to execute the loop body... This process will be repeated until the value of the expression is false (0). The execution process is shown in the following figure:
int pinNumber = 3;
while(pinNumber<=9)
{
pinMode(pinNumber,OUTPUT);
pinNumber = pinNumber + 1;
}

//This is equivalent to the following code
/*
pinMode(3,OUTPUT);
pinMode(4,OUTPUT);
pinMode(5,OUTPUT);
pinMode(6,OUTPUT);
pinMode(7,OUTPUT);
pinMode(8,OUTPUT);
pinMode(9,OUTPUT);
*/
6. if...else
http://www.taichi-maker.com/homepage/reference-index/arduino-code-reference/if-else/
Through the if... else statement, the user can let Arduino judge whether a certain condition is met, and execute the corresponding program according to the judgment result.
| 1 2 3 4 5 6 | If (expression 1){ Statement block 1 } else { Statement block 2 }
|
The above structure indicates that "statement block 1" is executed if the conditions of "expression 1" are met. Otherwise, Arduino will execute "statement block 2". (as shown in the figure below)
5. switch case statement
Like if Statement, switch... Case allows Arduino to run different program code according to different conditions. The switch statement compares the value of a variable with the value specified in the case statement. When the specified value in a case statement matches the variable in the switch statement. The code under the case statement will be run.
adopt break Keyword, Arduino can abort and jump out of the switch statement segment, break Keywords are often used at the end of each case statement. without break Statement, the switch statement will continue to execute the following expression ("continuous descent") until it encounters break , or reach the end of the switch statement.
Although the Arduino programming language has no restrictions if else The number of branches that can be processed, but when there are too many branches, use if else It will be inconvenient and easy to appear if else Pairing error.
switch (var) {
    case 1:
        //Execute the program here when var is equal to 1
        break;
    case 2:
        //Execute the program here when var is equal to 2
        break;
    default:
        // If the value of var does not match the value in the above case
        // Then execute the procedure here
        break;
}
Points needing attention:
1) In the above structure example code, when the variable var matches the value after a case successfully, if not break , Arduino will execute the statements of this branch and all subsequent branches.
2) case must be followed by an integer or an expression with an integer result, but cannot contain any variables.
3) Cannot be used after case character string , but you can use character , use character You need to enclose the characters in single quotation marks, such as case: 'b'.
4) Default is not required. When there is no "default", if all "case s" fail to match, nothing will be executed.
6. User defined functions
Define function:
void displayClear(){
  // Clean up display
  digitalWrite(3, LOW);
  digitalWrite(4, LOW);
  digitalWrite(5, LOW);
  digitalWrite(6, LOW);
  digitalWrite(7, LOW);
  digitalWrite(8, LOW);
  digitalWrite(9, LOW);
}
Call:
void loop() {
  int myNumber = 0;
  while(myNumber <= 9){
    displayNumber(myNumber);
    delay(500);


    displayClear();


    myNumber++;
    while(!digitalRead(2)){
      digitalWrite(5, HIGH);
      digitalWrite(6, HIGH);
      digitalWrite(7, HIGH);
      digitalWrite(8, HIGH);
      digitalWrite(9, HIGH);
    }
    delay(500);
  }
}
7. Completion of production
randomSeed()
The randomSeed() function can be used to generate random seeds. The random number generated by using the random() function alone will always repeat the same set of random numbers after each program restart. If you want the random number generated after the program restarts to be different from the random number of the last time the program ran, you need to use the randomSeed() function.
In practical application, an empty pin can be read as a random seed value by calling the analysisread() function. The specific operation will be described in the following example programs on this page.
grammar
randomSeed(seedVal)
parameter
seedVal: random seed value
example
randomSeed(analogRead(A0));
//Read an analog value at A0 end
/*
 * MC Guess numbers (Ver. 1.0)
 *
 * This program is used in the Arduino tutorial for zero basic introduction made by Taiji maker
 * MC Guess the number. By learning and building this small device, we hope you can
 * Learn the following:
 *
 *  - LED Principle and application of nixie tube
 *  - if...else if Concept and application of
 *  - while Concept and application of cycle
 *  - switch case Control statement
 *  - random Use of functions
 *  - Create and use custom functions (three forms: no parameter, no return value, no return value with parameters, and return value with parameters)
 *  - Observe the running status of the debugging program through the serial port monitor
 *
 *  Circuit connection:
 *  For the detailed circuit connection information of this production, please refer to the relevant webpage of Arduino tutorial for zero foundation introduction on Taiji maker's website.
 *
 *
 *  Taiji maker website address:
 *  www.taichi-maker.com
 *
 *  If you have any suggestions or comments on us, please email:
 *  taichimaker@163.com
 *
 *  You can also get more information about our Tai Chi Chuang customers through our WeChat official account and micro-blog.
 *
 *  This example code is in the public domain.
 *
 *  2017-04-23
 *
 *  Note:
 *  At present, science and technology can not realize mind control.
 *  Technology can change the world, but there are also people with evil intentions who will use technology to make
 *  An imperceptible device. These devices can be used for gambling or fraud.
 *  We must stay away from gambling and believe in science
*/


int thisResult;  //The number displayed on the nixie tube after the storage key is pressed.
int nextResult;  //Store the cheating number, that is, the number to be displayed after the next key is pressed.

void setup() {
  pinMode(2, INPUT_PULLUP); //A key switch is connected to pin 2. Set pin 2 to the input pull-up mode
  int pinNumber = 3;        //Set pins 3-9 to output mode
  while(pinNumber <= 9){
    pinMode(pinNumber, OUTPUT);
    pinNumber = pinNumber + 1;
  }
  randomSeed(analogRead(A0)); //In order to generate random numbers in different order after each reset or power failure
}

// the loop function runs over and over again forever
void loop() {
  if (!digitalRead(2)){      //Read the level status of pin 2
    getRandomNumber(0,10);   //After the user presses the key, he starts a new number guessing game
  }
  displayNumber(thisResult); //Display the "result" of the number guessing game in the nixie tube
}

/*
Each time the user presses a key, the randomly generated number is stored in the nextResult variable.
The number actually displayed on the nixie tube is the thisResult variable.
When thisResult is about to be displayed in front of the nixie tube, the program will pass the next displayed number
 The form of graphic hint is displayed on the nixie tube. How the specific program displays the hint graphics,
See the description of the displayCheat() function.
*/
void getRandomNumber(int minNumber, int maxNumber){
  thisResult = nextResult;
  int i;
  while(i < 15){
    i = i + 1;
    nextResult = random(0, 10);
    displayRandom();         //Display random patterns to confuse attention
    delay(50 + i * 10);      //Let the random pattern display time from fast to slow, increasing confusion
    displayClear();
  }
  displayCheat(nextResult);  //Display cheating pattern. Users can use this function to display the pattern
                             //Know the number that will appear on the LED nixie tube after the next key press.
                             //This pattern displays a new number each time the user presses the key
                             //Last pattern display before
  delay(500);
  displayClear();
}

//Display the number on the LED nixie tube according to the parameter value
void displayNumber(int ledNumber){
  switch(ledNumber){
    case 1:  //Display 1
      digitalWrite(4, HIGH);
      digitalWrite(7, HIGH);
      break;
    case 2:  //Display 2
      digitalWrite(3, HIGH);
      digitalWrite(4, HIGH);
      digitalWrite(5, HIGH);
      digitalWrite(8, HIGH);
      digitalWrite(9, HIGH);
      break;
    case 3:   //Display 3
      digitalWrite(3, HIGH);
      digitalWrite(4, HIGH);
      digitalWrite(5, HIGH);
      digitalWrite(7, HIGH);
      digitalWrite(8, HIGH);
      break;
    case 4:  //Display 4
      digitalWrite(4, HIGH);
      digitalWrite(5, HIGH);
      digitalWrite(6, HIGH);
      digitalWrite(7, HIGH);
      break;
    case 5:  //Display 5
      digitalWrite(3, HIGH);
      digitalWrite(5, HIGH);
      digitalWrite(6, HIGH);
      digitalWrite(7, HIGH);
      digitalWrite(8, HIGH);
      break;
    case 6:  //Display 6
      digitalWrite(3, HIGH);
      digitalWrite(5, HIGH);
      digitalWrite(6, HIGH);
      digitalWrite(7, HIGH);
      digitalWrite(8, HIGH);
      digitalWrite(9, HIGH);
      break;
    case 7:  //Display 7
      digitalWrite(3, HIGH);
      digitalWrite(4, HIGH);
      digitalWrite(7, HIGH);
      break;
    case 8:  //Display 8
      digitalWrite(3, HIGH);
      digitalWrite(4, HIGH);
      digitalWrite(5, HIGH);
      digitalWrite(6, HIGH);
      digitalWrite(7, HIGH);
      digitalWrite(8, HIGH);
      digitalWrite(9, HIGH);
      break;
    case 9:  //Display 9
      digitalWrite(3, HIGH);
      digitalWrite(4, HIGH);
      digitalWrite(5, HIGH);
      digitalWrite(6, HIGH);
      digitalWrite(7, HIGH);
      digitalWrite(8, HIGH);
      break;
    case 0:  //Show default
      digitalWrite(3, HIGH);
      digitalWrite(4, HIGH);
      digitalWrite(6, HIGH);
      digitalWrite(7, HIGH);
      digitalWrite(8, HIGH);
      digitalWrite(9, HIGH);
      break;
    default:
        digitalWrite(4, HIGH);
        digitalWrite(5, HIGH);
        digitalWrite(7, HIGH);
        digitalWrite(8, HIGH);
        digitalWrite(9, HIGH);
    }
}

//Clean up display
void displayClear(){
  digitalWrite(3, LOW);
  digitalWrite(4, LOW);
  digitalWrite(5, LOW);
  digitalWrite(6, LOW);
  digitalWrite(7, LOW);
  digitalWrite(8, LOW);
  digitalWrite(9, LOW);
}

//Display random patterns to confuse attention
//Make it difficult to detect when the cheating pattern is displayed.
void displayRandom(){
  int randomPin = random(3,9);
  digitalWrite(randomPin, HIGH);
}

//Display cheating pattern.
void displayCheat(int number){
  switch(number){
    case 1:  // Display number 1 cheating pattern
      digitalWrite(3, HIGH);
      break;
    case 2:  // Display number 2 cheating pattern
      digitalWrite(6, HIGH);
      break;
    case 3:  // Display number 3 cheating pattern
      digitalWrite(4, HIGH); ;
      break;
    case 4:  // Display number 4 cheating pattern
      digitalWrite(5, HIGH);
      break;
    case 5:  // Display number 5 cheating pattern
      digitalWrite(9, HIGH);
      break;
    case 6:  // Display number 6 cheating pattern
      digitalWrite(7, HIGH);
      break;
    case 7: // Display number 7 cheating pattern
      digitalWrite(8, HIGH);
      break;
    case 8: // Display number 8 cheating pattern
      digitalWrite(6, HIGH);
      digitalWrite(4, HIGH);
      break;
    case 9: // Display number 9 cheating pattern
      digitalWrite(9, HIGH);
      digitalWrite(7, HIGH);
      break;
    case 0: // Display the number 0 cheating pattern
      digitalWrite(3, HIGH);
      digitalWrite(8, HIGH);
      break;
    }
}