Catalog
1. Serial communication
2.IIC
The fifth function of single-chip computer - serial communication, which can establish a direct connection between your computer and single-chip computer, can also be the connection of other modules, such as Bluetooth, WIFI, etc. Interface is a serial port, the other part of the module, interface IIC or SPI, such as gyroscope is generally IIC, OLED display, interface is also IIC
Physically, serial communication requires three lines TX RX GND, TX is sending, RX is accepting GND is grounding, see the schematic diagram
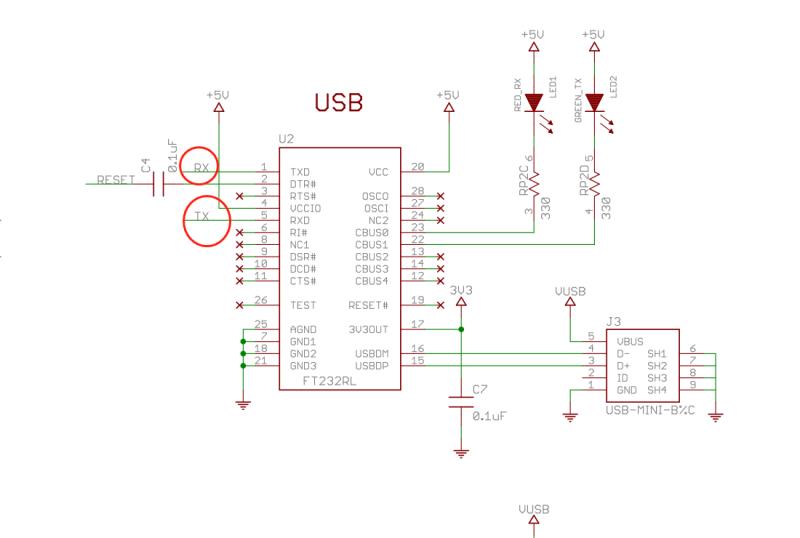
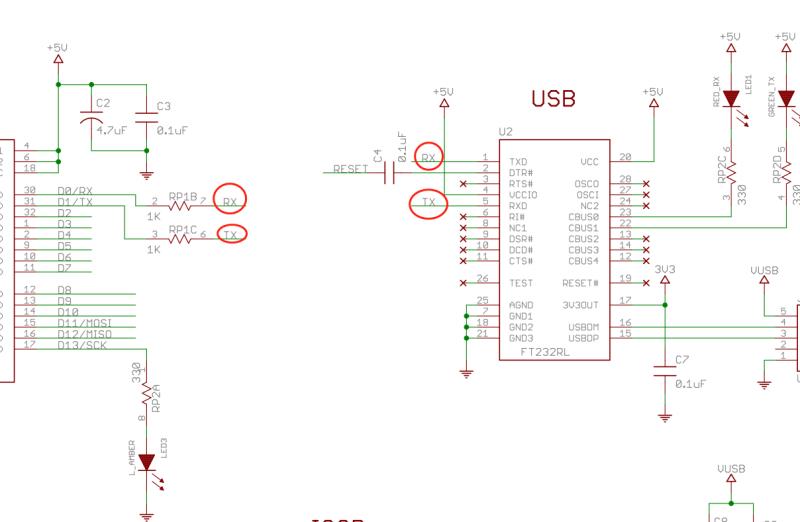
We see that RX RT converts the serial port into a USB port through a USB chip, so plugging into our USB cable is a serial port and power supply function (note whether the data or power cable is used, the power cord can not appear COM port). Our computer will have a virtual COM port.
Serial port has two functions, the first is to send data, the second is to receive data from outside, and the data sent is a series of 16-digit arrays, such as 5577 03 05 9A B4 ff ff, which means, we have a scientific name, called protocol, also known as communication protocol , The so-called communication protocol is the meaning of the numeric value agreed upon by the two parties, that is, to send this series of data, the meaning represented by each hexadecimal number, generally when we make the agreement, for example, 5577 represents the beginning, 03 05 78 9A B4, these five data represent five parameters, of course, Specific parameters are determined according to specific needs, and the last two ff's indicate the end. If we have agreed on such an agreement, then what I send and what you receive, you will also know what each field represents. If I do not know the agreement between the two parties, it will be difficult for me to get involved in your communications. For example, I want to repair a device that communicates through serial ports.
So I can listen to what they're communicating and write out the 16-digit numbers they're communicating, but I don't know what they're saying. Only the device manufacturer knows about this, which we call a private agreement.
Some of the agreements are public. In order to make it easier for each manufacturer to connect their devices, as long as everyone follows the same agreement, our devices can communicate with each other, so products of large companies generally follow a standard agreement.
So when it comes to serial communication, we also need to talk about a concept: the baud rate of communication, so-called baud rate, is the number of bits that send data in one second. Communication is between two devices, so their frequencies must be consistent. Usually we use a baud rate of 9600. The lower the baud rate, the slower the data will be sent. The higher the baud rate, the faster the data will be sent, which may cause problems.
int incomedate = 0;
void setup() {

  Serial.begin(9600); //Set serial baud rate 9600
}
void loop() {

  if (Serial.available() > 0)//Serial port receives data
  {
    incomedate = Serial.read();//Get data received by serial port
    if (incomedate == 'a') // Determine the characters we receive
    {
      Serial.println("ko no dio da!");What you see printed in the serial monitor
    }
  }

  delay(1000);//Cycle Delay One Second Printing

}
Let's take a look at these functions
.Serial.begin(speed) defines our baud rate
`int Serial.available() determines the buffer state and returns the number of bytes received
`int Serial.read() reads the serial port and returns the received data (that is, what we want us to set, assign it to him)
`Serial.flush() Empty buffer
`Serial.print(data) Serial output data, data can be any data type
`Serial.println(data) Serial output data with carriage return (empty line)
Let's comb the whole process again. SCM does nothing at the beginning, just wait there. When my computer sends a data to the SCM, the SCM receives and judges this data. If I want the data, I will choose branch to do something. What we're doing here is feeding back a string and if not, we can let him do something else, and with this feature we can light our remote lights
For example, we add a light to our judgment so that when we receive the data we want, we can light it up
Next is our IIC communication
Code from Huanghao Audio
//I2C Host
#include <Wire.h>
#define LED 13

//Initialization
void setup()
{
  Wire.begin(); //Host
  pinMode(LED,OUTPUT);
  Serial.begin(115200);
}
//main program
void loop()
{
  Wire.beginTransmission(4); //Slave for sending data to device number 4
  Wire.write("OFF");        // Send String
  Wire.endTransmission();    // Stop Sending
  request();               //Reply status
  delay(1000);

  Wire.beginTransmission(4);
  Wire.write("ON");
  Wire.endTransmission();
  request();
  delay(1000);


}
void request()
{
    delay(10);
    Wire.requestFrom(4, 2);    //Notification No. 4 uploads 2 bytes from the computer
  String c;
  while(Wire.available()>0)    // When host receives slave data
  {
   c += char(Wire.read());
  }
    Serial.print(c);
    if(c=="OK"){digitalWrite(LED,HIGH);}
    else {digitalWrite(LED,LOW);}
}
//I2C slave
#include <Wire.h>
#define LED 13
bool LED_STA;//Record LED status
//Initialization
void setup()
{
Wire.begin(4); // Join the i2c bus and set the slave address to #4
Wire.onReceive(receiveEvent); //Register events that receive host characters
Wire.onRequest(requestEvent); // Register Host Notifies Events for Uploading Data from Machine
pinMode(LED,OUTPUT);//Set Digital Port 13 as Output
Serial.begin(115200); //Set Serial Port Baud Rate
}
//main program
void loop()
{
delay(100);//delayed
}
// Execute this event when a host character is received from the machine
void receiveEvent(int a)
{
String c;
while( Wire.available()>0) //
{
c += char(Wire.read()); // Receive bytes as characters
}
Serial.print(c); // Print characters to serial monitor
if(c=="ON"){LED_STA = 1; digitalWrite(LED,HIGH);}//Record LED status
if(c=="OFF"){LED_STA = 0;digitalWrite(LED,LOW);}
}
//Execute this event when the host notifies to upload data from the machine
void requestEvent()
{
if(LED_STA == 1){Wire.write("OK"); }//Reply OK if the light is already on
else {Wire.write("NO");}
}
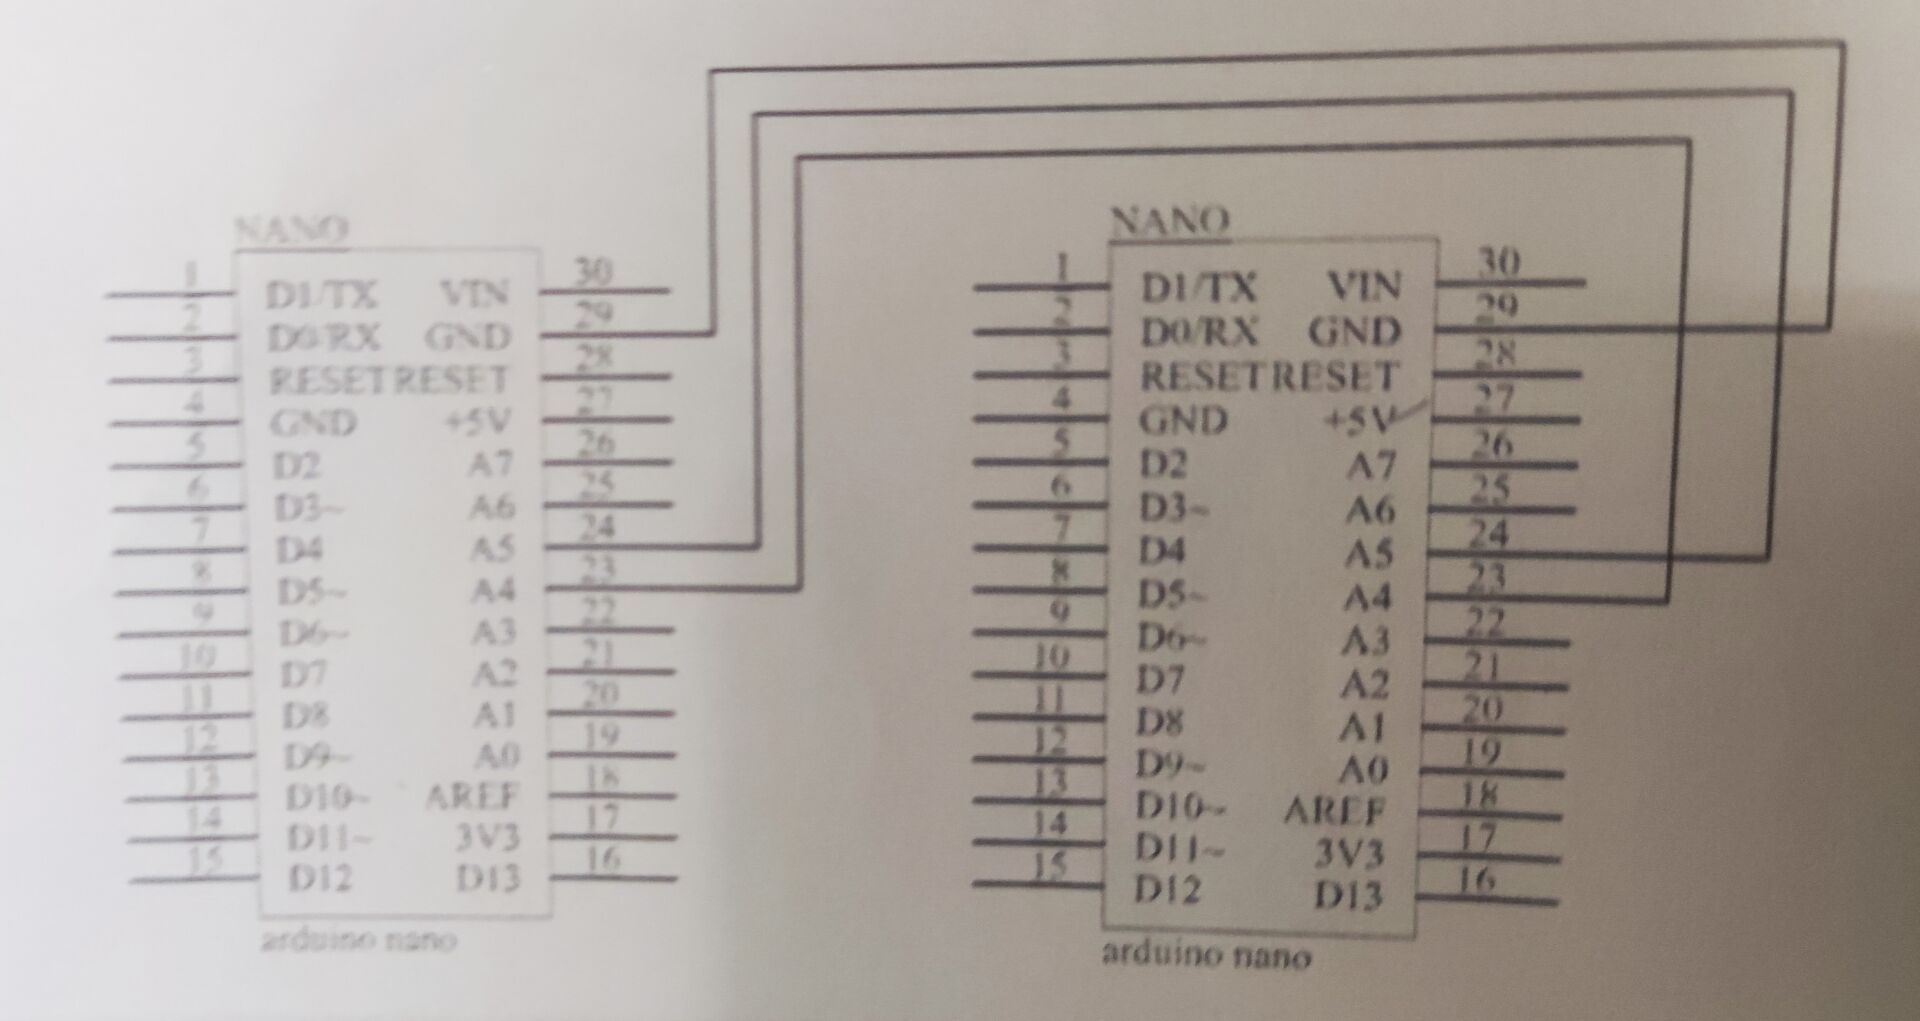
And this is our wiring diagram. Now we just need to connect our led lights to the D13 pins on both the host and slave.
Because it's a circular operation, there's nothing we need to do, and the computer does it itself (slightly modify the code, replace it with Serial.prinln, so we can see what's printed out more clearly, and pay attention to our baud rate!!!!)
The host sends out the string "ON" from the lamp; Send out "OFF" to turn off the lamp.
Record led status from machine, if it is really bright, reply to host "OK", if it is not bright, reply to "NO"
Host receives reply as "OK", then host light is on, otherwise light is off
Next we introduce our functions
begin() Host usage, initialize Wire.h Library
`begin(adress) From machine, set local address
`requestFrom(adress,count) Ask the slave for count of its own data after starting the IIC bus
`beginTransmission() initiates IIC communication from the slave machine for the address address
`write() the form in which data is sent
Wire.write(value) sends numeric values
Pointer to Wire.write(string) character group
Wire.write(data,length) data: an array of bytes, length: number of transfers
`byte available() returns the number of bytes received
`byte read() receives data
`onReceive(handler) is used from the machine to register a function that handles accepting data
`onRequest(handler) is used from the machine to register a function that handles the request host