Introduction:
Review of the previous part:
In ARKit( Light and Animation Processing To use Objective-C to open an AR project in a normal project, realize a demo of solar system, realize the rotation and rotation of the sun, including the relationship between each node, who is the child node of each node, set up the Earth-Moon node, then add the zodiac, add the animation to the zodiac node, deal with the relationship between the earth and the sun, of course, add illumination and more comprehensive after the animation processing. Rendering
This article introduces:
Get the three-dimensional coordinate points, get the real-time position of the camera (two classifications), calculate the distance:
// A(x1,y1,z1),B(x2,y2,z2), then the distance between A and B is
// d=√[(x1-x2)^2+(y1-y2)^2+(z1-z2)^2]
Then we record the starting point. Here we write a Line class, which implements the main roles and scenarios, creates SCNGeometrySource objects, creates SCNGeometryElement to connect the created vertices, draws a line in line (GPU operation can reduce CPU burden), and then gets the distance of real-time testing, and puts you in the first place in our real world. Measure the position of the origin and the distance from where you end.
Text:
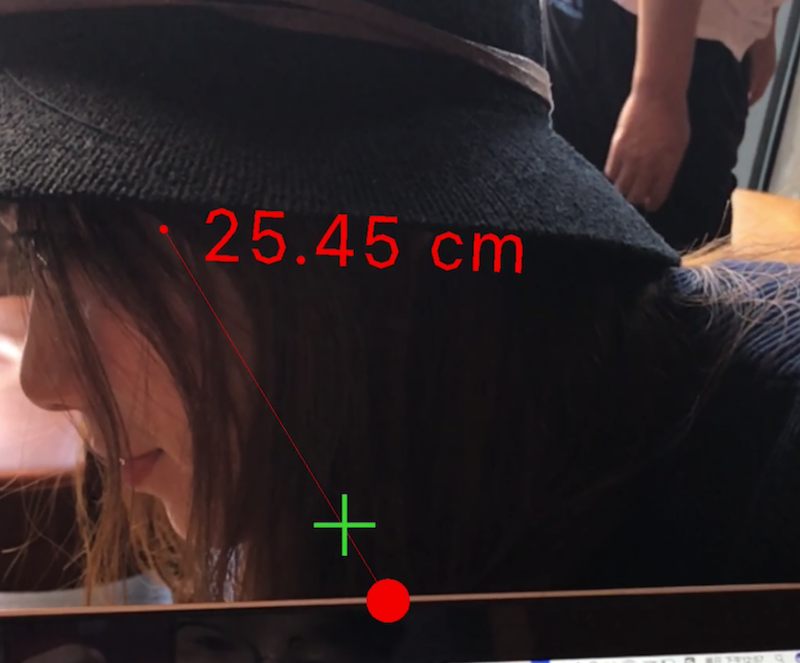
Effect demonstration:

Use examples:
Realization ideas:
1. Setting up the basic environment and opening up global tracking
2. Get the three-dimensional coordinates
3. Get the real-time location of the camera
4. Initialization scenarios and roles
5. Real-time tracking, event handling and improvement
Steps:
1. Build a basic framework
Session.run method opens global tracking < Question: Global tracking failure?> The session.run method opens global tracking < Question: Global tracking failure?> The session.run method opens global tracking.
Building Basic Framework Basic Control Properties
@IBOutlet weak var sceneV: ARSCNView!
@IBOutlet weak var InfoL: UILabel!//Don't mind the label's name. It's handicapped.
@IBOutlet weak var targetIM: UIImageView!
var session = ARSession()
var configuration = ARWorldTrackingConfiguration()
2. Proxy, global tracking status
func session(_ session: ARSession, didFailWithError error: Error) {
InfoL.text = "error"
}
func sessionWasInterrupted(_ session: ARSession) {
InfoL.text = "interrupt~"
}
func sessionInterruptionEnded(_ session: ARSession) {
InfoL.text = "End"
}
4.BXARSCNView+Extension class to get three-dimensional coordinates
func worldVector(for position:CGPoint) ->SCNVector3?{
//result
let results = hitTest(position, types: [.featurePoint])
guard let result = results.first else {
return nil
}
//--> Return to the camera's position
return SCNVector3.positionTranform(result.worldTransform)
}
When setting the result, we use types, where the distance between the camera and the object is used to search for the anchor point detected by ARSession. The object in the real world is not the content in SceneKit in view, assuming the use of the content.
5. BXSCN Vector 3 + Extension returns coordinates x,y,z, calculates distance, and draws lines
Return xyz
static func positionTranform(_ tranform:matrix_float4x4) -> SCNVector3{
//Return the x,y,z axes of coordinates
return SCNVector3Make(tranform.columns.3.x, tranform.columns.3.y, tranform.columns.3.z)
}
Calculated distance
func distance(for vector:SCNVector3) -> Float {
let distanceX = self.x-vector.x//The present position minus the departure position
let distanceY = self.y-vector.y
let distanceZ = self.z-vector.z
return sqrt((distanceX * distanceX)+(distanceY * distanceY)+(distanceZ * distanceZ))
}
Draw line
func line(to vector:SCNVector3,color:UIColor) -> SCNNode {
let indices : [UInt32] = [0,1]//index
let source = SCNGeometrySource(vertices: [self,vector]) // Create a geometric container
let element = SCNGeometryElement(indices: indices, primitiveType: .line)//Create a geometric element (line) in the form of a line
let geomtry = SCNGeometry(sources: [source], elements: [element])//geometry
geomtry.firstMaterial?.diffuse.contents = color//Render colors
let node = SCNNode(geometry: geomtry)//Return a node
return node
}
6. Initialization of main roles and scenarios
Definition
var color = UIColor.red,
var startNode : SCNNode
var endNode : SCNNode
var textNode : SCNNode
var text : SCNText
var lineNode : SCNNode?
let sceneView: ARSCNView
let startVector: SCNVector3
Initialization: Create Nodes - Add Subnodes
self.sceneView = sceneView
self.startVector = startVector
self.unit = unit
let dot = SCNSphere(radius: 0.5)
dot.firstMaterial?.diffuse.contents = color
dot.firstMaterial?.lightingModel = .constant//Illumination, the surface looks the same light, no shadows.
dot.firstMaterial?.isDoubleSided = true//Both sides are bright.
startNode = SCNNode(geometry: dot)
startNode.scale = SCNVector3(1/500.0,1/500.0,1/500.0)
startNode.position = startVector
sceneView.scene.rootNode.addChildNode(startNode)
endNode = SCNNode(geometry: dot)//All you need to do here is create it first and add it later.
endNode.scale = SCNVector3(1/500.0,1/500.0,1/500.0)//There are pits here, too.
text = SCNText(string: "", extrusionDepth: 0.1)
text.font = .systemFont(ofSize: 5)
text.firstMaterial?.diffuse.contents = color
text.firstMaterial?.lightingModel = .constant
text.firstMaterial?.isDoubleSided = true
text.alignmentMode = kCAAlignmentCenter//position
text.truncationMode = kCATruncationMiddle//........
let textWrapperNode = SCNNode(geometry: text)
textWrapperNode.eulerAngles = SCNVector3Make(0, .pi, 0) // Numbers are facing themselves
textWrapperNode.scale = SCNVector3(1/500.0,1/500.0,1/500.0)
textNode = SCNNode()
textNode.addChildNode(textWrapperNode)//Add to the wrapper node
let constraint = SCNLookAtConstraint(target: sceneView.pointOfView)//Let's make an approximation.
constraint.isGimbalLockEnabled = true
textNode.constraints = [constraint]
sceneView.scene.rootNode.addChildNode(textNode)
SCNVector3(A representation of a three-component vector.
SceneKit uses three-component vectors for a variety of purposes, such as
describing node or vertex positions, surface normals, and scale or translation
transforms. The different vector components should be interpreted based on the
context in which the vector is being used.
Important
In macOS, the x, y, and z fields in this structure are CGFloat values. In iOS,
tvOS, and watchOS, these fields are Float values.) Here we describe the location of nodes or vertices with CGFloat - > or there will be unexpected situations (disappear?????)
7. Processing updates
lineNode?.removeFromParentNode()//Remove all lines
lineNode = startVector.line(to: vector, color: color)
sceneView.scene.rootNode.addChildNode(lineNode!)
//Update text a
text.string = distance(to: vector)
//Text location
textNode.position = SCNVector3((startVector.x + vector.x) / 2.0 , (startVector.y + vector.y) / 2.0 ,(startVector.z + vector.z) / 2.0 )
endNode.position = vector
if endNode.parent == nil {
sceneView.scene.rootNode.addChildNode(endNode)
}
8. When you click on the screen, enter the test state, start drawing lines, and record start and end points.
Of course, we need to track the display time in the main thread
DispatchQueue.main.async {}
Optimization:
1. Advanced usage of global tracking: Remove all anchors when the life cycle view is about to show, and re-open the catch-up efficiency will be greatly improved. When the life cycle view is about to disappear, the location we are tracking does not necessarily remain in the original position, so if we remove all anchors and follow up again, will the efficiency be improved a lot? > resetTrack RemoveExisting Anchors
2.Equatable protocol prevents duplication:
public static func == (lhs: SCNVector3, rhs: SCNVector3) -> Bool {
// When the left is equal to the right
return (lhs.x == rhs.x) && (lhs.y == rhs.y) && (lhs.z == rhs.z)
}
3. Remove remove
line.remove(), clear when you click Reset
Conclusion:
The main difficulties of this paper are the acquisition of three-dimensional coordinate points, the real-time position of the camera, the calculation of distance and the drawing of lines.
Finally, I present the code address of this article for you. I also wrote a comment on demo in git. You can take a closer look at it. demo Welcome to download, star