Why full burial?
Buried points in the past manual form
In the past, the buried points were artificially defined and selectively buried. The number of buried points continued to increase after multiple version iterations.
- Calling basically the same code in each code block is highly intrusive. If you replace the SDK later, you may make a lot of changes
- Manual burying may result in the loss of burying points due to negligence
- The user behavior can only be traced back according to the buried point. Some details and processes cannot be connected, and the user use scenario cannot be restored
- Each version iteration requires PM and RD to sort out the buried points and consume time
Full buried point
- It is not possible to load the calling code on each button and page. You only need to load it in the application initialization
- User behavior triggers automatic reporting, and there is no need for PM to think about which page to bury points on
- Configurable, you can choose to filter the reporting page, events, or add attribute reporting on a specific page
- Version iteration does not require re embedding
How?
- Page operation: Application.ActivityLifecycleCallbacks interface
public interface ActivityLifecycleCallbacks {

  void onActivityCreated(@NonNull Activity activity, @Nullable Bundle 				           savedInstanceState);

  void onActivityStarted(@NonNull Activity activity);

  void onActivityResumed(@NonNull Activity activity);

  void onActivityPaused(@NonNull Activity activity);

  void onActivityStopped(@NonNull Activity activity);

  void onActivitySaveInstanceState(@NonNull Activity activity, @NonNull Bundle outState);

  void onActivityDestroyed(@NonNull Activity activity);

}
Application start end: AppStart, AppEnd
Listen for start and pause in the ActivityLifecycleCallbacks interface, and use SP and ContentProvider to assist in recording the start time and pause time of the application. If the user's app is forcibly killed or manually exited in the background, the next time the app is reused, the time in SP and the current time will be detected, and then compared to judge whether the user is restarting the app, Or just switch to the background and then switch back.
be careful ⚠️: Detect in start and update time data in pause.
Application click Control
Scheme 1: proxy the click event interface of hook control
Overall idea: listen for callbacks according to the ActivityLifecycleCallbacks interface, get the current Activity in the onActivityResume callback, and then use the DecorView to recursively traverse all child views to proxy the onClickListener method. At the same time, the observer of the ViewTree is performed when the Activity is started. When the ViewTree is changed (for example, the invisible and non clickable view is set), the hook is performed again.
hook: use reflection to obtain the onClickListener object set by the view and the object type (button, textView...) that distinguishes the view, and then set different listeners.
Disadvantages: basically every View or Viewgroup has its own click event, and the click event interface is an excuse within the class. There is no top-level interface for compatibility detection, so a large number of wrapperlisteners need to be done, which is cumbersome and repetitive. In addition, every time you create a page, you have to make a Hook, which has low performance and low efficiency.
Scheme 2: using the callback of Window click
The event distribution function of each click, dispatchTouchEvent(MotionEvent event), performs hook, and embeds points by using the RootView information of the current activity and the event information.
Specifically: judge whether the clicked coordinates are in the view (judged by rootView loop) and whether the view is visible;
Disadvantages: each click needs to traverse the rootView and judge one by one, which is inefficient.
Scenario 3:AOP(Aspect Oriented Programming)
Aspect oriented programming. Using AspectJ,
Idea: insert embedded code before or after the corresponding onClick method call during program compilation.
Scheme 4: bytecode stub
At present, there are two frameworks for bytecode function instrumentation
ASM
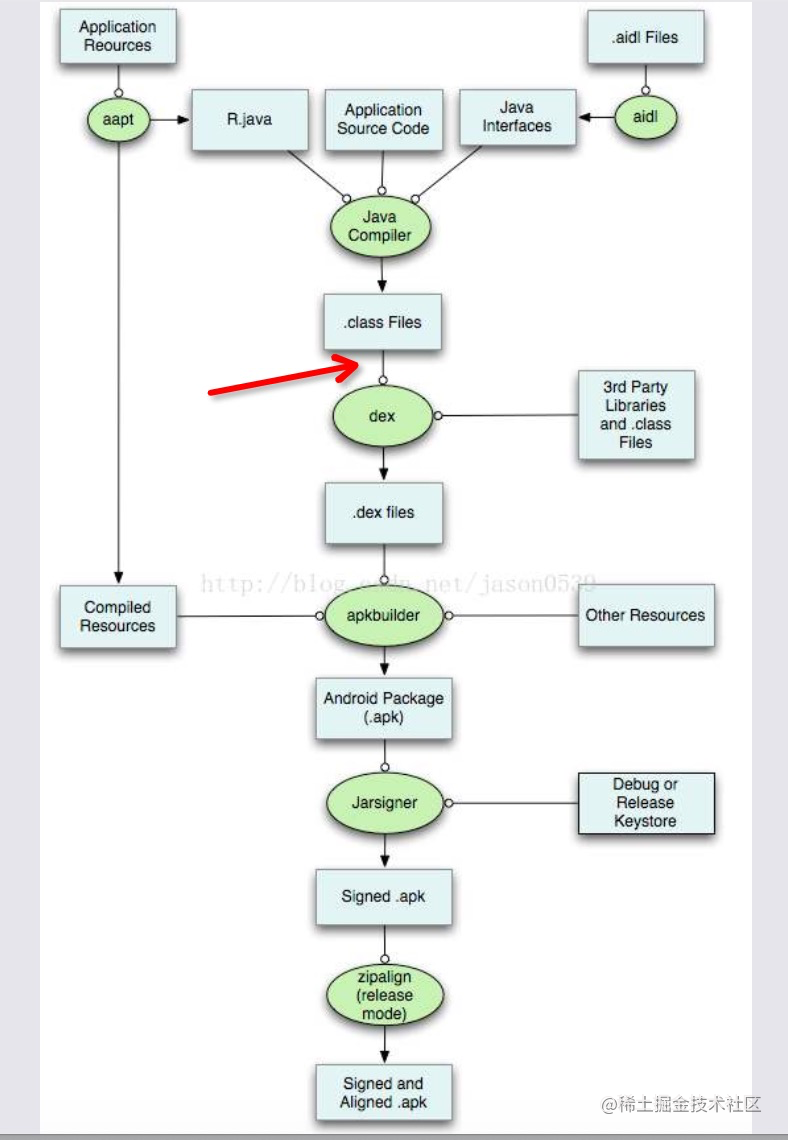
Idea: before the application is packaged into APK, it will be compiled into. class file, then packaged into dex, and finally form APK. So it's OK to replace the source file between packaging it into a dex file and compiling it into a. class file.
Disadvantages: there are no disadvantages at present
Javassist
The idea is consistent with ASM, but compared with ASM, the efficiency is not high enough.
ASM framework for bytecode Function Instrumentation
After the comparison of the above schemes, ASM is finally used for bytecode pile insertion. It is mainly due to low code intrusion and customizable configuration (filtering collection pages, filtering duration, configuring page mapping, etc.).
The arrow in the following figure points to the position where the function pile is inserted.
Low code intrusion
The scheme implementation is to insert the method after the code file is compiled into a class file, which does not need to be done in the writing stage.
- Use the Transform API provided by android to obtain the project file
- Modify the file when it is detected that the file suffix is class
- ASM framework reads, analyzes and inserts bytecode with corresponding API s
- First get the details of the class (class name, modifier, inherited parent class, implemented interface, etc.)
- Then scan the methods of this class for judgment and insert our preset buried point code
- Then overwrite the original class file
- gradle then continues to compile and generate dex
efficiency
It is faster than using reflection in java, which is also introduced on the ASM official website. ASM is designed and implemented as small and as fast as possible, so it is very suitable for use in dynamic systems (but of course it can also be used statically, such as in compilers).
For more information about the distance and specific use of framework ASM, I won't repeat it here.
How to use?
Add in the build.gradle of project:
buildscript {

    repositories {
        google()
        jcenter()
        maven {
            url uri('repo')
        }

    }
    dependencies {
        classpath 'com.cage:autotrack.android:1.0.0'
        // NOTE: Do not place your application dependencies here; they belong
        // in the individual module build.gradle files
    }
}
In the APP module:
apply plugin: 'com.cage.plugin'

dependencies{
 implementation project(':cgtrack_support')
}
initialization:
//Initialization in Application
//kotlin
TrackApi.init(this)

//java
TrackApi.INSTANCE.init(this);
//to configure
ConfigOptions.INSTANCE.addTrackInfoCallBack(new TrackInfoCallback() {
                @Override
                public void trackInfo(String eventName, JSONObject json) {
                   //The buried point event is reported here
                   //Of course, the callback type can also be changed from JSONObjetc to String
                }
            });
After accessing APP
Click to browse the page in the APP, and the corresponding events will be triggered:
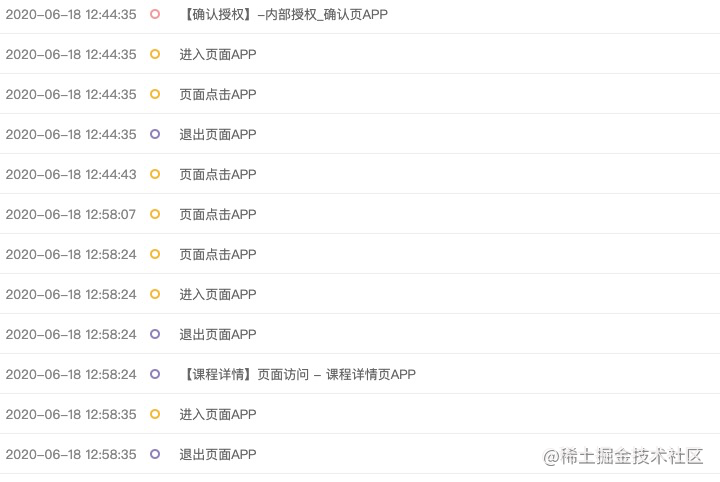
Triggered when the page is clicked:

Triggered when the page exits:

Triggered when entering the page:

Subsequent maintenance and iterative upgrade
Currently, View, Dialog, CompoundButton, AdapterView and BottomNavigationView have been overwritten.
If the corresponding control is missing later, you can add the corresponding bytecode description according to the corresponding control:
For example, the bottom control in the APP is Google's design control. Add:
 SDK_API_CLASS = "com/cage/cgtrack/TrackUtils"

//Normal setting click event
if(mInterfaces.contains('android/support/design/widget/BottomNavigationView$OnNavigationItemSelectedListener') && nameDesc == 'onNavigationItemSelected(Landroid/view/MenuItem;)Z') {
    //Insert variable
    methodVisitor.visitVarInsn(ALOAD, 1)
    //Insertion method
    methodVisitor.visitMethodInsn(INVOKESTATIC, SDK_API_CLASS, "trackViewOnClick", "(Landroid/view/MenuItem;)V", false)
}

//Set with Lambda form
MethodCell onNavigationItemSelected = new MethodCell(
                'onNavigationItemSelected',
                '(Landroid/view/ MenuItem;)Z',
                'Landroid/support/design/widget/BottomNavigationView$OnNavigationItemSelectedListener',
                'trackViewOnClick',
                '(Landroid/view/MenuItem;)V',
                1, 1,
                [Opcodes.ALOAD])
        LAMBDA_METHODS.put(onNavigationItemSelected.parent + onNavigationItemSelected.name + onNavigationItemSelected.desc, onNavigationItemSelected)
The meaning of the above steps:
First judge whether the interface implemented in this class contains OnNavigationItemSelectedListener interface, and then judge whether the method implementing this interface is onNavigationItemSelected. If yes, it means that this class contains this interface and implements the method, and can insert embedded code.
Relevant video recommendations:
[Android component design] initialization speed of bytecode plug-in optimization framework
This article is transferred from https://juejin.cn/post/6844904194445426702 , in case of infringement, please contact to delete.