1, Foreword
The previous articles shared the basic authorization and user-defined authorization of IdentityServer4 password mode. Recently, due to the transformation of a gateway service, the authorization of IdentityServer4 was used. During the transformation process, it was found that it is more suitable for Role-based authorization, and users are restricted from accessing different Api resources through different roles, Here I will share the detailed explanation of identity server 4 Role-based authorization.
IdentityServer4 historical article directory
- Asp. Basic concepts in net core identityserver4
- Asp. Application practice of IdentityServer4 authorization center in net core
- Asp. User defined authorization mode of IdentityServer4 authorization center in net core
- Asp. The authorization principle of IdentityServer4 in net core and the application of refreshing Token
- Asp. Detailed explanation of Claim of IdentityServer4 in net core
I haven't read the previous articles. I suggest you look back at the above articles and then read this article, but for Daniel, you can skip....
Two. Simulation scenario
According to the style and routine of my article, first simulate the application scene before the actual combat. The actual combat without the scene is playing hooligans. The simulated scene can make everyone invest more. At the same time, it is also the crystallization of self-learning, thinking and summary!!!
You are no stranger to role authorization. You should be familiar with the design of RBAC. RBAC is not described here. You can baidu if you are interested. Let's simply simulate the character scene here
If there is such a data gateway service (hereinafter collectively referred to as data gateway), the client has three account roles (ordinary user, administrator user and super administrator user). The data gateway assigns different data access permissions to the users in these three roles. The scene is as follows: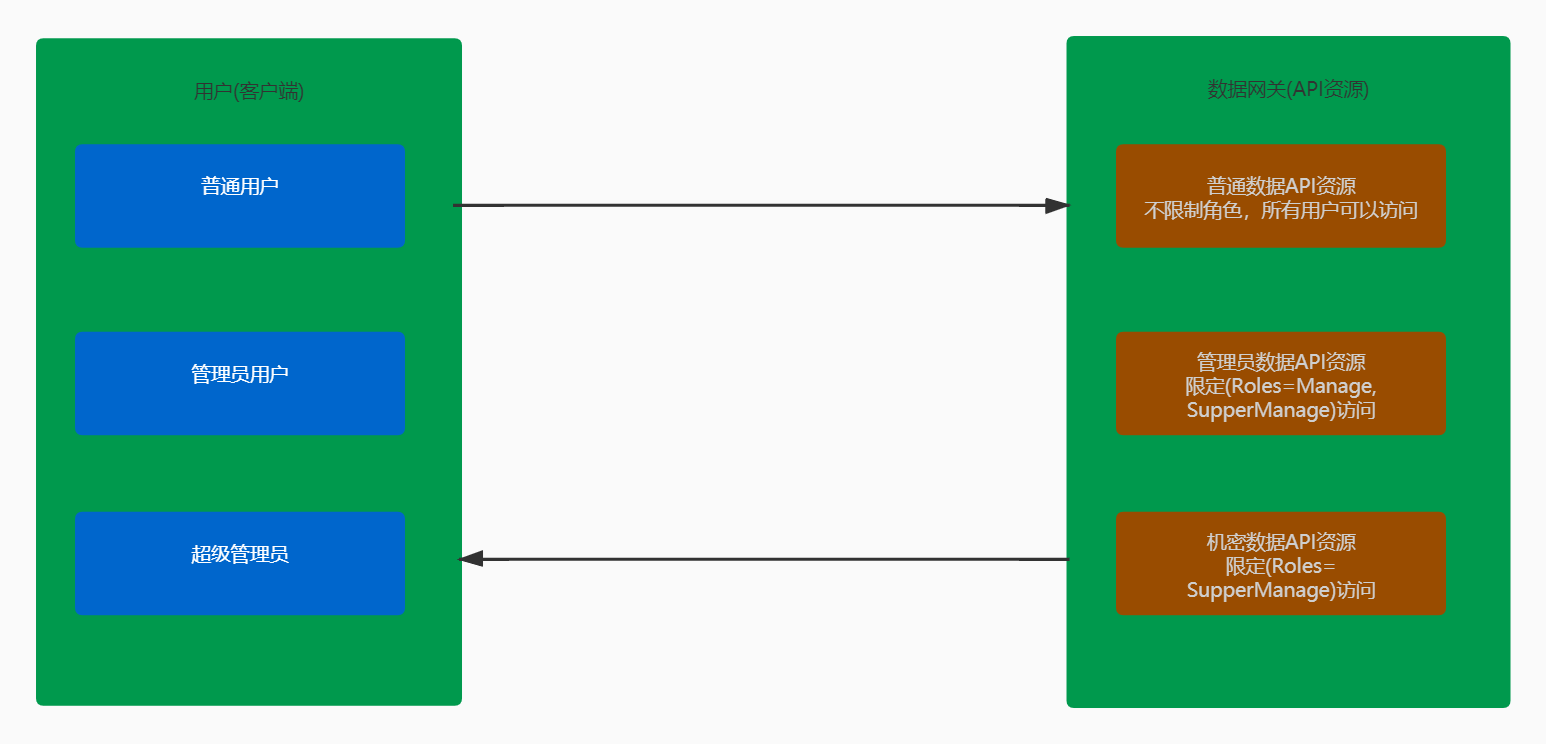
So how will we design this scene? This scenario is relatively simple, with single and fixed roles. For this scenario, many people may consider implementing it through Filter, which is of course OK. However, for this scenario, identity server 4 itself supports role authorization. Let me share with you the role authorization of identity server 4
3, Role authorization practice
Authorization process
Before coding, let's sort out the role authorization flow chart of IdentityServer4. I briefly draw the following flow chart: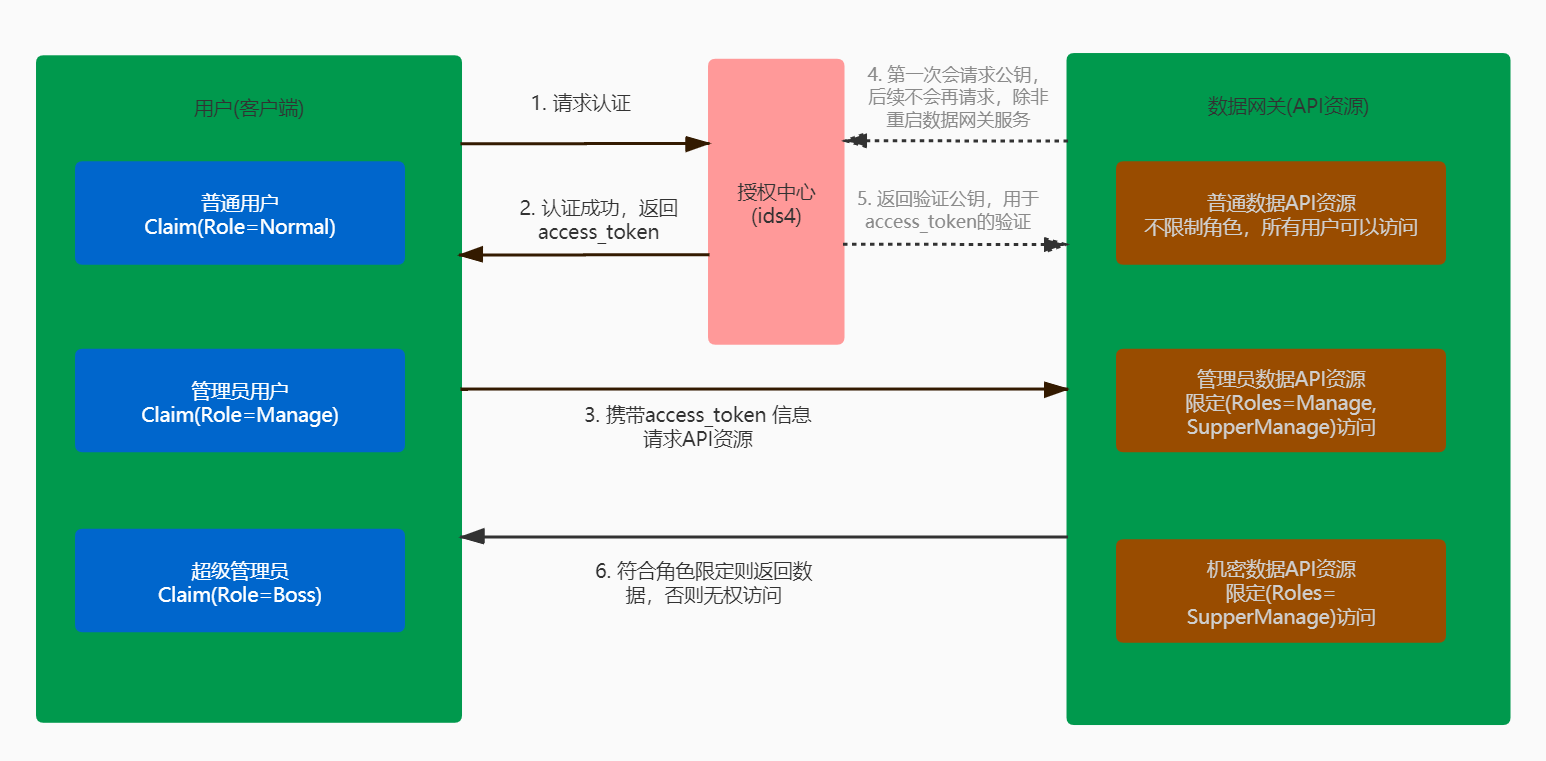
The scenario diagram is summarized as follows:
- The client is divided into three core roles (ordinary user, administrator user and super management boss) users. The three users access the same data gateway (API resources)
- The data gateway (API resource) imposes access restrictions on these three user roles.
The authorization process is explained as follows:
- Step 1: different users carry user passwords and other information to access the authorization center (ids4) to try authorization
- Step 2: the authorization center authorizes the user by returning access_token to the user and declare the user's Role in the Claim..
- Step 3: the client carries the access_token attempts to request data gateway (API resource).
- Step 4: after receiving the first request from the client, the data gateway will go to the authorization center to request to obtain the verification public key.
- Step 5: the authorization center returns the verification public key to the data gateway and caches it. Later, it will not go to the authorization center to obtain the verification public key again (it will only be requested once unless the service is restarted).
- Step 6: the data gateway (ids4) verifies access by verifying the gateway_ Whether the token passes the verification, and whether the Role declared by the requested client user is consistent with the Role agreed by the requested API resource. If it is consistent, it will be returned to the client through step, otherwise the request will be rejected directly
Lu code
The code continues the sequel of the examples in the above articles. You know, don't start from scratch (it's strongly recommended that those who haven't read the above articles read the above contents first, or they will be confused and skipped by the boss)
To enable the authorization center implemented by IdentityServer4 to support role authentication, we need to add the introduction of roles in the defined API resources. The code is as follows:
The authorization center (Jlion.NetCore.Identity.Service) in the previous articles
The code is as follows:
 /// <summary>
 ///Resources
 /// </summary>
 /// <returns></returns>
 public static IEnumerable<ApiResource> GetApiResources()
 {
     return new List<ApiResource>
     {
         new ApiResource(OAuthConfig.UserApi.ApiName,OAuthConfig.UserApi.ApiName),
     };
 }
The supporting code transformation for adding roles is as follows:
 /// <summary>
 ///Resources
 /// </summary>
 /// <returns></returns>
 public static IEnumerable<ApiResource> GetApiResources()
 {
      return new List<ApiResource>
      {
          new ApiResource(
              OAuthConfig.UserApi.ApiName,
              OAuthConfig.UserApi.ApiName,
              new List<string>(){JwtClaimTypes.Role }
              ),
      };
 }
After adding Role authentication support to API resources, you need to declare the Role information of Claim user after successful login and authorization. The code is as follows:
Code before modification:
public class ResourceOwnerPasswordValidator : IResourceOwnerPasswordValidator
{
   public async Task ValidateAsync(ResourceOwnerPasswordValidationContext context)
   {
       try
       {
           var userName = context.UserName;
           var password = context.Password;

           //Verify the user, so you can go to the database to verify whether the user name and password are correct
           var claimList = await ValidateUserAsync(userName, password);

           // Verify account number
           context.Result = new GrantValidationResult
           (
              subject: userName,
              authenticationMethod: "custom",
              claims: claimList.ToArray()
           );
       }
       catch (Exception ex)
       {
           //Verify abnormal results
           context.Result = new GrantValidationResult()
           {
              IsError = true,
              Error = ex.Message
           };
       }
   }

   #region Private Method
   /// <summary>
   ///Verify user
   /// </summary>
   /// <param name="loginName"></param>
   /// <param name="password"></param>
   /// <returns></returns>
   private async Task<List<Claim>> ValidateUserAsync(string loginName, string password)
   {
      //TODO can verify its existence in the database through user name and password,
      // And role related information. I still use the existing users and passwords in memory
      var user = OAuthMemoryData.GetTestUsers();

      if (user == null)
          throw new Exception("Login failed. The user name and password are incorrect");

      return new List<Claim>()
      {

          new Claim(ClaimTypes.Name, $"{loginName}"),
          new Claim(EnumUserClaim.DisplayName.ToString(),"Test user"),
          new Claim(EnumUserClaim.UserId.ToString(),"10001"),
          new Claim(EnumUserClaim.MerchantId.ToString(),"000100001"),
      };
   }
   #endregion
 }
In order to keep the source code of the previous articles and make the source code of the previous articles traceable, I will not transform and upgrade the source code here. I will directly add a user password verifier class,
It is named RoleTestResourceOwnerPasswordValidator, and the code transformation is as follows:
 /// <summary>
 ///Role authorization user name password verifier demo
 /// </summary>
 public class RoleTestResourceOwnerPasswordValidator : IResourceOwnerPasswordValidator
 {
     public async Task ValidateAsync(ResourceOwnerPasswordValidationContext context)
     {
         try
         {
             var userName = context.UserName;
             var password = context.Password;

             //Verify the user, so you can go to the database to verify whether the user name and password are correct
             var claimList = await ValidateUserByRoleAsync(userName, password);

             // Verify account number
             context.Result = new GrantValidationResult
             (
                 subject: userName,
                 authenticationMethod: "custom",
                 claims: claimList.ToArray()
             );
         }
         catch (Exception ex)
         {
             //Verify abnormal results
             context.Result = new GrantValidationResult()
             {
                 IsError = true,
                 Error = ex.Message
             };
         }
     }

     #region Private Method

     /// <summary>
     ///Validate user role (Demo specific method)
     ///The main difference between here and before is to keep the source code synchronized with the blog
     /// </summary>
     /// <param name="loginName"></param>
     /// <param name="password"></param>
     /// <returns></returns>
     private async Task<List<Claim>> ValidateUserByRoleAsync(string loginName, string password)
     {
         //TODO can verify its existence in the database through user name and password,
         // And role related information. I still use the existing users and passwords in memory
         var user = OAuthMemoryData.GetUserByUserName(loginName);

         if (user == null)
            throw new Exception("Login failed. The user name and password are incorrect");

         //The following Claim statement is hard coded for demonstration,
         //The actual production environment needs to be declared by reading the information of the database

         return new List<Claim>()
         {

             new Claim(ClaimTypes.Name, $"{user.UserName}"),
             new Claim(EnumUserClaim.DisplayName.ToString(),user.DisplayName),
             new Claim(EnumUserClaim.UserId.ToString(),user.UserId.ToString()),
             new Claim(EnumUserClaim.MerchantId.ToString(),user.MerchantId.ToString()),
             new Claim(JwtClaimTypes.Role.ToString(),user.Role.ToString())
         };
     }
     #endregion
}
To facilitate the demonstration, I directly defined Role as a public enumeration EnumUserRole. The code is as follows:
/// <summary>
///Role enumeration
/// </summary>
public enum EnumUserRole
{
    Normal,
    Manage,
    SupperManage
}
In GetUserByUserName, users with three roles are hard coded. The codes are as follows:
 /// <summary>
 ///Hard coded for demonstration,
 ///This method can query the database through DDD design to the underlying database
 /// </summary>
 /// <param name="userName"></param>
 /// <returns></returns>
 public static UserModel GetUserByUserName(string userName)
 {
      var normalUser = new UserModel()
      {
         DisplayName = "Zhang San",
         MerchantId = 10001,
         Password = "123456",
         Role = Enums.EnumUserRole.Normal,
         SubjectId = "1",
         UserId = 20001,
         UserName = "testNormal"
     };
     var manageUser = new UserModel()
     {
         DisplayName = "Li Si",
         MerchantId = 10001,
         Password = "123456",
         Role = Enums.EnumUserRole.Manage,
         SubjectId = "1",
         UserId = 20001,
         UserName = "testManage"
     };
     var supperManageUser = new UserModel()
     {
         DisplayName = "dotNET doctor",
         MerchantId = 10001,
         Password = "123456",
         Role = Enums.EnumUserRole.SupperManage,
         SubjectId = "1",
         UserId = 20001,
         UserName = "testSupperManage"
     };
     var list = new List<UserModel>() {
         normalUser,
         manageUser,
         supperManageUser
     };
     return list?.Where(item => item.UserName.Equals(userName))?.FirstOrDefault();
 }
Well, now the Role declared after the user authorization is passed has also been completed. I use the Role supported by jwtcliimtypes by default. You can also implement it without jwtcliimtypes class.
Finally, in order to make the new blog users who have not read the previous articles not confused, I still post the registered ids middleware code,
Register a new user name and password verifier into DI. The code is as follows:
 public void ConfigureServices(IServiceCollection services)
 {
     services.AddControllers();


     #region database storage method
     services.AddIdentityServer()
        .AddDeveloperSigningCredential()
        .AddInMemoryApiResources(OAuthMemoryData.GetApiResources())
        //.AddInMemoryClients(OAuthMemoryData.GetClients())
        .AddClientStore<ClientStore>()
        //.AddResourceOwnerValidator<ResourceOwnerPasswordValidator>()
        .AddResourceOwnerValidator<RoleTestResourceOwnerPasswordValidator>()
        .AddExtensionGrantValidator<WeiXinOpenGrantValidator>()
        .AddProfileService<UserProfileService>();//Add verification of wechat custom mode

     #endregion
 }


 public void Configure(IApplicationBuilder app, IWebHostEnvironment env)
 {
    if (env.IsDevelopment())
    {
       app.UseDeveloperExceptionPage();
    }
    //Middleware using identity server 4
    app.UseIdentityServer();

    app.UseRouting();
    app.UseAuthorization();
    app.UseEndpoints(endpoints =>
    {
         endpoints.MapControllers();
    });
}
The role support code of the authorization center is finished. Let's transform the user gateway service mentioned in the previous articles. Here I call it data gateway,
Project: jlion NetCore. Identity. UserApiService
Last article about Asp. Detailed explanation of Claim of IdentityServer4 in net core
In this article, a UserController controller is added to the data gateway service, and an interface to access the basic Claim information of users is added. The previous code is as follows:
[ApiController]
[Route("[controller]")]
public class UserController : ControllerBase
{

    private readonly ILogger<UserController> _logger;

    public UserController(ILogger<UserController> logger)
    {
        _logger = logger;
    }

    [Authorize]
    [HttpGet]
    public async Task<object> Get()
    {
        var userId = User.UserId();
        return new
        {
            name = User.Name(),
            userId = userId,
            displayName = User.DisplayName(),
            merchantId = User.MerchantId(),
        };
    }
}
In the above code, Authorize does not specify a Role, which means that all users can access this interface. Next, we create an interface in UserController that can only be accessed by the super administrator Role. The code is as follows
 [Authorize(Roles =nameof(EnumUserRole.SupperManage))]
 [HttpGet("{id}")]
 public async Task<object> Get(int id)
 {
     var userId = User.UserId();
     return new
     {
         name = User.Name(),
         userId = userId,
         displayName = User.DisplayName(),
         merchantId = User.MerchantId(),
         roleName=User.Role()//Get the role of the currently logged in user
     };
 }
Here, the data gateway code has also been transformed. Next, we will run the results to see if it is correct.
function
We run our authorization gateway service and data gateway service through the command line respectively, as shown in the following figure:
The authorized gateway also specifies the 5000 port, as shown in the following figure: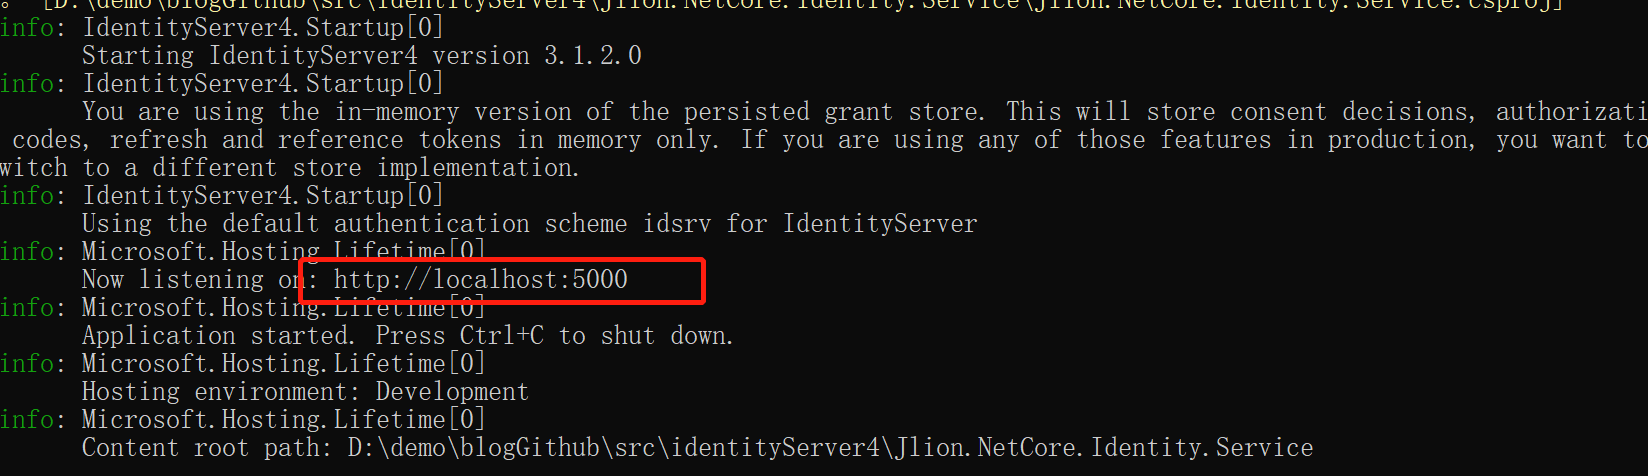
As in previous articles, the data gateway specifies 5001 port, as shown in the following figure: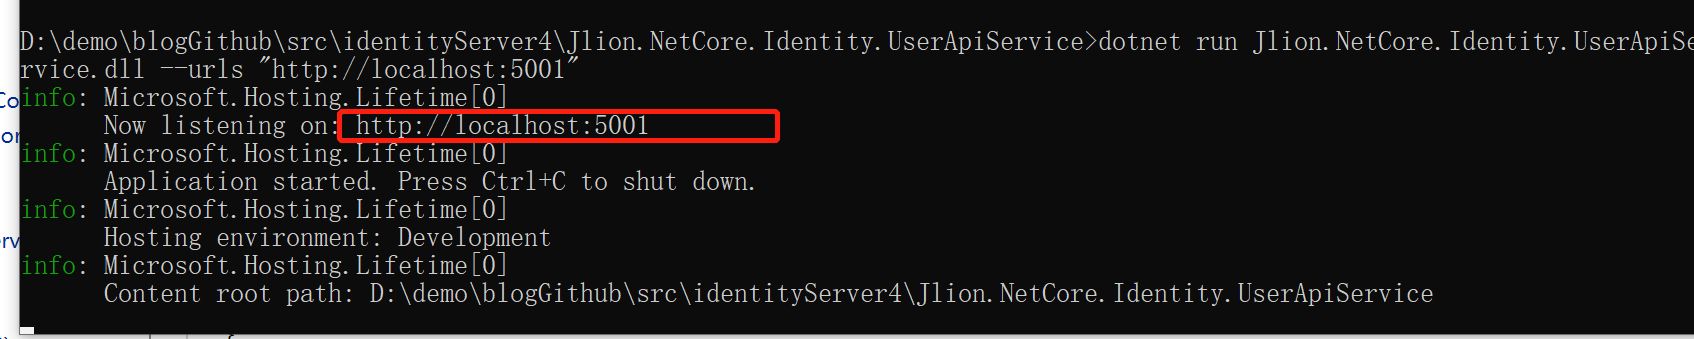
Now that both the authorization gateway and the data gateway are running perfectly, let's simulate the request through postman.
First, request the authorization center to obtain access through the ordinary user (testNormal)_ Token, as shown in the following figure:
The request is verified,
Then get access through_ Token to obtain common interface: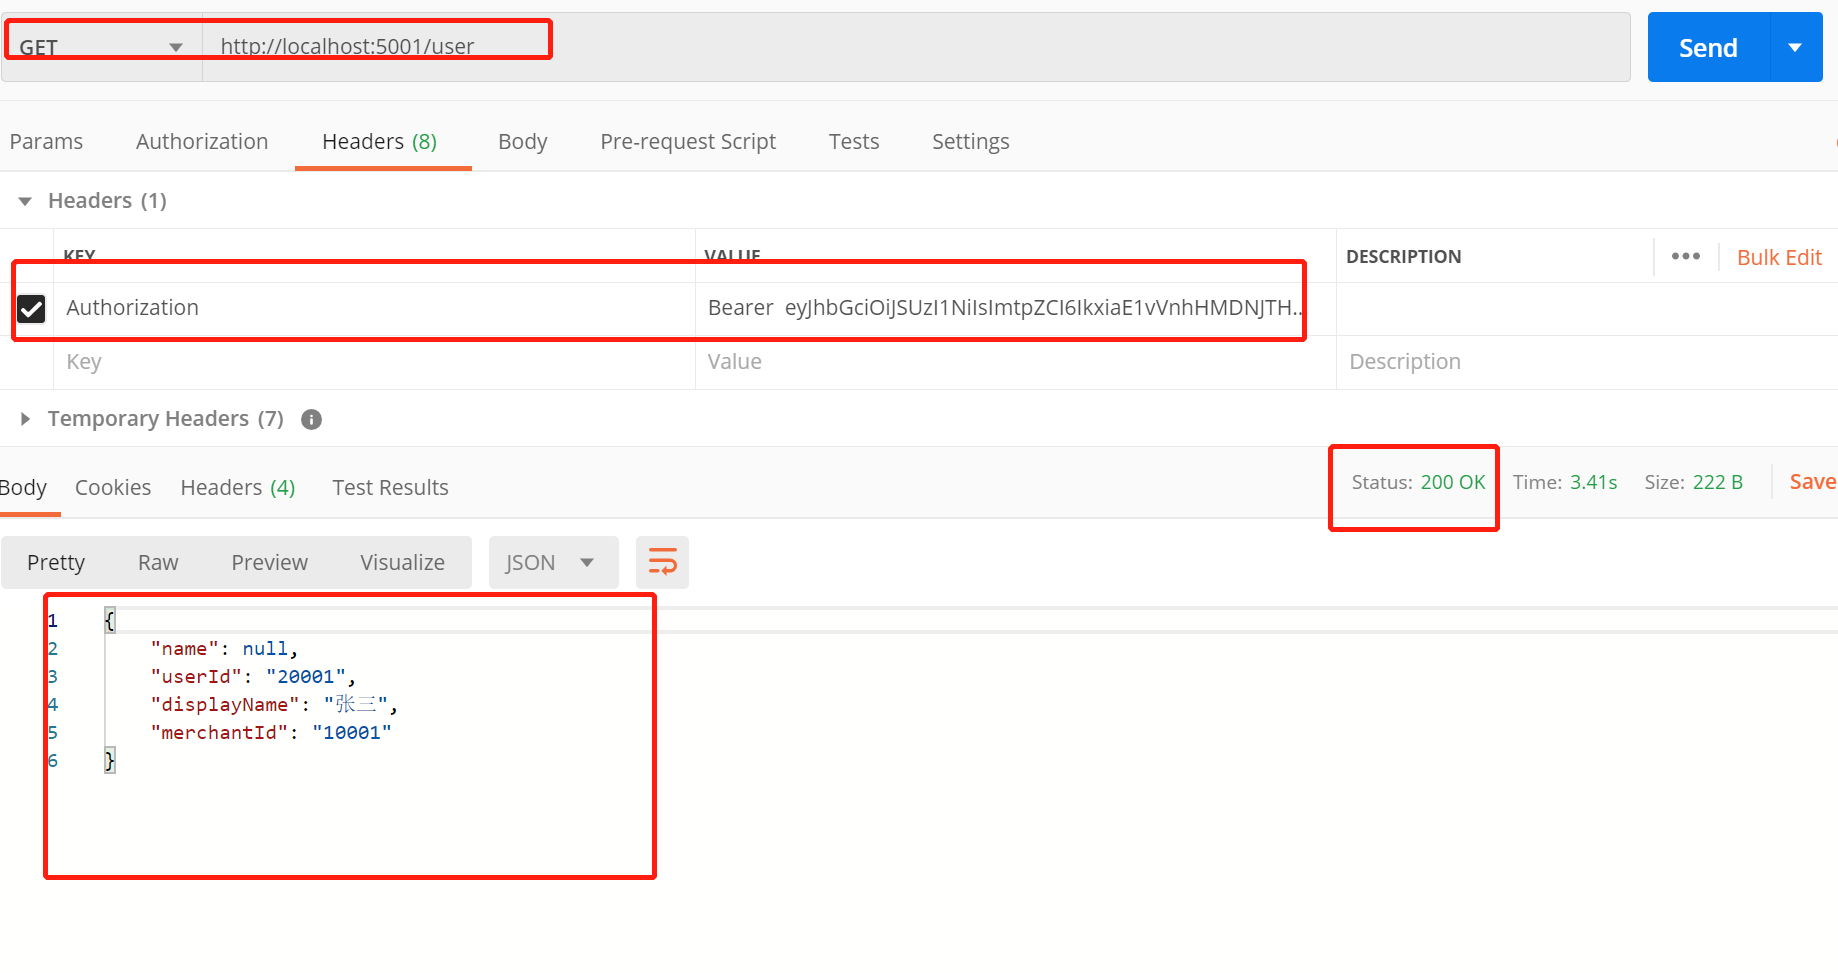
And get the data perfectly
Next, visit the role interface marked with supermanage super administrator, as shown in the following figure:
If you are interested in running git, you can run it one by one. The test results are the same as those of other students. If you are interested in running git, you can run it one by one. The test results are the same as those of other students,
Here, the basic application of role authorization based on ids4 has also been completed.
Conclusion: the above shared and learned the practical example of role authorization in IdentityServer4, but there is a bad disadvantage from the above example, that is, each api access needs to be hard coded to specify role, which is very unrealistic and flexible in the production environment. Role is a flexible configuration of roles and resources through background self-management, Is there any good way to implement identity server 4? Leave it to everyone to think. Thinking has the goal of learning and the progress of thinking.
Blog series source code address: https://github.com/a312586670/NetCoreDemo
Words of thanks: March is about to pass, and March is also a beautiful beginning. My blog has been sorting and sharing since March, inheriting the goal of learning together and making common progress, self-discipline and sharing related technologies. The article continued to synchronize to my WeChat official account, Dr. dotNET, which has achieved initial success this month, and has won more than 500+ fans in one month. Thank you for your attention to me all the time. Your concern has given me more power to share better original technical articles. It has not been concerned about the search for "WeChat" by the official account of WeChat, or WeChat's sweeping of the two-dimensional code. It can also be a positive sharing or a recommendation from the lower right corner, so that more people will pay attention to my article.